
Instruction Manual 3
Page 7
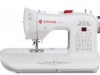
... in Thread Guide Post provides smooth flow of thread from spool holder to eliminate the possibility of tension on fabric, It has an allpurpose setting plus settings for extra-light and extra -heavy pressure, and for easy removal and replacement of bulky fabrics. 5. Bobbin-Winder Tension Disc regulates thread tension for...
... in Thread Guide Post provides smooth flow of thread from spool holder to eliminate the possibility of tension on fabric, It has an allpurpose setting plus settings for extra-light and extra -heavy pressure, and for easy removal and replacement of bulky fabrics. 5. Bobbin-Winder Tension Disc regulates thread tension for...
Instruction Manual 4
Page 75
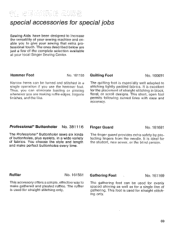
...lightly padded fabrics. Professional* Buttonholer No. 381116 The Professional* Buttonholer sews six kinds of buttonholes, plus eyelets, in a wide variety of the complete selection available at your local Singer Sewing Center. It is excellent for the placement of gathering. This foot is used for the student..., new sewer, or the blind person. The ones described below are making ruffle edges, lingerie finishes, and the...
...lightly padded fabrics. Professional* Buttonholer No. 381116 The Professional* Buttonholer sews six kinds of buttonholes, plus eyelets, in a wide variety of the complete selection available at your local Singer Sewing Center. It is excellent for the placement of gathering. This foot is used for the student..., new sewer, or the blind person. The ones described below are making ruffle edges, lingerie finishes, and the...
Instruction Manual 8
Page 38
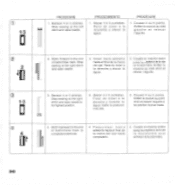
... hasta la posici6n mas alta. 3. Cousez 4 ou 5 points. P e s p u n tear h a c i a 4. H 36 I 2 2 1 2. Bartack 4 or 5 stitches. Arreter la couture au point droit et relever l'aiguille a sa position la plus haute. 0 4 4. of buttonhole mark to the end 1 --- Coudre en marche arriere T of buttonhole mark. Coser hacia adelante hasta el final de la marca del ojal...
... hasta la posici6n mas alta. 3. Cousez 4 ou 5 points. P e s p u n tear h a c i a 4. H 36 I 2 2 1 2. Bartack 4 or 5 stitches. Arreter la couture au point droit et relever l'aiguille a sa position la plus haute. 0 4 4. of buttonhole mark to the end 1 --- Coudre en marche arriere T of buttonhole mark. Coser hacia adelante hasta el final de la marca del ojal...
Instruction Manual 13
Page 27
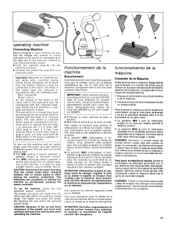
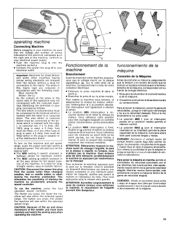
...the foot operated speed controller. IMPORTANT: Votre machine fonctionne exclusivement sur courant 220/230 volts. Renseignez-vous aupres de votre Ami SINGER ou de votre magasin SINGER. • Enfoncez la prise machine b dans le socle c. • Branchez la prise d sur la prise murale. course... the speed controller. Vous eviterez ainsi de faire demarrer accidentellement la machine en appuyant par inadvertence sur le rheostat. Plus vous appuyerez, plus la vitesse de la machine sera grande. Conviene sobre todo para costuras largas y rectas. operating machine Connecting Machine Before...
...the foot operated speed controller. IMPORTANT: Votre machine fonctionne exclusivement sur courant 220/230 volts. Renseignez-vous aupres de votre Ami SINGER ou de votre magasin SINGER. • Enfoncez la prise machine b dans le socle c. • Branchez la prise d sur la prise murale. course... the speed controller. Vous eviterez ainsi de faire demarrer accidentellement la machine en appuyant par inadvertence sur le rheostat. Plus vous appuyerez, plus la vitesse de la machine sera grande. Conviene sobre todo para costuras largas y rectas. operating machine Connecting Machine Before...
Instruction Manual 14
Page 26
... machine b dans le socle c. • Branchez la prise d sur la prise murale. Cet interrupteur sert egalement a allumer la lampe. • La position MIN (interrupteur a mi- Plus vous appuyerez plug la vitesse sera grande. CUIDADO: Desconecte el enchufe macho del enchufe hembra cuando haga falta cambiar las agujas, los prensatelas o las planchas...
... machine b dans le socle c. • Branchez la prise d sur la prise murale. Cet interrupteur sert egalement a allumer la lampe. • La position MIN (interrupteur a mi- Plus vous appuyerez plug la vitesse sera grande. CUIDADO: Desconecte el enchufe macho del enchufe hembra cuando haga falta cambiar las agujas, los prensatelas o las planchas...
Instruction Manual 18
Page 2
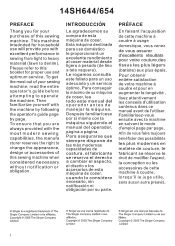
... (batiste) aux plus modernes en matiere de couture, le fabricant se reserve le droit de modifier ('aspect, la conception ou les accessoires de cette machine a coudre, lorsqu'il le juge utile, sans aucun autre preavis. ® Singer is a registered trademark of this sewing machine when considered necessary without notification or.... Please refer to denim). INTRODUCCIoN Le agradecemos su compra de esta maquina de coser. Afin de vous faire toujours beneficier des possibilites les plus epais. Copyright © 2005 The Singer Company Limited ® Singer es una marca registrada de The...
... (batiste) aux plus modernes en matiere de couture, le fabricant se reserve le droit de modifier ('aspect, la conception ou les accessoires de cette machine a coudre, lorsqu'il le juge utile, sans aucun autre preavis. ® Singer is a registered trademark of this sewing machine when considered necessary without notification or.... Please refer to denim). INTRODUCCIoN Le agradecemos su compra de esta maquina de coser. Afin de vous faire toujours beneficier des possibilites les plus epais. Copyright © 2005 The Singer Company Limited ® Singer es una marca registrada de The...
Instruction Manual
Page 63
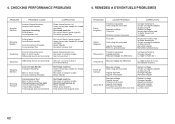
... pied presseur Corriger les tensions Changer l'aiguille Le règler à moins de 1 Ondulations Mauvais règlage de différentiel Le règler à plus de 1 pour les matières tricotées Points de manque Casse de fil Mauvais enfilage Taille d'aiguille mauvaise Aiguille épointée Aiguille...
... pied presseur Corriger les tensions Changer l'aiguille Le règler à moins de 1 Ondulations Mauvais règlage de différentiel Le règler à plus de 1 pour les matières tricotées Points de manque Casse de fil Mauvais enfilage Taille d'aiguille mauvaise Aiguille épointée Aiguille...

Instruction Manual 2
Page 2
...relevant national legislation relating to electrical/electronic products. Do not operate where aerosol (spray) products are the exclusive trademarks of The Singer Company Limited S.à r.l. Special care is DC 5V. Switch the sewing machine off before operating SAVE THESE INSTRUCTIONS This product... ("0") when making any maintenance. If it to break. 17. Do not modify the plug in any air openings blocked. SINGER and ONE PLUS are being used by persons (including children) with EEC Directive 2004/108/EC covering the electromagnetic compatibility. All rights reserved. To...
...relevant national legislation relating to electrical/electronic products. Do not operate where aerosol (spray) products are the exclusive trademarks of The Singer Company Limited S.à r.l. Special care is DC 5V. Switch the sewing machine off before operating SAVE THESE INSTRUCTIONS This product... ("0") when making any maintenance. If it to break. 17. Do not modify the plug in any air openings blocked. SINGER and ONE PLUS are being used by persons (including children) with EEC Directive 2004/108/EC covering the electromagnetic compatibility. All rights reserved. To...
Instruction Manual 32
Page 16
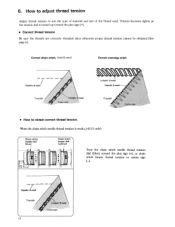
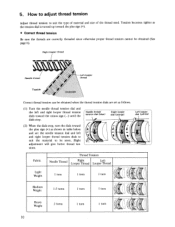
... thread tension to obtain correct thread tension. LIII I® IIII ICI ID Turn the chain stitch needle thread tension dial (blue) toward the plus sign (+), or chain stitch looper thread tension to minus sign 00 0 Needle thread Topside 14 LOoper ti,read Underside When the chain stitch needle... thread tension is turned up toward the plus sign (+). • Correct thread tension Be sure the threads are correctly threaded since otherwise proper thread tension cannot be obtained (See page 6).
... thread tension to obtain correct thread tension. LIII I® IIII ICI ID Turn the chain stitch needle thread tension dial (blue) toward the plus sign (+), or chain stitch looper thread tension to minus sign 00 0 Needle thread Topside 14 LOoper ti,read Underside When the chain stitch needle... thread tension is turned up toward the plus sign (+). • Correct thread tension Be sure the threads are correctly threaded since otherwise proper thread tension cannot be obtained (See page 6).
Instruction Manual 32
Page 17
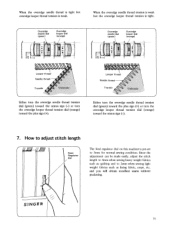
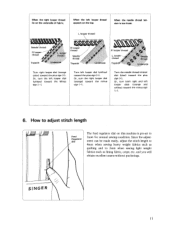
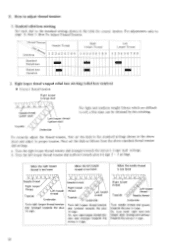
...minus sign (-). 7. and you will obtain excellent seams without puckering. When the overedge needle thread tension is weak but overedge looper thread tension is weak. SINGER 15 Overedge needle dial (green) Overedge looper dial (orange) A 1 V ID Overedge needle dial (green) Overedge looper dial (orange) A V V... overedge needle thread tension dial (green) toward the minus sign (-) or turn the overedge looper thread tension dial (orange) toward the plus sign (+). How to adjust stitch length r L ,--11 Feed Regulator dial The feed regulator dial on this machine is pre-set to...
...minus sign (-). 7. and you will obtain excellent seams without puckering. When the overedge needle thread tension is weak but overedge looper thread tension is weak. SINGER 15 Overedge needle dial (green) Overedge looper dial (orange) A 1 V ID Overedge needle dial (green) Overedge looper dial (orange) A V V... overedge needle thread tension dial (green) toward the minus sign (-) or turn the overedge looper thread tension dial (orange) toward the plus sign (+). How to adjust stitch length r L ,--11 Feed Regulator dial The feed regulator dial on this machine is pre-set to...
Instruction Manual 33
Page 12
... 1 A 1 - 1 Medium Weight Heavy Weight 1.5 turns 2 turns 1 turn 1 turn 1 turn IlI AI - 1 turn the dials toward the plus sign (+) as shown in table below A and set as the tension dial is turned up toward the plus sign (+). • Correct thread tension Be sure the threads are set the needle tension dial and left...
... 1 A 1 - 1 Medium Weight Heavy Weight 1.5 turns 2 turns 1 turn 1 turn 1 turn IlI AI - 1 turn the dials toward the plus sign (+) as shown in table below A and set as the tension dial is turned up toward the plus sign (+). • Correct thread tension Be sure the threads are set the needle tension dial and left...
Instruction Manual 33
Page 13
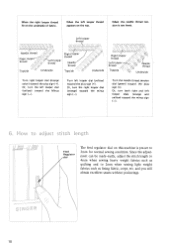
Or, turn both right and left looper dial (yellow) toward the Minus sign (-). SINGER 11 How to adjust stitch length Feed Regulator dial The feed regulator dial on this machine is too loose. L looper thread Needle thread R looper thread ... and yellow) toward the minus sign (-). 6. When the right looper thread lie on the underside of fabric, When the left looper dial (yellow) toward the plus sign (+). and you will obtain excellent seams without puckerings. When the needle thread tension is pre-set to 2mm when sewing light weight fabrics such...
Or, turn both right and left looper dial (yellow) toward the Minus sign (-). SINGER 11 How to adjust stitch length Feed Regulator dial The feed regulator dial on this machine is too loose. L looper thread Needle thread R looper thread ... and yellow) toward the minus sign (-). 6. When the right looper thread lie on the underside of fabric, When the left looper dial (yellow) toward the plus sign (+). and you will obtain excellent seams without puckerings. When the needle thread tension is pre-set to 2mm when sewing light weight fabrics such...
Instruction Manual 35
Page 12
...Left looper thread Right looper thread Needle thread Underside Topside Underside Right looper thread Left looper . Or, turn the right looper dial (orange) toward the plus sign (+). and you will obtain excellent seams without puckerings. 10 Turn left looper dials (orange and yellow) toward the... plus sign (+). Or, turn both right and left looper dial (yellow) toward the minus sign (-). Since the adjustment can be made easily, adjust the stitch ...
...Left looper thread Right looper thread Needle thread Underside Topside Underside Right looper thread Left looper . Or, turn the right looper dial (orange) toward the plus sign (+). and you will obtain excellent seams without puckerings. 10 Turn left looper dials (orange and yellow) toward the... plus sign (+). Or, turn both right and left looper dial (yellow) toward the minus sign (-). Since the adjustment can be made easily, adjust the stitch ...
Instruction Manual 35
Page 14
...the left looper dials (orange and yellow) towards the minus (-) sign. 12 Or, turn right looper thread tension dial (orange) towards the plus (+) sign. Right looper thread wrapped rolled hem stitching (rolled hem variation) • Correct thread tension Right looper (orange dial) - - ...b. Turn needle thread dial (green) towards the plus (+) sign 2 - 3 settings. For adjustments refer to roll, a fine seam can be obtained by this stitching. Needle thread (green dial) Topside...
...the left looper dials (orange and yellow) towards the minus (-) sign. 12 Or, turn right looper thread tension dial (orange) towards the plus (+) sign. Right looper thread wrapped rolled hem stitching (rolled hem variation) • Correct thread tension Right looper (orange dial) - - ...b. Turn needle thread dial (green) towards the plus (+) sign 2 - 3 settings. For adjustments refer to roll, a fine seam can be obtained by this stitching. Needle thread (green dial) Topside...


