

Instruction Manual 3
Page 7
... removal. 8. Slide Plate opens for safety and convenience. 6. Hand Wheel positions take-up Lever controls flow of tension on fabric, It has an allpurpose setting plus settings for extra-light and extra -heavy pressure, and for bobbin winding. 2. Always turn it toward you select the appropriate tension for either flat or...
... removal. 8. Slide Plate opens for safety and convenience. 6. Hand Wheel positions take-up Lever controls flow of tension on fabric, It has an allpurpose setting plus settings for extra-light and extra -heavy pressure, and for bobbin winding. 2. Always turn it toward you select the appropriate tension for either flat or...
Instruction Manual 4
Page 75
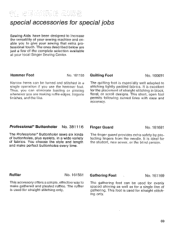
...way to make perfect buttonholes every time. The ones described below are making ruffle edges, lingerie finishes, and the like. It is used for straight stitching only. 69 Professional* Buttonholer No. 381116 The Professional* Buttonholer sews six kinds of buttonholes, plus eyelets, in a single operation if you use ... for special jobs Sewing Aids have been designed to increase the versatility of your sewing machine and enable you to give your local Singer Sewing Center. Hemmer Foot No. 161195 Narrow hems can eliminate basting or pinning whenever you are just a few of the complete ...
...way to make perfect buttonholes every time. The ones described below are making ruffle edges, lingerie finishes, and the like. It is used for straight stitching only. 69 Professional* Buttonholer No. 381116 The Professional* Buttonholer sews six kinds of buttonholes, plus eyelets, in a single operation if you use ... for special jobs Sewing Aids have been designed to increase the versatility of your sewing machine and enable you to give your local Singer Sewing Center. Hemmer Foot No. 161195 Narrow hems can eliminate basting or pinning whenever you are just a few of the complete ...
Instruction Manual 8
Page 38
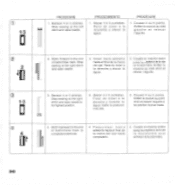
.... Parar de coser a la derecha y levantar la aguja hasta la posici6n mas alta. 3. Arreter la couture au point droit et relever l'aiguille a sa position la plus haute. 0 4 4. H 36 Cousez 4 ou 5 points. Coudre en marche avant jusqu'au repere a la fin de la boutonniere. PROCEDIMIENTO 1. Stop sewing at the left -^ stitch and...
.... Parar de coser a la derecha y levantar la aguja hasta la posici6n mas alta. 3. Arreter la couture au point droit et relever l'aiguille a sa position la plus haute. 0 4 4. H 36 Cousez 4 ou 5 points. Coudre en marche avant jusqu'au repere a la fin de la boutonniere. PROCEDIMIENTO 1. Stop sewing at the left -^ stitch and...
Instruction Manual 13
Page 27
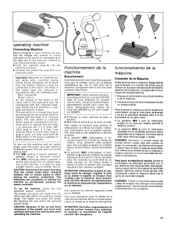
...tissus faciles manier et pour la plupart des ouvrages requerant des vitesses variables. Pour actionner la machine, appuyez le pied sur le rheostat. Plus vous appuyerez, plus la vitesse de la machine sera grande. Esto a la vez encendera la luz para coser. • La posici0n MIN f (...sur la plaque signaletique (a), sur le cOte. IMPORTANT: Votre machine fonctionne exclusivement sur courant 220/230 volts. Renseignez-vous aupres de votre Ami SINGER ou de votre magasin SINGER. • Enfoncez la prise machine b dans le socle c. • Branchez la prise d sur la prise murale. Para arrancar la...
...tissus faciles manier et pour la plupart des ouvrages requerant des vitesses variables. Pour actionner la machine, appuyez le pied sur le rheostat. Plus vous appuyerez, plus la vitesse de la machine sera grande. Esto a la vez encendera la luz para coser. • La posici0n MIN f (...sur la plaque signaletique (a), sur le cOte. IMPORTANT: Votre machine fonctionne exclusivement sur courant 220/230 volts. Renseignez-vous aupres de votre Ami SINGER ou de votre magasin SINGER. • Enfoncez la prise machine b dans le socle c. • Branchez la prise d sur la prise murale. Para arrancar la...
Instruction Manual 14
Page 26
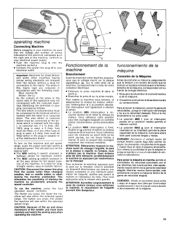
... to the terminal which is marked with the coloured markings identifying the terminals in your electrical outlet. course illustre en f) limite la vitesse du moteur. Plus vous appuyerez plug la vitesse sera grande. Esto elimina la posibilidad' de .que la maquina se ponga en marcha si se toca el controlador de...
... to the terminal which is marked with the coloured markings identifying the terminals in your electrical outlet. course illustre en f) limite la vitesse du moteur. Plus vous appuyerez plug la vitesse sera grande. Esto elimina la posibilidad' de .que la maquina se ponga en marcha si se toca el controlador de...
Instruction Manual 18
Page 2
... de esta maquina de coser. Afin de vous faire toujours beneficier des possibilites les plus epais. Copyright © 2005 The Singer Company Limited ® Singer es una marca registrada de The Singer Company Limited o sus afiliados. Copyright © 2005 The Singer Company Limited Please refer to operate the machine. Esta maquina destinada para uso domestic...
... de esta maquina de coser. Afin de vous faire toujours beneficier des possibilites les plus epais. Copyright © 2005 The Singer Company Limited ® Singer es una marca registrada de The Singer Company Limited o sus afiliados. Copyright © 2005 The Singer Company Limited Please refer to operate the machine. Esta maquina destinada para uso domestic...
Instruction Manual
Page 63
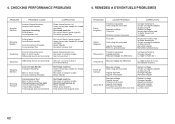
... pied presseur Corriger les tensions Changer l'aiguille Le règler à moins de 1 Ondulations Mauvais règlage de différentiel Le règler à plus de 1 pour les matières tricotées Points de manque Casse de fil Mauvais enfilage Taille d'aiguille mauvaise Aiguille épointée Aiguille...
... pied presseur Corriger les tensions Changer l'aiguille Le règler à moins de 1 Ondulations Mauvais règlage de différentiel Le règler à plus de 1 pour les matières tricotées Points de manque Casse de fil Mauvais enfilage Taille d'aiguille mauvaise Aiguille épointée Aiguille...

Instruction Manual 2
Page 2
...USA & Canada only) Use Model YC-485 EC or Model JF-1000 with EEC Directive 2004/108/EC covering the electromagnetic compatibility. SINGER and ONE PLUS are being administered. 10. Always unplug this manual. Indoors use bent needles. 16. to the off or unplug the appliance when leaving...modify the plug in this sewing machine from outlet. 11. Return the sewing machine to persons: 1. DANGER--To reduce the risk of The Singer Company Limited S.à r.l. To reduce the risk of the appliance before servicing. Caution - Unplug the foot controller of burns, fire, electric...
...USA & Canada only) Use Model YC-485 EC or Model JF-1000 with EEC Directive 2004/108/EC covering the electromagnetic compatibility. SINGER and ONE PLUS are being administered. 10. Always unplug this manual. Indoors use bent needles. 16. to the off or unplug the appliance when leaving...modify the plug in this sewing machine from outlet. 11. Return the sewing machine to persons: 1. DANGER--To reduce the risk of The Singer Company Limited S.à r.l. To reduce the risk of the appliance before servicing. Caution - Unplug the foot controller of burns, fire, electric...
Instruction Manual 32
Page 16
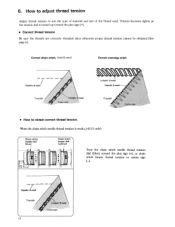
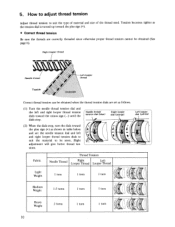
...material and size of the thread used. LIII I® IIII ICI ID Turn the chain stitch needle thread tension dial (blue) toward the plus sign (+), or chain stitch looper thread tension to minus sign 00 0 Needle thread Topside 14 LOoper ti,read Underside When the chain stitch ...needle thread tension is turned up toward the plus sign (+). • Correct thread tension Be sure the threads are correctly threaded since otherwise proper thread tension cannot be obtained (See page 6). 6....
...material and size of the thread used. LIII I® IIII ICI ID Turn the chain stitch needle thread tension dial (blue) toward the plus sign (+), or chain stitch looper thread tension to minus sign 00 0 Needle thread Topside 14 LOoper ti,read Underside When the chain stitch ...needle thread tension is turned up toward the plus sign (+). • Correct thread tension Be sure the threads are correctly threaded since otherwise proper thread tension cannot be obtained (See page 6). 6....
Instruction Manual 32
Page 17
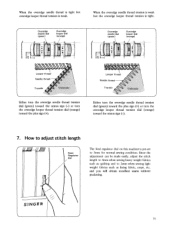
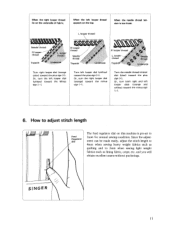
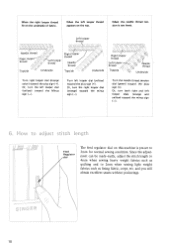
...turn the overedge needle thread tension dial (green) toward the minus sign (-) or turn the overedge looper thread tension dial (orange) toward the plus sign (+). How to adjust stitch length r L ,--11 Feed Regulator dial The feed regulator dial on this machine is tight. Looper thread ...Needle thread Topside Underside Either turn the overedge needle thread tension dial (green) toward the plus sign (+) or turn the overedge looper thread tension dial (orange) toward the minus sign (-). 7. SINGER 15 Since the adjustment can be made easily, adjust the stitch length to 4mm when sewing...
...turn the overedge needle thread tension dial (green) toward the minus sign (-) or turn the overedge looper thread tension dial (orange) toward the plus sign (+). How to adjust stitch length r L ,--11 Feed Regulator dial The feed regulator dial on this machine is tight. Looper thread ...Needle thread Topside Underside Either turn the overedge needle thread tension dial (green) toward the plus sign (+) or turn the overedge looper thread tension dial (orange) toward the minus sign (-). 7. SINGER 15 Since the adjustment can be made easily, adjust the stitch length to 4mm when sewing...
Instruction Manual 33
Page 12
...the dials stop , turn , 1 I 1 turn 1 A 1 - 1 Medium Weight Heavy Weight 1.5 turns 2 turns 1 turn 1 turn 1 turn IlI AI - 1 turn the dials toward the plus sign (+) as shown in table below A and set as follows. (1) Turn the needle thread tension dial and the left and right looper thread tension dials... toward the plus sign (+). • Correct thread tension Be sure the threads are set the needle tension dial and left and right looper thread tension ...
...the dials stop , turn , 1 I 1 turn 1 A 1 - 1 Medium Weight Heavy Weight 1.5 turns 2 turns 1 turn 1 turn 1 turn IlI AI - 1 turn the dials toward the plus sign (+) as shown in table below A and set as follows. (1) Turn the needle thread tension dial and the left and right looper thread tension dials... toward the plus sign (+). • Correct thread tension Be sure the threads are set the needle tension dial and left and right looper thread tension ...
Instruction Manual 33
Page 13
When the right looper thread lie on the underside of fabric, When the left looper dial (yellow) toward the plus sign (+). When the needle thread tension is pre-set to 2mm when sewing light weight fabrics such as quilting and to 3mm for normal... made easily, adjust the stitch length to 4mm when sewing heavy weight fabrics such as lining fabric, crepe, etc. SINGER 11 Or, turn both right and left looper dial (yellow) toward the plus sign (+). L looper thread Needle thread R looper thread Topside L looper thread Underside R looper thread Needle thread Topside Underside R looper...
When the right looper thread lie on the underside of fabric, When the left looper dial (yellow) toward the plus sign (+). When the needle thread tension is pre-set to 2mm when sewing light weight fabrics such as quilting and to 3mm for normal... made easily, adjust the stitch length to 4mm when sewing heavy weight fabrics such as lining fabric, crepe, etc. SINGER 11 Or, turn both right and left looper dial (yellow) toward the plus sign (+). L looper thread Needle thread R looper thread Topside L looper thread Underside R looper thread Needle thread Topside Underside R looper...
Instruction Manual 35
Page 12
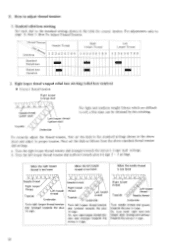
... looper . Or, turn the left looper dial (yellow) toward the minus sign (-). Or, turn the right looper dial (orange) toward the plus sign (+). When the right looper thread lie on this machine is too loose. When the needle thread tension is pre-set to 2mm when sewing... light weight fabrics such as lining fabric, crepe, etc. Turn left looper dial (yellow) toward the plus sign (+). thread Topside Needle thread Underside Turn right looper dial (orange color) toward the Minus sign (-). and you will obtain excellent seams without ...
... looper . Or, turn the left looper dial (yellow) toward the minus sign (-). Or, turn the right looper dial (orange) toward the plus sign (+). When the right looper thread lie on this machine is too loose. When the needle thread tension is pre-set to 2mm when sewing... light weight fabrics such as lining fabric, crepe, etc. Turn left looper dial (yellow) toward the plus sign (+). thread Topside Needle thread Underside Turn right looper dial (orange color) toward the Minus sign (-). and you will obtain excellent seams without ...
Instruction Manual 35
Page 14
... looper (orange dial) - - Next set the dials to proper tension. Or, turn both right and left looper thread tension dial (yellow) towards the plus (+) sign 2 - 3 settings. 3. I Left Looper Thread 1 234 56789 2. Or, turn right looper thread tension dial (orange) towards the minus ... is too loose Needle thread Right looper thread Topside Left looper thread Underside Turn right looper thread tension dial (orange) towards plus (+) sign. How To Adjust Thread Tension. For adjustments refer to adjust thread tension 1. Standard rolled hem stitching Set each dial...
... looper (orange dial) - - Next set the dials to proper tension. Or, turn both right and left looper thread tension dial (yellow) towards the plus (+) sign 2 - 3 settings. 3. I Left Looper Thread 1 234 56789 2. Or, turn right looper thread tension dial (orange) towards the minus ... is too loose Needle thread Right looper thread Topside Left looper thread Underside Turn right looper thread tension dial (orange) towards plus (+) sign. How To Adjust Thread Tension. For adjustments refer to adjust thread tension 1. Standard rolled hem stitching Set each dial...


