
XV-Z17000 Operation Manual
Page 3
...you have checked the contents of the carton thoroughly against the list of "Supplied accessories" on the bottom of projector. pressly approved by the manufacturer could void the user's authority to operate this operation manual carefully. ONLY PRODUCT ...Sharp at 1-800-BE-SHARP. U.S.A. WARNING: This is intended to alert the user to the presence of these materials may be regulated due to the presence of your local authorities, the Electronics Industries Al- Introduction IMPORTANT • For your assistance in the literature accompanying the product. Model No.: XV-Z17000...
...you have checked the contents of the carton thoroughly against the list of "Supplied accessories" on the bottom of projector. pressly approved by the manufacturer could void the user's authority to operate this operation manual carefully. ONLY PRODUCT ...Sharp at 1-800-BE-SHARP. U.S.A. WARNING: This is intended to alert the user to the presence of these materials may be regulated due to the presence of your local authorities, the Electronics Industries Al- Introduction IMPORTANT • For your assistance in the literature accompanying the product. Model No.: XV-Z17000...

XV-Z17000 Operation Manual
Page 4
...particular installation. The lamp will not occur in the lamp may cause burns or injury. • Wait at your nearest Sharp Authorized Projector Dealer or Service Center. * If the new lamp does not light after the power cord is no guarantee that glass ...after replacement, take your projector to Part 15 of conformity SHARP PROJECTOR, MODEL XV-Z17000 This device complies with the limits for a Class B digital device, pursuant to the nearest Sharp Authorized Projector Dealer or Service Center for help. If you contact your nearest Sharp Authorized Projector Dealer or Service Center to...
...particular installation. The lamp will not occur in the lamp may cause burns or injury. • Wait at your nearest Sharp Authorized Projector Dealer or Service Center. * If the new lamp does not light after the power cord is no guarantee that glass ...after replacement, take your projector to Part 15 of conformity SHARP PROJECTOR, MODEL XV-Z17000 This device complies with the limits for a Class B digital device, pursuant to the nearest Sharp Authorized Projector Dealer or Service Center for help. If you contact your nearest Sharp Authorized Projector Dealer or Service Center to...

XV-Z17000 Operation Manual
Page 5
..., and may differ slightly from the actual display. Example: "Picture" menu screen when COMPONENT is selected for setting up and operating the projector. RETURN ENTER END Buttons used in this operation Button used in the same manner. • In this operation manual, the illustration and... select the menu screen to adjust on the model. Note Indicates additional information for input mode Picture SIG-ADJ Picture Mode Contrast Bright Color Tint Sharp Red Blue CLR Temp IRIS1 (Manual) IRIS2 (Auto) Eco+Quiet Advanced Reset SCR-ADJ PRJ-ADJ Standard 0 0 0 0 0 0 0 0 High ...
..., and may differ slightly from the actual display. Example: "Picture" menu screen when COMPONENT is selected for setting up and operating the projector. RETURN ENTER END Buttons used in this operation Button used in the same manner. • In this operation manual, the illustration and... select the menu screen to adjust on the model. Note Indicates additional information for input mode Picture SIG-ADJ Picture Mode Contrast Bright Color Tint Sharp Red Blue CLR Temp IRIS1 (Manual) IRIS2 (Auto) Eco+Quiet Advanced Reset SCR-ADJ PRJ-ADJ Standard 0 0 0 0 0 0 0 0 High ...

XV-Z17000 Operation Manual
Page 6
...All Adjustment Items 40 Computer Image Adjustment ("SIG-ADJ" Menu)...41 Adjusting the Computer Image 41 Setup Setting Up the Projector 16 Setting Up the Projector 16 Standard Setup (Front Projection 16 Projection (PRJ) Mode 17 Ceiling-mount Setup 17 Screen Size and Projection Distance 18...Background Image 45 Selecting the Menu Screen Position 45 Reversing/Inverting Projected Images 45 Selecting the On-screen Display Language ......... 45 Adjusting the Projector Function ("PRJ-ADJ" Menu)...46 Setting Auto Power Off Mode 46 Setting the Power Save Mode (Economy Mode) ... 46 Setting One...
...All Adjustment Items 40 Computer Image Adjustment ("SIG-ADJ" Menu)...41 Adjusting the Computer Image 41 Setup Setting Up the Projector 16 Setting Up the Projector 16 Standard Setup (Front Projection 16 Projection (PRJ) Mode 17 Ceiling-mount Setup 17 Screen Size and Projection Distance 18...Background Image 45 Selecting the Menu Screen Position 45 Reversing/Inverting Projected Images 45 Selecting the On-screen Display Language ......... 45 Adjusting the Projector Function ("PRJ-ADJ" Menu)...46 Setting Auto Power Off Mode 46 Setting the Power Save Mode (Economy Mode) ... 46 Setting One...

XV-Z17000 Operation Manual
Page 9
...of the plastic cover. -7 tain it . Do not carry the projector by a Sharp Authorized Projector Dealer or Service Center. Introduction Observe the following safeguards when setting up your nearest Sharp Authorized Projector Dealer or Service Center for replacement. Close the curtains and dim the lights when ..., the vents and lens must be installed in places exposed to maintain high image quality, SHARP recommends that it is not a malfunction. Do not subject the projector to rest your eyes occasionally. Continuously watching the screen for long hours will not...
...of the plastic cover. -7 tain it . Do not carry the projector by a Sharp Authorized Projector Dealer or Service Center. Introduction Observe the following safeguards when setting up your nearest Sharp Authorized Projector Dealer or Service Center for replacement. Close the curtains and dim the lights when ..., the vents and lens must be installed in places exposed to maintain high image quality, SHARP recommends that it is not a malfunction. Do not subject the projector to rest your eyes occasionally. Continuously watching the screen for long hours will not...

XV-Z17000 Operation Manual
Page 10
... regulates the internal temperature, and its performance is automatically controlled. The surrounding area appears dark, which may cause injury. When using the projector in use an appropriate power cord for the specified purpose. Do not move around while wearing the 3D Glasses. ...the cloth may result in injury. Be careful not to avoid their prolonged use the 3D Glasses if they are using the projector overseas, make the connections. Follow the correct procedure when loading the battery. (See page 51.) Loading the battery incorrectly may damage ...
... regulates the internal temperature, and its performance is automatically controlled. The surrounding area appears dark, which may cause injury. When using the projector in use an appropriate power cord for the specified purpose. Do not move around while wearing the 3D Glasses. ...the cloth may result in injury. Be careful not to avoid their prolonged use the 3D Glasses if they are using the projector overseas, make the connections. Follow the correct procedure when loading the battery. (See page 51.) Loading the battery incorrectly may damage ...

XV-Z17000 Operation Manual
Page 11
...and their accessories. *2 Which power cords are supplied along with your country. • Operation manual Note • Codes in your nearest Sharp Authorized Projector Dealer or Service Center. -9 only) AN-TK201 AN-TK202 AN-EP101B (for U.S.A. only) AN-C3CP2 AN-3DG10-S AN-3DG10-R AN...(2) Two AA size batteries (3) Two pairs of the optional accessories may not be available depending on the region. Please check with your projector depends on the region. Optional accessories Lamp unit Ceiling-mount adaptor Ceiling-mount bracket Ceiling-mount ...
...and their accessories. *2 Which power cords are supplied along with your country. • Operation manual Note • Codes in your nearest Sharp Authorized Projector Dealer or Service Center. -9 only) AN-TK201 AN-TK202 AN-EP101B (for U.S.A. only) AN-C3CP2 AN-3DG10-S AN-3DG10-R AN...(2) Two AA size batteries (3) Two pairs of the optional accessories may not be available depending on the region. Please check with your projector depends on the region. Optional accessories Lamp unit Ceiling-mount adaptor Ceiling-mount bracket Ceiling-mount ...
XV-Z17000 Operation Manual
Page 12
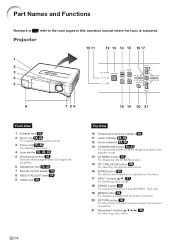
Projector 10 11 12 13 14 15 16 17 1 2 3 4 5 6 7 89 18 19 20 21 Front View 1 Exhaust vent 59 2 Zoom ring 15, 24 For enlarging/reducing ... 60 11 Lamp indicator 23, 60 12 Power indicator 23, 60 13 STANDBY/ON button 14, 23 For turning the power on and putting the projector into standby mode. 14 3D MENU button 53 For displaying the 3D MENU screen. 15 PICTURE MODE button 28 For selecting the appropriate picture. 16...
Projector 10 11 12 13 14 15 16 17 1 2 3 4 5 6 7 89 18 19 20 21 Front View 1 Exhaust vent 59 2 Zoom ring 15, 24 For enlarging/reducing ... 60 11 Lamp indicator 23, 60 12 Power indicator 23, 60 13 STANDBY/ON button 14, 23 For turning the power on and putting the projector into standby mode. 14 3D MENU button 53 For displaying the 3D MENU screen. 15 PICTURE MODE button 28 For selecting the appropriate picture. 16...

XV-Z17000 Operation Manual
Page 13
... on the side. • Always close the lens shutter to prevent damage to the lens when transporting the projector. • Do not lift or carry the projector by the lens as this may damage the lens. 7 89 10 Terminals 1 RS-232C terminal 22 Terminal ...S-VIDEO input terminal 19, 20 Terminal for use it by the carrying handle on how to secure the projector. -11 Introduction Projector (Rear View) 1 2 3 4 5 6 11 Using the Carrying Handle When transporting the projector, carry it to use with an S-video terminal. 6 VIDEO input terminal 19 Terminal for connecting video ...
... on the side. • Always close the lens shutter to prevent damage to the lens when transporting the projector. • Do not lift or carry the projector by the lens as this may damage the lens. 7 89 10 Terminals 1 RS-232C terminal 22 Terminal ...S-VIDEO input terminal 19, 20 Terminal for use it by the carrying handle on how to secure the projector. -11 Introduction Projector (Rear View) 1 2 3 4 5 6 11 Using the Carrying Handle When transporting the projector, carry it to use with an S-video terminal. 6 VIDEO input terminal 19 Terminal for connecting video ...

XV-Z17000 Operation Manual
Page 14
... 5 13 6 14 7 15 16 8 17 9 18 10 19 20 1 ON button 14, 23 For turning the power on. 2 STANDBY button 15, 23 For putting the projector into the standby mode. 3 HDMI1, 2, COMPONENT, S-VIDEO, VIDEO, COMPUTER buttons 15, 27 For switching to the respective input modes. 4 FREEZE button 28 For freezing images...
... 5 13 6 14 7 15 16 8 17 9 18 10 19 20 1 ON button 14, 23 For turning the power on. 2 STANDBY button 15, 23 For putting the projector into the standby mode. 3 HDMI1, 2, COMPONENT, S-VIDEO, VIDEO, COMPUTER buttons 15, 27 For switching to the respective input modes. 4 FREEZE button 28 For freezing images...

XV-Z17000 Operation Manual
Page 15
... Usable Range The remote control can be reflected off a screen for a long time. • Comply with this case, move the projector away from the remote control if you wipe them first and then remove them to leak. • Remove the batteries from leaked batteries ...Batteries of different types have run out, as possible with new batteries. • Remove the batteries from the fluorescent lamp. In this projector may cause old batteries to leak or explode. Battery fluid from the remote control once they are kept. Please follow the precautions below Caution...
... Usable Range The remote control can be reflected off a screen for a long time. • Comply with this case, move the projector away from the remote control if you wipe them first and then remove them to leak. • Remove the batteries from leaked batteries ...Batteries of different types have run out, as possible with new batteries. • Remove the batteries from the fluorescent lamp. In this projector may cause old batteries to leak or explode. Battery fluid from the remote control once they are kept. Please follow the precautions below Caution...

XV-Z17000 Operation Manual
Page 16
...1 ON button -14 Open the lens shutter fully and then turn the projector on Page 23 On the projector 2 STANDBY/ON button Press STANDBY/ON on the projector or ON on the remote control pointing the remote control towards the projector. Place the projector facing a screen 5 INPUT button Page 16 2. Quick Start This section ...provides an example showing how to connect the projector to video equipment that has an HDMI output terminal with a brief explanation of the steps from connection through to the video equipment and ...
...1 ON button -14 Open the lens shutter fully and then turn the projector on Page 23 On the projector 2 STANDBY/ON button Press STANDBY/ON on the projector or ON on the remote control pointing the remote control towards the projector. Place the projector facing a screen 5 INPUT button Page 16 2. Quick Start This section ...provides an example showing how to connect the projector to video equipment that has an HDMI output terminal with a brief explanation of the steps from connection through to the video equipment and ...

XV-Z17000 Operation Manual
Page 17
...or on the remote control to switch the Input mode. • Press P or R to select "HDMI1" for the Input mode. On the projector 1 STANDBY/ON button On the remote control On-screen display 1 STANDBY button 2 -15 HDMI1 button HDMI1 YPbPr 1080P Page 27 • Press ...HDMI1, HDMI2, COMPONENT, S-VIDEO, VIDEO and COMPUTER on the projector. 6. The projector angle is displayed, to put the projector into standby mode. Turn the video equipment on the remote control, then press that button again while the confirmation...
...or on the remote control to switch the Input mode. • Press P or R to select "HDMI1" for the Input mode. On the projector 1 STANDBY/ON button On the remote control On-screen display 1 STANDBY button 2 -15 HDMI1 button HDMI1 YPbPr 1080P Page 27 • Press ...HDMI1, HDMI2, COMPONENT, S-VIDEO, VIDEO and COMPUTER on the projector. 6. The projector angle is displayed, to put the projector into standby mode. Turn the video equipment on the remote control, then press that button again while the confirmation...

XV-Z17000 Operation Manual
Page 18
...lens center is not in direct sunlight or room light. Note • The projector lens should be distorted, making viewing difficult. Standard Setup (Front Projection) Place the projector at and level. Example of the screen. Light falling directly on the screen washes...screen, the image will be centered in a sunny or bright room. Setting Up the Projector Setting Up the Projector For optimal image quality, position the projector perpendicular to the screen with the projector's feet flat the required distance from the screen according to page 18 for additional...
...lens center is not in direct sunlight or room light. Note • The projector lens should be distorted, making viewing difficult. Standard Setup (Front Projection) Place the projector at and level. Example of the screen. Light falling directly on the screen washes...screen, the image will be centered in a sunny or bright room. Setting Up the Projector Setting Up the Projector For optimal image quality, position the projector perpendicular to the screen with the projector's feet flat the required distance from the screen according to page 18 for additional...

XV-Z17000 Operation Manual
Page 19
... Distance For details, refer to obtain the recommended ceiling-mount adaptor and unit (sold separately). Projection (PRJ) Mode The projector can use the optional Sharp ceiling-mount adaptor and unit for the projection setting in use. (You can set the PRJ Mode in the diagram below.... Before mounting the projector, contact your nearest Sharp Authorized Projector Dealer or Service Center to "Screen Size and Projection Distance" on page 18. Indication of the 4 projection modes, shown in...
... Distance For details, refer to obtain the recommended ceiling-mount adaptor and unit (sold separately). Projection (PRJ) Mode The projector can use the optional Sharp ceiling-mount adaptor and unit for the projection setting in use. (You can set the PRJ Mode in the diagram below.... Before mounting the projector, contact your nearest Sharp Authorized Projector Dealer or Service Center to "Screen Size and Projection Distance" on page 18. Indication of the 4 projection modes, shown in...
XV-Z17000 Operation Manual
Page 20
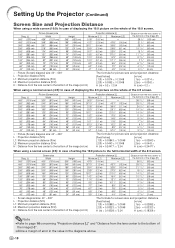
Setting Up the Projector (Continued) Screen Size and Projection Distance When using a wide screen (16:9): In case of displaying the 16:9 picture on the whole of the 4:3 screen. Diag. (x) ...
Setting Up the Projector (Continued) Screen Size and Projection Distance When using a wide screen (16:9): In case of displaying the 16:9 picture on the whole of the 4:3 screen. Diag. (x) ...
XV-Z17000 Operation Manual
Page 21
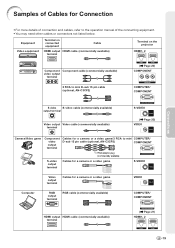
Equipment Video equipment Terminal on connected equipment Cable HDMI output HDMI cable (commercially available) terminal Terminal on the projector HDMI1, 2 Component Component cable (commercially available) video output terminal 3 RCA to mini D-sub 15 pin cable (optional, AN-C3CP2) ( Page 20) COMPONENT COMPUTER/ COMPONENT S-video S-...
Equipment Video equipment Terminal on connected equipment Cable HDMI output HDMI cable (commercially available) terminal Terminal on the projector HDMI1, 2 Component Component cable (commercially available) video output terminal 3 RCA to mini D-sub 15 pin cable (optional, AN-C3CP2) ( Page 20) COMPONENT COMPUTER/ COMPONENT S-video S-...
XV-Z17000 Operation Manual
Page 22
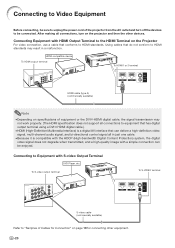
After making all connections, turn off the devices to be connected. Connecting Equipment with HDMI Output Terminal to the HDMI Terminal on the projector and then the other equipment. -20 HDMI-compatible device To HDMI output terminal To HDMI1 or 2 terminal HDMI cable (type A) ...(commercially available) Note • Depending on page 19 for Connection" on specifications of the projector from the AC outlet and turn on the Projector For video connection, use a cable that conforms to HDMI standards. Connecting to Equipment with a simple connection can deliver a ...
After making all connections, turn off the devices to be connected. Connecting Equipment with HDMI Output Terminal to the HDMI Terminal on the projector and then the other equipment. -20 HDMI-compatible device To HDMI output terminal To HDMI1 or 2 terminal HDMI cable (type A) ...(commercially available) Note • Depending on page 19 for Connection" on specifications of the projector from the AC outlet and turn on the Projector For video connection, use a cable that conforms to HDMI standards. Connecting to Equipment with a simple connection can deliver a ...

XV-Z17000 Operation Manual
Page 23
... unless the computer's external output port is the last device to enable your nearest Macintosh Dealer. • Depending on after all the connections are using a SHARP notebook computer). Connections -21 Refer to the specific instructions in your computer's operation manual to be required for use with some of computer signals...
... unless the computer's external output port is the last device to enable your nearest Macintosh Dealer. • Depending on after all the connections are using a SHARP notebook computer). Connections -21 Refer to the specific instructions in your computer's operation manual to be required for use with some of computer signals...

XV-Z17000 Operation Manual
Page 24
... terminal on the computer. When connecting to or from the computer while it is connected to a computer, the computer can be used to control the projector and check the status of the computer for details. • For details on RS-232C specifications and commands, see page 66. This may... damage your computer or projector. • Do not connect or disconnect an RS-232C serial control cable to a computer using an RS-232C serial control cable Computer To RS-232C...
... terminal on the computer. When connecting to or from the computer while it is connected to a computer, the computer can be used to control the projector and check the status of the computer for details. • For details on RS-232C specifications and commands, see page 66. This may... damage your computer or projector. • Do not connect or disconnect an RS-232C serial control cable to a computer using an RS-232C serial control cable Computer To RS-232C...


