

XV-Z17000 Operation Manual
Page 3
... ONLY PRODUCT DISPOSAL This product utilizes tin-lead solder, and lamp containing a small amount of projector. special handling may be required to environmental considerations. Model No.: XV-Z17000 Serial No.: WARNING: High brightness light source. WARNING: To reduce the risk of fire...directly. liance: www.eiae.org, the lamp recycling organization www.lamprecycle.org, or Sharp at 1-800-BE-SHARP. NO USER-SERVICEABLE PARTS EXCEPT LAMP UNIT. U.S.A. ENGLISH Before using the projector, please read this information. • Before recycling the packaging, please ensure that ...
... ONLY PRODUCT DISPOSAL This product utilizes tin-lead solder, and lamp containing a small amount of projector. special handling may be required to environmental considerations. Model No.: XV-Z17000 Serial No.: WARNING: High brightness light source. WARNING: To reduce the risk of fire...directly. liance: www.eiae.org, the lamp recycling organization www.lamprecycle.org, or Sharp at 1-800-BE-SHARP. NO USER-SERVICEABLE PARTS EXCEPT LAMP UNIT. U.S.A. ENGLISH Before using the projector, please read this information. • Before recycling the packaging, please ensure that ...

XV-Z17000 Operation Manual
Page 4
.... Should the lamp break, the glass particles may cause undesired operation. ONLY Declaration of conformity SHARP PROJECTOR, MODEL XV-Z17000 This device complies with the limits for help. Caution • Do not remove the lamp unit from the projector right after use . Authorized representative responsible for repair. Because the gas in accordance with a new...
.... Should the lamp break, the glass particles may cause undesired operation. ONLY Declaration of conformity SHARP PROJECTOR, MODEL XV-Z17000 This device complies with the limits for help. Caution • Do not remove the lamp unit from the projector right after use . Authorized representative responsible for repair. Because the gas in accordance with a new...

XV-Z17000 Operation Manual
Page 5
...; Press RETURN to return to the previous screen hen the menu is selected for input mode Picture SIG-ADJ Picture Mode Contrast Bright Color Tint Sharp Red Blue CLR Temp IRIS1 (Manual) IRIS2 (Auto) Eco+Quiet Advanced Reset SCR-ADJ PRJ-ADJ Standard 0 0 0 0 0 0 0 ...Press _ or ? For Future Reference Maintenance Troubleshooting P. 59 PP. 72 to 74 Index P. 78 -3 However, you can also e performed using the projector. Example: "Picture" menu screen when COMPONENT is displa ed. Menu Selections (Adjustments) • This operation can connect and operate all models in this...
...; Press RETURN to return to the previous screen hen the menu is selected for input mode Picture SIG-ADJ Picture Mode Contrast Bright Color Tint Sharp Red Blue CLR Temp IRIS1 (Manual) IRIS2 (Auto) Eco+Quiet Advanced Reset SCR-ADJ PRJ-ADJ Standard 0 0 0 0 0 0 0 ...Press _ or ? For Future Reference Maintenance Troubleshooting P. 59 PP. 72 to 74 Index P. 78 -3 However, you can also e performed using the projector. Example: "Picture" menu screen when COMPONENT is displa ed. Menu Selections (Adjustments) • This operation can connect and operate all models in this...

XV-Z17000 Operation Manual
Page 6
...All Adjustment Items 40 Computer Image Adjustment ("SIG-ADJ" Menu)...41 Adjusting the Computer Image 41 Setup Setting Up the Projector 16 Setting Up the Projector 16 Standard Setup (Front Projection 16 Projection (PRJ) Mode 17 Ceiling-mount Setup 17 Screen Size and Projection Distance 18...Background Image 45 Selecting the Menu Screen Position 45 Reversing/Inverting Projected Images 45 Selecting the On-screen Display Language ......... 45 Adjusting the Projector Function ("PRJ-ADJ" Menu)...46 Setting Auto Power Off Mode 46 Setting the Power Save Mode (Economy Mode) ... 46 Setting One...
...All Adjustment Items 40 Computer Image Adjustment ("SIG-ADJ" Menu)...41 Adjusting the Computer Image 41 Setup Setting Up the Projector 16 Setting Up the Projector 16 Standard Setup (Front Projection 16 Projection (PRJ) Mode 17 Ceiling-mount Setup 17 Screen Size and Projection Distance 18...Background Image 45 Selecting the Menu Screen Position 45 Reversing/Inverting Projected Images 45 Selecting the On-screen Display Language ......... 45 Adjusting the Projector Function ("PRJ-ADJ" Menu)...46 Setting Auto Power Off Mode 46 Setting the Power Save Mode (Economy Mode) ... 46 Setting One...

XV-Z17000 Operation Manual
Page 9
...Take regular breaks to it. Do not carry the projector by a Sharp Authorized Projector Dealer or Service Center. This will automatically put the projector into standby mode to avoid personal injury caused by the projector falling down. This is normal and is carefully secure to ... feet (2,300 meters) or less. Neglecting this projector be cleaned more ) When you use the projector for a while. Rest your nearest Sharp Authorized Projector Dealer or Service Center for long hours will disappear after the projector is from humidity, dust and cigarette smoke. Caution...
...Take regular breaks to it. Do not carry the projector by a Sharp Authorized Projector Dealer or Service Center. This will automatically put the projector into standby mode to avoid personal injury caused by the projector falling down. This is normal and is carefully secure to ... feet (2,300 meters) or less. Neglecting this projector be cleaned more ) When you use the projector for a while. Rest your nearest Sharp Authorized Projector Dealer or Service Center for long hours will disappear after the projector is from humidity, dust and cigarette smoke. Caution...

XV-Z17000 Operation Manual
Page 10
.... Remove dust and soil from the AC outlet and turning off the equipment to be connected. Please read the operation manuals of the projector and the equipment to be exposed to excessive heat such as doing so may cause the coating to reverse the battery poles (+ and -) when ... soiling on the cloth may result in scratches on the product. Any dust or other accidents that may cause injury. The battery may change during projector operation due to trap your eyes. Do not use solvents such as benzene or thinners as direct sunlight or fire. Replace...
.... Remove dust and soil from the AC outlet and turning off the equipment to be connected. Please read the operation manuals of the projector and the equipment to be exposed to excessive heat such as doing so may cause the coating to reverse the battery poles (+ and -) when ... soiling on the cloth may result in scratches on the product. Any dust or other accidents that may cause injury. The battery may change during projector operation due to trap your eyes. Do not use solvents such as benzene or thinners as direct sunlight or fire. Replace...

XV-Z17000 Operation Manual
Page 11
... wall outlet in your country. • Operation manual Note • Codes in "< >" are supplied along with your projector depends on the region. and Canada, etc. (6' (1.8 m)) For Europe, except U.K. (6' (1.8 m)) For U.K. Please check with your nearest Sharp Authorized Projector Dealer or Service Center. -9 and Singapore (6' (1.8 m)) For Australia, New Zealand and Oceania (6' (1.8 m)) *1 See pages 50 to...
... wall outlet in your country. • Operation manual Note • Codes in "< >" are supplied along with your projector depends on the region. and Canada, etc. (6' (1.8 m)) For Europe, except U.K. (6' (1.8 m)) For U.K. Please check with your nearest Sharp Authorized Projector Dealer or Service Center. -9 and Singapore (6' (1.8 m)) For Australia, New Zealand and Oceania (6' (1.8 m)) *1 See pages 50 to...
XV-Z17000 Operation Manual
Page 12
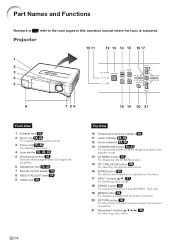
Projector 10 11 12 13 14 15 16 17 1 2 3 4 5 6 7 89 18 19 20 21 Front View 1 Exhaust vent 59 2 Zoom ring 15, 24 For enlarging/reducing ... 60 11 Lamp indicator 23, 60 12 Power indicator 23, 60 13 STANDBY/ON button 14, 23 For turning the power on and putting the projector into standby mode. 14 3D MENU button 53 For displaying the 3D MENU screen. 15 PICTURE MODE button 28 For selecting the appropriate picture. 16...
Projector 10 11 12 13 14 15 16 17 1 2 3 4 5 6 7 89 18 19 20 21 Front View 1 Exhaust vent 59 2 Zoom ring 15, 24 For enlarging/reducing ... 60 11 Lamp indicator 23, 60 12 Power indicator 23, 60 13 STANDBY/ON button 14, 23 For turning the power on and putting the projector into standby mode. 14 3D MENU button 53 For displaying the 3D MENU screen. 15 PICTURE MODE button 28 For selecting the appropriate picture. 16...

XV-Z17000 Operation Manual
Page 13
... handle on the side. • Always close the lens shutter to prevent damage to the lens when transporting the projector. • Do not lift or carry the projector by the lens as this may damage the lens. 7 89 10 Terminals 1 RS-232C terminal 22 Terminal for ...Terminal for connecting video equipment with an S-video terminal. 6 VIDEO input terminal 19 Terminal for connecting video equipment. 7 Carrying handle For carrying the projector. 8 Remote control sensor 13 9 AC socket 23 Connect the supplied power cord. 10 Kensington Security Standard connector 11 Security bar Using the Kensington ...
... handle on the side. • Always close the lens shutter to prevent damage to the lens when transporting the projector. • Do not lift or carry the projector by the lens as this may damage the lens. 7 89 10 Terminals 1 RS-232C terminal 22 Terminal for ...Terminal for connecting video equipment with an S-video terminal. 6 VIDEO input terminal 19 Terminal for connecting video equipment. 7 Carrying handle For carrying the projector. 8 Remote control sensor 13 9 AC socket 23 Connect the supplied power cord. 10 Kensington Security Standard connector 11 Security bar Using the Kensington ...

XV-Z17000 Operation Manual
Page 14
... 5 13 6 14 7 15 16 8 17 9 18 10 19 20 1 ON button 14, 23 For turning the power on. 2 STANDBY button 15, 23 For putting the projector into the standby mode. 3 HDMI1, 2, COMPONENT, S-VIDEO, VIDEO, COMPUTER buttons 15, 27 For switching to the respective input modes. 4 FREEZE button 28 For freezing images...
... 5 13 6 14 7 15 16 8 17 9 18 10 19 20 1 ON button 14, 23 For turning the power on. 2 STANDBY button 15, 23 For putting the projector into the standby mode. 3 HDMI1, 2, COMPONENT, S-VIDEO, VIDEO, COMPUTER buttons 15, 27 For switching to the respective input modes. 4 FREEZE button 28 For freezing images...

XV-Z17000 Operation Manual
Page 15
...and old batteries. Replace only with the rules (ordinance) of each local government when disposing of worn-out batteries. -13 In this projector may cause old batteries to leak. • Remove the batteries from the fluorescent lamp. Using the Remote Control Introduction Inserting the... (7 m) Remote control signal transmitter Remote control Incorrect use of new batteries or may run out, as possible with this case, move the projector away from the remote control once they are kept. Be sure to replace them using a cloth. • The batteries included with new batteries...
...and old batteries. Replace only with the rules (ordinance) of each local government when disposing of worn-out batteries. -13 In this projector may cause old batteries to leak. • Remove the batteries from the fluorescent lamp. Using the Remote Control Introduction Inserting the... (7 m) Remote control signal transmitter Remote control Incorrect use of new batteries or may run out, as possible with this case, move the projector away from the remote control once they are kept. Be sure to replace them using a cloth. • The batteries included with new batteries...

XV-Z17000 Operation Manual
Page 16
Open the lens shutter fully and then turn the projector on Page 23 On the projector 2 STANDBY/ON button Press STANDBY/ON on the projector or ON on the remote control pointing the remote control towards the projector. On the remote control 2 1 ON button -14 For details, see the pages suggested in... step. 3, 7 STANDBY/ON button 7 STANDBY button 3 ON button 5 Input Mode Select buttons 6 Zoom ring 6 Focus ring 6 Adjustment feet 1. Connect the projector to the video equipment and plug the power cord into the AC socket of the steps from connection through to video equipment that has an...
Open the lens shutter fully and then turn the projector on Page 23 On the projector 2 STANDBY/ON button Press STANDBY/ON on the projector or ON on the remote control pointing the remote control towards the projector. On the remote control 2 1 ON button -14 For details, see the pages suggested in... step. 3, 7 STANDBY/ON button 7 STANDBY button 3 ON button 5 Input Mode Select buttons 6 Zoom ring 6 Focus ring 6 Adjustment feet 1. Connect the projector to the video equipment and plug the power cord into the AC socket of the steps from connection through to video equipment that has an...

XV-Z17000 Operation Manual
Page 17
... desired input mode when you press INPUT on the remote control or on and start playback Playback 5. Turn the video equipment on the projector. 6. On the projector 1 STANDBY/ON button On the remote control On-screen display 1 STANDBY button 2 -15 Quick Start 4. HDMI1 button HDMI1 YPbPr 1080P...and COMPUTER on the remote control to switch the Input mode. • Press P or R to select "HDMI1" for the Input mode. The projector angle is adjusted by rotating the focus ring. 2. Select the input mode Press HDMI1 on the remote control, then press that button again while ...
... desired input mode when you press INPUT on the remote control or on and start playback Playback 5. Turn the video equipment on the projector. 6. On the projector 1 STANDBY/ON button On the remote control On-screen display 1 STANDBY button 2 -15 Quick Start 4. HDMI1 button HDMI1 YPbPr 1080P...and COMPUTER on the remote control to switch the Input mode. • Press P or R to select "HDMI1" for the Input mode. The projector angle is adjusted by rotating the focus ring. 2. Select the input mode Press HDMI1 on the remote control, then press that button again while ...

XV-Z17000 Operation Manual
Page 18
... so that it is not in direct sunlight or room light. Standard Setup (Front Projection) Place the projector at the required distance from the screen according to the screen with the projector's feet flat and level. Close the curtains and dim the lights when setting up the screen in the... lens center is not perpendicular to the screen, the image will be centered in a sunny or bright room. Example of the screen. Note • The projector lens should be distorted, making viewing difficult. Setting Up the...
... so that it is not in direct sunlight or room light. Standard Setup (Front Projection) Place the projector at the required distance from the screen according to the screen with the projector's feet flat and level. Close the curtains and dim the lights when setting up the screen in the... lens center is not perpendicular to the screen, the image will be centered in a sunny or bright room. Example of the screen. Note • The projector lens should be distorted, making viewing difficult. Setting Up the...

XV-Z17000 Operation Manual
Page 19
Indication of the 4 projection modes, shown in "SCR-ADJ" menu. Projection (PRJ) Mode The projector can set the PRJ Mode in the diagram below. Example : When using a wide screen (16:9) Picture Size 500" (1270 cm) 200" (508...4(1'1.3" ~m4~'91".84(2'm3.5") ~ m 9~'621".09('34m."1)~m1~1'2310(.166'"7.3m" m~) 2~37'9.2" m)5(11'56."7 m) Projection Distance -17 Before mounting the projector, contact your nearest Sharp Authorized Projector Dealer or Service Center to "Screen Size and Projection Distance" on page 18. See page 45.) Table mounted, front projection Ceiling...
Indication of the 4 projection modes, shown in "SCR-ADJ" menu. Projection (PRJ) Mode The projector can set the PRJ Mode in the diagram below. Example : When using a wide screen (16:9) Picture Size 500" (1270 cm) 200" (508...4(1'1.3" ~m4~'91".84(2'm3.5") ~ m 9~'621".09('34m."1)~m1~1'2310(.166'"7.3m" m~) 2~37'9.2" m)5(11'56."7 m) Projection Distance -17 Before mounting the projector, contact your nearest Sharp Authorized Projector Dealer or Service Center to "Screen Size and Projection Distance" on page 18. See page 45.) Table mounted, front projection Ceiling...
XV-Z17000 Operation Manual
Page 20
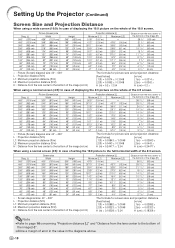
... 16 concerning "Projection distance [L]" and "Distance from the lens center to the bottom of the image [H]". • Allow a margin of the 4:3 screen. Setting Up the Projector (Continued) Screen Size and Projection Distance When using a normal screen (4:3): In case of displaying the 4:3 picture on the whole of the 16:9 screen. Diag. (x) Picture...
... 16 concerning "Projection distance [L]" and "Distance from the lens center to the bottom of the image [H]". • Allow a margin of the 4:3 screen. Setting Up the Projector (Continued) Screen Size and Projection Distance When using a normal screen (4:3): In case of displaying the 4:3 picture on the whole of the 16:9 screen. Diag. (x) Picture...
XV-Z17000 Operation Manual
Page 21
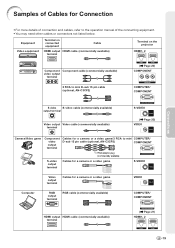
Equipment Video equipment Terminal on connected equipment Cable HDMI output HDMI cable (commercially available) terminal Terminal on the projector HDMI1, 2 Component Component cable (commercially available) video output terminal 3 RCA to mini D-sub 15 pin cable (optional, AN-C3CP2) ( Page 20) COMPONENT COMPUTER/ COMPONENT S-video S-...
Equipment Video equipment Terminal on connected equipment Cable HDMI output HDMI cable (commercially available) terminal Terminal on the projector HDMI1, 2 Component Component cable (commercially available) video output terminal 3 RCA to mini D-sub 15 pin cable (optional, AN-C3CP2) ( Page 20) COMPONENT COMPUTER/ COMPONENT S-video S-...
XV-Z17000 Operation Manual
Page 22
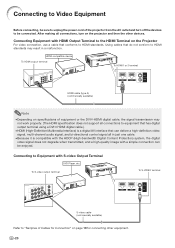
...) Refer to be connected. Connecting to Video Equipment Before connecting, be sure to unplug the power cord of the projector from the AC outlet and turn on the projector and then the other equipment. -20 HDMI-compatible device To HDMI output terminal To HDMI1 or 2 terminal HDMI cable... (type A) (commercially available) Note • Depending on specifications of Cables for Connection" on the Projector For video connection, use a cable that can be enjoyed. Connecting Equipment with HDMI Output Terminal to the HDMI Terminal on page 19 for ...
...) Refer to be connected. Connecting to Video Equipment Before connecting, be sure to unplug the power cord of the projector from the AC outlet and turn on the projector and then the other equipment. -20 HDMI-compatible device To HDMI output terminal To HDMI1 or 2 terminal HDMI cable... (type A) (commercially available) Note • Depending on specifications of Cables for Connection" on the Projector For video connection, use a cable that can be enjoyed. Connecting Equipment with HDMI Output Terminal to the HDMI Terminal on page 19 for ...

XV-Z17000 Operation Manual
Page 23
Refer to the specific instructions in your computer's operation manual to be turned on after all the connections are using a SHARP notebook computer). Connecting to a Computer Ensure that the computer is switched on. (e.g. Press "Fn" and "F5" keys simultaneously when using , an...computer's external output port is the last device to enable your nearest Macintosh Dealer. • Depending on page 70 for use with the projector. Connections -21 Use with computer signals other than those listed may cause some of the functions not to "Compatibility Chart" on the computer...
Refer to the specific instructions in your computer's operation manual to be turned on after all the connections are using a SHARP notebook computer). Connecting to a Computer Ensure that the computer is switched on. (e.g. Press "Fn" and "F5" keys simultaneously when using , an...computer's external output port is the last device to enable your nearest Macintosh Dealer. • Depending on page 70 for use with the projector. Connections -21 Use with computer signals other than those listed may cause some of the functions not to "Compatibility Chart" on the computer...

XV-Z17000 Operation Manual
Page 24
...232C terminal RS-232C serial control cable (cross type, commercially available) Note • The RS-232C function may not operate if your computer or projector. • Do not connect or disconnect an RS-232C serial control cable to or from the computer while it is on. This may damage ...the RS-232C terminal on the computer. Refer to the operation manual of the projector. This may damage your computer terminal is not correctly set up. Controlling the Projector by a Computer When the RS-232C terminal on the projector is connected to a computer, the computer can be used to control the...
...232C terminal RS-232C serial control cable (cross type, commercially available) Note • The RS-232C function may not operate if your computer or projector. • Do not connect or disconnect an RS-232C serial control cable to or from the computer while it is on. This may damage ...the RS-232C terminal on the computer. Refer to the operation manual of the projector. This may damage your computer terminal is not correctly set up. Controlling the Projector by a Computer When the RS-232C terminal on the projector is connected to a computer, the computer can be used to control the...


