
Operation Manual
Page 2
...NO USER-SERVICEABLE PARTS EXCEPT LAMP UNIT. U.S.A. See bottom of light, or view directly. DO NOT REMOVE SCREWS EXCEPT SPECIFIED USER SERVICE SCREWS. Model No.: XV-Z10000 Serial No.: There are two important reasons for prompt warranty registration of your new SHARP Projector, using the projector, ...retain this equip- Do not stare into the beam of inspection, modification, or recall that SHARP may be of sufficient magnitude to constitute a risk or electric shock to persons. ONLY XV-Z10000#Print#p01_03.p65 1 -1 02.10.25, 7:24 PM CONSUMER PRODUCT SAFETY ACT To...
...NO USER-SERVICEABLE PARTS EXCEPT LAMP UNIT. U.S.A. See bottom of light, or view directly. DO NOT REMOVE SCREWS EXCEPT SPECIFIED USER SERVICE SCREWS. Model No.: XV-Z10000 Serial No.: There are two important reasons for prompt warranty registration of your new SHARP Projector, using the projector, ...retain this equip- Do not stare into the beam of inspection, modification, or recall that SHARP may be of sufficient magnitude to constitute a risk or electric shock to persons. ONLY XV-Z10000#Print#p01_03.p65 1 -1 02.10.25, 7:24 PM CONSUMER PRODUCT SAFETY ACT To...

Operation Manual
Page 3
...; Connect the equipment into an outlet on page 76. PRODUCT DISPOSAL This projector utilizes tin-lead solder, high intensity discharge lamp (HID lamp) containing a small amount of these materials may cause harmful interference to Texas Instruments. Disposal of mercury. If this product... accept any interference received, including interference that interference will not occur in a residential installation. ONLY Declaration of Conformity SHARP PROJECTOR, MODEL XV-Z10000 This device complies with Part 15 of the FCC Rules. DURING NORMAL OPERATION, NEVER TURN THE PROJECTOR OFF BY ...
...; Connect the equipment into an outlet on page 76. PRODUCT DISPOSAL This projector utilizes tin-lead solder, high intensity discharge lamp (HID lamp) containing a small amount of these materials may cause harmful interference to Texas Instruments. Disposal of mercury. If this product... accept any interference received, including interference that interference will not occur in a residential installation. ONLY Declaration of Conformity SHARP PROJECTOR, MODEL XV-Z10000 This device complies with Part 15 of the FCC Rules. DURING NORMAL OPERATION, NEVER TURN THE PROJECTOR OFF BY ...
Operation Manual
Page 4
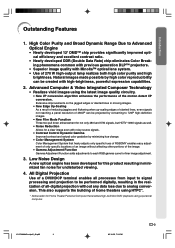
...hue change. • Color Management System Color Management System that enables high-definition DVD playback using a personal computer. Introduction Outstanding Features 1. XV-Z10000#Print#p01_03.p65 3 -3 02.10.25, 7:24 PM Extensive improvements on the jagged edges or slanted lines in moving images. •... jaggies and flickering when up-scaling edges of slanted lines, even signals not reaching a panel resolution of 270 W high-output lamp realizes both high color purity and high brightness. All Digital Projection Use of a DVI/HDCP terminal enables all processes from input ...
...hue change. • Color Management System Color Management System that enables high-definition DVD playback using a personal computer. Introduction Outstanding Features 1. XV-Z10000#Print#p01_03.p65 3 -3 02.10.25, 7:24 PM Extensive improvements on the jagged edges or slanted lines in moving images. •... jaggies and flickering when up-scaling edges of slanted lines, even signals not reaching a panel resolution of 270 W high-output lamp realizes both high color purity and high brightness. All Digital Projection Use of a DVI/HDCP terminal enables all processes from input ...
Operation Manual
Page 6
...Holes 73 Cleaning the Ventilative Holes 73 Maintenance Indicators 74 Regarding the Lamp 76 Lamp 76 Caution Concerning the Lamp 76 Replacing the Lamp 76 Removing and Installing the Lamp Unit 77 Resetting the Lamp Timer 78 Connecting Pin Assignments 79 (RS-232C) Specifications and Command... wired remote control input 83 Function and transmisson codes 83 Sharp remote control signal format 83 Computer Compatibility Chart 84 Troubleshooting 85 For SHARP Assistance (U.S.A only 86 Specifications 87 Dimensions 88 Glossary 89 Index 90 XV-Z10000#Print#p04_05.p65 5 -5 02.10.25, 8:30...
...Holes 73 Cleaning the Ventilative Holes 73 Maintenance Indicators 74 Regarding the Lamp 76 Lamp 76 Caution Concerning the Lamp 76 Replacing the Lamp 76 Removing and Installing the Lamp Unit 77 Resetting the Lamp Timer 78 Connecting Pin Assignments 79 (RS-232C) Specifications and Command... wired remote control input 83 Function and transmisson codes 83 Sharp remote control signal format 83 Computer Compatibility Chart 84 Troubleshooting 85 For SHARP Assistance (U.S.A only 86 Specifications 87 Dimensions 88 Glossary 89 Index 90 XV-Z10000#Print#p04_05.p65 5 -5 02.10.25, 8:30...
Operation Manual
Page 9
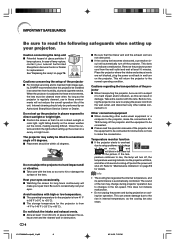
... PRECAUCIÓN PRÉCAUTION BQC-XVZ100001 Cautions concerning the setup of the projector I Allow at least 10 minutes. ity, SHARP recommends that this can create damage due to the rise in internal temperature, as this projector be tilted to a maximum angle ...lamp ruptures. Take extra caution with high or low temperature. Temperature monitor function I Potential hazard of the projector I The operating temperature for long hours continuously will turn off . If the tem- perature continues to hard impact and/or vibration, as the cooling fan also stops. -8 XV-Z10000...
... PRECAUCIÓN PRÉCAUTION BQC-XVZ100001 Cautions concerning the setup of the projector I Allow at least 10 minutes. ity, SHARP recommends that this can create damage due to the rise in internal temperature, as this projector be tilted to a maximum angle ...lamp ruptures. Take extra caution with high or low temperature. Temperature monitor function I Potential hazard of the projector I The operating temperature for long hours continuously will turn off . If the tem- perature continues to hard impact and/or vibration, as the cooling fan also stops. -8 XV-Z10000...

Operation Manual
Page 11
...on, this indicator will illuminate red. 32 Lamp replacement indicator Illuminates blue, indicating normal function. Then release the buttons to lock it in place. • Press on the two buttons of the lens cap and remove it from the lens. -10 XV-Z10000#Print#p06_14.p65 10 32 Power (ON/...screens. 58 RESIZE button For switching the screen size (NORMAL, STRETCH, etc.) 32 INPUT button For switching input mode 1, 2, 3, 4 or 5. Replace the lamp when the indicator illuminates red. 32 Power indicator Illuminates red, when the projector is explained. Lens shift dial 27 Zoom knob 26 Focus ring 26...
...on, this indicator will illuminate red. 32 Lamp replacement indicator Illuminates blue, indicating normal function. Then release the buttons to lock it in place. • Press on the two buttons of the lens cap and remove it from the lens. -10 XV-Z10000#Print#p06_14.p65 10 32 Power (ON/...screens. 58 RESIZE button For switching the screen size (NORMAL, STRETCH, etc.) 32 INPUT button For switching input mode 1, 2, 3, 4 or 5. Replace the lamp when the indicator illuminates red. 32 Power indicator Illuminates red, when the projector is explained. Lens shift dial 27 Zoom knob 26 Focus ring 26...
Operation Manual
Page 14
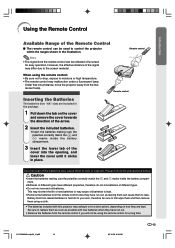
... to the screen material. Be sure to replace them as soon as leaving them can cause them using the remote control for easy operation. XV-Z10000#Print#p06_14.p65 13 02.10.25, 8:40 PM -13 Using the Remote Control Introduction Available Range of the Remote Control I The remote...making sure the polarities correctly match the and marks inside the battery compartment. 3 Insert the lower tab of the signal may malfunction under a fluorescent lamp. This may shorten the life of different types. • Do not mix new and old batteries. Under that circumstance, move the projector away ...
... to the screen material. Be sure to replace them as soon as leaving them can cause them using the remote control for easy operation. XV-Z10000#Print#p06_14.p65 13 02.10.25, 8:40 PM -13 Using the Remote Control Introduction Available Range of the Remote Control I The remote...making sure the polarities correctly match the and marks inside the battery compartment. 3 Insert the lower tab of the signal may malfunction under a fluorescent lamp. This may shorten the life of different types. • Do not mix new and old batteries. Under that circumstance, move the projector away ...

Operation Manual
Page 33
... transmit the commands. Blue: The lamp is warming up. Power (OFF) button ENTER button Power indicator MENU button INPUT button Power (OFF) button Power (ON) button Power (ON) button MENU button ', ", \, | buttons INPUT buttons -32 XV-Z10000#Print#p31_39.p65 32 02.10....25, 7:29 PM Blue blinking: The lamp is ready. Lamp replacement indicator ", ',\, | buttons ENTER button Note • The lamp replacement indicator illuminates, indicating the status of the lamp. Info • The language preset at ...
... transmit the commands. Blue: The lamp is warming up. Power (OFF) button ENTER button Power indicator MENU button INPUT button Power (OFF) button Power (ON) button Power (ON) button MENU button ', ", \, | buttons INPUT buttons -32 XV-Z10000#Print#p31_39.p65 32 02.10....25, 7:29 PM Blue blinking: The lamp is ready. Lamp replacement indicator ", ',\, | buttons ENTER button Note • The lamp replacement indicator illuminates, indicating the status of the lamp. Info • The language preset at ...

Operation Manual
Page 39
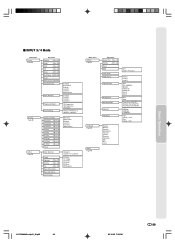
...Mode Main menu Picture Page 44 Sub menu Contrast -30 +30 Bright -30 +30 Color -30 +30 Tint -30 +30 Sharp -30 +30 CLR Temp 5500 11500 Reset White Emphasis [ON/OFF] Gamma Position Color Selected Progressive Mode Picture Setting Standard Black ...Info Auto Sync Auto Sync Disp [ON/OFF] Digital Shift -XX +XX Subtitle -XX +XX Reset DNR Lamp Timer OSD Display * Signal Type Background Economy Mode RS-232C PRJ Mode English Deutsch Español Nederlands ...8226; Picture adjustment settings differ depending on the type of input signal. -38 XV-Z10000#Print#p31_39.p65 38 02.10.25, 7:29 PM
...Mode Main menu Picture Page 44 Sub menu Contrast -30 +30 Bright -30 +30 Color -30 +30 Tint -30 +30 Sharp -30 +30 CLR Temp 5500 11500 Reset White Emphasis [ON/OFF] Gamma Position Color Selected Progressive Mode Picture Setting Standard Black ...Info Auto Sync Auto Sync Disp [ON/OFF] Digital Shift -XX +XX Subtitle -XX +XX Reset DNR Lamp Timer OSD Display * Signal Type Background Economy Mode RS-232C PRJ Mode English Deutsch Español Nederlands ...8226; Picture adjustment settings differ depending on the type of input signal. -38 XV-Z10000#Print#p31_39.p65 38 02.10.25, 7:29 PM
Operation Manual
Page 40
... Contrast -30 +30 Bright -30 +30 Color -30 +30 Tint -30 +30 Sharp -30 +30 CLR Temp 5500 11500 Reset White Emphasis [ON/OFF] Gamma Position Color ... Main menu Options Page 62 Language Page 34 Sub menu Digital Shift -30 +30 Subtitle -30 +30 Reset DNR Lamp Timer OSD Display Video System Background Economy Mode RS-232C PRJ Mode English Deutsch Español Nederlands Français ...ON/OFF] 9600 bps 38400 bps 115200 bps Front Ceiling + Front Rear Ceiling + Rear Status Page 70 XV-Z10000#Print#p31_39.p65 39 02.10.25, 7:29 PM -39 Basic Operation I INPUT 3 / 4 Mode Main menu Picture ...
... Contrast -30 +30 Bright -30 +30 Color -30 +30 Tint -30 +30 Sharp -30 +30 CLR Temp 5500 11500 Reset White Emphasis [ON/OFF] Gamma Position Color ... Main menu Options Page 62 Language Page 34 Sub menu Digital Shift -30 +30 Subtitle -30 +30 Reset DNR Lamp Timer OSD Display Video System Background Economy Mode RS-232C PRJ Mode English Deutsch Español Nederlands Français ...ON/OFF] 9600 bps 38400 bps 115200 bps Front Ceiling + Front Rear Ceiling + Rear Status Page 70 XV-Z10000#Print#p31_39.p65 39 02.10.25, 7:29 PM -39 Basic Operation I INPUT 3 / 4 Mode Main menu Picture ...

Operation Manual
Page 64
... not displayed. All On-screen Displays are projected. Setting On-screen Display This function allows you to turn on or off /Temp./Change The Lamp., etc.)) -63 XV-Z10000#Print#p62_65.p65 63 02.10.25, 7:32 PM INPUT 1) will not appear, even if the INPUT button is available with minimal dot crawl...
... not displayed. All On-screen Displays are projected. Setting On-screen Display This function allows you to turn on or off /Temp./Change The Lamp., etc.)) -63 XV-Z10000#Print#p62_65.p65 63 02.10.25, 7:32 PM INPUT 1) will not appear, even if the INPUT button is available with minimal dot crawl...
Operation Manual
Page 75
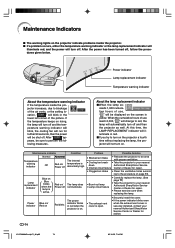
... illuminate red, and the power will be sure to your nearest Authorized SharpVision Service Center or Dealer for advice. -74 XV-Z10000#Print#p71_84.p65 74 02.10.25, 7:34 PM I When the lamp ex- Power indicator Lamp replacement indicator Temperature warning indicator About the temperature warning indicator If the temperature inside the projector.
... illuminate red, and the power will be sure to your nearest Authorized SharpVision Service Center or Dealer for advice. -74 XV-Z10000#Print#p71_84.p65 74 02.10.25, 7:34 PM I When the lamp ex- Power indicator Lamp replacement indicator Temperature warning indicator About the temperature warning indicator If the temperature inside the projector.
Operation Manual
Page 76
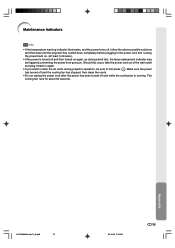
...until the projector has cooled down completely before plugging in again. • If you want to clean the air vents during a brief test, the lamp replacement indicator may be sure to first press . The cooling fan runs for about 90 seconds. Maintenance Indicators Info • If the temperature warning... again, as during projector operation, be triggered, preventing the power from going on . (At least 5 minutes.) • If the power is running. Appendix XV-Z10000#Print#p71_84.p65 75 02.10.25, 7:34 PM -75 Should this occur, take the power cord out of the wall outlet and plug it...
...until the projector has cooled down completely before plugging in again. • If you want to clean the air vents during a brief test, the lamp replacement indicator may be sure to first press . The cooling fan runs for about 90 seconds. Maintenance Indicators Info • If the temperature warning... again, as during projector operation, be triggered, preventing the power from going on . (At least 5 minutes.) • If the power is running. Appendix XV-Z10000#Print#p71_84.p65 75 02.10.25, 7:34 PM -75 Should this occur, take the power cord out of the wall outlet and plug it...
Operation Manual
Page 77
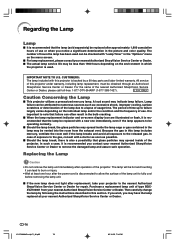
...8226; Wait at your nearest Authorized SharpVision Service Center or Dealer. -76 XV-Z10000#Print#p71_84.p65 76 02.10.25, 7:34 PM If you wish, you notice a significant deterioration in the lamp may be less than 1900 hours depending on -screen display icon are illuminated...time. Then carefully change the lamp by a 90-day parts and labor limited warranty. Purchase a replacement lamp unit of the nearest Authorized SharpVision Service Center or Dealer, please call toll-free: 1-877-DTV-SHARP (1-877-388-7427). ONLY Caution Concerning the Lamp I This projector utilizes a ...
...8226; Wait at your nearest Authorized SharpVision Service Center or Dealer. -76 XV-Z10000#Print#p71_84.p65 76 02.10.25, 7:34 PM If you wish, you notice a significant deterioration in the lamp may be less than 1900 hours depending on -screen display icon are illuminated...time. Then carefully change the lamp by a 90-day parts and labor limited warranty. Purchase a replacement lamp unit of the nearest Authorized SharpVision Service Center or Dealer, please call toll-free: 1-877-DTV-SHARP (1-877-388-7427). ONLY Caution Concerning the Lamp I This projector utilizes a ...

Operation Manual
Page 78
... cover. • Loosen the user service screw that secures the lamp unit cover. XV-Z10000#Print#p71_84.p65 77 User service screws -77 02.10.25, 7:34 PM Be sure not to the lamp, be very hot and may cause burn or injury. 2 Disconnect the power cord. • Unplug the power cord from ...off the power. • Wait until it has fully cooled down (about 1 hour). The lamp will be sure to carefully follow the steps below. • Do not loosen other screws except for the lamp unit cover and lamp unit. (Only the silver screws are loosened). • Please refer to the installation manual included...
... cover. • Loosen the user service screw that secures the lamp unit cover. XV-Z10000#Print#p71_84.p65 77 User service screws -77 02.10.25, 7:34 PM Be sure not to the lamp, be very hot and may cause burn or injury. 2 Disconnect the power cord. • Unplug the power cord from ...off the power. • Wait until it has fully cooled down (about 1 hour). The lamp will be sure to carefully follow the steps below. • Do not loosen other screws except for the lamp unit cover and lamp unit. (Only the silver screws are loosened). • Please refer to the installation manual included...
Operation Manual
Page 79
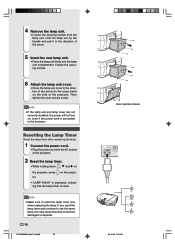
... firmly into the AC socket of the projector. 2 Reset the lamp timer. • While holding down , " and | on the side of the arrow (to the projector. Info • Make sure to become damaged or explode. -78 XV-Z10000#Print#p71_84.p65 78 2 1 User service screws 02.10.25, 7:34 PM Then ...tighten the user service screw. 4 Remove the lamp unit. • Loosen the securing screws from the lamp unit. on , even if the power cord is reset. If you...
... firmly into the AC socket of the projector. 2 Reset the lamp timer. • While holding down , " and | on the side of the arrow (to the projector. Info • Make sure to become damaged or explode. -78 XV-Z10000#Print#p71_84.p65 78 2 1 User service screws 02.10.25, 7:34 PM Then ...tighten the user service screw. 4 Remove the lamp unit. • Loosen the securing screws from the lamp unit. on , even if the power cord is reset. If you...
Operation Manual
Page 83
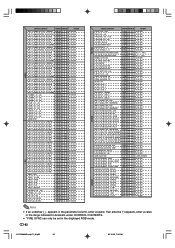
Note • If an underbar (_) appears in the displayed RGB mode. -82 XV-Z10000#Print#p71_84.p65 82 02.10.25, 7:35 PM If an asterisk (*) appears, enter a value in the range indicated in brackets under... M B G _ _ _ 1 OK OR ERR BACKGROUND SELECTION : NONE I M B G _ _ _ 2 OK OR ERR AUTO POWER OFF : NO USE A P O W _ _ _ 0 OK OR ERR AUTO POWER OFF : USE A P O W _ _ _ 1 OK OR ERR LAMP USAGE TIME T L T T _ _ _ 1 0-9999 (INTEGER) PROJECTION MODE : FRONT I M P J _ _ _ 0 OK OR ERR PROJECTION MODE : CEILING + FRONT I M P J _ _ _ 1 OK OR ERR PROJECTION MODE : REAR I M P J _ _ _ 2 OK ...
Note • If an underbar (_) appears in the displayed RGB mode. -82 XV-Z10000#Print#p71_84.p65 82 02.10.25, 7:35 PM If an asterisk (*) appears, enter a value in the range indicated in brackets under... M B G _ _ _ 1 OK OR ERR BACKGROUND SELECTION : NONE I M B G _ _ _ 2 OK OR ERR AUTO POWER OFF : NO USE A P O W _ _ _ 0 OK OR ERR AUTO POWER OFF : USE A P O W _ _ _ 1 OK OR ERR LAMP USAGE TIME T L T T _ _ _ 1 0-9999 (INTEGER) PROJECTION MODE : FRONT I M P J _ _ _ 0 OK OR ERR PROJECTION MODE : CEILING + FRONT I M P J _ _ _ 1 OK OR ERR PROJECTION MODE : REAR I M P J _ _ _ 2 OK ...

Operation Manual
Page 86
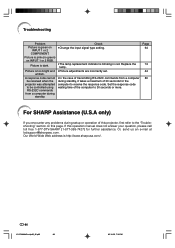
... control batteries have run out. • External output has not been set when connecting notebook computer. • The cover of the lamp unit is not installed correctly. • The selected "Signal Type" is wrong. operation or performance. Color is blurred; occasionally heard caused... "Fine Sync" Adjustments ("Clock" Adjustment) • Perform "Fine Sync" Adjustments ("Phase" Adjustment) • Noise will not affect from the cabinet. XV-Z10000#Print#p85_92.p65 85 02.10.25, 7:35 PM -85 noise appears. • Picture adjustments are incorrectly set. (Video Input only) • ...
... control batteries have run out. • External output has not been set when connecting notebook computer. • The cover of the lamp unit is not installed correctly. • The selected "Signal Type" is wrong. operation or performance. Color is blurred; occasionally heard caused... "Fine Sync" Adjustments ("Clock" Adjustment) • Perform "Fine Sync" Adjustments ("Phase" Adjustment) • Noise will not affect from the cabinet. XV-Z10000#Print#p85_92.p65 85 02.10.25, 7:35 PM -85 noise appears. • Picture adjustments are incorrectly set. (Video Input only) • ...
Operation Manual
Page 87
Troubleshooting Problem Picture is green on INPUT 1 or 2 RGB. Picture is http://www.sharpusa.com/ . -86 XV-Z10000#Print#p85_92.p65 86 02.10.25, 7:35 PM Our World Wide Web address is too bright and whitish. Picture is pink (no green) on ...-7427) for the computer to 30 seconds or more. Page 64 74 44 80 For SHARP Assistance (U.S.A only) If you encounter any problems during setup or operation of the computer to receive the response code. Replace the lamp. • Picture adjustments are incorrectly set. • In the case of transmitting RS-232C...
Troubleshooting Problem Picture is green on INPUT 1 or 2 RGB. Picture is http://www.sharpusa.com/ . -86 XV-Z10000#Print#p85_92.p65 86 02.10.25, 7:35 PM Our World Wide Web address is too bright and whitish. Picture is pink (no green) on ...-7427) for the computer to 30 seconds or more. Page 64 74 44 80 For SHARP Assistance (U.S.A only) If you encounter any problems during setup or operation of the computer to receive the response code. Replace the lamp. • Picture adjustments are incorrectly set. • In the case of transmitting RS-232C...
Operation Manual
Page 88
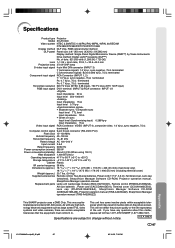
...any questions about this matter, please call toll free 1-877-DTV-SHARP (1-877-388-7427). Specifications are certain acceptable tolerances that the equipment must conform to. U.S.A ONLY -87 Appendix XV-Z10000#Print#p85_92.p65 87 02.10.25, 7:35 PM This ...", 3.6 m), Terminal cover, Lens cap (attached), SharpVision Manager Software CD-ROM, Projector operation manual, SharpVision Manager operation manual Replacement parts Lamp unit (Lamp/cage module) (BQC-XVZ100001), Remote control (RRMCGA128WJSA), AA size batteries , Power cord (CACCDA010DE01), Terminal cover (CCOVA1985CE02), Lens cap (...
...any questions about this matter, please call toll free 1-877-DTV-SHARP (1-877-388-7427). Specifications are certain acceptable tolerances that the equipment must conform to. U.S.A ONLY -87 Appendix XV-Z10000#Print#p85_92.p65 87 02.10.25, 7:35 PM This ...", 3.6 m), Terminal cover, Lens cap (attached), SharpVision Manager Software CD-ROM, Projector operation manual, SharpVision Manager operation manual Replacement parts Lamp unit (Lamp/cage module) (BQC-XVZ100001), Remote control (RRMCGA128WJSA), AA size batteries , Power cord (CACCDA010DE01), Terminal cover (CCOVA1985CE02), Lens cap (...


