
Operation Manual
Page 6
... materials may cause harmful interference to radio communications. This SHARP projector uses a DLP® chip. This very sophisticated panel contains 786,432 (XR40X/XR-30X) / 480,000 (XR-30S) pixels ...SHARP (1-800-237-4277) U.S.A. INFORMATION This equipment has been tested and found to comply with Part 15 of the FCC rules. These limits are located in accordance with any interference received, including interference that interference will not affect the picture quality or the life expectancy of mercury. U.S.A. Caution Concerning Lamp Replacement See "Replacing the Lamp...
... materials may cause harmful interference to radio communications. This SHARP projector uses a DLP® chip. This very sophisticated panel contains 786,432 (XR40X/XR-30X) / 480,000 (XR-30S) pixels ...SHARP (1-800-237-4277) U.S.A. INFORMATION This equipment has been tested and found to comply with Part 15 of the FCC rules. These limits are located in accordance with any interference received, including interference that interference will not affect the picture quality or the life expectancy of mercury. U.S.A. Caution Concerning Lamp Replacement See "Replacing the Lamp...
Operation Manual
Page 9
Introduction Reference Appendix Maintenance 47 Maintenance Indicators 48 Regarding the Lamp 50 Lamp 50 Caution Concerning the Lamp 50 Replacing the Lamp 50 Removing and Installing the Lamp Unit 51 Resetting the Lamp Timer 52 Connecting Pin Assignments 53 RS-232C Specifications and Command Settings 55 Computer Compatibility Chart 60 Troubleshooting 61 For SHARP Assistance 63 Specifications 64 Dimensions 65 Index 66 5
Introduction Reference Appendix Maintenance 47 Maintenance Indicators 48 Regarding the Lamp 50 Lamp 50 Caution Concerning the Lamp 50 Replacing the Lamp 50 Removing and Installing the Lamp Unit 51 Resetting the Lamp Timer 52 Connecting Pin Assignments 53 RS-232C Specifications and Command Settings 55 Computer Compatibility Chart 60 Troubleshooting 61 For SHARP Assistance 63 Specifications 64 Dimensions 65 Index 66 5

Operation Manual
Page 12
... 13/16 inches (30 cm) of the unit. Take regular breaks to avoid personal injury caused by a Sharp Authorized Projector Dealer or Service Center. Place the projector where the intake and exhaust vents are not obstructed. ■ If the cooling fan becomes obstructed, a protection...Continuously watching the screen for long hours will disappear after the projector is first turned on a level site within the adjustment range (approx. 9 degrees) of the projector ■ For minimal servicing and to "High". See "Replacing the Lamp" on the screen washes out the colors, making viewing ...
... 13/16 inches (30 cm) of the unit. Take regular breaks to avoid personal injury caused by a Sharp Authorized Projector Dealer or Service Center. Place the projector where the intake and exhaust vents are not obstructed. ■ If the cooling fan becomes obstructed, a protection...Continuously watching the screen for long hours will disappear after the projector is first turned on a level site within the adjustment range (approx. 9 degrees) of the projector ■ For minimal servicing and to "High". See "Replacing the Lamp" on the screen washes out the colors, making viewing ...

Operation Manual
Page 14
...mini D-sub 15 pin cable (10n (3.0 m)) ■ DIN-D-sub RS-232C adaptor (5 57/64" (15cm)) ■ Remote receiver ■ Lamp unit ■ Ceiling-mount bracket ■ Extension tube AN-C3CP2 AN-A1RS AN-MR2 AN-XR30LP AN-XRCM30 (for U.S.A.) AN-60KT AN-TK201 ...8226; Operation manual (this manual and CD-ROM ) Note • Codes in your nearest Sharp Authorized Projector Dealer or Service Center. 10 Optional accessories ■ 3 RCA to the wall outlet in "< >" are Replacement parts codes. and For Europe, Canada, etc. Accessories Supplied accessories Two R-6 batteries RGB cable ...
...mini D-sub 15 pin cable (10n (3.0 m)) ■ DIN-D-sub RS-232C adaptor (5 57/64" (15cm)) ■ Remote receiver ■ Lamp unit ■ Ceiling-mount bracket ■ Extension tube AN-C3CP2 AN-A1RS AN-MR2 AN-XR30LP AN-XRCM30 (for U.S.A.) AN-60KT AN-TK201 ...8226; Operation manual (this manual and CD-ROM ) Note • Codes in your nearest Sharp Authorized Projector Dealer or Service Center. 10 Optional accessories ■ 3 RCA to the wall outlet in "< >" are Replacement parts codes. and For Europe, Canada, etc. Accessories Supplied accessories Two R-6 batteries RGB cable ...
Operation Manual
Page 29
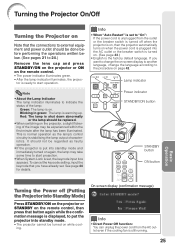
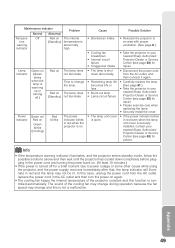
... illuminates to indicate the status of the image may take some time to start operation. Red: The lamp is shut down abnormally or the lamp should be replaced. • When switching on the projector, a slight flickering of the lamp. It should be done before performing the operations written below. (See pages 21 to 24.) Remove...
... illuminates to indicate the status of the image may take some time to start operation. Red: The lamp is shut down abnormally or the lamp should be replaced. • When switching on the projector, a slight flickering of the lamp. It should be done before performing the operations written below. (See pages 21 to 24.) Remove...
Operation Manual
Page 52
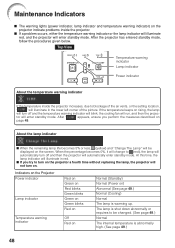
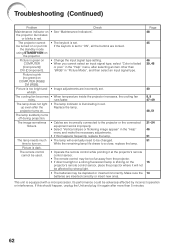
...below. If the temperature keeps on rising, the lamp will turn off and then the projector will automatically enter standby mode. After " " appears, ensure you try to turn on the projector a fourth time without replacing the lamp, the projector will not turn off and the temperature warning ...indicator will blink, the cooling fan will enter standby mode. At this time, the lamp indicator will illuminate in the lower left corner...
...below. If the temperature keeps on rising, the lamp will turn off and then the projector will automatically enter standby mode. After " " appears, ensure you try to turn on the projector a fourth time without replacing the lamp, the projector will not turn off and the temperature warning ...indicator will blink, the cooling fan will enter standby mode. At this time, the lamp indicator will illuminate in the lower left corner...
Operation Manual
Page 53
... cord from the AC outlet, and then connect it again. • Carefully replace the lamp. (See page 51.) • Take the projector to your nearest Sharp Authorized Projector Dealer or Service Center (see page 63) for repair. • Please exercise care when replacing the lamp. • Securely install the cover. • If the power indicator blinks in...
... cord from the AC outlet, and then connect it again. • Carefully replace the lamp. (See page 51.) • Take the projector to your nearest Sharp Authorized Projector Dealer or Service Center (see page 63) for repair. • Please exercise care when replacing the lamp. • Securely install the cover. • If the power indicator blinks in...

Operation Manual
Page 54
... labor limited warranty. Replacing the Lamp Caution • Do not remove the lamp unit from your nearest Sharp Authorized Projector Dealer or Service Center to allow the surface of use . Because the gas in the picture and color quality. CUSTOMERS: The lamp included with the on-screen display. (See page 44.) ■ Purchase a replacement lamp of type AN...
... labor limited warranty. Replacing the Lamp Caution • Do not remove the lamp unit from your nearest Sharp Authorized Projector Dealer or Service Center to allow the surface of use . Because the gas in the picture and color quality. CUSTOMERS: The lamp included with the on-screen display. (See page 44.) ■ Purchase a replacement lamp of type AN...
Operation Manual
Page 56
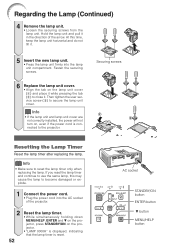
...screw (3) to reset the lamp timer only when replacing the lamp. Regarding the Lamp (Continued) 4 Remove the lamp unit. • Loosen the securing screws from the lamp unit. Info • Make sure to secure the lamp unit cover. Info • If the lamp unit and lamp unit cover are not correctly .... Hold the lamp unit and pull it in the direction of the projector. 2 52 Reset the lamp timer. • While simultaneously holding down MENU/HELP, ENTER and R on the projector, press STANDBY/ON on the projector. • "LAMP 0000H" is displayed, indicating that the lamp timer is connected...
...screw (3) to reset the lamp timer only when replacing the lamp. Regarding the Lamp (Continued) 4 Remove the lamp unit. • Loosen the securing screws from the lamp unit. Info • Make sure to secure the lamp unit cover. Info • If the lamp unit and lamp unit cover are not correctly .... Hold the lamp unit and pull it in the direction of the projector. 2 52 Reset the lamp timer. • While simultaneously holding down MENU/HELP, ENTER and R on the projector, press STANDBY/ON on the projector. • "LAMP 0000H" is displayed, indicating that the lamp timer is connected...
Operation Manual
Page 66
...; The remote control may be depleted or inserted incorrectly. If this happens frequently, replace the lamp. The projector cannot be affected by incorrect operation or interference. The lamp does not light • The lamp indicator is set . The lamp needs much • The lamp will not be turned on or put into the standby mode using STANDBY...
...; The remote control may be depleted or inserted incorrectly. If this happens frequently, replace the lamp. The projector cannot be affected by incorrect operation or interference. The lamp does not light • The lamp indicator is set . The lamp needs much • The lamp will not be turned on or put into the standby mode using STANDBY...

Operation Manual
Page 70
... 43 PRJ Mode 19, 42 Progressive 40 R-CLICK/RETURN button 34, 37 Rear adjustment foot 27 Red 40 Remote control 13 Remote control sensor 15 Replacing the lamp 50, 51 Resize 30, 41 RESIZE button 30 RGB cable 21 RS-232C terminal 24 SCR - ADJ 41 Screen Size and Projection Distance 20... Setup Guide 26, 42 Sharp 40 Speaker 43 SPOT button 32 STANDBY button 25 STANDBY Mode 43 STANDBY/ON button 25 STRETCH 30, 31 Supplied accessories 10...
... 43 PRJ Mode 19, 42 Progressive 40 R-CLICK/RETURN button 34, 37 Rear adjustment foot 27 Red 40 Remote control 13 Remote control sensor 15 Replacing the lamp 50, 51 Resize 30, 41 RESIZE button 30 RGB cable 21 RS-232C terminal 24 SCR - ADJ 41 Screen Size and Projection Distance 20... Setup Guide 26, 42 Sharp 40 Speaker 43 SPOT button 32 STANDBY button 25 STANDBY Mode 43 STANDBY/ON button 25 STRETCH 30, 31 Supplied accessories 10...


