PG-MB56X , PG-MB66X Operation Manual
Page 3
...of fire or electric shock, do not stare directly into standby mode always use the STANDBY/ON button on the projector or the STANDBY button on the remote control. CAUTION RISK OF ELECTRIC SHOCK. DO NOT REMOVE SCREWS EXCEPT SPECIFIED USER SERVICE SCREW. CAUTION: TO REDUCE... point within the product's enclosure that any safety notification of the parts, service and labor warranty applicable to your new SHARP Projector, using the projector, please read this product to give under the 1972 Consumer Product Safety Act, PLEASE READ CAREFULLY THE IMPORTANT "LIMITED WARRANTY" CLAUSE....
...of fire or electric shock, do not stare directly into standby mode always use the STANDBY/ON button on the projector or the STANDBY button on the remote control. CAUTION RISK OF ELECTRIC SHOCK. DO NOT REMOVE SCREWS EXCEPT SPECIFIED USER SERVICE SCREW. CAUTION: TO REDUCE... point within the product's enclosure that any safety notification of the parts, service and labor warranty applicable to your new SHARP Projector, using the projector, please read this product to give under the 1972 Consumer Product Safety Act, PLEASE READ CAREFULLY THE IMPORTANT "LIMITED WARRANTY" CLAUSE....
PG-MB56X , PG-MB66X Operation Manual
Page 6
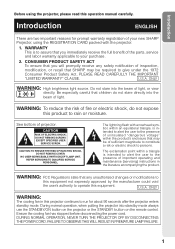
...Image ........ 42 Selecting the Setup Guide 42 Reversing/Inverting Projected Images 42 Selecting the On-screen Display Language 42 Adjusting the Projector Function ("PRJ - Contents Preparing Introduction How to Read this Operation Manual .... 3 Contents 4 IMPORTANT SAFEGUARDS 6 Accessories 10 ... with RGB Input Terminal 25 Controlling the Projector by a Computer 26 Connecting the Power Cord 26 Using Basic Operation Turning the Projector On/Off 27 Turning the Projector on the Projector (Keylock Function 45 Troubleshooting with the Remote Control .... 34 Displaying and Setting the ...
...Image ........ 42 Selecting the Setup Guide 42 Reversing/Inverting Projected Images 42 Selecting the On-screen Display Language 42 Adjusting the Projector Function ("PRJ - Contents Preparing Introduction How to Read this Operation Manual .... 3 Contents 4 IMPORTANT SAFEGUARDS 6 Accessories 10 ... with RGB Input Terminal 25 Controlling the Projector by a Computer 26 Connecting the Power Cord 26 Using Basic Operation Turning the Projector On/Off 27 Turning the Projector on the Projector (Keylock Function 45 Troubleshooting with the Remote Control .... 34 Displaying and Setting the ...
PG-MB56X , PG-MB66X Operation Manual
Page 12
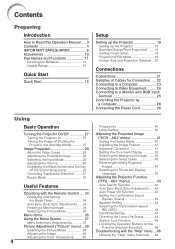
Accessories Supplied accessories Remote control Two R-6 batteries RGB cable RRMCGA398WJSA ("AA" size, UM/SUM-3, (10' (3.0 m)) HP-7 or similar) QCNWGA045WJPZ Lens ...-L) QCNWGA015WJPZ 3 RCA to 15-pin D-sub cable (10n (3.0 m)) I DIN-D-sub RS-232C adaptor (5 57/64o (15 cm)) I Remote receiver I Lamp unit AN-C3CP2 AN-A1RS AN-MR2 AN-XR20L2 (for PG-MB66X/PG-MB56X) AN-XR10L2 (for XG-MB50X-L/XR-11XC... Power cord (6' (1.8 m)) QACCDA007WJPZ Optional accessories I 3 RCA to 15-pin D-sub cable (10' (3.0 m)) (Only supplied with your nearest Sharp Authorized Projector Dealer or Service Center. 10
Accessories Supplied accessories Remote control Two R-6 batteries RGB cable RRMCGA398WJSA ("AA" size, UM/SUM-3, (10' (3.0 m)) HP-7 or similar) QCNWGA045WJPZ Lens ...-L) QCNWGA015WJPZ 3 RCA to 15-pin D-sub cable (10n (3.0 m)) I DIN-D-sub RS-232C adaptor (5 57/64o (15 cm)) I Remote receiver I Lamp unit AN-C3CP2 AN-A1RS AN-MR2 AN-XR20L2 (for PG-MB66X/PG-MB56X) AN-XR10L2 (for XG-MB50X-L/XR-11XC... Power cord (6' (1.8 m)) QACCDA007WJPZ Optional accessories I 3 RCA to 15-pin D-sub cable (10' (3.0 m)) (Only supplied with your nearest Sharp Authorized Projector Dealer or Service Center. 10
PG-MB56X , PG-MB66X Operation Manual
Page 13
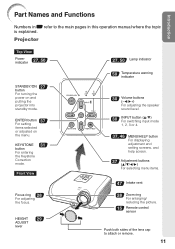
... and Functions Numbers in Z refer to attach or remove. 11 ENTER button 37 For setting items selected or adjusted on and putting the projector into standby mode. HEIGHT 29 ADJUST lever 27, 50 Lamp indicator 50 Temperature warning indicator 30 Volume buttons (-O/Q+) For adjusting the speaker sound ...and help screen. 37 Adjustment buttons (P/R/O/Q) For selecting menu items. 47 Intake vent 28 Zoom ring For enlarging/ reducing the picture. 15 Remote control sensor Push both sides of the lens cap to the main pages in this operation manual where the topic is explained. KEYSTONE 31 ...
... and Functions Numbers in Z refer to attach or remove. 11 ENTER button 37 For setting items selected or adjusted on and putting the projector into standby mode. HEIGHT 29 ADJUST lever 27, 50 Lamp indicator 50 Temperature warning indicator 30 Volume buttons (-O/Q+) For adjusting the speaker sound ...and help screen. 37 Adjustment buttons (P/R/O/Q) For selecting menu items. 47 Intake vent 28 Zoom ring For enlarging/ reducing the picture. 15 Remote control sensor Push both sides of the lens cap to the main pages in this operation manual where the topic is explained. KEYSTONE 31 ...
PG-MB56X , PG-MB66X Operation Manual
Page 15
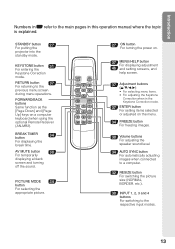
... the Keystone Correction when in the Keystone Correction mode. 37 ENTER button For setting items selected or adjusted on a computer keyboard when using the optional Remote Receiver (AN-MR2). STANDBY button 27 For putting the projector into the standby mode.
... the Keystone Correction when in the Keystone Correction mode. 37 ENTER button For setting items selected or adjusted on a computer keyboard when using the optional Remote Receiver (AN-MR2). STANDBY button 27 For putting the projector into the standby mode.
PG-MB56X , PG-MB66X Operation Manual
Page 16
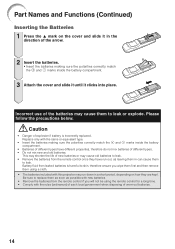
... inside the battery compartment. 3 Attach the cover and slide it until it clicks into place. Be sure to leak. Battery fluid from the remote control once they are kept. Part Names and Functions (Continued) Inserting the Batteries 1 Press the P mark on how they have different properties,... therefore do not mix batteries of different types. • Do not mix new and old batteries. Replace only with this projector may cause old batteries to leak. • Remove the batteries from leaked batteries is incorrectly replaced. Incorrect use of explosion if battery...
... inside the battery compartment. 3 Attach the cover and slide it until it clicks into place. Be sure to leak. Battery fluid from the remote control once they are kept. Part Names and Functions (Continued) Inserting the Batteries 1 Press the P mark on how they have different properties,... therefore do not mix batteries of different types. • Do not mix new and old batteries. Replace only with this projector may cause old batteries to leak. • Remove the batteries from leaked batteries is incorrectly replaced. Incorrect use of explosion if battery...
PG-MB56X , PG-MB66X Operation Manual
Page 17
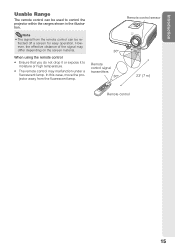
...; The signal from the fluorescent lamp. 30° Remote control signal transmitters 30° Remote control sensor 23n (7 m) Remote control 15 flected off a screen for easy operation. When using the remote control • Ensure that you do not drop it or expose it to control the projector within the ranges shown in the illustration. In...
...; The signal from the fluorescent lamp. 30° Remote control signal transmitters 30° Remote control sensor 23n (7 m) Remote control 15 flected off a screen for easy operation. When using the remote control • Ensure that you do not drop it or expose it to control the projector within the ranges shown in the illustration. In...

PG-MB56X , PG-MB66X Operation Manual
Page 18
...a computer, see the page described below for each step. Place the projector facing a wall or a screen _P. 18 2. Connect the projector to the computer and plug the power cord into the AC socket of the projector and the computer is explained using one example. 3 8 STANDBY/ON ... button 4 Focus ring 4 ENTER button 7 Adjustment buttons (P/R/O/Q) 4 HEIGHT ADJUST lever 6 INPUT 1 button 1. Quick Start This section shows the basic operation (projector connecting with the computer). Remove the lens cap and turn the projector on On the projector On the remote control _P. 27 16
...a computer, see the page described below for each step. Place the projector facing a wall or a screen _P. 18 2. Connect the projector to the computer and plug the power cord into the AC socket of the projector and the computer is explained using one example. 3 8 STANDBY/ON ... button 4 Focus ring 4 ENTER button 7 Adjustment buttons (P/R/O/Q) 4 HEIGHT ADJUST lever 6 INPUT 1 button 1. Quick Start This section shows the basic operation (projector connecting with the computer). Remove the lens cap and turn the projector on On the projector On the remote control _P. 27 16
PG-MB56X , PG-MB66X Operation Manual
Page 19
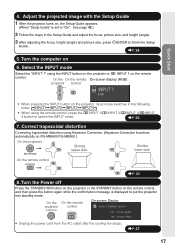
Select the INPUT mode Select the "INPUT 1" using Keystone Correction. (Keystone Correction functions automatically on the remote control. On the On the remote projector control On-screen Display • Unplug the power cord from the AC outlet after the cooling fan stops. _P. 27 17 ..., and then press the button again while the confirmation message is set to put the projector into standby mode. On the On the remote On-screen display (RGB) projector control • When pressing the INPUT button on , the Setup Guide appears. (When "Setup Guide" is displayed to "On". ...
Select the INPUT mode Select the "INPUT 1" using Keystone Correction. (Keystone Correction functions automatically on the remote control. On the On the remote projector control On-screen Display • Unplug the power cord from the AC outlet after the cooling fan stops. _P. 27 17 ..., and then press the button again while the confirmation message is set to put the projector into standby mode. On the On the remote On-screen display (RGB) projector control • When pressing the INPUT button on , the Setup Guide appears. (When "Setup Guide" is displayed to "On". ...
PG-MB56X , PG-MB66X Operation Manual
Page 29
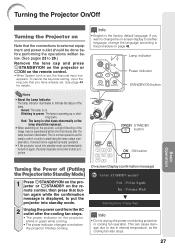
...power cord from the AC outlet after the lamp has been illuminated. Green: The lamp is put the projector into Standby Mode) 1 Press SSTANDBY/ON on the projector or eSTANDBY on the remote control, then press that button again while the confirmation message is stabilising the lamp output characteristics. This .... See page 44 for details. This can cause damage due to 26.) Remove the lens cap and press S STANDBY/ON on the projector or fON on the remote control. • When System Lock is warming up or shutting down abnormally or the lamp should be replaced. • When switching on...
...power cord from the AC outlet after the lamp has been illuminated. Green: The lamp is put the projector into Standby Mode) 1 Press SSTANDBY/ON on the projector or eSTANDBY on the remote control, then press that button again while the confirmation message is stabilising the lamp output characteristics. This .... See page 44 for details. This can cause damage due to 26.) Remove the lens cap and press S STANDBY/ON on the projector or fON on the remote control. • When System Lock is warming up or shutting down abnormally or the lamp should be replaced. • When switching on...

PG-MB56X , PG-MB66X Operation Manual
Page 32
... Search" is connected to external equipment, set to "On", INPUT (P/ R) on the projector functions as the Auto Search buttons. (See page 43.) Adjusting the Volume Press K/L on the remote control or -O/Q+ on the projector to adjust the volume. Note • Pressing K/-O will lower the volume. • Pressing...temporarily display a black screen and turn the projected image back on the remote control to external equipment, the volume level of the projector. Set the projector's volume to the lowest level when turning the projector on/ off or when changing the input signal. • When ...
... Search" is connected to external equipment, set to "On", INPUT (P/ R) on the projector functions as the Auto Search buttons. (See page 43.) Adjusting the Volume Press K/L on the remote control or -O/Q+ on the projector to adjust the volume. Note • Pressing K/-O will lower the volume. • Pressing...temporarily display a black screen and turn the projected image back on the remote control to external equipment, the volume level of the projector. Set the projector's volume to the lowest level when turning the projector on/ off or when changing the input signal. • When ...
PG-MB56X , PG-MB66X Operation Manual
Page 36
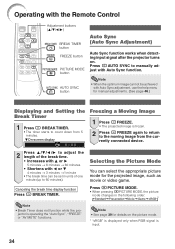
... display function Press k BREAK TIMER. Press FAUTO SYNC to 60 minutes). Selecting the Picture Mode You can be achieved with the Remote Control Adjustment buttons (P/R/O/Q) BREAK TIMER button FREEZE button PICTURE MODE button AUTO SYNC button Auto Sync (Auto Sync Adjustment) Auto Sync function... works when detecting input signal after the projector turns on the picture mode. * "sRGB" is displayed only when RGB signal is input. 34 ROn-screen display Freezing a Moving Image ...
... display function Press k BREAK TIMER. Press FAUTO SYNC to 60 minutes). Selecting the Picture Mode You can be achieved with the Remote Control Adjustment buttons (P/R/O/Q) BREAK TIMER button FREEZE button PICTURE MODE button AUTO SYNC button Auto Sync (Auto Sync Adjustment) Auto Sync function... works when detecting input signal after the projector turns on the picture mode. * "sRGB" is displayed only when RGB signal is input. 34 ROn-screen display Freezing a Moving Image ...
PG-MB56X , PG-MB66X Operation Manual
Page 37
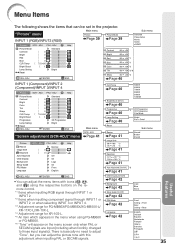
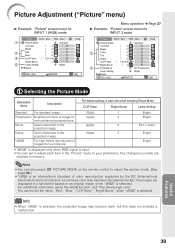
... adjustment when inputting PAL or SECAM signals. ADJ PRJ - ADJ Help Picture Mode Contrast Bright Color Tint Sharp CLR Temp Bright Boost Progressive Lamp Setting Reset SEL./ADJ. 0 0 0 0 0 7500K 1 Standard...items that can adjust the picture tone with icons ( , , and ) using the respective buttons on the remote control. *1 Items when inputting RGB signal through INPUT 1 or INPUT 2. *2 Items when inputting component signal... XR-10S-L. *5 An item which appears in the projector. Main menu "Picture" menu Picture Picture Mode INPUT 1 (RGB)/INPUT2 (RGB) Page 39 Page 39 Picture ...
... adjustment when inputting PAL or SECAM signals. ADJ PRJ - ADJ Help Picture Mode Contrast Bright Color Tint Sharp CLR Temp Bright Boost Progressive Lamp Setting Reset SEL./ADJ. 0 0 0 0 0 7500K 1 Standard...items that can adjust the picture tone with icons ( , , and ) using the respective buttons on the remote control. *1 Items when inputting RGB signal through INPUT 1 or INPUT 2. *2 Items when inputting component signal... XR-10S-L. *5 An item which appears in the projector. Main menu "Picture" menu Picture Picture Mode INPUT 1 (RGB)/INPUT2 (RGB) Page 39 Page 39 Picture ...
PG-MB56X , PG-MB66X Operation Manual
Page 41
...page 34.) • *sRGB is selected. As the fixed color area has been decided by the IEC (International Electrotechnical Commission). Game Gives sharpness to the projected image. For additional information about the sRGB function, visit "http://www.srgb.com/". Picture Adjustment ("Picture" menu) Q Example:...when "sRGB" is an international standard of color reproduction regulated by the IEC, the images are retained in a natural tint based on the remote control to your preference. Note • You can set the items, "Red", "Blue", "CLR Temp", "Bright Boost", when "sRGB"...
...page 34.) • *sRGB is selected. As the fixed color area has been decided by the IEC (International Electrotechnical Commission). Game Gives sharpness to the projected image. For additional information about the sRGB function, visit "http://www.srgb.com/". Picture Adjustment ("Picture" menu) Q Example:...when "sRGB" is an international standard of color reproduction regulated by the IEC, the images are retained in a natural tint based on the remote control to your preference. Note • You can set the items, "Red", "Blue", "CLR Temp", "Bright Boost", when "sRGB"...
PG-MB56X , PG-MB66X Operation Manual
Page 43
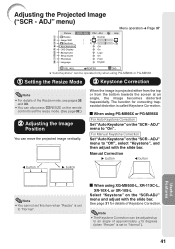
.... For Manual Keystone Correction Set "Auto Keystone" on the "SCR - a When using XG-MB50X-L, XR-11XC-L, XR-10X-L or XR-10S-L Select "Keystone" on the remote control to set to "Off", select "Keystone", and then adjust with the slide bar. ADJ 1 Resize 2 Image Shift 3 Keystone Auto Keystone 4 OSD Display 5 Background 6 Setup...
.... For Manual Keystone Correction Set "Auto Keystone" on the "SCR - a When using XG-MB50X-L, XR-11XC-L, XR-10X-L or XR-10S-L Select "Keystone" on the remote control to set to "Off", select "Keystone", and then adjust with the slide bar. ADJ 1 Resize 2 Image Shift 3 Keystone Auto Keystone 4 OSD Display 5 Background 6 Setup...

PG-MB56X , PG-MB66X Operation Manual
Page 45
...depending on the image of INPUT 1 n INPUT 2 n INPUT 3 n INPUT 4 when you press INPUT (P/R) on the remote control to a computer. The Auto Power Off function will occur when the projector is not output from the internal speaker. Note • Auto Sync adjustment is also performed by the... Note • When the Auto Power Off function is set to "On", press C INPUT 1,C INPUT 2, D INPUT 3 or EINPUT 4 on the projector. • While "Auto Search" is made . 5 Speaker Setting Selectable items On Off Description The audio signal is not automatically performed. jector selects the ...
...depending on the image of INPUT 1 n INPUT 2 n INPUT 3 n INPUT 4 when you press INPUT (P/R) on the remote control to a computer. The Auto Power Off function will occur when the projector is not output from the internal speaker. Note • Auto Sync adjustment is also performed by the... Note • When the Auto Power Off function is set to "On", press C INPUT 1,C INPUT 2, D INPUT 3 or EINPUT 4 on the projector. • While "Auto Search" is made . 5 Speaker Setting Selectable items On Off Description The audio signal is not automatically performed. jector selects the ...

PG-MB56X , PG-MB66X Operation Manual
Page 46
...product warranty is slow. When you lose or forget your keycode, contact your nearest Sharp Authorized Projector Dealer or Service Center (see page 63). P R 115200bps Transmission speed is recommended that both the projector and computer are set to enter the preset keycode in a safe place where only... when the remaining lamp life becomes 5%. • The lamp life may vary depending on the projector for entering the keycode appears. 2 Press the 4 buttons on the remote control or on the projector to "High", the fan rotation speeds up, and the fan noise becomes louder. 9 Checking ...
...product warranty is slow. When you lose or forget your keycode, contact your nearest Sharp Authorized Projector Dealer or Service Center (see page 63). P R 115200bps Transmission speed is recommended that both the projector and computer are set to enter the preset keycode in a safe place where only... when the remaining lamp life becomes 5%. • The lamp life may vary depending on the projector for entering the keycode appears. 2 Press the 4 buttons on the remote control or on the projector to "High", the fan rotation speeds up, and the fan noise becomes louder. 9 Checking ...
PG-MB56X , PG-MB66X Operation Manual
Page 47
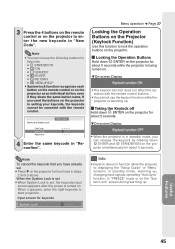
... f ON • e STANDBY • h ENTER • l RETURN • B MENU/HELP • System lock function recognizes each button on the remote control or on the projector as an individual button, even if they share the same button name. Input screen for about 5 seconds. a Locking the Operation Buttons Hold down...mode, you have already set , the keycode input screen appears after the power is being turned on the projector. 3 Press the 4 buttons on the remote control or on the projector to enter the new keycode in steps 2 and 3 above. Menu operation n Page 37 Locking the ...
... f ON • e STANDBY • h ENTER • l RETURN • B MENU/HELP • System lock function recognizes each button on the remote control or on the projector as an individual button, even if they share the same button name. Input screen for about 5 seconds. a Locking the Operation Buttons Hold down...mode, you have already set , the keycode input screen appears after the power is being turned on the projector. 3 Press the 4 buttons on the remote control or on the projector to enter the new keycode in steps 2 and 3 above. Menu operation n Page 37 Locking the ...

PG-MB56X , PG-MB66X Operation Manual
Page 49
... Thinner Info • If you want to test on a small, inconspicuous area on the projector before cleaning the projector. Maintenance Cleaning the projector I Ensure that you press S STANDBY/ON on the projector or eSTANDBY on the remote control and put the projector into standby mode. Avoid using benzene or thinner, as they may cause damage to...
... Thinner Info • If you want to test on a small, inconspicuous area on the projector before cleaning the projector. Maintenance Cleaning the projector I Ensure that you press S STANDBY/ON on the projector or eSTANDBY on the remote control and put the projector into standby mode. Avoid using benzene or thinner, as they may cause damage to...
PG-MB56X , PG-MB66X Operation Manual
Page 55
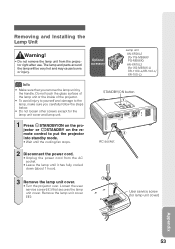
Remove the lamp unit cover (2). 1 2 User service screw (for the lamp unit cover and lamp unit. 1 Press SSTANDBY/ON on the projector or eSTANDBY on the remote control to the lamp, make sure you remove the lamp unit by the handle. Do not touch the glass surface of the lamp unit or ...the inside of the projector. • To avoid injury to yourself and damage to put the projector into standby mode. • Wait until it...
Remove the lamp unit cover (2). 1 2 User service screw (for the lamp unit cover and lamp unit. 1 Press SSTANDBY/ON on the projector or eSTANDBY on the remote control to the lamp, make sure you remove the lamp unit by the handle. Do not touch the glass surface of the lamp unit or ...the inside of the projector. • To avoid injury to yourself and damage to put the projector into standby mode. • Wait until it...


