
XR10S|XR10X|XR20S|XR20X Operation Manual
Page 5
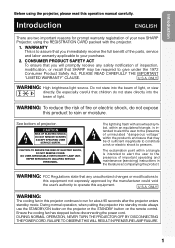
... DO NOT REMOVE SCREWS EXCEPT SPECIFIED USER SERVICE SCREW. The lightning flash with the projector. 1. The exclamation point within a triangle is to your new SHARP Projector, using the projector, please read this equipment. Ensure the cooling fan has stopped before disconnecting the power ...the product. ONLY WARNING: High brightness light source. FAILURE TO OBSERVE THIS WILL RESULT IN PREMATURE LAMP FAILURE. 1 NO USER-SERVICEABLE PARTS EXCEPT LAMP UNIT. Introduction Before using the REGISTRATION CARD packed with arrowhead symbol, within the product's enclosure that...
... DO NOT REMOVE SCREWS EXCEPT SPECIFIED USER SERVICE SCREW. The lightning flash with the projector. 1. The exclamation point within a triangle is to your new SHARP Projector, using the projector, please read this equipment. Ensure the cooling fan has stopped before disconnecting the power ...the product. ONLY WARNING: High brightness light source. FAILURE TO OBSERVE THIS WILL RESULT IN PREMATURE LAMP FAILURE. 1 NO USER-SERVICEABLE PARTS EXCEPT LAMP UNIT. Introduction Before using the REGISTRATION CARD packed with arrowhead symbol, within the product's enclosure that...

XR10S|XR10X|XR20S|XR20X Operation Manual
Page 6
... the FCC Rules. ONLY Declaration of conformity SHARP PROJECTOR, MODEL XR-20X/XR-20S/XR-10X/XR-10S This device complies with the limits for help. This very sophisticated panel contains 786,432 (XR20X/XR-10X) / 480,000 (XR-20S/XR-10S) pixels (micromirrors). ONLY PRODUCT DISPOSAL This projector utilizes tin-lead solder, and a pressurized lamp containing a small amount of America, the Electronic...
... the FCC Rules. ONLY Declaration of conformity SHARP PROJECTOR, MODEL XR-20X/XR-20S/XR-10X/XR-10S This device complies with the limits for help. This very sophisticated panel contains 786,432 (XR20X/XR-10X) / 480,000 (XR-20S/XR-10S) pixels (micromirrors). ONLY PRODUCT DISPOSAL This projector utilizes tin-lead solder, and a pressurized lamp containing a small amount of America, the Electronic...

XR10S|XR10X|XR20S|XR20X Operation Manual
Page 7
... in the same manner. • In this operation manual, the illustration and the screen display are slightly different, depending on the projector. 1 Press BMENU. • The "Picture" menu screen for the selected input mode is displayed. However, you can also be performed by... using the projector. Picture SCR - ADJ PRJ - ADJ Picture Mode Contrast Bright Red Blue CLR Temp Bright Boost Lamp Setting Reset 0 0 0 0 7500K 1 Standard Bright Help SEL./ADJ. For Future Reference Maintenance P. 47...
... in the same manner. • In this operation manual, the illustration and the screen display are slightly different, depending on the projector. 1 Press BMENU. • The "Picture" menu screen for the selected input mode is displayed. However, you can also be performed by... using the projector. Picture SCR - ADJ PRJ - ADJ Picture Mode Contrast Bright Red Blue CLR Temp Bright Boost Lamp Setting Reset 0 0 0 0 7500K 1 Standard Bright Help SEL./ADJ. For Future Reference Maintenance P. 47...

XR10S|XR10X|XR20S|XR20X Operation Manual
Page 8
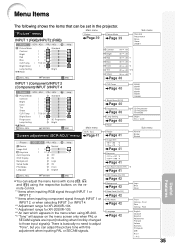
...PRJ) Mode 19 Screen Size and Projection Distance .. 20 Connections Connections 21 Samples of Cables for Connection ..... 22 Connecting to a Computer 23 Connecting to Video Equipment ......... 24 Connecting to a Monitor with RGB Input Terminal 25 Controlling the Projector by a Computer 26 Connecting the Power Cord 26...the Transmission Speed (RS-232C 44 Fan Mode Setting 44 Checking the Lamp Life Status 44 System Lock Function 44 Locking the Operation Buttons on 27 Turning the Power off (Putting the Projector into Standby Mode 27 Image Projection 28 About the Setup Guide 28 Adjusting...
...PRJ) Mode 19 Screen Size and Projection Distance .. 20 Connections Connections 21 Samples of Cables for Connection ..... 22 Connecting to a Computer 23 Connecting to Video Equipment ......... 24 Connecting to a Monitor with RGB Input Terminal 25 Controlling the Projector by a Computer 26 Connecting the Power Cord 26...the Transmission Speed (RS-232C 44 Fan Mode Setting 44 Checking the Lamp Life Status 44 System Lock Function 44 Locking the Operation Buttons on 27 Turning the Power off (Putting the Projector into Standby Mode 27 Image Projection 28 About the Setup Guide 28 Adjusting...

XR10S|XR10X|XR20S|XR20X Operation Manual
Page 12
... Mode" to maintain high image quality, SHARP recommends that the intake vent and the exhaust vent are not blocked, plug the power cord back in an area free from -4°F to 140°F (-20°C to hit or damage the surface of lamp rupture, contact your eyes occasionally. I ...often. Do not block the exhaust and intake vents. In case of the lens. Rest your nearest Sharp Authorized Projector Dealer or Service Center for long hours will return the projector to direct sunlight or bright light. Light falling directly on page 50. Close the curtains and dim the...
... Mode" to maintain high image quality, SHARP recommends that the intake vent and the exhaust vent are not blocked, plug the power cord back in an area free from -4°F to 140°F (-20°C to hit or damage the surface of lamp rupture, contact your eyes occasionally. I ...often. Do not block the exhaust and intake vents. In case of the lens. Rest your nearest Sharp Authorized Projector Dealer or Service Center for long hours will return the projector to direct sunlight or bright light. Light falling directly on page 50. Close the curtains and dim the...

XR10S|XR10X|XR20S|XR20X Operation Manual
Page 13
...vents, " " and " " will illuminate in . Introduction I When turning off the projector, the cooling fan runs to rise, the lamp will turn off, the temperature warn- Caution regarding usage of the projector from the Internet (http://www.adobe.com). dicators" on how to make the connections AFTER... unplugging the power cord of the projector I When using the "File", "Open" menu....
...vents, " " and " " will illuminate in . Introduction I When turning off the projector, the cooling fan runs to rise, the lamp will turn off, the temperature warn- Caution regarding usage of the projector from the Internet (http://www.adobe.com). dicators" on how to make the connections AFTER... unplugging the power cord of the projector I When using the "File", "Open" menu....
XR10S|XR10X|XR20S|XR20X Operation Manual
Page 14
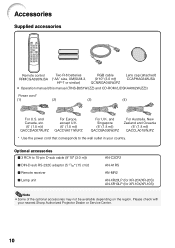
...Sharp Authorized Projector Dealer or Service Center. 10 and Singapore (6' (1.8 m)) QACCBA036WJPZ For Australia, New Zealand and Oceania (6' (1.8 m)) QACCLA018WJPZ * Use the power cord that corresponds to 15-pin D-sub cable (9n10o (3.0 m)) I DIN-D-sub RS-232C adaptor (5 57/64o (15 cm)) I Remote receiver I Lamp unit AN-C3CP2 AN-A1RS AN-MR2 AN-XR20LP (for XR-20X/XR-20S...) AN-XR10LP (for XR-10X/XR-10S) Note • Some of the optional accessories may not be available ...
...Sharp Authorized Projector Dealer or Service Center. 10 and Singapore (6' (1.8 m)) QACCBA036WJPZ For Australia, New Zealand and Oceania (6' (1.8 m)) QACCLA018WJPZ * Use the power cord that corresponds to 15-pin D-sub cable (9n10o (3.0 m)) I DIN-D-sub RS-232C adaptor (5 57/64o (15 cm)) I Remote receiver I Lamp unit AN-C3CP2 AN-A1RS AN-MR2 AN-XR20LP (for XR-20X/XR-20S...) AN-XR10LP (for XR-10X/XR-10S) Note • Some of the optional accessories may not be available ...

XR10S|XR10X|XR20S|XR20X Operation Manual
Page 15
...Front View Focus ring 28 For adjusting the focus. KEYSTONE 31 button For entering the Keystone Correction mode. HEIGHT 29 ADJUST lever 27, 48 Lamp indicator 48 Temperature warning indicator 30 Volume buttons (-O/Q+) For adjusting the speaker sound level. 30 INPUT button (P/R) For switching input mode 1, ... button 37 For setting items selected or adjusted on and putting the projector into standby mode. Introduction Part Names and Functions Numbers in this operation manual where the topic is explained. Projector Top View Power indicator 27, 48 STANDBY/ON 27 button For turning...
...Front View Focus ring 28 For adjusting the focus. KEYSTONE 31 button For entering the Keystone Correction mode. HEIGHT 29 ADJUST lever 27, 48 Lamp indicator 48 Temperature warning indicator 30 Volume buttons (-O/Q+) For adjusting the speaker sound level. 30 INPUT button (P/R) For switching input mode 1, ... button 37 For setting items selected or adjusted on and putting the projector into standby mode. Introduction Part Names and Functions Numbers in this operation manual where the topic is explained. Projector Top View Power indicator 27, 48 STANDBY/ON 27 button For turning...
XR10S|XR10X|XR20S|XR20X Operation Manual
Page 19
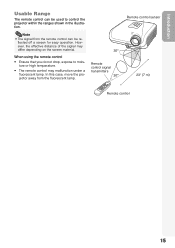
In this case, move the projector away from the remote control can be re- Introduction Usable Range The remote control can be used to mois- However, the effective distance of the signal may malfunction under a fluorescent lamp. ture or high temperature. • The remote control may differ ...depending on the screen material. Note • The signal from the fluorescent lamp. 30° Remote control signal transmitters 30° Remote control sensor 23n (7 m) Remote control 15 When using the remote control ...
In this case, move the projector away from the remote control can be re- Introduction Usable Range The remote control can be used to mois- However, the effective distance of the signal may malfunction under a fluorescent lamp. ture or high temperature. • The remote control may differ ...depending on the screen material. Note • The signal from the fluorescent lamp. 30° Remote control signal transmitters 30° Remote control sensor 23n (7 m) Remote control 15 When using the remote control ...

XR10S|XR10X|XR20S|XR20X Operation Manual
Page 31
... not be regarded as faulty operation. • If the projector is stabilising the lamp output characteristics. STANDBY button ON button Turning the Power off (Putting the Projector into Standby Mode) 1 Press SSTANDBY/ON on the projector or eSTANDBY on the remote control, then press that the ...8226; The power indicator changes to red when the projector finishes cooling. If you have already set , the keycode input box appears. Lamp indicator Power indicator STANDBY/ON button Note • About the Lamp Indicator The lamp indicator illuminates to indicate the status of the image may...
... not be regarded as faulty operation. • If the projector is stabilising the lamp output characteristics. STANDBY button ON button Turning the Power off (Putting the Projector into Standby Mode) 1 Press SSTANDBY/ON on the projector or eSTANDBY on the remote control, then press that the ...8226; The power indicator changes to red when the projector finishes cooling. If you have already set , the keycode input box appears. Lamp indicator Power indicator STANDBY/ON button Note • About the Lamp Indicator The lamp indicator illuminates to indicate the status of the image may...
XR10S|XR10X|XR20S|XR20X Operation Manual
Page 39
...XR-20X/XR-10X. *4 Adjustment range for XR-20S/XR-10S. *5 An item which appears in the menu when using XR-20X. *6 "Tone" will appear on the menu screen only when PAL or SECAM signals are input (including when forcibly changed to adjust "Tone", but you can be set in the projector...30 *2 INPUT 1 (Component)/INPUT 2 (Component)/INPUT 3/INPUT 4 Picture SCR - ADJ PRJ - ADJ Help Picture Mode Contrast Bright Color Tint Sharp CLR Temp Bright Boost Progressive Lamp Setting Reset SEL./ADJ. 0 0 0 0 0 7500K 1 Standard 3D Progressive Bright ENTER END "Screen adjustment (SCR-ADJ)" menu Main menu ...
...XR-20X/XR-10X. *4 Adjustment range for XR-20S/XR-10S. *5 An item which appears in the menu when using XR-20X. *6 "Tone" will appear on the menu screen only when PAL or SECAM signals are input (including when forcibly changed to adjust "Tone", but you can be set in the projector...30 *2 INPUT 1 (Component)/INPUT 2 (Component)/INPUT 3/INPUT 4 Picture SCR - ADJ PRJ - ADJ Help Picture Mode Contrast Bright Color Tint Sharp CLR Temp Bright Boost Progressive Lamp Setting Reset SEL./ADJ. 0 0 0 0 0 7500K 1 Standard 3D Progressive Bright ENTER END "Screen adjustment (SCR-ADJ)" menu Main menu ...

XR10S|XR10X|XR20S|XR20X Operation Manual
Page 41
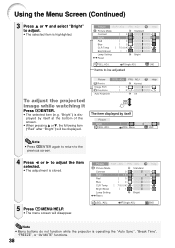
Picture SCR - ADJ Picture Mode Contrast Bright Red Blue CLR Temp Bright Boost Lamp Setting Reset 0 0 0 0 7500K 1 Standard Bright Help SEL./ADJ. ADJ PRJ - Using the Menu Screen ENTER button Adjustment buttons (P/R/O/Q) MENU/HELP button Adjustment buttons... the selected input mode is displayed. Menu Selections (Adjustments) Example: Adjusting "Bright". • This operation can also be performed by using the buttons on the projector. 1 Press BMENU. • The "Picture" menu screen for INPUT 1 (RGB) mode Menu item 2 Press Q or O and select "Picture" to the previous ...
Picture SCR - ADJ Picture Mode Contrast Bright Red Blue CLR Temp Bright Boost Lamp Setting Reset 0 0 0 0 7500K 1 Standard Bright Help SEL./ADJ. ADJ PRJ - Using the Menu Screen ENTER button Adjustment buttons (P/R/O/Q) MENU/HELP button Adjustment buttons... the selected input mode is displayed. Menu Selections (Adjustments) Example: Adjusting "Bright". • This operation can also be performed by using the buttons on the projector. 1 Press BMENU. • The "Picture" menu screen for INPUT 1 (RGB) mode Menu item 2 Press Q or O and select "Picture" to the previous ...
XR10S|XR10X|XR20S|XR20X Operation Manual
Page 42
...previous screen. 4 Press O or Q to adjust the item selected. • The adjustment is highlighted. ADJ Picture Mode Contrast Bright Red Blue CLR Temp Bright Boost Lamp Setting Reset 0 0 0 0 7500K 1 Standard Bright SEL./ADJ. Picture SCR - Using the Menu Screen (Continued) 3 Press P or R and select "Bright" .... • The selected item (e.g. Picture SCR - Single ADJ Help END Note • Menu buttons do not function while the projector is displayed by itself at the bottom of the screen. • When pressing P or R, the following item ("Red" after "Bright") will ...
...previous screen. 4 Press O or Q to adjust the item selected. • The adjustment is highlighted. ADJ Picture Mode Contrast Bright Red Blue CLR Temp Bright Boost Lamp Setting Reset 0 0 0 0 7500K 1 Standard Bright SEL./ADJ. Picture SCR - Using the Menu Screen (Continued) 3 Press P or R and select "Bright" .... • The selected item (e.g. Picture SCR - Single ADJ Help END Note • Menu buttons do not function while the projector is displayed by itself at the bottom of the screen. • When pressing P or R, the following item ("Red" after "Bright") will ...
XR10S|XR10X|XR20S|XR20X Operation Manual
Page 44
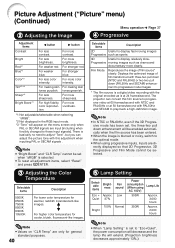
..."Lamp Setting" is set when "sRGB" is selected. • To reset all adjustment items, select "Reset" and press hENTER. For weaker red. For more color intensity. For stronger red. For weaker blue. For less color intensity. For more brightness. The projector can...operation n Page 37 2 Adjusting the Image 4 Progressive Adjustment Items Contrast Bright Red*1 Blue*1 Color*2 Tint*2 *3 Sharp*2 Bright Boost*1 O button Q button For less contrast. For more sharpness. Note • "Bright Boost" and "CLR Temp" cannot be enabled automatically when the film source has been ...
..."Lamp Setting" is set when "sRGB" is selected. • To reset all adjustment items, select "Reset" and press hENTER. For weaker red. For more color intensity. For stronger red. For weaker blue. For less color intensity. For more brightness. The projector can...operation n Page 37 2 Adjusting the Image 4 Progressive Adjustment Items Contrast Bright Red*1 Blue*1 Color*2 Tint*2 *3 Sharp*2 Bright Boost*1 O button Q button For less contrast. For more sharpness. Note • "Bright Boost" and "CLR Temp" cannot be enabled automatically when the film source has been ...
XR10S|XR10X|XR20S|XR20X Operation Manual
Page 47
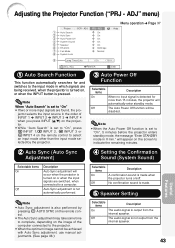
...Projector... projector ...projector. • While "Auto Search" is set to the input mode in which signals are being received, when the projector... is made . 5 Speaker Setting Selectable items On Off Description The audio signal is pressed. The Auto Power Off function will occur when the projector... is turned on , or when the INPUT button is output from the internal speaker. 43 No confirmation sound is made when the projector... turns on the remote control to select an input mode other than 15 minutes, the projector...projector...connected to the projector. • When...
...Projector... projector ...projector. • While "Auto Search" is set to the input mode in which signals are being received, when the projector... is made . 5 Speaker Setting Selectable items On Off Description The audio signal is pressed. The Auto Power Off function will occur when the projector... is turned on , or when the INPUT button is output from the internal speaker. 43 No confirmation sound is made when the projector... turns on the remote control to select an input mode other than 15 minutes, the projector...projector...connected to the projector. • When...
XR10S|XR10X|XR20S|XR20X Operation Manual
Page 48
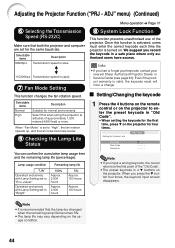
...Lamp Setting set for the same baud rate. Setting the System Lock PRJ - Note • It is 4 R buttons on the projector to enter the preset keycode in a safe place where only authorized users have access. Even if the product warranty is slow. When you lose or forget your keycode, contact your nearest Sharp... Authorized Projector Dealer or Service Center (see page 61). ADJ" menu) (Continued) Menu operation n Page 37 6 Selecting the Transmission...
...Lamp Setting set for the same baud rate. Setting the System Lock PRJ - Note • It is 4 R buttons on the projector to enter the preset keycode in a safe place where only authorized users have access. Even if the product warranty is slow. When you lose or forget your keycode, contact your nearest Sharp... Authorized Projector Dealer or Service Center (see page 61). ADJ" menu) (Continued) Menu operation n Page 37 6 Selecting the Transmission...

XR10S|XR10X|XR20S|XR20X Operation Manual
Page 52
... " " appears, be changed. (See page 49.) Normal The internal temperature is abnormally high. (See page 49.) 48 Indicators on the Projector Power indicator Lamp indicator Temperature warning indicator Red on Green on Red blinks Green blinks Green on Green blinks Red on Off Red on Normal (Standby) Normal... or requires to be sure to turn on page 49. I If you try to perform the measures described on the projector a fourth time without replacing the lamp, the projector will not turn off and the temperature warning indicator will blink, the cooling fan will enter standby mode.
... " " appears, be changed. (See page 49.) Normal The internal temperature is abnormally high. (See page 49.) 48 Indicators on the Projector Power indicator Lamp indicator Temperature warning indicator Red on Green on Red blinks Green blinks Green on Green blinks Red on Off Red on Normal (Standby) Normal... or requires to be sure to turn on page 49. I If you try to perform the measures described on the projector a fourth time without replacing the lamp, the projector will not turn off and the temperature warning indicator will blink, the cooling fan will enter standby mode.

XR10S|XR10X|XR20S|XR20X Operation Manual
Page 53
...Cooling) Red blinks Problem The internal temperature is securely installed, contact your nearest Sharp Authorized Projector Dealer or Service Center (see page 61) for repair. • Please exercise care when replacing the lamp. • Securely install the cover. • If the power indicator blinks... indicator Temperature warning indicator Normal Off Abnormal Red on (Standby) Lamp indicator Green on (Green blinks when the lamp is warming up or turning off for a brief moment due to your nearest Sharp Authorized Projector Dealer or Service Center (see page 61) for repair. &#...
...Cooling) Red blinks Problem The internal temperature is securely installed, contact your nearest Sharp Authorized Projector Dealer or Service Center (see page 61) for repair. • Please exercise care when replacing the lamp. • Securely install the cover. • If the power indicator blinks... indicator Temperature warning indicator Normal Off Abnormal Red on (Standby) Lamp indicator Green on (Green blinks when the lamp is warming up or turning off for a brief moment due to your nearest Sharp Authorized Projector Dealer or Service Center (see page 61) for repair. &#...
XR10S|XR10X|XR20S|XR20X Operation Manual
Page 54
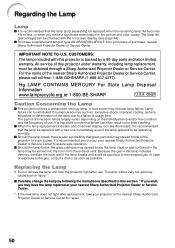
... a possibility that the lamp be replaced with this projector under warranty, including lamp replacement, must be obtained through a Sharp Authorized Projector Dealer or Service Center. Replacing the Lamp • Do not remove the lamp unit from your place of the projector. IMPORTANT NOTE TO U.S. Regarding the Lamp Lamp I It is recommended you contact your nearest Sharp Authorized Projector Dealer or Service Center...
... a possibility that the lamp be replaced with this projector under warranty, including lamp replacement, must be obtained through a Sharp Authorized Projector Dealer or Service Center. Replacing the Lamp • Do not remove the lamp unit from your place of the projector. IMPORTANT NOTE TO U.S. Regarding the Lamp Lamp I It is recommended you contact your nearest Sharp Authorized Projector Dealer or Service Center...
XR10S|XR10X|XR20S|XR20X Operation Manual
Page 56
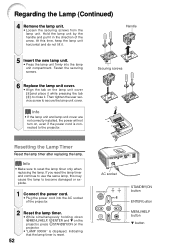
... button R button Regarding the Lamp (Continued) 4 Remove the lamp unit. • Loosen the securing screws from the lamp unit. If you reset the lamp timer and continue to use the same lamp, this time, keep the lamp unit horizontal and do not tilt it in the direction of the projector. 2 52 Reset the lamp timer. • While simultaneously...
... button R button Regarding the Lamp (Continued) 4 Remove the lamp unit. • Loosen the securing screws from the lamp unit. If you reset the lamp timer and continue to use the same lamp, this time, keep the lamp unit horizontal and do not tilt it in the direction of the projector. 2 52 Reset the lamp timer. • While simultaneously...


