
XR10S|XR10X|XR20S|XR20X Operation Manual
Page 5
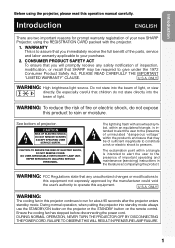
...To ensure that you immediately receive the full benefit of the parts, service and labor warranty applicable to your new SHARP Projector, using the projector, please read this equipment. ONLY WARNING: High brightness light source. REFER SERVICING TO QUALIFIED SERVICE PERSONNEL. ONLY ...do not expose this projector continues to run for prompt warranty registration of projector. During normal operation, when putting the projector into the beam of light, or view directly. DURING NORMAL OPERATION, NEVER TURN THE PROJECTOR OFF BY DISCONNECTING THE POWER CORD. CAUTION RISK ...
...To ensure that you immediately receive the full benefit of the parts, service and labor warranty applicable to your new SHARP Projector, using the projector, please read this equipment. ONLY WARNING: High brightness light source. REFER SERVICING TO QUALIFIED SERVICE PERSONNEL. ONLY ...do not expose this projector continues to run for prompt warranty registration of projector. During normal operation, when putting the projector into the beam of light, or view directly. DURING NORMAL OPERATION, NEVER TURN THE PROJECTOR OFF BY DISCONNECTING THE POWER CORD. CAUTION RISK ...

XR10S|XR10X|XR20S|XR20X Operation Manual
Page 8
... IMPORTANT SAFEGUARDS 6 How to Access the PDF Operation Manuals 9 Accessories 10 Part Names and Functions 11 Inserting the Batteries 14 Usable Range 15 Quick Start Quick Start 16 Setup Setting up the Projector 18 Setting up the Projector 18 Standard Setup (Front Projection) ....... 18 Ceiling-mount Setup 18 ...Setting 44 Checking the Lamp Life Status 44 System Lock Function 44 Locking the Operation Buttons on 27 Turning the Power off (Putting the Projector into Standby Mode 27 Image Projection 28 About the Setup Guide 28 Adjusting the Projected Image 28 Switching the ...
... IMPORTANT SAFEGUARDS 6 How to Access the PDF Operation Manuals 9 Accessories 10 Part Names and Functions 11 Inserting the Batteries 14 Usable Range 15 Quick Start Quick Start 16 Setup Setting up the Projector 18 Setting up the Projector 18 Standard Setup (Front Projection) ....... 18 Ceiling-mount Setup 18 ...Setting 44 Checking the Lamp Life Status 44 System Lock Function 44 Locking the Operation Buttons on 27 Turning the Power off (Putting the Projector into Standby Mode 27 Image Projection 28 About the Setup Guide 28 Adjusting the Projected Image 28 Switching the ...

XR10S|XR10X|XR20S|XR20X Operation Manual
Page 10
... servicing. 1. The openings should be read all of these instructions before you are not sure of the type of power supply to overturn. 10. BUT IMPROPER USE CAN RESULT IN POTENTIAL ELECTRICAL SHOCK OR FIRE HAZARDS. Cleaning Unplug this product near water-for cleaning.... 6. This will only fit into the power outlet, please contact your electrician. Use only with a cart, stand, tripod, bracket, or table ...
... servicing. 1. The openings should be read all of these instructions before you are not sure of the type of power supply to overturn. 10. BUT IMPROPER USE CAN RESULT IN POTENTIAL ELECTRICAL SHOCK OR FIRE HAZARDS. Cleaning Unplug this product near water-for cleaning.... 6. This will only fit into the power outlet, please contact your electrician. Use only with a cart, stand, tripod, bracket, or table ...

XR10S|XR10X|XR20S|XR20X Operation Manual
Page 11
... Service Unplug this product from heat sources such as radiators, heat registers, stoves, or other products (including amplifiers) that produce heat. • DLP\ (Digital Light Processing) and DMD\ (Digital Micromirror Device) are trademarks of Texas Instruments, Inc. • Microsoft® and Windows® ... 19. When the product exhibits a distinct change in proper operating condition. 21. Refer all servicing to rain or water. When the power-supply cord or plug is in performance, this product, ask the service technician to perform safety checks to a wall or ceiling only ...
... Service Unplug this product from heat sources such as radiators, heat registers, stoves, or other products (including amplifiers) that produce heat. • DLP\ (Digital Light Processing) and DMD\ (Digital Micromirror Device) are trademarks of Texas Instruments, Inc. • Microsoft® and Windows® ... 19. When the product exhibits a distinct change in proper operating condition. 21. Refer all servicing to rain or water. When the power-supply cord or plug is in performance, this product, ask the service technician to perform safety checks to a wall or ceiling only ...

XR10S|XR10X|XR20S|XR20X Operation Manual
Page 12
...the wall outlet and wait at least 11 13/16 inches (30 cm) of the projector I Allow at least 10 minutes. This does not indicate a malfunction. (See pages 48 and 49.) Remove the projector power cord from -4°F to 140°F (-20°C to hit or damage the ...the adjustment range (8 degrees) of the adjustment foot. 8 Avoid locations with thin air, set up the projector in places exposed to avoid personal injury caused by a Sharp Authorized Projector Dealer or Service Center. Close the curtains and dim the lights when setting up your eyes occasionally. Caution regarding...
...the wall outlet and wait at least 11 13/16 inches (30 cm) of the projector I Allow at least 10 minutes. This does not indicate a malfunction. (See pages 48 and 49.) Remove the projector power cord from -4°F to 140°F (-20°C to hit or damage the ...the adjustment range (8 degrees) of the adjustment foot. 8 Avoid locations with thin air, set up the projector in places exposed to avoid personal injury caused by a Sharp Authorized Projector Dealer or Service Center. Close the curtains and dim the lights when setting up your eyes occasionally. Caution regarding...

XR10S|XR10X|XR20S|XR20X Operation Manual
Page 13
... the PDF Manuals for instructions on how to make the connections AFTER unplugging the power cord of the plastic cover. The period the cooling fan runs will vary, depending on the projector will illuminate in the lower left corner of the plug may change during projection or...the picture. When using the "File", "Open" menu. 9 This does not indicate malfunction. • Do not unplug the power cord during projector operation due to changes in . I If the projector starts to overheat due to setup problems or blockage of the air vents, " " and " " will blink, and after ...
... the PDF Manuals for instructions on how to make the connections AFTER unplugging the power cord of the plastic cover. The period the cooling fan runs will vary, depending on the projector will illuminate in the lower left corner of the plug may change during projection or...the picture. When using the "File", "Open" menu. 9 This does not indicate malfunction. • Do not unplug the power cord during projector operation due to changes in . I If the projector starts to overheat due to setup problems or blockage of the air vents, " " and " " will blink, and after ...
XR10S|XR10X|XR20S|XR20X Operation Manual
Page 14
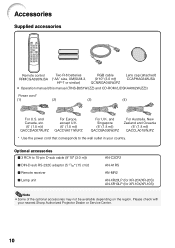
... Optional accessories I Lamp unit AN-C3CP2 AN-A1RS AN-MR2 AN-XR20LP (for XR-20X/XR-20S) AN-XR10LP (for XR-10X/XR-10S) Note • Some of the optional accessories may not be available depending on the...Power cord* (1) (2) (3) (4) For U.S. and Singapore (6' (1.8 m)) QACCBA036WJPZ For Australia, New Zealand and Oceania (6' (1.8 m)) QACCLA018WJPZ * Use the power cord that corresponds to 15-pin D-sub cable (9n10o (3.0 m)) I DIN-D-sub RS-232C adaptor (5 57/64o (15 cm)) I Remote receiver I 3 RCA to the wall outlet in your nearest Sharp Authorized Projector Dealer or Service Center. 10...
... Optional accessories I Lamp unit AN-C3CP2 AN-A1RS AN-MR2 AN-XR20LP (for XR-20X/XR-20S) AN-XR10LP (for XR-10X/XR-10S) Note • Some of the optional accessories may not be available depending on the...Power cord* (1) (2) (3) (4) For U.S. and Singapore (6' (1.8 m)) QACCBA036WJPZ For Australia, New Zealand and Oceania (6' (1.8 m)) QACCLA018WJPZ * Use the power cord that corresponds to 15-pin D-sub cable (9n10o (3.0 m)) I DIN-D-sub RS-232C adaptor (5 57/64o (15 cm)) I Remote receiver I 3 RCA to the wall outlet in your nearest Sharp Authorized Projector Dealer or Service Center. 10...

XR10S|XR10X|XR20S|XR20X Operation Manual
Page 15
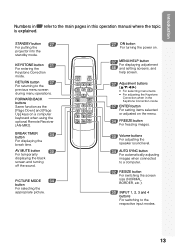
..., 48 STANDBY/ON 27 button For turning the power on the menu. KEYSTONE 31 button For entering the Keystone Correction mode. Front View Focus ring 28 For adjusting the focus. ENTER button 37 For setting items selected or adjusted on and putting the projector into standby mode. Introduction Part Names and Functions...
..., 48 STANDBY/ON 27 button For turning the power on the menu. KEYSTONE 31 button For entering the Keystone Correction mode. Front View Focus ring 28 For adjusting the focus. ENTER button 37 For setting items selected or adjusted on and putting the projector into standby mode. Introduction Part Names and Functions...

XR10S|XR10X|XR20S|XR20X Operation Manual
Page 16
... Audio output terminal of equipment connected to the main pages in Z refer to the AUDIO INPUT terminal. Rear View Terminals Refer to secure the projector. 12 AUDIO (INPUT 1, 2) 23 terminal (Shared for INPUT 1 and 2) 24 INPUT 1 and 23 INPUT 2 terminals Terminals for 24 ...47 Exhaust vent 43 Speaker Rear adjustment foot 29 Kensington Security 26 AC socket Standard connector Connect the supplied Power cord. Intake vent 47 26 RS-232C terminal Terminal for controlling the projector using a computer. 24 AUDIO (INPUT 25 3, 4) terminal (Shared for INPUT 3 and 4) 25 INPUT...
... Audio output terminal of equipment connected to the main pages in Z refer to the AUDIO INPUT terminal. Rear View Terminals Refer to secure the projector. 12 AUDIO (INPUT 1, 2) 23 terminal (Shared for INPUT 1 and 2) 24 INPUT 1 and 23 INPUT 2 terminals Terminals for 24 ...47 Exhaust vent 43 Speaker Rear adjustment foot 29 Kensington Security 26 AC socket Standard connector Connect the supplied Power cord. Intake vent 47 26 RS-232C terminal Terminal for controlling the projector using a computer. 24 AUDIO (INPUT 25 3, 4) terminal (Shared for INPUT 3 and 4) 25 INPUT...
XR10S|XR10X|XR20S|XR20X Operation Manual
Page 17
... 1, 2, 3 and 4 buttons For switching to the respective input modes. 13 PICTURE MODE 34 button For selecting the appropriate picture. 27 ON button For turning the power on. 37 MENU/HELP button For displaying adjustment 46 and setting screens, and help screen. 37 Adjustment buttons (P/R/O/Q) • For selecting menu items. • For... using the optional Remote Receiver (AN-MR2). Introduction Numbers in Z refer to the previous menu screen during menu operations. STANDBY button 27 For putting the projector into the standby mode.
... 1, 2, 3 and 4 buttons For switching to the respective input modes. 13 PICTURE MODE 34 button For selecting the appropriate picture. 27 ON button For turning the power on. 37 MENU/HELP button For displaying adjustment 46 and setting screens, and help screen. 37 Adjustment buttons (P/R/O/Q) • For selecting menu items. • For... using the optional Remote Receiver (AN-MR2). Introduction Numbers in Z refer to the previous menu screen during menu operations. STANDBY button 27 For putting the projector into the standby mode.

XR10S|XR10X|XR20S|XR20X Operation Manual
Page 20
... with the computer). Remove the lens cap and turn the projector on On the projector On the remote control _P. 27 16 Connect the projector to the computer and plug the power cord into the AC socket of the projector and the computer is explained using one example. 3 8 STANDBY/ON button 8 STANDBY button 6 INPUT button...
... with the computer). Remove the lens cap and turn the projector on On the projector On the remote control _P. 27 16 Connect the projector to the computer and plug the power cord into the AC socket of the projector and the computer is explained using one example. 3 8 STANDBY/ON button 8 STANDBY button 6 INPUT button...

XR10S|XR10X|XR20S|XR20X Operation Manual
Page 21
Adjust the projected image with the Setup Guide 1 After the projector turns on the remote control. Turn the computer on XR-20X.) On the projector Shrinks upper side. Correct trapezoidal distortion Correcting trapezoidal distortion using the INPUT button on the projector or C INPUT 1 on , the Setup Guide appears. (When ... then press the button again while the confirmation message is set to put the projector into standby mode. On the On the remote projector control On-screen Display • Unplug the power cord from the AC outlet after the cooling fan stops. _P. 27 17 Turn...
Adjust the projected image with the Setup Guide 1 After the projector turns on the remote control. Turn the computer on XR-20X.) On the projector Shrinks upper side. Correct trapezoidal distortion Correcting trapezoidal distortion using the INPUT button on the projector or C INPUT 1 on , the Setup Guide appears. (When ... then press the button again while the confirmation message is set to put the projector into standby mode. On the On the remote projector control On-screen Display • Unplug the power cord from the AC outlet after the cooling fan stops. _P. 27 17 Turn...

XR10S|XR10X|XR20S|XR20X Operation Manual
Page 27
...computer signals compatible with some of when using a SHARP notebook computer). Use with computer signals other devices. Contact your computer's external output port. Connecting to a Computer Before connecting, ensure that the power cord of the projector is unplugged from the AC outlet and turn ...on the projector and then the other than those listed may cause some Macintosh computers. Note • ...
...computer signals compatible with some of when using a SHARP notebook computer). Use with computer signals other devices. Contact your computer's external output port. Connecting to a Computer Before connecting, ensure that the power cord of the projector is unplugged from the AC outlet and turn ...on the projector and then the other than those listed may cause some Macintosh computers. Note • ...
XR10S|XR10X|XR20S|XR20X Operation Manual
Page 30
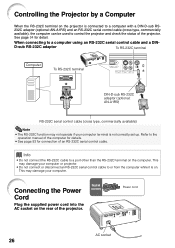
...manual of an RS-232C serial control cable. This may damage your computer. Supplied accessory Power cord AC socket 26 Refer to control the projector and check the status of the projector. Controlling the Projector by a Computer When the RS-232C terminal on the computer. This may damage your... computer or projector. • Do not connect or disconnect an RS-232C serial control cable to a computer using an RS-232C serial control cable and a DIN- Connecting the Power Cord Plug the supplied power cord into the AC socket on . See ...
...manual of an RS-232C serial control cable. This may damage your computer. Supplied accessory Power cord AC socket 26 Refer to control the projector and check the status of the projector. Controlling the Projector by a Computer When the RS-232C terminal on the computer. This may damage your... computer or projector. • Do not connect or disconnect an RS-232C serial control cable to a computer using an RS-232C serial control cable and a DIN- Connecting the Power Cord Plug the supplied power cord into the AC socket on . See ...

XR10S|XR10X|XR20S|XR20X Operation Manual
Page 31
... 27 Basic Operation This can cause damage due to rise in green while cooling. • The power indicator changes to red when the projector finishes cooling. Lamp indicator Power indicator STANDBY/ON button Note • About the Lamp Indicator The lamp indicator illuminates to indicate the... minute after the cooling fan stops. • The power indicator on the projector, a slight flickering of the lamp. STANDBY button ON button Turning the Power off (Putting the Projector into Standby Mode) 1 Press SSTANDBY/ON on the projector or eSTANDBY on the remote control, then press that...
... 27 Basic Operation This can cause damage due to rise in green while cooling. • The power indicator changes to red when the projector finishes cooling. Lamp indicator Power indicator STANDBY/ON button Note • About the Lamp Indicator The lamp indicator illuminates to indicate the... minute after the cooling fan stops. • The power indicator on the projector, a slight flickering of the lamp. STANDBY button ON button Turning the Power off (Putting the Projector into Standby Mode) 1 Press SSTANDBY/ON on the projector or eSTANDBY on the remote control, then press that...
XR10S|XR10X|XR20S|XR20X Operation Manual
Page 40
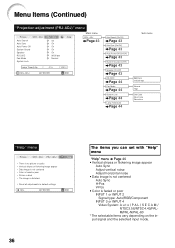
ADJ Page 43 Lamp Timer(Life) 0h 100% SEL./ADJ. ENTER END Auto Search [On/Off] Page 43 Auto Sync [On/Off] Page 43 Auto Power Off [On/Off] Page 43 System Sound [On/Off] Page 43 Speaker [On/Off] Page 43 RS-232C Page 44 Fan Mode Page 44 System ... Sub menu 9600 bps 115200 bps Normal High Old Code New Code Reconfirm "Help" menu Picture SCR - ADJ PRJ - ADJ Auto Search Auto Sync Auto Power Off System Sound Speaker RS-232C Fan Mode System Lock PRJ - ADJ There is no picture or audio Vertical stripes or flickering image appear Data...
ADJ Page 43 Lamp Timer(Life) 0h 100% SEL./ADJ. ENTER END Auto Search [On/Off] Page 43 Auto Sync [On/Off] Page 43 Auto Power Off [On/Off] Page 43 System Sound [On/Off] Page 43 Speaker [On/Off] Page 43 RS-232C Page 44 Fan Mode Page 44 System ... Sub menu 9600 bps 115200 bps Normal High Old Code New Code Reconfirm "Help" menu Picture SCR - ADJ PRJ - ADJ Auto Search Auto Sync Auto Power Off System Sound Speaker RS-232C Fan Mode System Lock PRJ - ADJ There is no picture or audio Vertical stripes or flickering image appear Data...
XR10S|XR10X|XR20S|XR20X Operation Manual
Page 44
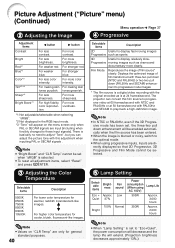
... Setting Selectable items Brightness Eco + Approx. There is basically no need to "Eco+Quiet", the power consumption will decrease and the lamp life will be set , the three-two pull down (PAL50Hz ...back a high-definition image. Selectable items Description 2D Useful to those input signals). The projector can adjust the picture tone with this film source to progressive video at 60 frames/second... Adjustment Items Contrast Bright Red*1 Blue*1 Color*2 Tint*2 *3 Sharp*2 Bright Boost*1 O button Q button For less contrast. Displays the optimized image of film source* clearly.
... Setting Selectable items Brightness Eco + Approx. There is basically no need to "Eco+Quiet", the power consumption will decrease and the lamp life will be set , the three-two pull down (PAL50Hz ...back a high-definition image. Selectable items Description 2D Useful to those input signals). The projector can adjust the picture tone with this film source to progressive video at 60 frames/second... Adjustment Items Contrast Bright Red*1 Blue*1 Color*2 Tint*2 *3 Sharp*2 Bright Boost*1 O button Q button For less contrast. Displays the optimized image of film source* clearly.
XR10S|XR10X|XR20S|XR20X Operation Manual
Page 47
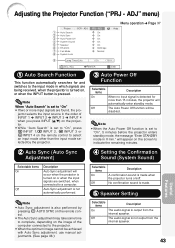
...C INPUT 1,C INPUT 2, D INPUT 3 or EINPUT 4 on the screen to complete, depending on /off. ADJ" menu) Picture SCR - Adjusting the Projector Function ("PRJ - ADJ Auto Search Auto Sync Auto Power Off System Sound Speaker RS-232C Fan Mode System Lock PRJ - ADJ On On On On On 9600 bps Normal Menu...operation n Page 37 Help Lamp Timer(Life) 0h 100% SEL./ADJ. Note • Auto Sync adjustment is also performed by the projector. 3 Auto Power Off Function Selectable items On Off Description When no input signal is detected for and switches to the input mode in the order of the...
...C INPUT 1,C INPUT 2, D INPUT 3 or EINPUT 4 on the screen to complete, depending on /off. ADJ" menu) Picture SCR - Adjusting the Projector Function ("PRJ - ADJ Auto Search Auto Sync Auto Power Off System Sound Speaker RS-232C Fan Mode System Lock PRJ - ADJ On On On On On 9600 bps Normal Menu...operation n Page 37 Help Lamp Timer(Life) 0h 100% SEL./ADJ. Note • Auto Sync adjustment is also performed by the projector. 3 Auto Power Off Function Selectable items On Off Description When no input signal is detected for and switches to the input mode in the order of the...

XR10S|XR10X|XR20S|XR20X Operation Manual
Page 49
... enter the new keycode in "FREEZE" mode or on the projector for about 5 seconds. Info • Keylock does not function while the projector is in standby mode, you have already set , the keycode input screen appears after the power is turned on the projector in "Reconfirm". ADJ Old Code New Code Reconfirm **** ---- ---- 3 Enter the...
... enter the new keycode in "FREEZE" mode or on the projector for about 5 seconds. Info • Keylock does not function while the projector is in standby mode, you have already set , the keycode input screen appears after the power is turned on the projector in "Reconfirm". ADJ Old Code New Code Reconfirm **** ---- ---- 3 Enter the...

XR10S|XR10X|XR20S|XR20X Operation Manual
Page 51
... cleaning the projector. Mild detergent diluted with a soft flannel cloth. I The cabinet as well as they may wear off dirt gently with water Appendix Mild detergent Wax Thinner Info • If you have unplugged the power cord before use any liquid type cleaning agents, as the operation panel ...is hard to scrape or hit the lens. Make sure to press S STANDBY/ON on the projector or eSTANDBY on the remote control and put the...
... cleaning the projector. Mild detergent diluted with a soft flannel cloth. I The cabinet as well as they may wear off dirt gently with water Appendix Mild detergent Wax Thinner Info • If you have unplugged the power cord before use any liquid type cleaning agents, as the operation panel ...is hard to scrape or hit the lens. Make sure to press S STANDBY/ON on the projector or eSTANDBY on the remote control and put the...


