

Operation Manual
Page 1
It will guide you for purchasing this manual carefully. XL-HP500W Micro Component System consisting of XLHP500W (main unit) and CP-HP500W (speaker system). OPERATION MANUAL XLHP500WA_FRONT 1 02.8.7, 9:54 AM To obtain the best performance from this product, please read this SHARP product. MICRO COMPONENT SYSTEM MODEL XL-HP500W Thank you in operating your SHARP product.
It will guide you for purchasing this manual carefully. XL-HP500W Micro Component System consisting of XLHP500W (main unit) and CP-HP500W (speaker system). OPERATION MANUAL XLHP500WA_FRONT 1 02.8.7, 9:54 AM To obtain the best performance from this product, please read this SHARP product. MICRO COMPONENT SYSTEM MODEL XL-HP500W Thank you in operating your SHARP product.
Operation Manual
Page 2
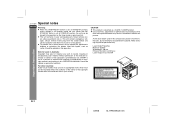
... Material: GaAIAs Wavelength: 780 nm Emission Duration: continuous Laser Output: max. 0.6 mW Important Instruction E-1 02/8/6 XL-HP500W(A)1.fm To prevent fire or shock hazard, do not expose this compact disc player is prohibited by the timer mode... or remote control. ! As the laser beam used in your country. XL-HP500W Special notes ENGLISH Warning: ! No objects filled with liquids, such as a CLASS 1 LASER product. ! When... the copyright. This unit contains no user serviceable parts. SHARP is still present inside the unit.
... Material: GaAIAs Wavelength: 780 nm Emission Duration: continuous Laser Output: max. 0.6 mW Important Instruction E-1 02/8/6 XL-HP500W(A)1.fm To prevent fire or shock hazard, do not expose this compact disc player is prohibited by the timer mode... or remote control. ! As the laser beam used in your country. XL-HP500W Special notes ENGLISH Warning: ! No objects filled with liquids, such as a CLASS 1 LASER product. ! When... the copyright. This unit contains no user serviceable parts. SHARP is still present inside the unit.
Operation Manual
Page 3
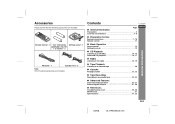
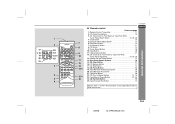
Accessories Please confirm that the following accessories are included. Contents XL-HP500W " General Information Page Precautions 3 Controls and indicators 4 - 6 ENGLISH " Preparation for Use System connections 7 - 10 Remote control 11 " Basic Operation Sound..." Advanced Features Timer and sleep operation 25 - 27 Enhancing your system 27, 28 " References Troubleshooting chart 29, 30 Maintenance 31 Specifications 31, 32 E-2 02/8/6 XL-HP500W(A)1.fm Remote control 1 "AA" size battery AM loop aerial 1 (UM/SUM-3, R6, HP7 or similar) 2 FM aerial 1 Speaker wire 2 Note: Only ...
Accessories Please confirm that the following accessories are included. Contents XL-HP500W " General Information Page Precautions 3 Controls and indicators 4 - 6 ENGLISH " Preparation for Use System connections 7 - 10 Remote control 11 " Basic Operation Sound..." Advanced Features Timer and sleep operation 25 - 27 Enhancing your system 27, 28 " References Troubleshooting chart 29, 30 Maintenance 31 Specifications 31, 32 E-2 02/8/6 XL-HP500W(A)1.fm Remote control 1 "AA" size battery AM loop aerial 1 (UM/SUM-3, R6, HP7 or similar) 2 FM aerial 1 Speaker wire 2 Note: Only ...
Operation Manual
Page 4
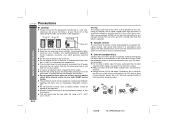
...176;F). SHARP will not be impeded by covering the ventilation openings with a higher voltage other factors. " Care of compact discs Compact discs are read. Do not write on the disc surface. Keep your discs away from which is specified is specified. NO YES Correct E-3 02/8/6 XL-HP500W(A)1.fm ... If a CD is at moderate levels. Do not mark this product with items, such as pulling the lead can cause noise or mistracking. XL-HP500W Precautions ENGLISH " General ! If your system. ! Do not remove the outer cover, as lighted candles, should only be used must be ...
...176;F). SHARP will not be impeded by covering the ventilation openings with a higher voltage other factors. " Care of compact discs Compact discs are read. Do not write on the disc surface. Keep your discs away from which is specified is specified. NO YES Correct E-3 02/8/6 XL-HP500W(A)1.fm ... If a CD is at moderate levels. Do not mark this product with items, such as pulling the lead can cause noise or mistracking. XL-HP500W Precautions ENGLISH " General ! If your system. ! Do not remove the outer cover, as lighted candles, should only be used must be ...
Operation Manual
Page 5
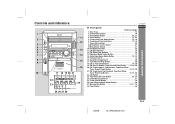
... Fast Wind, Tuner Preset Down Button 15, 19, 20 21. CD Button 14 23. Tape Button 20 General Information ENGLISH 25 26 27 28 E-4 02/8/6 XL-HP500W(A)1.fm Microphone Level Control 21 9. On/Stand-by Button 10 3. Headphone Socket 28 11. Controls and indicators 1 11 2 12 3 4 5 13 6 7 14... 8 15 9 16 10 17 18 19 20 21 22 24 23 XL-HP500W " Front panel Reference page 1. Microphone Socket 21 10. CD Track Up or Fast Forward, Tape Fast Wind, Tuner Preset Up Button 15, 19, 20 22...
... Fast Wind, Tuner Preset Down Button 15, 19, 20 21. CD Button 14 23. Tape Button 20 General Information ENGLISH 25 26 27 28 E-4 02/8/6 XL-HP500W(A)1.fm Microphone Level Control 21 9. On/Stand-by Button 10 3. Headphone Socket 28 11. Controls and indicators 1 11 2 12 3 4 5 13 6 7 14... 8 15 9 16 10 17 18 19 20 21 22 24 23 XL-HP500W " Front panel Reference page 1. Microphone Socket 21 10. CD Track Up or Fast Forward, Tape Fast Wind, Tuner Preset Up Button 15, 19, 20 22...

Operation Manual
Page 6
...Memory Indicator 9. Tape Record Indicator 15. AC Power Lead 7, 9 5. " Speaker system 1. Speaker Terminals 02/8/6 XL-HP500W(A)1.fm Sleep Indicator " Rear panel Reference page 1. FM 75 Ohms Aerial Terminal 7, 8 6. Speaker Terminals 7, 8... heat radiation. Tape Forward Play Indicator 6. CD Pause Indicator 13. Cooling Fan 3. FM Aerial Earth Terminal 7, 8 7. Bass Reflex Duct 4. Disc Number Indicators 2. Tweeter 2. XL-HP500W Controls and indicators (continued) ENGLISH 1 2 34 5 6 78 9 10 11 12 13 14 15 General Information 5 6 7 8 1 9 2 3 10 4 1...
...Memory Indicator 9. Tape Record Indicator 15. AC Power Lead 7, 9 5. " Speaker system 1. Speaker Terminals 02/8/6 XL-HP500W(A)1.fm Sleep Indicator " Rear panel Reference page 1. FM 75 Ohms Aerial Terminal 7, 8 6. Speaker Terminals 7, 8... heat radiation. Tape Forward Play Indicator 6. CD Pause Indicator 13. Cooling Fan 3. FM Aerial Earth Terminal 7, 8 7. Bass Reflex Duct 4. Disc Number Indicators 2. Tweeter 2. XL-HP500W Controls and indicators (continued) ENGLISH 1 2 34 5 6 78 9 10 11 12 13 14 15 General Information 5 6 7 8 1 9 2 3 10 4 1...
Operation Manual
Page 7
1 2 17 22 18 23 19 24 20 25 21 3 4 5 6 XL-HP500W ! Remote Control Transmitter 11 2. Clock Button 13 5. Extra Bass Button 12 7. Tape Button 20 9 11. Video/Auxiliary Button 27 10 12. Tape Reverse Mode Select ... Reference page 1. Equaliser Mode Select Button 12 7 6. CD Button 14 9. Tape Record Pause Button 23, 24 16 24. Tape Stop Button 20 15 22. E-6 02/8/6 XL-HP500W(A)1.fm CD Clear Button 17 16. CD Track Up or Fast Forward, Tape Fast Wind, Tuner Preset Up Button 15, 19, 20 13. Disc Direct...
1 2 17 22 18 23 19 24 20 25 21 3 4 5 6 XL-HP500W ! Remote Control Transmitter 11 2. Clock Button 13 5. Extra Bass Button 12 7. Tape Button 20 9 11. Video/Auxiliary Button 27 10 12. Tape Reverse Mode Select ... Reference page 1. Equaliser Mode Select Button 12 7 6. CD Button 14 9. Tape Record Pause Button 23, 24 16 24. Tape Stop Button 20 15 22. E-6 02/8/6 XL-HP500W(A)1.fm CD Clear Button 17 16. CD Track Up or Fast Forward, Tape Fast Wind, Tuner Preset Up Button 15, 19, 20 13. Disc Direct...
Operation Manual
Page 8
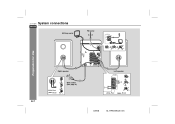
XL-HP500W System connections ENGLISH AM loop aerial FM aerial Preparation for Use Right speaker Left speaker E-7 Red Black Wall socket (See page 9.) Red Black 02/8/6 XL-HP500W(A)1.fm
XL-HP500W System connections ENGLISH AM loop aerial FM aerial Preparation for Use Right speaker Left speaker E-7 Red Black Wall socket (See page 9.) Red Black 02/8/6 XL-HP500W(A)1.fm
Operation Manual
Page 9
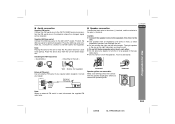
... > < Attaching to the plus (+) terminal. Speaker connection Connect the black wire to the minus (-) terminal, and the red wire to the wall > XL-HP500W ! Preparation for optimum reception. Incorrect E-8 02/8/6 XL-HP500W(A)1.fm Place the AM loop aerial on the unit or near the AC power lead may be received. Note: When an external...
... > < Attaching to the plus (+) terminal. Speaker connection Connect the black wire to the minus (-) terminal, and the red wire to the wall > XL-HP500W ! Preparation for optimum reception. Incorrect E-8 02/8/6 XL-HP500W(A)1.fm Place the AM loop aerial on the unit or near the AC power lead may be received. Note: When an external...

Operation Manual
Page 10
... V - 240 V AC). ! If necessary, adjust the selector to correspond to the AC socket. Wait until the appropriate voltage number appears in use for Use E-9 02/8/6 XL-HP500W(A)1.fm XL-HP500W System connections (continued) ENGLISH 230V 240V Wall socket (230 - 240 V, 50/60 Hz) ! Setting the AC voltage selector Check the setting of time. Notes...
... V - 240 V AC). ! If necessary, adjust the selector to correspond to the AC socket. Wait until the appropriate voltage number appears in use for Use E-9 02/8/6 XL-HP500W(A)1.fm XL-HP500W System connections (continued) ENGLISH 230V 240V Wall socket (230 - 240 V, 50/60 Hz) ! Setting the AC voltage selector Check the setting of time. Notes...
Operation Manual
Page 11
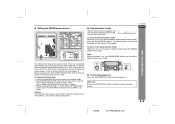
...) 50/9 " For 100 kHz FM interval (10 kHz in memory including clock, timer settings, tuner preset, and CD programme. ! Setting the FM/AM span selector XL-HP500W ! To return to the demonstration mode: When the unit is on the rear panel) to turn the power on the rear panel) as follows. Before... AM) 100/10 3 Whilst pressing down the / button and the X-BASS/DEMO button, press the ON/STAND-BY button until "CLEAR AL" appears. E-10 02/8/6 XL-HP500W(A)1.fm
...) 50/9 " For 100 kHz FM interval (10 kHz in memory including clock, timer settings, tuner preset, and CD programme. ! Setting the FM/AM span selector XL-HP500W ! To return to the demonstration mode: When the unit is on the rear panel) to turn the power on the rear panel) as follows. Before... AM) 100/10 3 Whilst pressing down the / button and the X-BASS/DEMO button, press the ON/STAND-BY button until "CLEAR AL" appears. E-10 02/8/6 XL-HP500W(A)1.fm
Operation Manual
Page 12
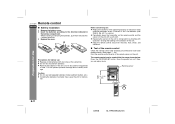
.... (See pages 7 - 10.) Point the remote control directly at the same time. Change the lighting or the direction of time. Remote sensor 0.2 m - 6 m (8" - 20') E-11 02/8/6 XL-HP500W(A)2.fm " Remove the batteries if the unit is reduced or if the operation becomes erratic...
.... (See pages 7 - 10.) Point the remote control directly at the same time. Change the lighting or the direction of time. Remote sensor 0.2 m - 6 m (8" - 20') E-11 02/8/6 XL-HP500W(A)2.fm " Remove the batteries if the unit is reduced or if the operation becomes erratic...
Operation Manual
Page 13
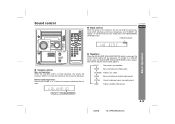
... button is turned anti-clockwise, the volume will appear. CLASSIC Treble is slightly emphasised. 0 1 2 ..... 29 30 MAXIMUM E-12 02/8/6 XL-HP500W(A)2.fm X-BASS indicator ENGLISH Basic Operation ! To change to increase or decrease the volume. ! ROCK Bass and treble are emphasised. When it .... To cancel the extra bass mode, press the X-BASS/DEMO (X-BASS) button. POPS Bass and treble are slightly emphasised. Sound control XL-HP500W ! Remote control operation: Press the VOLUME (+ or -) button to a different mode, press the EQUALIZER (EQUALIZER MODE) button repeatedly until...
... button is turned anti-clockwise, the volume will appear. CLASSIC Treble is slightly emphasised. 0 1 2 ..... 29 30 MAXIMUM E-12 02/8/6 XL-HP500W(A)2.fm X-BASS indicator ENGLISH Basic Operation ! To change to increase or decrease the volume. ! ROCK Bass and treble are emphasised. When it .... To cancel the extra bass mode, press the X-BASS/DEMO (X-BASS) button. POPS Bass and treble are slightly emphasised. Sound control XL-HP500W ! Remote control operation: Press the VOLUME (+ or -) button to a different mode, press the EQUALIZER (EQUALIZER MODE) button repeatedly until...
Operation Manual
Page 14
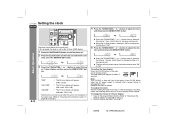
XL-HP500W Setting the clock ENGLISH 4 Press the TUNING/TIME ( or ) button to select 24-hour or 12-hour display and then press the MEMORY/SET button. ... confirm the time display: Press the CLOCK button on page 30 for about 5 seconds. To readjust the clock: Perform "Setting the clock" from step 1. 02/8/6 XL-HP500W(A)2.fm If the time display is selected, "AM" will appear. (AM 12:00 -
XL-HP500W Setting the clock ENGLISH 4 Press the TUNING/TIME ( or ) button to select 24-hour or 12-hour display and then press the MEMORY/SET button. ... confirm the time display: Press the CLOCK button on page 30 for about 5 seconds. To readjust the clock: Perform "Setting the clock" from step 1. 02/8/6 XL-HP500W(A)2.fm If the time display is selected, "AM" will appear. (AM 12:00 -
Operation Manual
Page 15
... due to the state of the disc tray 1 - 3 positions, that disc finishes playing, the next disc will begin from the same point, press the button. XL-HP500W ENGLISH CD Playback 1 Press the ON/STAND-BY button to turn the power on the trays 2 - 3 by following steps 3 - 5. 7 Press the / ...You can also play . Listening to start playback. Be sure to place 8 cm (3") CD in the stop mode, press the desired button. 02/8/6 XL-HP500W(A)2.fm E-14 To stop automatically. To exchange other CDs whilst playing a disc: Press the button for recording. 5 Press the button to open the ...
... due to the state of the disc tray 1 - 3 positions, that disc finishes playing, the next disc will begin from the same point, press the button. XL-HP500W ENGLISH CD Playback 1 Press the ON/STAND-BY button to turn the power on the trays 2 - 3 by following steps 3 - 5. 7 Press the / ...You can also play . Listening to start playback. Be sure to place 8 cm (3") CD in the stop mode, press the desired button. 02/8/6 XL-HP500W(A)2.fm E-14 To stop automatically. To exchange other CDs whilst playing a disc: Press the button for recording. 5 Press the button to open the ...

Operation Manual
Page 16
...of the DISC SELECT - ( 1 - 3) buttons to a CD (CDs) (continued) ENGLISH ! " If TV or radio interference occurs during playback. E-15 02/8/6 XL-HP500W(A)2.fm To locate the beginning of the first track is restored. To locate the desired portion CD Playback For audible fast forward: Press and hold..., wait until the desired track number appears. ! Press one disc tray. " When the end of a track on a single disc only. XL-HP500W Listening to select the desired disc. To restart the track being played: Press the button for less than 0.5 seconds during fast reverse, the unit...
...of the DISC SELECT - ( 1 - 3) buttons to a CD (CDs) (continued) ENGLISH ! " If TV or radio interference occurs during playback. E-15 02/8/6 XL-HP500W(A)2.fm To locate the beginning of the first track is restored. To locate the desired portion CD Playback For audible fast forward: Press and hold..., wait until the desired track number appears. ! Press one disc tray. " When the end of a track on a single disc only. XL-HP500W Listening to select the desired disc. To restart the track being played: Press the button for less than 0.5 seconds during fast reverse, the unit...
Operation Manual
Page 17
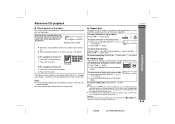
... all tracks on the remote control. For example, to choose 30 1 Press the "+10" button three times. 2 Press the "0" button. E-16 02/8/6 XL-HP500W(A)2.fm " When selecting number 11 or more, use the "+10" button. Repeat play , direct search is stopped, press the / button to number 10. ... tracks: Perform steps 1 - 6 in random order automatically. On the other hand, the button does not allow you to move to the previous track. XL-HP500W ! Direct search of the DISC SELECT - ( 1 - 3) buttons. 2 Press the RANDOM button on the chosen disc or a programmed sequence can move...
... all tracks on the remote control. For example, to choose 30 1 Press the "+10" button three times. 2 Press the "0" button. E-16 02/8/6 XL-HP500W(A)2.fm " When selecting number 11 or more, use the "+10" button. Repeat play , direct search is stopped, press the / button to number 10. ... tracks: Perform steps 1 - 6 in random order automatically. On the other hand, the button does not allow you to move to the previous track. XL-HP500W ! Direct search of the DISC SELECT - ( 1 - 3) buttons. 2 Press the RANDOM button on the chosen disc or a programmed sequence can move...

Operation Manual
Page 18
... 3) buttons will be displayed. Each time the button is lit, press the CLEAR button on the remote control. The new tracks will not work. XL-HP500W Advanced CD playback (continued) ENGLISH ! RY) button to save the track number. 5 Repeat steps 2 - 4 for playback in the stop mode,...7 Press the / button to select the desired disc. Notes: " Opening the disc tray automatically cancels the programmed sequence. E-17 02/8/6 XL-HP500W(A)2.fm To cancel the programmed play is flashing. The "MEMORY" indicator will disappear and all the programmed contents will not be cleared. " ...
... 3) buttons will be displayed. Each time the button is lit, press the CLEAR button on the remote control. The new tracks will not work. XL-HP500W Advanced CD playback (continued) ENGLISH ! RY) button to save the track number. 5 Repeat steps 2 - 4 for playback in the stop mode,...7 Press the / button to select the desired disc. Notes: " Opening the disc tray automatically cancels the programmed sequence. E-17 02/8/6 XL-HP500W(A)2.fm To cancel the programmed play is flashing. The "MEMORY" indicator will disappear and all the programmed contents will not be cleared. " ...
Operation Manual
Page 19
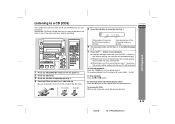
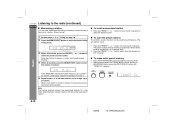
FM stereo mode indicator ! AM stereo broadcasts will stop the auto tuning, press the TUNING/TIME button again. XL-HP500W ENGLISH Radio Notes: " When radio interference occurs, auto scan tuning may stop automatically at the first receivable broadcast station. The reception changes to ... (FM or AM). To receive an FM stereo transmission: Press the TUNER (BAND) button to monaural, and the sound becomes clearer. E-18 02/8/6 XL-HP500W(A)2.fm Manual tuning: Press the TUNING/TIME button as many times as required to tune in stereo. FM stereo receiving indicator " If the FM reception...
FM stereo mode indicator ! AM stereo broadcasts will stop the auto tuning, press the TUNING/TIME button again. XL-HP500W ENGLISH Radio Notes: " When radio interference occurs, auto scan tuning may stop automatically at the first receivable broadcast station. The reception changes to ... (FM or AM). To receive an FM stereo transmission: Press the TUNER (BAND) button to monaural, and the sound becomes clearer. E-18 02/8/6 XL-HP500W(A)2.fm Manual tuning: Press the TUNING/TIME button as many times as required to tune in stereo. FM stereo receiving indicator " If the FM reception...
Operation Manual
Page 20
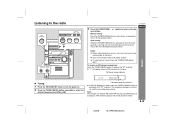
BASS/DEMO button, press the ON/STAND-BY button until "TUNER CL" appears. E-19 02/8/6 XL-HP500W(A)2.fm The preset number will flash and the programmed stations will be tuned in sequentially, for more than 0.5 seconds to select the desired station. 1 Perform ... to the radio (continued) ENGLISH ! To scan the preset stations The stations saved in memory and recall them at the push of a button. (Preset tuning) ! XL-HP500W Listening to select the preset channel number. Memorising a station You can store 40 AM and FM stations in memory can be a power failure or the...
BASS/DEMO button, press the ON/STAND-BY button until "TUNER CL" appears. E-19 02/8/6 XL-HP500W(A)2.fm The preset number will flash and the programmed stations will be tuned in sequentially, for more than 0.5 seconds to select the desired station. 1 Perform ... to the radio (continued) ENGLISH ! To scan the preset stations The stations saved in memory and recall them at the push of a button. (Preset tuning) ! XL-HP500W Listening to select the preset channel number. Memorising a station You can store 40 AM and FM stations in memory can be a power failure or the...


