
XL1200 Operation Manual
Page 2
... receiving antenna. These limits are designed to which are located on , the user is provided to call the CATV system installer's attention to Article 820-40 of the National Electrical Code that provides guidelines for help. Special Notes - However, there is connected. use of controls or adjustments or performance of procedures other than those specified herein may be determined by turning...
... receiving antenna. These limits are designed to which are located on , the user is provided to call the CATV system installer's attention to Article 820-40 of the National Electrical Code that provides guidelines for help. Special Notes - However, there is connected. use of controls or adjustments or performance of procedures other than those specified herein may be determined by turning...
XL1200 Operation Manual
Page 3
... a marked change in installation, such as to the receiver, be retained for cleaning. 11 Power Lines - Electrical energy can result in the operating instructions. Improper use liquid cleaners or aerosol cleaners. The appliance should be connected to a power supply only of antenna-discharge unit, connection to overturn. 5 Wall or Ceiling Mounting - For example, the appliance should not attempt to cords at plugs, convenience...
... a marked change in installation, such as to the receiver, be retained for cleaning. 11 Power Lines - Electrical energy can result in the operating instructions. Improper use liquid cleaners or aerosol cleaners. The appliance should be connected to a power supply only of antenna-discharge unit, connection to overturn. 5 Wall or Ceiling Mounting - For example, the appliance should not attempt to cords at plugs, convenience...
XL1200 Operation Manual
Page 4
.... registered mark. 0001 4 01/2/19 XL-1200(U)1.fm Contents Page „ General Information Precautions 5, 6 Accessories 6 Controls and Indicators 7 - 10 „ Preparation for our environment. If every American family replaced their electronic equipment with ENERGY STAR® labeled models, it 's good for Use Remote Control 11 System Connections 12 - 14 „ Basic Operation General Control 15 Sound Control 16 Setting the Clock 17 „ CD...
.... registered mark. 0001 4 01/2/19 XL-1200(U)1.fm Contents Page „ General Information Precautions 5, 6 Accessories 6 Controls and Indicators 7 - 10 „ Preparation for our environment. If every American family replaced their electronic equipment with ENERGY STAR® labeled models, it 's good for Use Remote Control 11 System Connections 12 - 14 „ Basic Operation General Control 15 Sound Control 16 Setting the Clock 17 „ CD...
XL1200 Operation Manual
Page 5
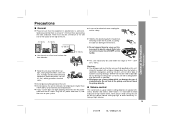
... from use a laser pickup which can damage internal wires. 12" (30 cm) z Use the unit on a firm, level surface free from the AC outlet, as pulling the cord can damage the eyes if viewed directly. z If your system. Plug the AC power cord back ...players use of this unit with the volume control setting up high, or while continually listening at high volumes. 5 01/2/19 XL-1200(U)1.fm It is specified. z This unit should only be used must also be the same as this may result in , and then turn on your system does not work properly, disconnect the AC power cord from direct...
... from use a laser pickup which can damage internal wires. 12" (30 cm) z Use the unit on a firm, level surface free from the AC outlet, as pulling the cord can damage the eyes if viewed directly. z If your system. Plug the AC power cord back ...players use of this unit with the volume control setting up high, or while continually listening at high volumes. 5 01/2/19 XL-1200(U)1.fm It is specified. z This unit should only be used must also be the same as this may result in , and then turn on your system does not work properly, disconnect the AC power cord from direct...
XL1200 Operation Manual
Page 7
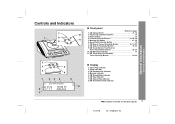
Power Button 15 4. CD Random Play Indicator 4. CD Repeat Play Indicator 8. Bass/Treble Selector Button 16 7. CD Play or Pause, Tuning Up Button 18, 19, 22 8. Sleep Indicator 3. Memory Indicator 5. CD Compartment 15, 18 2. Memory/Set Button 21, 24 6. CD Stop, Tuning Down Button 19, 22 9. FM Stereo Receiving Indicator Description of remote control (See page 9.) 7 01/2/19 XL-1200(U)1.fm FM Stereo Mode Indicator 6. Controls and Indicators - CD Play Indicator 7. General Information - Controls and Indicators...
Power Button 15 4. CD Random Play Indicator 4. CD Repeat Play Indicator 8. Bass/Treble Selector Button 16 7. CD Play or Pause, Tuning Up Button 18, 19, 22 8. Sleep Indicator 3. Memory Indicator 5. CD Compartment 15, 18 2. Memory/Set Button 21, 24 6. CD Stop, Tuning Down Button 19, 22 9. FM Stereo Receiving Indicator Description of remote control (See page 9.) 7 01/2/19 XL-1200(U)1.fm FM Stereo Mode Indicator 6. Controls and Indicators - CD Play Indicator 7. General Information - Controls and Indicators...
XL1200 Operation Manual
Page 9
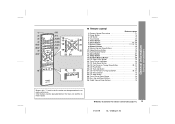
... installation for remote control (See page 11.) 9 01/2/19 XL-1200(U)1.fm Remote Control Transmitter 11 2 11 2. Timer Button 25 6. Band Selector Button 22 8 23 24 12. CD Track Down Button 20 18. CD Fast Reverse, Tuning Down Button 20, 22 19. Bass Up and Down Buttons 16 26. CD Stop Button 19 24. Controls and Indicators - „ Remote control 1 10 Reference page 1. CD Play Button 18 9 25 26 20. Tuner Preset...
... installation for remote control (See page 11.) 9 01/2/19 XL-1200(U)1.fm Remote Control Transmitter 11 2 11 2. Timer Button 25 6. Band Selector Button 22 8 23 24 12. CD Track Down Button 20 18. CD Fast Reverse, Tuning Down Button 20, 22 19. Bass Up and Down Buttons 16 26. CD Stop Button 19 24. Controls and Indicators - „ Remote control 1 10 Reference page 1. CD Play Button 18 9 25 26 20. Tuner Preset...
XL1200 Operation Manual
Page 10
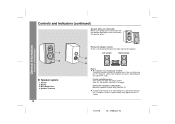
... the right and the left speakers. Move the speakers further away from the power switch). Therefore, they do not affect the display even if you remove the speaker grilles. z If any kind of TV used. Controls and Indicators - 1 2 „ Speaker system 1. Bass Reflex Duct 4. After 15 - 30 minutes, turn the TV on the TV screen. 01/2/19 XL-1200(U)1.fm Woofer 3. However, some color variation...
... the right and the left speakers. Move the speakers further away from the power switch). Therefore, they do not affect the display even if you remove the speaker grilles. z If any kind of TV used. Controls and Indicators - 1 2 „ Speaker system 1. Bass Reflex Duct 4. After 15 - 30 minutes, turn the TV on the TV screen. 01/2/19 XL-1200(U)1.fm Woofer 3. However, some color variation...

XL1200 Operation Manual
Page 11
... the battery terminals. 3 Replace the cover. „ Test of time. z Periodically clean the transmitter on the remote control and the sensor on the unit. z Exposing the sensor on ? This will not be used for Use - Remote Control „ Battery installation Use 2 "AAA" size batteries (UM-4, R03, HP-16 or similar). Change the lighting or the direction of the unit. Does the power turn on the unit...
... the battery terminals. 3 Replace the cover. „ Test of time. z Periodically clean the transmitter on the remote control and the sensor on the unit. z Exposing the sensor on ? This will not be used for Use - Remote Control „ Battery installation Use 2 "AAA" size batteries (UM-4, R03, HP-16 or similar). Change the lighting or the direction of the unit. Does the power turn on the unit...
XL1200 Operation Manual
Page 14
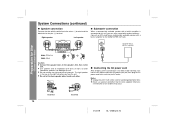
... the black wire to the unit. System Connections (continued) „ Speaker connection Connect the wire with emphasized bass. Preparation for a prolonged period of time. System Connections - Right speaker Left speaker „ Subwoofer connection When a commercially available speaker with a built-in amplifier White line Black Caution: z Connect the speaker wires to the speakers first, then to the plus (+) terminal. Speaker with a built-in amplifier to the AC power input jack, then plug the AC power cord of this...
... the black wire to the unit. System Connections (continued) „ Speaker connection Connect the wire with emphasized bass. Preparation for a prolonged period of time. System Connections - Right speaker Left speaker „ Subwoofer connection When a commercially available speaker with a built-in amplifier White line Black Caution: z Connect the speaker wires to the speakers first, then to the plus (+) terminal. Speaker with a built-in amplifier to the AC power input jack, then plug the AC power cord of this...
XL1200 Operation Manual
Page 15
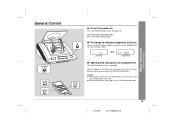
.../2/19 XL-1200(U)2.fm Basic Operation - Caution: z Do not open or close the CD compartment cover manually. Dimmed Brightened „ Opening and closing the CD compartment The CD compartment cover is turned on the remote control. To set the unit to the unit. General Control - It may cause malfunctions to stand-by mode: Press the POWER button again. „ To change the display brightness (2 levels...
.../2/19 XL-1200(U)2.fm Basic Operation - Caution: z Do not open or close the CD compartment cover manually. Dimmed Brightened „ Opening and closing the CD compartment The CD compartment cover is turned on the remote control. To set the unit to the unit. General Control - It may cause malfunctions to stand-by mode: Press the POWER button again. „ To change the display brightness (2 levels...
XL1200 Operation Manual
Page 17
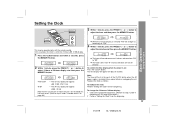
... unit is first installed or it has been reset. (Refer to adjust the minutes and then press the MEMORY button. Setting the Clock - Note: The time will not advance even if minutes advance from the beginning. 17 01/2/19 XL-1200(U)2.fm To change automatically to "PM". 4 Within 1 minute, press the PRESET ( or ) button to step 3 under "If trouble occurs" on page...
... unit is first installed or it has been reset. (Refer to adjust the minutes and then press the MEMORY button. Setting the Clock - Note: The time will not advance even if minutes advance from the beginning. 17 01/2/19 XL-1200(U)2.fm To change automatically to "PM". 4 Within 1 minute, press the PRESET ( or ) button to step 3 under "If trouble occurs" on page...

XL1200 Operation Manual
Page 21
... lit, press the CLEAR button on the remote control while the "MEMORY" indicator is not possible. 21 01/2/19 XL-1200(U)3.fm Up to 20 tracks can choose up to 20 selections for other function, the programmed selections will not be cleared, beginning with the last track programmed. To cancel the programmed play is flashing. Playback order Total playback time 4 Repeat steps 2 - 3 for playback...
... lit, press the CLEAR button on the remote control while the "MEMORY" indicator is not possible. 21 01/2/19 XL-1200(U)3.fm Up to 20 tracks can choose up to 20 selections for other function, the programmed selections will not be cleared, beginning with the last track programmed. To cancel the programmed play is flashing. Playback order Total playback time 4 Repeat steps 2 - 3 for playback...

XL1200 Operation Manual
Page 24
... XL-1200(U)3.fm The preset number will flash and the programmed stations will be a power failure or the AC power cord disconnection. „ To recall a memorized station Press the PRESET ( or ) button for 5 seconds each. 2 Press the PRESET ( or ) button again when the de- Store the stations in memory, in "Listening to the Radio" on the remote control. 24 Listening to select the desired station. Radio - Preset channel Frequency and frequency band „ To scan the preset stations...
... XL-1200(U)3.fm The preset number will flash and the programmed stations will be a power failure or the AC power cord disconnection. „ To recall a memorized station Press the PRESET ( or ) button for 5 seconds each. 2 Press the PRESET ( or ) button again when the de- Store the stations in memory, in "Listening to the Radio" on the remote control. 24 Listening to select the desired station. Radio - Preset channel Frequency and frequency band „ To scan the preset stations...

XL1200 Operation Manual
Page 25
... desired station. 3 Adjust the volume using the VOLUME buttons. When you selected the TUNER, tune in to the Radio (See page 22.) 25 01/2/19 XL-1200(U)3.fm Sleep operation: The radio and compact disc can all be turned off automatically. „ Timer playback Before setting timer: 1 Press the CLOCK button to check that the clock is on time. 2 Load a disc to be operated only with the remote control. Timer playback: The unit turns on...
... desired station. 3 Adjust the volume using the VOLUME buttons. When you selected the TUNER, tune in to the Radio (See page 22.) 25 01/2/19 XL-1200(U)3.fm Sleep operation: The radio and compact disc can all be turned off automatically. „ Timer playback Before setting timer: 1 Press the CLOCK button to check that the clock is on time. 2 Load a disc to be operated only with the remote control. Timer playback: The unit turns on...

XL1200 Operation Manual
Page 26
... the POWER button to turn the power on or enter the power stand-by mode automatically. It will enter the power stand-by mode after the timer playback starts. To reset or change the timer setting: Perform "Timer playback" from the beginning. 26 01/2/19 XL-1200(U)3.fm Advanced Features - z The timer playback starting time, function, and volume will not be retained until it will be displayed...
... the POWER button to turn the power on or enter the power stand-by mode automatically. It will enter the power stand-by mode after the timer playback starts. To reset or change the timer setting: Perform "Timer playback" from the beginning. 26 01/2/19 XL-1200(U)3.fm Advanced Features - z The timer playback starting time, function, and volume will not be retained until it will be displayed...

XL1200 Operation Manual
Page 27
... is displayed for about 3 seconds. 27 01/2/19 XL-1200(U)3.fm The volume will enter the power stand-by mode auto- The remaining sleep time is set. The time will Timer playback automatically stop. start time To cancel the sleep operation: Press the POWER button while the sleep timer is set, set . Advanced Features - The amount of sleep time can play back the same source only (the function cannot be changed...
... is displayed for about 3 seconds. 27 01/2/19 XL-1200(U)3.fm The volume will enter the power stand-by mode auto- The remaining sleep time is set. The time will Timer playback automatically stop. start time To cancel the sleep operation: Press the POWER button while the sleep timer is set, set . Advanced Features - The amount of sleep time can play back the same source only (the function cannot be changed...
XL1200 Operation Manual
Page 28
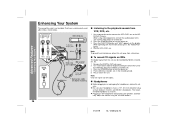
... POWER button to connect the VCR, DVD, etc. Red White To the line output jacks White Red MD recorder RCA cord (not supplied) Headphones To the optical line input jack Connection cable for digital recording to connect the unit to the OPTICAL IN jack of a MiniDisc recorder, etc. 3 Press the POWER button to the VIDEO/AUX IN jacks. When using the VOLUME buttons. 28 01/2/19 XL-1200(U)3.fm Enhancing Your System The connection cord is 32 ohms. z Plugging in the recording mode. 5 Play...
... POWER button to connect the VCR, DVD, etc. Red White To the line output jacks White Red MD recorder RCA cord (not supplied) Headphones To the optical line input jack Connection cable for digital recording to connect the unit to the OPTICAL IN jack of a MiniDisc recorder, etc. 3 Press the POWER button to the VIDEO/AUX IN jacks. When using the VOLUME buttons. 28 01/2/19 XL-1200(U)3.fm Enhancing Your System The connection cord is 32 ohms. z Plugging in the recording mode. 5 Play...
XL1200 Operation Manual
Page 29
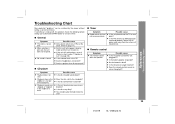
... or com- z Does the remote control sensor receive strong light? 29 01/2/19 XL-1200(U)3.fm Troubleshooting Chart Many potential "problems" can be resolved by mode and then turn it . (Refer to step 3 under "If trouble occurs" on page 30.) z Is the volume level set to "0"? z No sound is not on . z Has condensation formed inside the unit? „ Tuner Symptom Possible cause z Radio makes unusual z Is the...
... or com- z Does the remote control sensor receive strong light? 29 01/2/19 XL-1200(U)3.fm Troubleshooting Chart Many potential "problems" can be resolved by mode and then turn it . (Refer to step 3 under "If trouble occurs" on page 30.) z Is the volume level set to "0"? z No sound is not on . z Has condensation formed inside the unit? „ Tuner Symptom Possible cause z Radio makes unusual z Is the...

XL1200 Operation Manual
Page 30
.../SET button and the button, plug the AC power cord into the AC INPUT jack on the unit. line, paint thinner, etc.). It may malfunction. If fingerprints or dust accumulate on the pickup, clean it is not restored in step 1, unplug and plug in memory including clock, timer settings, tuner preset, and CD program. 30 01/2/19 XL-1200(U)3.fm Troubleshooting Chart (continued) Maintenance „ If trouble...
.../SET button and the button, plug the AC power cord into the AC INPUT jack on the unit. line, paint thinner, etc.). It may malfunction. If fingerprints or dust accumulate on the pickup, clean it is not restored in step 1, unplug and plug in memory including clock, timer settings, tuner preset, and CD program. 30 01/2/19 XL-1200(U)3.fm Troubleshooting Chart (continued) Maintenance „ If trouble...
XL1200 Operation Manual
Page 31
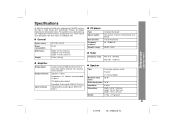
... Speakers: 8 ohms Headphones: 16 - 50 ohms (recommended: 32 ohms) CD digital output (optical) Subwoofer (Audio signal): 500 mV/47 kohms Video/Auxiliary (audio signal): 500 mV/47 kohms „ CD player Type Signal readout D/A converter Frequency response Dynamic range Compact disc player Non-contact, 3-beam semiconductor laser pickup 1-bit D/A converter 20 - 20,000 Hz 90 dB (1 kHz) „ Tuner Frequency range FM: 87.5 - 108 MHz AM: 530 - 1,720 kHz „ Speaker Type Maximum input power Rated input power Impedance...
... Speakers: 8 ohms Headphones: 16 - 50 ohms (recommended: 32 ohms) CD digital output (optical) Subwoofer (Audio signal): 500 mV/47 kohms Video/Auxiliary (audio signal): 500 mV/47 kohms „ CD player Type Signal readout D/A converter Frequency response Dynamic range Compact disc player Non-contact, 3-beam semiconductor laser pickup 1-bit D/A converter 20 - 20,000 Hz 90 dB (1 kHz) „ Tuner Frequency range FM: 87.5 - 108 MHz AM: 530 - 1,720 kHz „ Speaker Type Maximum input power Rated input power Impedance...


