XG-MB70X Operation Manual
Page 6
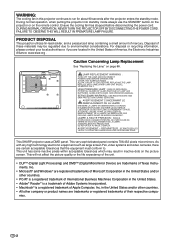
... projector enters the standby mode. POTENTIAL HAZARD OF GLASS PARTICLES IF LAMP HAS RUPTURED. LAMPE A HAUTE PRESSION : RISQUE D'EXPLOSION. WARNING: The cooling fan in inactive dots on the picture screen. HOT SURFACE INSIDE. LAMP REPLACEMENT WARNING : TURN OFF THE LAMP AND DISCONNECT POWER CORD BEFORE OPENING THIS COVER. NE REMPLACER QUE PAR UNE LAMPE SHARP DE MODÈLE AN-MB70LP. Ensure the cooling fan has stopped before disconnecting the power cord. REPLACE WITH SAME SHARP LAMP...
... projector enters the standby mode. POTENTIAL HAZARD OF GLASS PARTICLES IF LAMP HAS RUPTURED. LAMPE A HAUTE PRESSION : RISQUE D'EXPLOSION. WARNING: The cooling fan in inactive dots on the picture screen. HOT SURFACE INSIDE. LAMP REPLACEMENT WARNING : TURN OFF THE LAMP AND DISCONNECT POWER CORD BEFORE OPENING THIS COVER. NE REMPLACER QUE PAR UNE LAMPE SHARP DE MODÈLE AN-MB70LP. Ensure the cooling fan has stopped before disconnecting the power cord. REPLACE WITH SAME SHARP LAMP...
XG-MB70X Operation Manual
Page 8
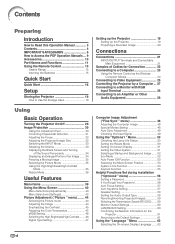
... Modes Setting 48 Auto Sync Adjustment 49 Checking the Input Signal 49 Using the "Options1 " Menu 50 Checking the Lamp Life Status 50 Setting the Resize Mode 50 Setting On-screen Display 51 Setting the Video System 51 Selecting a Startup and Background Image ....... 52 Eco Mode 52 Auto Power Off Function 53 Selecting the Menu Screen Position 53 System Lock Function 54 Keylock Function 55 Helpful Functions Set during Installation ("Options2 " menu 56 Setting a Password 56 If You Forget Your Password 56 Auto Focus Setting 57 Auto Keystone Setting 57 Speaker Setting...
... Modes Setting 48 Auto Sync Adjustment 49 Checking the Input Signal 49 Using the "Options1 " Menu 50 Checking the Lamp Life Status 50 Setting the Resize Mode 50 Setting On-screen Display 51 Setting the Video System 51 Selecting a Startup and Background Image ....... 52 Eco Mode 52 Auto Power Off Function 53 Selecting the Menu Screen Position 53 System Lock Function 54 Keylock Function 55 Helpful Functions Set during Installation ("Options2 " menu 56 Setting a Password 56 If You Forget Your Password 56 Auto Focus Setting 57 Auto Keystone Setting 57 Speaker Setting...
XG-MB70X Operation Manual
Page 11
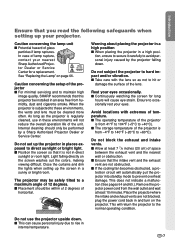
... light. ■ Position the screen so that you read the following safeguards when setting up the screen in and turn on the projector. Caution concerning the lamp unit ■ Potential hazard of the unit. In case of the lens. tor Dealer or Service Center for long hours will return the projector to the normal operating condition. Avoid locations with the lens so as the projector...
... light. ■ Position the screen so that you read the following safeguards when setting up the screen in and turn on the projector. Caution concerning the lamp unit ■ Potential hazard of the unit. In case of the lens. tor Dealer or Service Center for long hours will return the projector to the normal operating condition. Avoid locations with the lens so as the projector...
XG-MB70X Operation Manual
Page 12
... audio- Using the projector in internal temperature, as the cooling fan also stops. -8 Temperature monitor function ■ If the projector starts to setup problems or blockage of the air vents, " " and " " will illumi- Refer to "Maintenance Indicators" on the projector will enter the standby mode. This can result in . Take extra care with the lens. If the temperature continues to rise, the lamp will turn off period the projector will blink...
... audio- Using the projector in internal temperature, as the cooling fan also stops. -8 Temperature monitor function ■ If the projector starts to setup problems or blockage of the air vents, " " and " " will illumi- Refer to "Maintenance Indicators" on the projector will enter the standby mode. This can result in . Take extra care with the lens. If the temperature continues to rise, the lamp will turn off period the projector will blink...

XG-MB70X Operation Manual
Page 15
... obstruction between the auto focus sensor and the screen, or if there is explained. Introduction Part Names and Functions Numbers in refer to a computer. Front View 12 Power indicator 12·64 Lamp indicator 12·64 Temperature warning indicator 33 Volume buttons For adjusting the speaker sound level. 32 ZOOM/FOCUS button For adjusting the projected image size or adjusting the focus. 33 INPUT buttons For switching input mode 1, 2, 3 or 4. 32 AUTO FOCUS button For adjusting the focus automatically. 40 Adjustment buttons ('/"/\/|) For selecting menu items and...
... obstruction between the auto focus sensor and the screen, or if there is explained. Introduction Part Names and Functions Numbers in refer to a computer. Front View 12 Power indicator 12·64 Lamp indicator 12·64 Temperature warning indicator 33 Volume buttons For adjusting the speaker sound level. 32 ZOOM/FOCUS button For adjusting the projected image size or adjusting the focus. 33 INPUT buttons For switching input mode 1, 2, 3 or 4. 32 AUTO FOCUS button For adjusting the focus automatically. 40 Adjustment buttons ('/"/\/|) For selecting menu items and...

XG-MB70X Operation Manual
Page 21
... to switch the INPUT mode. On the projector On the remote control " On-screen Display • Unplug the power cord from the AC outlet after the cooling fan stops. cally displays a focus pattern and performs Auto Focus once. 2 Adjust the projected image size • Adjust the projected image size by pressing the ZOOM buttons. • To perform Auto Focus again, press the AUTO FOCUS button. On the projector On the remote control • If the image is automatically adjusted, and then the focus pattern disappears. 6. Turn the Power...
... to switch the INPUT mode. On the projector On the remote control " On-screen Display • Unplug the power cord from the AC outlet after the cooling fan stops. cally displays a focus pattern and performs Auto Focus once. 2 Adjust the projected image size • Adjust the projected image size by pressing the ZOOM buttons. • To perform Auto Focus again, press the AUTO FOCUS button. On the projector On the remote control • If the image is automatically adjusted, and then the focus pattern disappears. 6. Turn the Power...
XG-MB70X Operation Manual
Page 33
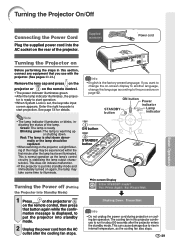
... into standby mode and immediately turned on the projector, a slight flickering of the image may take some time to start projection. Red: The lamp is set, the keycode input screen appears. ON button STANDBY button Power indicator Lamp indicator Note • The lamp indicator illuminates or blinks, indicating the status of the projector. Supplied accessory Power cord Turning the Projector on Before performing the steps in internal temperature, as the lamp's control circuitry is warming up or shutting down abnormally or the lamp should be replaced. • When switching...
... into standby mode and immediately turned on the projector, a slight flickering of the image may take some time to start projection. Red: The lamp is set, the keycode input screen appears. ON button STANDBY button Power indicator Lamp indicator Note • The lamp indicator illuminates or blinks, indicating the status of the projector. Supplied accessory Power cord Turning the Projector on Before performing the steps in internal temperature, as the lamp's control circuitry is warming up or shutting down abnormally or the lamp should be replaced. • When switching...

XG-MB70X Operation Manual
Page 48
... or 1080I signals are not displayed when selecting INPUT 1/INPUT 2 and setting the "Signal Type" to "RGB" or setting the "Signal Type" to "Auto" and the input signal is set to "Component" or set to your preferences using the "Picture" menu. Game For natural color gradation for a more exciting theater experience. Menu operation Page 42 Example: "Picture" screen menu for INPUT 1 or INPUT 2 is recognized as a component signal. • To reset all picture modes, items on the remote control to...
... or 1080I signals are not displayed when selecting INPUT 1/INPUT 2 and setting the "Signal Type" to "RGB" or setting the "Signal Type" to "Auto" and the input signal is set to "Component" or set to your preferences using the "Picture" menu. Game For natural color gradation for a more exciting theater experience. Menu operation Page 42 Example: "Picture" screen menu for INPUT 1 or INPUT 2 is recognized as a component signal. • To reset all picture modes, items on the remote control to...
XG-MB70X Operation Manual
Page 55
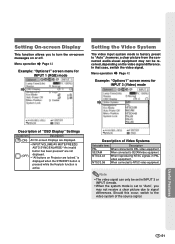
...; The video signal can only be received, depending on Projector are displayed. • INPUT/VOLUME/AV MUTE/FREEZE/ AUTO SYNC/ENLARGE/ "An invalid button has been pressed." Menu operation Page 42 Example: "Options1" screen menu for INPUT 1 (RGB) mode Setting the Video System The video input system mode is factory preset to PAL video equipment. Description of "OSD Display" Settings Selectable items Description (ON) All On-screen Displays are locked." Menu operation Page 42 Example: "Options1" screen menu for INPUT 3 (Video) mode Useful Features...
...; The video signal can only be received, depending on Projector are displayed. • INPUT/VOLUME/AV MUTE/FREEZE/ AUTO SYNC/ENLARGE/ "An invalid button has been pressed." Menu operation Page 42 Example: "Options1" screen menu for INPUT 1 (RGB) mode Setting the Video System The video input system mode is factory preset to PAL video equipment. Description of "OSD Display" Settings Selectable items Description (ON) All On-screen Displays are locked." Menu operation Page 42 Example: "Options1" screen menu for INPUT 3 (Video) mode Useful Features...

XG-MB70X Operation Manual
Page 58
... new keycode in "New Code". Note Not displaying the keycode input screen when turning the projector on • Press " on . When the System Lock is set • When System Lock is set the keycode with the buttons on the projector, use only those buttons on the projector. tions1" menu, then press . • A message is turned on the projector for four times. Note • You cannot use the following buttons for keycode: • ON button • STANDBY button...
... new keycode in "New Code". Note Not displaying the keycode input screen when turning the projector on • Press " on . When the System Lock is set • When System Lock is set the keycode with the buttons on the projector, use only those buttons on the projector. tions1" menu, then press . • A message is turned on the projector for four times. Note • You cannot use the following buttons for keycode: • ON button • STANDBY button...
XG-MB70X Operation Manual
Page 72
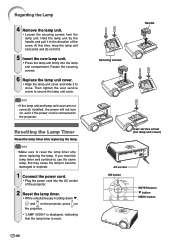
... user service screw to the projector. Info • If the lamp unit and lamp unit cover are not correctly installed, the power will not turn on the projector. • "LAMP 0000H" is displayed, indicating that the lamp timer is connected to secure the lamp unit cover. If you reset the lamp timer and continue to use the same lamp, this time, keep the lamp unit horizontal and do not tilt it in the direction of the projector. 2 Reset the lamp timer...
... user service screw to the projector. Info • If the lamp unit and lamp unit cover are not correctly installed, the power will not turn on the projector. • "LAMP 0000H" is displayed, indicating that the lamp timer is connected to secure the lamp unit cover. If you reset the lamp timer and continue to use the same lamp, this time, keep the lamp unit horizontal and do not tilt it in the direction of the projector. 2 Reset the lamp timer...

XG-MB70X Operation Manual
Page 74
... on the computer. • Cables incorrectly connected to rear panel of the projector. 23,25-28 • "Bright" is set . 55 turned on the projector. -70 Check Page • Projector power cord is not plugged into the If the keylock is set to cabinet shrinkage - noise appears. • Image adjustments are locked. Maintenance • See "Maintenance Indicators". 64 indicator illuminates or blinks in red. Troubleshooting Problem No picture and no sound is heard.
... on the computer. • Cables incorrectly connected to rear panel of the projector. 23,25-28 • "Bright" is set . 55 turned on the projector. -70 Check Page • Projector power cord is not plugged into the If the keylock is set to cabinet shrinkage - noise appears. • Image adjustments are locked. Maintenance • See "Maintenance Indicators". 64 indicator illuminates or blinks in red. Troubleshooting Problem No picture and no sound is heard.

XG-MB70X Operation Manual
Page 75
... be changed. The lamp suddenly turns off during projection. If this happens frequently, replace the lamp. • The lamp will eventually need to turn on INPUT 1 (RGB)/ INPUT 2 (RGB). The lamp has reached the end of its life. Replace the lamp. Picture is illuminating in again after the projector turns on INPUT 1 (COMPONENT)/ INPUT 2 (COMPONENT). Check • Change the input signal type setting. • Image adjustments are incorrectly set. • When temperature inside the projector increases, the cooling fan runs...
... be changed. The lamp suddenly turns off during projection. If this happens frequently, replace the lamp. • The lamp will eventually need to turn on INPUT 1 (RGB)/ INPUT 2 (RGB). The lamp has reached the end of its life. Replace the lamp. Picture is illuminating in again after the projector turns on INPUT 1 (COMPONENT)/ INPUT 2 (COMPONENT). Check • Change the input signal type setting. • Image adjustments are incorrectly set. • When temperature inside the projector increases, the cooling fan runs...
XG-MB70X Operation Manual
Page 76
... 9900-0159 Belgium http://www.sharp.nl http://www.sharp.be http://www.sharp.lu Sharp Corporation of Korea (82) 2-3660-2002 lcd@sharp-korea.co.kr http://www.sharpkorea.co.kr Sharp Business Systems (India) Limited (91) 11- 6431313 service@sharp-oa.com For SHARP Assistance If you encounter any problems during setup or operation of this operation manual does not answer your question...
... 9900-0159 Belgium http://www.sharp.nl http://www.sharp.be http://www.sharp.lu Sharp Corporation of Korea (82) 2-3660-2002 lcd@sharp-korea.co.kr http://www.sharpkorea.co.kr Sharp Business Systems (India) Limited (91) 11- 6431313 service@sharp-oa.com For SHARP Assistance If you encounter any problems during setup or operation of this operation manual does not answer your question...
XG-MB70X Operation Manual
Page 77
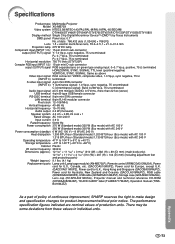
...), Operation manual (TINSB416WJZZ) As a part of policy of production units. Specifications Product type Multimedia Projector Model XG-MB70X Video system NTSC3.58/NTSC4.43/PAL/PAL-M/PAL-N/PAL-60/SECAM/ DTV480I/DTV480P/DTV540P/DTV576I/DTV576P/DTV720P/DTV1035I/DTV1080I Display method Single Chip Digital Micromirror DeviceTM (DMDTM) by Texas Instruments DMD panel Panel size: 0.7" No. of dots: 786,432 dots (1,024 [H] × 768 [V]) Lens 1.5 × electric zoom/focus lens, F2.0-2.5, f = 21.3-31.6 mm Projection lamp 275...
...), Operation manual (TINSB416WJZZ) As a part of policy of production units. Specifications Product type Multimedia Projector Model XG-MB70X Video system NTSC3.58/NTSC4.43/PAL/PAL-M/PAL-N/PAL-60/SECAM/ DTV480I/DTV480P/DTV540P/DTV576I/DTV576P/DTV720P/DTV1035I/DTV1080I Display method Single Chip Digital Micromirror DeviceTM (DMDTM) by Texas Instruments DMD panel Panel size: 0.7" No. of dots: 786,432 dots (1,024 [H] × 768 [V]) Lens 1.5 × electric zoom/focus lens, F2.0-2.5, f = 21.3-31.6 mm Projection lamp 275...
Setup Guide
Page 1
... an Error Occurs (Mail - General 15 Setting for the Network (Network - MULTIMEDIA PROJECTOR MODEL XG-MB70X SETUP GUIDE Screen Size and Projection Distance 2 Connecting Pin Assignments 3 RS-232C Specifications and Commands .......... 4 Setting up a Network Connection for the Computer 8 3. Connecting the Projector to Main Menu 26 Troubleshooting 27 Dimensions 30 Recipient Setting) ..... 16 Setting the Projector Using RS-232C or Telnet ...... 17 When Connecting Using RS-232C 17 When Connecting Using Telnet 18 SETUP MENU (Main Menu 19 ADVANCED SETUP MENU 19 Controlling the...
... an Error Occurs (Mail - General 15 Setting for the Network (Network - MULTIMEDIA PROJECTOR MODEL XG-MB70X SETUP GUIDE Screen Size and Projection Distance 2 Connecting Pin Assignments 3 RS-232C Specifications and Commands .......... 4 Setting up a Network Connection for the Computer 8 3. Connecting the Projector to Main Menu 26 Troubleshooting 27 Dimensions 30 Recipient Setting) ..... 16 Setting the Projector Using RS-232C or Telnet ...... 17 When Connecting Using RS-232C 17 When Connecting Using Telnet 18 SETUP MENU (Main Menu 19 ADVANCED SETUP MENU 19 Controlling the...

Setup Guide
Page 4
... the projector's operation manual for connection.) Communication conditions Set the serial port settings of the table. Signal format: Conforms to match that of the computer to RS-232C standard. Command format C1 C2 C3 C4 P1 P2 P3 P4 Return code (0DH) Command 4-digit Response code format Normal response Parameter 4-digit Problem response (communication error or incorrect command) O K Return code (0DH) E R R Return code (0DH) Info • When controlling the projector using RS-232C commands...
... the projector's operation manual for connection.) Communication conditions Set the serial port settings of the table. Signal format: Conforms to match that of the computer to RS-232C standard. Command format C1 C2 C3 C4 P1 P2 P3 P4 Return code (0DH) Command 4-digit Response code format Normal response Parameter 4-digit Problem response (communication error or incorrect command) O K Return code (0DH) E R R Return code (0DH) Info • When controlling the projector using RS-232C commands...
Setup Guide
Page 19
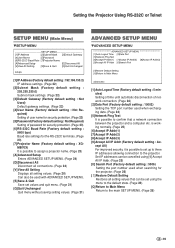
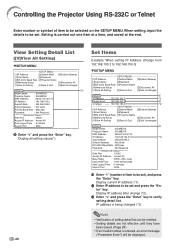
... Port [!]Restore Default Setting [Q]Return to Main Menu advanced> [1]Auto Logout Time (Factory default setting : 5 minutes) Setting of time until automatic disconnection of network connection. (Page 24) [2] Data Port (Factory default setting : 10002) Setting the TCP port number used when searching for the RS-232C terminals. (Page 23) [7] Projector Name (Factory default setting : XGMB70X) It is possible to assign a projector name. (Page 23) [A]Advanced Setup Enters ADVANCED SETUP MENU. (Page 24) [D]Disconnect All Disconnect all connections. (Page 24) [V] View All Setting Displays all setting...
... Port [!]Restore Default Setting [Q]Return to Main Menu advanced> [1]Auto Logout Time (Factory default setting : 5 minutes) Setting of time until automatic disconnection of network connection. (Page 24) [2] Data Port (Factory default setting : 10002) Setting the TCP port number used when searching for the RS-232C terminals. (Page 23) [7] Projector Name (Factory default setting : XGMB70X) It is possible to assign a projector name. (Page 23) [A]Advanced Setup Enters ADVANCED SETUP MENU. (Page 24) [D]Disconnect All Disconnect all connections. (Page 24) [V] View All Setting Displays all setting...
Setup Guide
Page 20
... Status)********** Data Port : 10002 Accept IP Address : Accept All Busy Reply : ERR+ code Input Hold Time : 1000 milliseconds Auto Logout Time : 5 minutes Search Port : 5006 1 Enter "1" (number of item to be selected on the SETUP MENU. Display all setting values(*). View Setting Detail List ([V]View All Setting) ▼SETUP MENU SETUP MENU [1]IP Address [2]Subnet Mask [3]Default Gateway [4]User Name [5]Password [6]RS-232C Baud Rate [7]Projector Name [A]Advanced Setup [D]Disconnect All [V]View All Setting [S]Save & Quit [Q]Quit Unchanged setup>v 1 Model...
... Status)********** Data Port : 10002 Accept IP Address : Accept All Busy Reply : ERR+ code Input Hold Time : 1000 milliseconds Auto Logout Time : 5 minutes Search Port : 5006 1 Enter "1" (number of item to be selected on the SETUP MENU. Display all setting values(*). View Setting Detail List ([V]View All Setting) ▼SETUP MENU SETUP MENU [1]IP Address [2]Subnet Mask [3]Default Gateway [4]User Name [5]Password [6]RS-232C Baud Rate [7]Projector Name [A]Advanced Setup [D]Disconnect All [V]View All Setting [S]Save & Quit [Q]Quit Unchanged setup>v 1 Model...

Setup Guide
Page 24
Setting Auto Logout Time (ADVANCED[1]Auto Logout Time) If there is performed, the connection to the projector via network will be displayed and returns the ADVANCED SETUP MENU. Note • If Disconnect All is no input after a fixed time, the projector automatically disconnects network connection using the Auto Logout function. setup>a 1 ADVANCED SETUP MENU [1]Auto Logout Time [2]Data Port [5]Network Ping Test [6]Accept IP Addr(1) [7]Accept IP Addr(2) [8]Accept IP Addr(3) [9]Accept All IP Addr [0]Search Port [!]Restore Default Setting [Q]Return...
Setting Auto Logout Time (ADVANCED[1]Auto Logout Time) If there is performed, the connection to the projector via network will be displayed and returns the ADVANCED SETUP MENU. Note • If Disconnect All is no input after a fixed time, the projector automatically disconnects network connection using the Auto Logout function. setup>a 1 ADVANCED SETUP MENU [1]Auto Logout Time [2]Data Port [5]Network Ping Test [6]Accept IP Addr(1) [7]Accept IP Addr(2) [8]Accept IP Addr(3) [9]Accept All IP Addr [0]Search Port [!]Restore Default Setting [Q]Return...


