
Instruction Manual
Page 2
WARNING FCC Regulations state that any unauthorized changes or modifications to this equipment. FOR YOUR RECORDS Please record below the model number and serial number for easy reference in a commercial environment. Model Number Serial Number Date of Purchase Place of loss or theft. These numbers are designed to provide reasonable protection against harmful interference when the equipment is provided for a Class A digital device, pursuant to operate this equipment not expressly approved by the manufacturer could void the user's authority to Part 15 of the unit. CAUTION The AC ...
WARNING FCC Regulations state that any unauthorized changes or modifications to this equipment. FOR YOUR RECORDS Please record below the model number and serial number for easy reference in a commercial environment. Model Number Serial Number Date of Purchase Place of loss or theft. These numbers are designed to provide reasonable protection against harmful interference when the equipment is provided for a Class A digital device, pursuant to operate this equipment not expressly approved by the manufacturer could void the user's authority to Part 15 of the unit. CAUTION The AC ...
Instruction Manual
Page 3
... an individual with a dedicated earth-guard. It will help you if you very much for Disposal Instructions. Do not use a sharp-pointed object on the same electrical circuit could cause the POS terminal to malfunction. • If the POS terminal malfunctions, call ...your purchase of the SHARP POS Terminal Model UP-3301. Contact Local Environmental Officials for your authorized SHARP dealer for service - INTRODUCTION Thank you encounter any operational problems. IMPORTANT • Install your POS ...
... an individual with a dedicated earth-guard. It will help you if you very much for Disposal Instructions. Do not use a sharp-pointed object on the same electrical circuit could cause the POS terminal to malfunction. • If the POS terminal malfunctions, call ...your purchase of the SHARP POS Terminal Model UP-3301. Contact Local Environmental Officials for your authorized SHARP dealer for service - INTRODUCTION Thank you encounter any operational problems. IMPORTANT • Install your POS ...
Instruction Manual
Page 4
Part Names and Functions 7 External View 7 Front view 7 Rear view 7 Displays 8 Operator display (touch panel 8 Customer display 10 Screen save mode 10 2. Selecting an Operating Mode 12 Operating Modes 12 Mode Selection 13 Selecting a mode 13 Entering a secret code 13 Returning to Entries 15 Preparations for direct PLUs 35 PLU price level shift 36 Condiment entries 37 Display of the Date 14 5. Time Display and Automatic Updating of Subtotals 38 Merchandise subtotal 38 2 www.cashregisters.net CONTENTS INTRODUCTION 1 IMPORTANT 1 PRECAUTION 1 1. Entries 16 ...
Part Names and Functions 7 External View 7 Front view 7 Rear view 7 Displays 8 Operator display (touch panel 8 Customer display 10 Screen save mode 10 2. Selecting an Operating Mode 12 Operating Modes 12 Mode Selection 13 Selecting a mode 13 Entering a secret code 13 Returning to Entries 15 Preparations for direct PLUs 35 PLU price level shift 36 Condiment entries 37 Display of the Date 14 5. Time Display and Automatic Updating of Subtotals 38 Merchandise subtotal 38 2 www.cashregisters.net CONTENTS INTRODUCTION 1 IMPORTANT 1 PRECAUTION 1 1. Entries 16 ...

Instruction Manual
Page 5
Manager Mode 59 Entering the Manager Mode 59 Override Entries 59 3 www.cashregisters.net Correction 54 Correction of the Last Entry (Direct Void 54 Correction of the Next-to-Last or Earlier Entries (Indirect Void 55 Subtotal Void 57 Correction of non-add code numbers 46 Remote printer send function 47 Gratuity 47 Payment Treatment 47 Tip-in /out 44 Bill totalizing/bill transfer 44 Bill separating 45 Auxiliary Entries 46 Percent calculations (premium or discount 46 Discount entries 46 Refund entries 46 Return entries 46 Printing of Incorrect Entries Not Handled by the ...
Manager Mode 59 Entering the Manager Mode 59 Override Entries 59 3 www.cashregisters.net Correction 54 Correction of the Last Entry (Direct Void 54 Correction of the Next-to-Last or Earlier Entries (Indirect Void 55 Subtotal Void 57 Correction of non-add code numbers 46 Remote printer send function 47 Gratuity 47 Payment Treatment 47 Tip-in /out 44 Bill totalizing/bill transfer 44 Bill separating 45 Auxiliary Entries 46 Percent calculations (premium or discount 46 Discount entries 46 Refund entries 46 Return entries 46 Printing of Incorrect Entries Not Handled by the ...
Instruction Manual
Page 6
10. Reading (X) and Resetting (Z) of Sales Totals 61 How to Program Alphanumeric Characters 96 Using character keys on PLUs 71 PLU stock report 71 PLU cost report 72 PLU top 20 report 73 PLU zero sales report (full 74 PLU zero sales (by dept.) report 74 PLU minimum stock report 74 PLU group total report by hour 75 Cash in drawer report 75 Tax report 76 Individual server report 77 Full server report 78 Employee report 79 Employee over-time report 79 Employee active status report 80 Hourly report 80 Labor cost % report 81 Ingredient stock report 81 GLU/PBLU report 82 GLU...
10. Reading (X) and Resetting (Z) of Sales Totals 61 How to Program Alphanumeric Characters 96 Using character keys on PLUs 71 PLU stock report 71 PLU cost report 72 PLU top 20 report 73 PLU zero sales report (full 74 PLU zero sales (by dept.) report 74 PLU minimum stock report 74 PLU group total report by hour 75 Cash in drawer report 75 Tax report 76 Individual server report 77 Full server report 78 Employee report 79 Employee over-time report 79 Employee active status report 80 Hourly report 80 Labor cost % report 81 Ingredient stock report 81 GLU/PBLU report 82 GLU...
Instruction Manual
Page 7
13. key (except menu PLU/condiment PLU 117 Direct condiment/menu PLU key 118 PLU Menu Key Programming 119 PLU menu key 119 Functional Programming 120 Discount key ( (-)1 thru (-)9 121 Percent key ( %1 thru %9 122 Gratuity 123 Tip 123 RA 124 PO 124 Manual tax 125 Media Key Programming 126 Cash key 127 Check key 130 Charge key 133 Employee charge key 136 Currency conversion key 139 Eat-in key 139 Service key 140 Final key 142 Cash in drawer 144 Check change 144 Check cashing 145 Text Programming 147 Function text 148 Department group text 150 PLU group text 150 ...
13. key (except menu PLU/condiment PLU 117 Direct condiment/menu PLU key 118 PLU Menu Key Programming 119 PLU menu key 119 Functional Programming 120 Discount key ( (-)1 thru (-)9 121 Percent key ( %1 thru %9 122 Gratuity 123 Tip 123 RA 124 PO 124 Manual tax 125 Media Key Programming 126 Cash key 127 Check key 130 Charge key 133 Employee charge key 136 Currency conversion key 139 Eat-in key 139 Service key 140 Final key 142 Cash in drawer 144 Check change 144 Check cashing 145 Text Programming 147 Function text 148 Department group text 150 PLU group text 150 ...
Instruction Manual
Page 8
Appendix 212 Error Messages 212 18. Indext 214 6 www.cashregisters.net Date/Time Setting 161 Date/time 161 Optional Feature Selection 162 Function prohibition 163 Function selection 164 Printing selection 165 Secret Code Programming 166 Z1 reports 167 PGM2-mode operations 167 System Z1 reports 168 System PGM2-mode operations 168 Initial down-loading (with clearing of memory 169 Maintenance down-loading (without clearing of memory 169 CAT#2 execute 170 Report Programming 171 Zero skip 172 Hourly report 172 Stacked report 173 Employee report 176 Logo Text Programming ...
Appendix 212 Error Messages 212 18. Indext 214 6 www.cashregisters.net Date/Time Setting 161 Date/time 161 Optional Feature Selection 162 Function prohibition 163 Function selection 164 Printing selection 165 Secret Code Programming 166 Z1 reports 167 PGM2-mode operations 167 System Z1 reports 168 System PGM2-mode operations 168 Initial down-loading (with clearing of memory 169 Maintenance down-loading (without clearing of memory 169 CAT#2 execute 170 Report Programming 171 Zero skip 172 Hourly report 172 Stacked report 173 Employee report 176 Logo Text Programming ...
Instruction Manual
Page 9
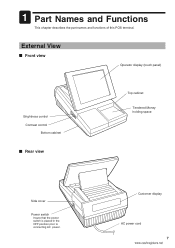
Customer display AC power cord 7 www.cashregisters.net External View Front view Operator display (touch panel) Brightness control Contrast control Bottom cabinet Rear view Top cabinet Tendered Money holding space Side cover Power switch Insure that the power switch is placed in the OFF position prior to connecting AC power. 1 Part Names and Functions This chapter describes the part names and functions of this POS terminal.
Customer display AC power cord 7 www.cashregisters.net External View Front view Operator display (touch panel) Brightness control Contrast control Bottom cabinet Rear view Top cabinet Tendered Money holding space Side cover Power switch Insure that the power switch is placed in the OFF position prior to connecting AC power. 1 Part Names and Functions This chapter describes the part names and functions of this POS terminal.
Instruction Manual
Page 10
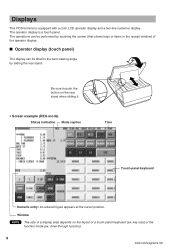
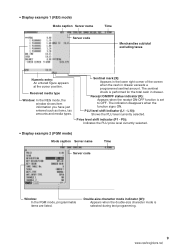
Displays This POS terminal is a touch panel. The operations can be performed by sliding the rear stand. Be sure to push the button on the layout of the operator display. ■ Operator display (touch panel) The display can be tilted to the best viewing angle by touching the screen (that shows keys or items in the receipt window) of a touch-panel keyboard (ex. Window NOTE The size of a display area depends on the rear stand when sliding it. • Screen example (REG mode) Status indication Mode caption Time Touch-panel keyboard Numeric entry: An entered figure appears at the ...
Displays This POS terminal is a touch panel. The operations can be performed by sliding the rear stand. Be sure to push the button on the layout of the operator display. ■ Operator display (touch panel) The display can be tilted to the best viewing angle by touching the screen (that shows keys or items in the receipt window) of a touch-panel keyboard (ex. Window NOTE The size of a display area depends on the rear stand when sliding it. • Screen example (REG mode) Status indication Mode caption Time Touch-panel keyboard Numeric entry: An entered figure appears at the ...
Instruction Manual
Page 11
Sentinel mark (X): Appears in the lower right corner of the screen when the cash in drawer. The indication disappears when the function signs ON. P5): Indicates the PLU price level currently selected. • Display example 2 (PGM mode) Mode caption Server name Time Server code Window: In the PGM mode, programmable items are listed. Double-size character mode indicator (W): Appears when the double-size character mode is set to OFF. PLU level shift indicator (L1 - Price level shift indicator (P1 - Receipt ON/OFF status indicator (R): Appears when the receipt ON-OFF function is...
Sentinel mark (X): Appears in the lower right corner of the screen when the cash in drawer. The indication disappears when the function signs ON. P5): Indicates the PLU price level currently selected. • Display example 2 (PGM mode) Mode caption Server name Time Server code Window: In the PGM mode, programmable items are listed. Double-size character mode indicator (W): Appears when the double-size character mode is set to OFF. PLU level shift indicator (L1 - Price level shift indicator (P1 - Receipt ON/OFF status indicator (R): Appears when the receipt ON-OFF function is...
Instruction Manual
Page 12
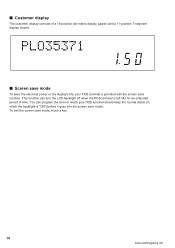
■ Customer display The customer display consists of time. This function can program the time for which your POS terminal is left idle for an extended period of a 16-position dot-matrix display (upper) and a 11-position 7-segment display (lower). ■ Screen save mode To save the electrical power or the display's life, your POS terminal should keep the normal status (in which the backlight is "ON") before it goes into the screen save mode, touch a key. 10 www.cashregisters.net You can turn the LCD backlight off when the POS terminal is provided with the screen save function....
■ Customer display The customer display consists of time. This function can program the time for which your POS terminal is left idle for an extended period of a 16-position dot-matrix display (upper) and a 11-position 7-segment display (lower). ■ Screen save mode To save the electrical power or the display's life, your POS terminal should keep the normal status (in which the backlight is "ON") before it goes into the screen save mode, touch a key. 10 www.cashregisters.net You can turn the LCD backlight off when the POS terminal is provided with the screen save function....
Instruction Manual
Page 13
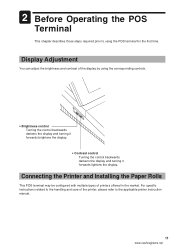
For specific instructions related to the handling and care of the printer, please refer to using the corresponding controls. • Brightness control Turning the control backwards darkens the display and turning it forwards brightens the display. • Contrast control Turning the control backwards darkens the display and turning it forwards lightens the display. Display Adjustment You can adjust the brightness and contrast of printers offered in the market. Connecting the Printer and Installing the Paper Rolls This POS terminal may be configured with multiple types of the ...
For specific instructions related to the handling and care of the printer, please refer to using the corresponding controls. • Brightness control Turning the control backwards darkens the display and turning it forwards brightens the display. • Contrast control Turning the control backwards darkens the display and turning it forwards lightens the display. Display Adjustment You can adjust the brightness and contrast of printers offered in the market. Connecting the Printer and Installing the Paper Rolls This POS terminal may be configured with multiple types of the ...
Instruction Manual
Page 14
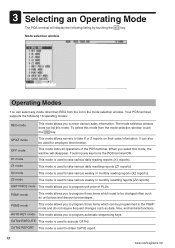
OPXZ mode This mode allows servers to take various weekly or monthly resetting reports (Z2 reports). Z2 mode This mode is used to take various daily reading reports (X1 reports). CAT#2 REPORT This mode is used to take X or Z reports on their sales information. Your POS terminal supports the following listing by touching the MODE key. This mode is used to take various weekly or monthly reading reports (X2 reports). UNIT PRICE mode This mode allows you to program unit price of the POS terminal. Touching any mode other than REG from the mode selection window, ...
OPXZ mode This mode allows servers to take various weekly or monthly resetting reports (Z2 reports). Z2 mode This mode is used to take various daily reading reports (X1 reports). CAT#2 REPORT This mode is used to take X or Z reports on their sales information. Your POS terminal supports the following listing by touching the MODE key. This mode is used to take various weekly or monthly reading reports (X2 reports). UNIT PRICE mode This mode allows you to program unit price of the POS terminal. Touching any mode other than REG from the mode selection window, ...
Instruction Manual
Page 15
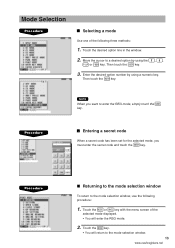
Procedure ■ Returning to the mode selection window To return to the mode selection window, use the following three methods: 1. Procedure Entering a secret code When a secret code has been set for the selected mode, you want to enter the REG mode, simply touch the CANCEL key. Touch the MODE or CANCEL key with the menu screen of the following procedure: 1. Enter the desired option number by using a numeric key. NOTE When you must enter the secret code and touch the ENTER key. Then touch the ENTER key. 3. Touch the MODE key. • You will enter the REG mode. ...
Procedure ■ Returning to the mode selection window To return to the mode selection window, use the following three methods: 1. Procedure Entering a secret code When a secret code has been set for the selected mode, you want to enter the REG mode, simply touch the CANCEL key. Touch the MODE or CANCEL key with the menu screen of the following procedure: 1. Enter the desired option number by using a numeric key. NOTE When you must enter the secret code and touch the ENTER key. Then touch the ENTER key. 3. Touch the MODE key. • You will enter the REG mode. ...
Instruction Manual
Page 16
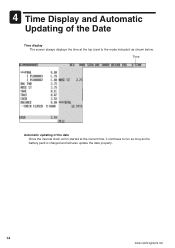
4 Time Display and Automatic Updating of the date Once the internal clock unit is charged and will also update the date properly. 14 www.cashregisters.net Time Automatic updating of the Date Time display The screen always displays the time at the correct time, it continues to run as long as the battery pack is started at the top (next to the mode indicator) as shown below.
4 Time Display and Automatic Updating of the date Once the internal clock unit is charged and will also update the date properly. 14 www.cashregisters.net Time Automatic updating of the Date Time display The screen always displays the time at the correct time, it continues to run as long as the battery pack is started at the top (next to the mode indicator) as shown below.
Instruction Manual
Page 17
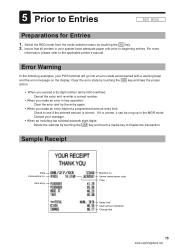
If it can be rung up in your system have adequate paper rolls prior to Entries REG MODE Preparations for Entries 1. Sample Receipt Date Consecutive no . For more information, please refer to see if the entered amount is correct, it is correct. Clear the error state by touching the CLEAR key and take the proper action. • When you exceed a 32-digit number (entry limit overflow): Cancel the entry and re-enter a correct number. • When you make an error in key operation: Clear the error and try the entry again. • When you make an entry beyond a programmed amount ...
If it can be rung up in your system have adequate paper rolls prior to Entries REG MODE Preparations for Entries 1. Sample Receipt Date Consecutive no . For more information, please refer to see if the entered amount is correct, it is correct. Clear the error state by touching the CLEAR key and take the proper action. • When you exceed a 32-digit number (entry limit overflow): Cancel the entry and re-enter a correct number. • When you make an error in key operation: Clear the error and try the entry again. • When you make an entry beyond a programmed amount ...

Instruction Manual
Page 18
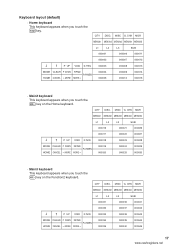
... menu keyboard · Drive thru keyboard · PGM/XZ mode keyboard · Character keyboard NOTE If you want to change the layout, consult your authorized SHARP dealer.
... menu keyboard · Drive thru keyboard · PGM/XZ mode keyboard · Character keyboard NOTE If you want to change the layout, consult your authorized SHARP dealer.
Instruction Manual
Page 19
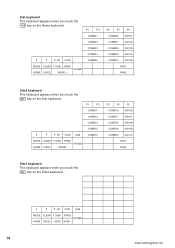
QTY DISC. MISC G. QTY DISC. CHK MGR MENU01 MENU02 MENU03 MENU04 MENU05 L1 L2 L3 SUB 000001 000006 000011 000002 000007 000012 ➞ ➞ P UP VOID D-THRU 000003 000008 000013 MODE CLEAR P DOWN RFND PAYMEN HOME CANCEL ←MORE MORE→ 000004 000005 000009 000010 000014 000015 · Main2 keyboard This keyboard appears when you touch the MORE→ key on the Home keyboard. CHK MGR MENU01 MENU02 MENU03 MENU04 MENU05 L1 L2 000031 L3 SUB 000036 000041 000032 000037 000042 ➞ ➞ P UP VOID D-THRU 000033 000038 ...
QTY DISC. MISC G. QTY DISC. CHK MGR MENU01 MENU02 MENU03 MENU04 MENU05 L1 L2 L3 SUB 000001 000006 000011 000002 000007 000012 ➞ ➞ P UP VOID D-THRU 000003 000008 000013 MODE CLEAR P DOWN RFND PAYMEN HOME CANCEL ←MORE MORE→ 000004 000005 000009 000010 000014 000015 · Main2 keyboard This keyboard appears when you touch the MORE→ key on the Home keyboard. CHK MGR MENU01 MENU02 MENU03 MENU04 MENU05 L1 L2 000031 L3 SUB 000036 000041 000032 000037 000042 ➞ ➞ P UP VOID D-THRU 000033 000038 ...
Instruction Manual
Page 20
· Sub keyboard This keyboard appears when you touch the MORE→ key on the Sub2 keyboard. ➞ ➞ P UP VOID SUB MODE CLEAR P DOWN RFND PAYMEN HOME CANCEL ←MORE MORE→ 18 www.cashregisters.net P1 P2 COMB11 COMB12 COMB13 COMB14 ➞ ➞ P UP VOID SUB COMB15 MODE CLEAR P DOWN RFND PAYMEN HOME CANCEL ←MORE P3 P4 P5 COMB16 000106 COMB17 000107 COMB18 000108 COMB19 000109 COMB20 000110 WAIT FINAL · Sub3 keyboard This keyboard appears when you touch the SUB key on the Sub keyboard. P1 P2 COMB01 COMB02 ...
· Sub keyboard This keyboard appears when you touch the MORE→ key on the Sub2 keyboard. ➞ ➞ P UP VOID SUB MODE CLEAR P DOWN RFND PAYMEN HOME CANCEL ←MORE MORE→ 18 www.cashregisters.net P1 P2 COMB11 COMB12 COMB13 COMB14 ➞ ➞ P UP VOID SUB COMB15 MODE CLEAR P DOWN RFND PAYMEN HOME CANCEL ←MORE P3 P4 P5 COMB16 000106 COMB17 000107 COMB18 000108 COMB19 000109 COMB20 000110 WAIT FINAL · Sub3 keyboard This keyboard appears when you touch the SUB key on the Sub keyboard. P1 P2 COMB01 COMB02 ...
Instruction Manual
Page 21
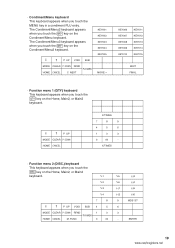
X/TIMES · Function menu 2 (DISC.) keyboard This keyboard appears when you touch the MORE→ key on the Condiment/Menu keyboard. key on the Home, Main2, or Main3 keyboard. %1 %5 (-)3 %2 %6 (-)4 %3 (-)1 (-)5 %4 (-)2 (-)6 7 8 9 MDS ST ➞ ➞ P UP VOID SUB 4 5 6 MODE CLEAR P DOWN RFND 1 2 3 PAYMEN HOME CANCEL M. The Condiment/Menu2 keyboard appears when you touch the DISC. The Condiment/Menu3 keyboard appears when you touch the MORE→ key on the Condiment/Menu2 keyboard. ➞ ➞ P UP VOID SUB MODE CLEAR P DOWN RFND...
X/TIMES · Function menu 2 (DISC.) keyboard This keyboard appears when you touch the MORE→ key on the Condiment/Menu keyboard. key on the Home, Main2, or Main3 keyboard. %1 %5 (-)3 %2 %6 (-)4 %3 (-)1 (-)5 %4 (-)2 (-)6 7 8 9 MDS ST ➞ ➞ P UP VOID SUB 4 5 6 MODE CLEAR P DOWN RFND 1 2 3 PAYMEN HOME CANCEL M. The Condiment/Menu2 keyboard appears when you touch the DISC. The Condiment/Menu3 keyboard appears when you touch the MORE→ key on the Condiment/Menu2 keyboard. ➞ ➞ P UP VOID SUB MODE CLEAR P DOWN RFND...