
Instruction Manual
Page 2
WARNING FCC Regulations state that any unauthorized changes or modifications to this equipment not expressly approved by the manufacturer could void the user's authority to operate this equipment in a residential area is likely to cause harmful interference, in which case the user will be easily accessible. Note: This equipment has been tested and found to comply with the instruction manual, may cause harmful interference to Part 15 of this equipment. Operation of the FCC Rules. FOR YOUR RECORDS Please record below the model number and serial number for further pertinent data. ...
WARNING FCC Regulations state that any unauthorized changes or modifications to this equipment not expressly approved by the manufacturer could void the user's authority to operate this equipment in a residential area is likely to cause harmful interference, in which case the user will be easily accessible. Note: This equipment has been tested and found to comply with the instruction manual, may cause harmful interference to Part 15 of this equipment. Operation of the FCC Rules. FOR YOUR RECORDS Please record below the model number and serial number for further pertinent data. ...
Instruction Manual
Page 3
... note that each unit be allowed to be regulated due to malfunction. • If the POS terminal malfunctions, call your authorized SHARP dealer for service - This recharging precaution can prevent unnecessary initial service calls. INTRODUCTION Thank you encounter any operational problems. IMPORTANT •... by an individual with a dedicated earth-guard. Do not use a sharp-pointed object on the same electrical circuit could cause damage to the display. Disposal of the SHARP POS Terminal Model UP-3301. Please read this manual for your purchase of these materials may become ...
... note that each unit be allowed to be regulated due to malfunction. • If the POS terminal malfunctions, call your authorized SHARP dealer for service - This recharging precaution can prevent unnecessary initial service calls. INTRODUCTION Thank you encounter any operational problems. IMPORTANT •... by an individual with a dedicated earth-guard. Do not use a sharp-pointed object on the same electrical circuit could cause damage to the display. Disposal of the SHARP POS Terminal Model UP-3301. Please read this manual for your purchase of these materials may become ...
Instruction Manual
Page 4
Time Display and Automatic Updating of Subtotals 38 Merchandise subtotal 38 2 www.cashregisters.net Before Operating the POS Terminal 11 Display Adjustment 11 Connecting the Printer and Installing the Paper Rolls 11 3. Prior to Use the Touch Panel 26 Cursor control by touching option(s) or item(s) in the window 26 Server Code Entries 29 Item Selection from the Menu Window 29 Item Entries 30 Single item entries 30 Repeat entries 31 Multiplication entries 31 Fast food sale entries 32 Scale entries 32 Special Entries for PLUs 34 Mix-and-match function 34 Link PLU ...
Time Display and Automatic Updating of Subtotals 38 Merchandise subtotal 38 2 www.cashregisters.net Before Operating the POS Terminal 11 Display Adjustment 11 Connecting the Printer and Installing the Paper Rolls 11 3. Prior to Use the Touch Panel 26 Cursor control by touching option(s) or item(s) in the window 26 Server Code Entries 29 Item Selection from the Menu Window 29 Item Entries 30 Single item entries 30 Repeat entries 31 Multiplication entries 31 Fast food sale entries 32 Scale entries 32 Special Entries for PLUs 34 Mix-and-match function 34 Link PLU ...

Instruction Manual
Page 5
Manager Mode 59 Entering the Manager Mode 59 Override Entries 59 3 www.cashregisters.net Correction 54 Correction of the Last Entry (Direct Void 54 Correction of the Next-to-Last or Earlier Entries (Indirect Void 55 Subtotal Void 57 Correction of non-add code numbers 46 Remote printer send function 47 Gratuity 47 Payment Treatment 47 Tip-in /out 44 Bill totalizing/bill transfer 44 Bill separating 45 Auxiliary Entries 46 Percent calculations (premium or discount 46 Discount entries 46 Refund entries 46 Return entries 46 Printing of Incorrect Entries Not Handled by the ...
Manager Mode 59 Entering the Manager Mode 59 Override Entries 59 3 www.cashregisters.net Correction 54 Correction of the Last Entry (Direct Void 54 Correction of the Next-to-Last or Earlier Entries (Indirect Void 55 Subtotal Void 57 Correction of non-add code numbers 46 Remote printer send function 47 Gratuity 47 Payment Treatment 47 Tip-in /out 44 Bill totalizing/bill transfer 44 Bill separating 45 Auxiliary Entries 46 Percent calculations (premium or discount 46 Discount entries 46 Refund entries 46 Return entries 46 Printing of Incorrect Entries Not Handled by the ...
Instruction Manual
Page 6
Reading (X) and Resetting (Z) of Sales Totals 61 How to Program Alphanumeric Characters 96 Using character keys on PLUs 71 PLU stock report 71 PLU cost report 72 PLU top 20 report 73 PLU zero sales report (full 74 PLU zero sales (by dept.) report 74 PLU minimum stock report 74 PLU group total report by hour 75 Cash in drawer report 75 Tax report 76 Individual server report 77 Full server report 78 Employee report 79 Employee over-time report 79 Employee active status report 80 Hourly report 80 Labor cost % report 81 Ingredient stock report 81 GLU/PBLU report 82 GLU/PBLU ...
Reading (X) and Resetting (Z) of Sales Totals 61 How to Program Alphanumeric Characters 96 Using character keys on PLUs 71 PLU stock report 71 PLU cost report 72 PLU top 20 report 73 PLU zero sales report (full 74 PLU zero sales (by dept.) report 74 PLU minimum stock report 74 PLU group total report by hour 75 Cash in drawer report 75 Tax report 76 Individual server report 77 Full server report 78 Employee report 79 Employee over-time report 79 Employee active status report 80 Hourly report 80 Labor cost % report 81 Ingredient stock report 81 GLU/PBLU report 82 GLU/PBLU ...
Instruction Manual
Page 7
Programming 98 Basic Instructions 98 Programming example 98 Article Programming 100 Department 101 PLU 103 PLU range 106 PLU stock 107 Ingredient 108 Ingredient stock 109 Link PLU table 110 Condiment table 111 Mix & Match table 112 Recipe table 113 Combo meal table 114 Scale table 115 Direct Key Programming 116 Direct PLU/COMBO/dept. key (except menu PLU/condiment PLU 117 Direct condiment/menu PLU key 118 PLU Menu Key Programming 119 PLU menu key 119 Functional Programming 120 Discount key ( (-)1 thru (-)9 121 Percent key ( %1 thru %9 122 Gratuity 123 Tip 123 RA 124 ...
Programming 98 Basic Instructions 98 Programming example 98 Article Programming 100 Department 101 PLU 103 PLU range 106 PLU stock 107 Ingredient 108 Ingredient stock 109 Link PLU table 110 Condiment table 111 Mix & Match table 112 Recipe table 113 Combo meal table 114 Scale table 115 Direct Key Programming 116 Direct PLU/COMBO/dept. key (except menu PLU/condiment PLU 117 Direct condiment/menu PLU key 118 PLU Menu Key Programming 119 PLU menu key 119 Functional Programming 120 Discount key ( (-)1 thru (-)9 121 Percent key ( %1 thru %9 122 Gratuity 123 Tip 123 RA 124 ...
Instruction Manual
Page 8
Operator Maintenance 209 In Case of Options 210 16. Options 210 List of Power Failure 209 Before Calling for the Canadian tax system 186 Function Key Programming 187 TRAINING Mode Selection 188 TRAINING mode 188 Backup Data Send Programming 189 Backup data send 189 Backup Data Receive Programming 190 Backup data receive 190 PLU Updating (in the PGM1 Mode 191 Unit Price Mode Programming 192 Automatic Sequencing Key Programming 193 Reading of Stored Programs 194 Program reading sequence 194 Sample printouts 196 14. Appendix 212 Error Messages 212 18. Specifications ...
Operator Maintenance 209 In Case of Options 210 16. Options 210 List of Power Failure 209 Before Calling for the Canadian tax system 186 Function Key Programming 187 TRAINING Mode Selection 188 TRAINING mode 188 Backup Data Send Programming 189 Backup data send 189 Backup Data Receive Programming 190 Backup data receive 190 PLU Updating (in the PGM1 Mode 191 Unit Price Mode Programming 192 Automatic Sequencing Key Programming 193 Reading of Stored Programs 194 Program reading sequence 194 Sample printouts 196 14. Appendix 212 Error Messages 212 18. Specifications ...
Instruction Manual
Page 9
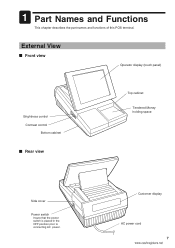
External View Front view Operator display (touch panel) Brightness control Contrast control Bottom cabinet Rear view Top cabinet Tendered Money holding space Side cover Power switch Insure that the power switch is placed in the OFF position prior to connecting AC power. 1 Part Names and Functions This chapter describes the part names and functions of this POS terminal. Customer display AC power cord 7 www.cashregisters.net
External View Front view Operator display (touch panel) Brightness control Contrast control Bottom cabinet Rear view Top cabinet Tendered Money holding space Side cover Power switch Insure that the power switch is placed in the OFF position prior to connecting AC power. 1 Part Names and Functions This chapter describes the part names and functions of this POS terminal. Customer display AC power cord 7 www.cashregisters.net
Instruction Manual
Page 10
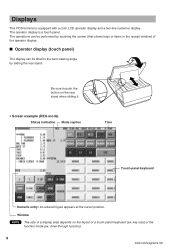
Be sure to the best viewing angle by touching the screen (that shows keys or items in the receipt window) of a touch-panel keyboard (ex. The operator display is equipped with a color LCD operator display and a two-line customer display. key size) or the function mode (ex. Window NOTE The size of a display area depends on the rear stand when sliding it. • Screen example (REG mode) Status indication Mode caption Time Touch-panel keyboard Numeric entry: An entered figure appears at the cursor position. drive-through function). 8 www.cashregisters.net Displays This POS ...
Be sure to the best viewing angle by touching the screen (that shows keys or items in the receipt window) of a touch-panel keyboard (ex. The operator display is equipped with a color LCD operator display and a two-line customer display. key size) or the function mode (ex. Window NOTE The size of a display area depends on the rear stand when sliding it. • Screen example (REG mode) Status indication Mode caption Time Touch-panel keyboard Numeric entry: An entered figure appears at the cursor position. drive-through function). 8 www.cashregisters.net Displays This POS ...
Instruction Manual
Page 11
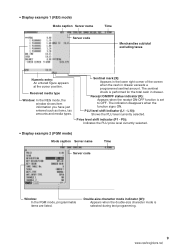
P5): Indicates the PLU price level currently selected. • Display example 2 (PGM mode) Mode caption Server name Time Server code Window: In the PGM mode, programmable items are listed. • Display example 1 (REG mode) Mode caption Server name Server code Time Merchandise subtotal excluding taxes Numeric entry: An entered figure appears at the cursor position. PLU level shift indicator (L1 - Received media type Window: In the REG mode, the window shows item information you have just entered such as items, tax amounts and media types. Receipt ON/OFF status indicator ...
P5): Indicates the PLU price level currently selected. • Display example 2 (PGM mode) Mode caption Server name Time Server code Window: In the PGM mode, programmable items are listed. • Display example 1 (REG mode) Mode caption Server name Server code Time Merchandise subtotal excluding taxes Numeric entry: An entered figure appears at the cursor position. PLU level shift indicator (L1 - Received media type Window: In the REG mode, the window shows item information you have just entered such as items, tax amounts and media types. Receipt ON/OFF status indicator ...
Instruction Manual
Page 12
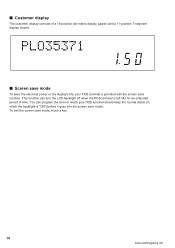
To exit the screen save function. ■ Customer display The customer display consists of time. You can turn the LCD backlight off when the POS terminal is left idle for which the backlight is provided with the screen save mode, touch a key. 10 www.cashregisters.net This function can program the time for an extended period of a 16-position dot-matrix display (upper) and a 11-position 7-segment display (lower). ■ Screen save mode To save the electrical power or the display's life, your POS terminal should keep the normal status (in which your POS terminal is "ON") ...
To exit the screen save function. ■ Customer display The customer display consists of time. You can turn the LCD backlight off when the POS terminal is left idle for which the backlight is provided with the screen save mode, touch a key. 10 www.cashregisters.net This function can program the time for an extended period of a 16-position dot-matrix display (upper) and a 11-position 7-segment display (lower). ■ Screen save mode To save the electrical power or the display's life, your POS terminal should keep the normal status (in which your POS terminal is "ON") ...
Instruction Manual
Page 13
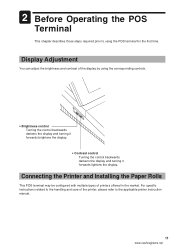
2 Before Operating the POS Terminal This chapter describes those steps required prior to using the corresponding controls. • Brightness control Turning the control backwards darkens the display and turning it forwards brightens the display. • Contrast control Turning the control backwards darkens the display and turning it forwards lightens the display. Display Adjustment You can adjust the brightness and contrast of the display by using the POS terminal for the first time. For specific instructions related to the applicable printer instruction manual. 11 www.cashregisters....
2 Before Operating the POS Terminal This chapter describes those steps required prior to using the corresponding controls. • Brightness control Turning the control backwards darkens the display and turning it forwards brightens the display. • Contrast control Turning the control backwards darkens the display and turning it forwards lightens the display. Display Adjustment You can adjust the brightness and contrast of the display by using the POS terminal for the first time. For specific instructions related to the applicable printer instruction manual. 11 www.cashregisters....
Instruction Manual
Page 14
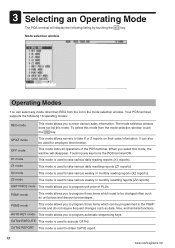
It can also be changed often such as date, time, and terminal functions. OFF mode X1 mode Z1 mode This mode locks all operations of PLUs. Z2 mode This mode is used to take various weekly or monthly reading reports (X2 reports). PGM1 mode This mode allows you to execute CAT#2. Touching any mode other than REG from the mode selection window, touch the CANCEL key. PGM2 mode This mode allows you to program those items which need to be used to program those items which can select any key turns the POS terminal ON. CAT#2 REPORT This mode is used for employee ...
It can also be changed often such as date, time, and terminal functions. OFF mode X1 mode Z1 mode This mode locks all operations of PLUs. Z2 mode This mode is used to take various weekly or monthly reading reports (X2 reports). PGM1 mode This mode allows you to execute CAT#2. Touching any mode other than REG from the mode selection window, touch the CANCEL key. PGM2 mode This mode allows you to program those items which need to be used to program those items which can select any key turns the POS terminal ON. CAT#2 REPORT This mode is used for employee ...
Instruction Manual
Page 15
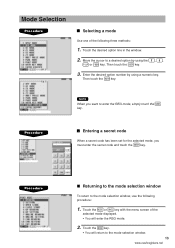
Enter the desired option number by using a numeric key. Procedure Entering a secret code When a secret code has been set for the selected mode, you want to a desired option by using the , , P UP or P DOWN key. Move the cursor to enter the REG mode, simply touch the CANCEL key. Then touch the ENTER key. Touch the MODE key. • You will enter the REG mode. 2. Mode Selection Procedure Selecting a mode Use one of the selected mode displayed. • You will return to the mode selection window, use the following three methods: 1. Then touch the ENTER key. 3. NOTE When ...
Enter the desired option number by using a numeric key. Procedure Entering a secret code When a secret code has been set for the selected mode, you want to a desired option by using the , , P UP or P DOWN key. Move the cursor to enter the REG mode, simply touch the CANCEL key. Then touch the ENTER key. Touch the MODE key. • You will enter the REG mode. 2. Mode Selection Procedure Selecting a mode Use one of the selected mode displayed. • You will return to the mode selection window, use the following three methods: 1. Then touch the ENTER key. 3. NOTE When ...
Instruction Manual
Page 16
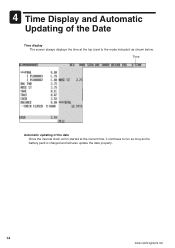
Time Automatic updating of the Date Time display The screen always displays the time at the correct time, it continues to run as long as the battery pack is started at the top (next to the mode indicator) as shown below. 4 Time Display and Automatic Updating of the date Once the internal clock unit is charged and will also update the date properly. 14 www.cashregisters.net
Time Automatic updating of the Date Time display The screen always displays the time at the correct time, it continues to run as long as the battery pack is started at the top (next to the mode indicator) as shown below. 4 Time Display and Automatic Updating of the date Once the internal clock unit is charged and will also update the date properly. 14 www.cashregisters.net
Instruction Manual
Page 17
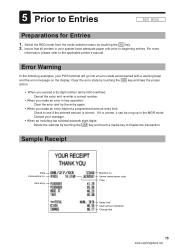
Clear the error state by touching the CLEAR key and touch a media key to finalize the transaction. Insure that all printers in your system have adequate paper rolls prior to the applicable printer's manual. Item entry Machine no . For more information, please refer to beginning entries. Error Warning In the following examples, your manager. • When an including-tax subtotal exceeds eight digits: Delete the subtotal by touching the CLEAR key and take the proper action. • When you exceed a 32-digit number (entry limit overflow): Cancel the entry and re-enter a ...
Clear the error state by touching the CLEAR key and touch a media key to finalize the transaction. Insure that all printers in your system have adequate paper rolls prior to the applicable printer's manual. Item entry Machine no . For more information, please refer to beginning entries. Error Warning In the following examples, your manager. • When an including-tax subtotal exceeds eight digits: Delete the subtotal by touching the CLEAR key and take the proper action. • When you exceed a 32-digit number (entry limit overflow): Cancel the entry and re-enter a ...

Instruction Manual
Page 18
... menu keyboard · Drive thru keyboard · PGM/XZ mode keyboard · Character keyboard NOTE If you want to change the layout, consult your authorized SHARP dealer.
... menu keyboard · Drive thru keyboard · PGM/XZ mode keyboard · Character keyboard NOTE If you want to change the layout, consult your authorized SHARP dealer.
Instruction Manual
Page 19
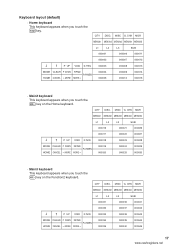
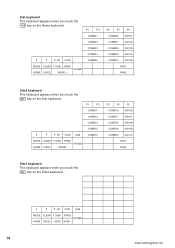
QTY DISC. Keyboard layout (default) · Home keyboard This keyboard appears when you touch the MORE→ key on the Function2 keyboard. QTY DISC. MISC G. MISC G. QTY DISC. MISC G. CHK MGR MENU01 MENU02 MENU03 MENU04 MENU05 L1 L2 L3 SUB 000001 000006 000011 000002 000007 000012 ➞ ➞ P UP VOID D-THRU 000003 000008 000013 MODE CLEAR P DOWN RFND PAYMEN HOME CANCEL ←MORE MORE→ 000004 000005 000009 000010 000014 000015 · Main2 keyboard This keyboard appears when you touch the HOME key. CHK MGR MENU01 MENU02 MENU03 MENU04...
QTY DISC. Keyboard layout (default) · Home keyboard This keyboard appears when you touch the MORE→ key on the Function2 keyboard. QTY DISC. MISC G. MISC G. QTY DISC. MISC G. CHK MGR MENU01 MENU02 MENU03 MENU04 MENU05 L1 L2 L3 SUB 000001 000006 000011 000002 000007 000012 ➞ ➞ P UP VOID D-THRU 000003 000008 000013 MODE CLEAR P DOWN RFND PAYMEN HOME CANCEL ←MORE MORE→ 000004 000005 000009 000010 000014 000015 · Main2 keyboard This keyboard appears when you touch the HOME key. CHK MGR MENU01 MENU02 MENU03 MENU04...
Instruction Manual
Page 20
· Sub keyboard This keyboard appears when you touch the MORE→ key on the Sub2 keyboard. ➞ ➞ P UP VOID SUB MODE CLEAR P DOWN RFND PAYMEN HOME CANCEL ←MORE MORE→ 18 www.cashregisters.net P1 P2 COMB11 COMB12 COMB13 COMB14 ➞ ➞ P UP VOID SUB COMB15 MODE CLEAR P DOWN RFND PAYMEN HOME CANCEL ←MORE P3 P4 P5 COMB16 000106 COMB17 000107 COMB18 000108 COMB19 000109 COMB20 000110 WAIT FINAL · Sub3 keyboard This keyboard appears when you touch the SUB key on the Sub keyboard. P1 P2 COMB01 COMB02 ...
· Sub keyboard This keyboard appears when you touch the MORE→ key on the Sub2 keyboard. ➞ ➞ P UP VOID SUB MODE CLEAR P DOWN RFND PAYMEN HOME CANCEL ←MORE MORE→ 18 www.cashregisters.net P1 P2 COMB11 COMB12 COMB13 COMB14 ➞ ➞ P UP VOID SUB COMB15 MODE CLEAR P DOWN RFND PAYMEN HOME CANCEL ←MORE P3 P4 P5 COMB16 000106 COMB17 000107 COMB18 000108 COMB19 000109 COMB20 000110 WAIT FINAL · Sub3 keyboard This keyboard appears when you touch the SUB key on the Sub keyboard. P1 P2 COMB01 COMB02 ...
Instruction Manual
Page 21
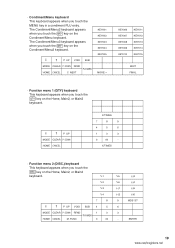
key on the Home, Main2, or Main3 keyboard. ➞ ➞ P UP MODE CLEAR P DOWN HOME CANCEL X/TIMES 7 8 9 4 5 6 1 2 3 0 00 - X/TIMES · Function menu 2 (DISC.) keyboard This keyboard appears when you touch the MENU key in a condiment PLU entry. · Condiment/Menu keyboard This keyboard appears when you touch the DISC. ENTER 19 www.cashregisters.net FUNC 0 00 - The Condiment/Menu3 keyboard appears when you touch the MORE→ key on the Condiment/Menu2 keyboard. ➞ ➞ P UP VOID SUB MODE CLEAR P DOWN RFND PAYMEN HOME CANCEL C ...
key on the Home, Main2, or Main3 keyboard. ➞ ➞ P UP MODE CLEAR P DOWN HOME CANCEL X/TIMES 7 8 9 4 5 6 1 2 3 0 00 - X/TIMES · Function menu 2 (DISC.) keyboard This keyboard appears when you touch the MENU key in a condiment PLU entry. · Condiment/Menu keyboard This keyboard appears when you touch the DISC. ENTER 19 www.cashregisters.net FUNC 0 00 - The Condiment/Menu3 keyboard appears when you touch the MORE→ key on the Condiment/Menu2 keyboard. ➞ ➞ P UP VOID SUB MODE CLEAR P DOWN RFND PAYMEN HOME CANCEL C ...