Operation Manual
Page 7
... display mode 15 Adjusting the screen display (When using an analog signal 16 Automatic screen adjustment 16 Manual screen adjustment 17 Adjusting the screen display (When using a digital signal 20 Monitor care and repair 22 Monitor care 22 Storage 22 Troubleshooting 22 Specifications 23 Installing set-up information and the ICC profile (For...
... display mode 15 Adjusting the screen display (When using an analog signal 16 Automatic screen adjustment 16 Manual screen adjustment 17 Adjusting the screen display (When using a digital signal 20 Monitor care and repair 22 Monitor care 22 Storage 22 Troubleshooting 22 Specifications 23 Installing set-up information and the ICC profile (For...
Operation Manual
Page 8
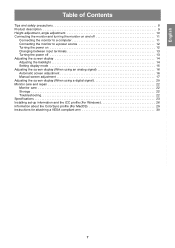
... come into contact with strong shocks or vibrations. Do not use in unsafe places. LCD monitor (1) - Analog signal cable (1) (model name: 0NK3080420400) - Sharp Corporation holds authorship rights to emit high quality video signals. - Do not reproduce it may be uneven colors or...or a third party, nor for long periods of time, as a result of dust, where humidity is a lot of overheating. Monitor and accessory checklist - CD-ROM (1) - Operation manual (1) Notes: - The digital signal cable (DVI-D24 pin - DVI-D24 pin) is a registered trademark of the supplied accessaries...
... come into contact with strong shocks or vibrations. Do not use in unsafe places. LCD monitor (1) - Analog signal cable (1) (model name: 0NK3080420400) - Sharp Corporation holds authorship rights to emit high quality video signals. - Do not reproduce it may be uneven colors or...or a third party, nor for long periods of time, as a result of dust, where humidity is a lot of overheating. Monitor and accessory checklist - CD-ROM (1) - Operation manual (1) Notes: - The digital signal cable (DVI-D24 pin - DVI-D24 pin) is a registered trademark of the supplied accessaries...
Operation Manual
Page 14
...on ). Remove the adjustment lock before attempting to operate control buttons. ADJUSTMENT menu reset Settings of items in place. Turn off the monitor power. 2.While pressing the MENU button, press the power button (i.e. Reset is complete. 2. Remove the adjustment lock before attempting to... control buttons. 14 Adjusting the screen display For analog signal 1.First perform an automatic adjustment. (p.16) 2.Perform manual adjustment where necessary. (p.17) For digital signal The monitor can generally be voided. 1. Turn off . Note: - Turn on the screen, the reset is complete when...
...on ). Remove the adjustment lock before attempting to operate control buttons. ADJUSTMENT menu reset Settings of items in place. Turn off the monitor power. 2.While pressing the MENU button, press the power button (i.e. Reset is complete. 2. Remove the adjustment lock before attempting to... control buttons. 14 Adjusting the screen display For analog signal 1.First perform an automatic adjustment. (p.16) 2.Perform manual adjustment where necessary. (p.17) For digital signal The monitor can generally be voided. 1. Turn off . Note: - Turn on the screen, the reset is complete when...
Operation Manual
Page 16
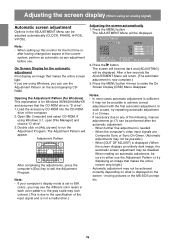
... pattern or the gray scale may look colored. (This is due to any of the following, manual adjustments (p.17) can be adjusted automatically (CLOCK, PHASE, H-POS, V-POS). Adjusting the screen automatically 1. When setting up this monitor for the first time or after the automatic adjustment. - On Screen Display for Windows 95/98...
... pattern or the gray scale may look colored. (This is due to any of the following, manual adjustments (p.17) can be adjusted automatically (CLOCK, PHASE, H-POS, V-POS). Adjusting the screen automatically 1. When setting up this monitor for the first time or after the automatic adjustment. - On Screen Display for Windows 95/98...
Operation Manual
Page 17
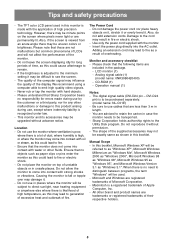
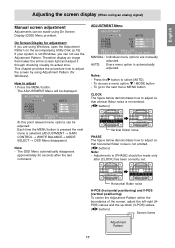
... menu options are using Windows, open the Adjustment Pattern on the accompanying Utility Disk. (p.16) If your system is not Windows, you are manually adjusted. To choose a menu option: / MODE button - The ADJUSTMENT Menu will be made using On Screen Display (OSD) Menu provided. ...Display for Windows). English Español Italiano Français Deutsch English Adjusting the screen display (When using an analog signal) Manual screen adjustment Adjustments can be adjusted. Adjustments to adjust so that makes the entire screen light and adjust it through checking visually its ...
... menu options are using Windows, open the Adjustment Pattern on the accompanying Utility Disk. (p.16) If your system is not Windows, you are manually adjusted. To choose a menu option: / MODE button - The ADJUSTMENT Menu will be made using On Screen Display (OSD) Menu provided. ...Display for Windows). English Español Italiano Français Deutsch English Adjusting the screen display (When using an analog signal) Manual screen adjustment Adjustments can be adjusted. Adjustments to adjust so that makes the entire screen light and adjust it through checking visually its ...
Operation Manual
Page 18
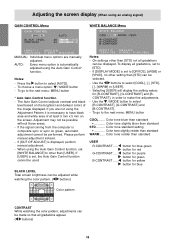
...adjusts contrast and black level based on the brightest and darkest colors of at least 5 mm x 5 mm on the screen. Please perform manual adjustment instead. - To display all gradations appear. ( buttons) 18 Color tone bluer than standard Color tone slightly bluer than standard USER R-... next menu: MENU button * Auto Gain Control function - Color tone redder than standard STD .......... B-CONTRAST ..... AUTO: Every menu option is displayed, perform manual adjustment. - To go to select [COOL], [·], [STD], [·], [WARM] or [USER]. - If the signal coming from the computer is...
...adjusts contrast and black level based on the brightest and darkest colors of at least 5 mm x 5 mm on the screen. Please perform manual adjustment instead. - To display all gradations appear. ( buttons) 18 Color tone bluer than standard Color tone slightly bluer than standard USER R-... next menu: MENU button * Auto Gain Control function - Color tone redder than standard STD .......... B-CONTRAST ..... AUTO: Every menu option is displayed, perform manual adjustment. - To go to select [COOL], [·], [STD], [·], [WARM] or [USER]. - If the signal coming from the computer is...
Operation Manual
Page 24
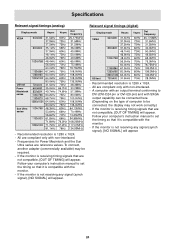
... non-interlaced. - Follow your computer's instruction manual to be connected, the display may be connected here. (Depending on the type of computer to set the timing so that it is compatible with non-interlaced. - US text - If the monitor is not receiving any signal (synch signal),... [NO SIGNAL] will appear. If the monitor is receiving timing signals that are not compatible, [OUT OF TIMING] will appear. All are not...
... non-interlaced. - Follow your computer's instruction manual to be connected, the display may be connected here. (Depending on the type of computer to set the timing so that it is compatible with non-interlaced. - US text - If the monitor is not receiving any signal (synch signal),... [NO SIGNAL] will appear. If the monitor is receiving timing signals that are not compatible, [OUT OF TIMING] will appear. All are not...
Operation Manual
Page 26
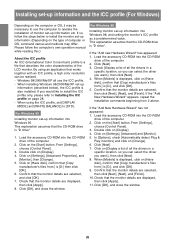
...of computer or OS, command names and methods may be realized. - Click on [Display]. 4. If so, follow the computer's own operation manual while reading this.) About the ICC profile An ICC (International Color Consortium) profile is a file that the CD-ROM drive is "D drive".... want .], then click [Next]. 4. In [Options], check [Automatically detect Plug & Play monitors] and click on the type of the computer. 2. For Windows 98 Installing monitor set -up information into Windows 95. Load the accessory CD-ROM into the CD-ROM drive of the LCD monitor. Click [Next]. 7.
...of computer or OS, command names and methods may be realized. - Click on [Display]. 4. If so, follow the computer's own operation manual while reading this.) About the ICC profile An ICC (International Color Consortium) profile is a file that the CD-ROM drive is "D drive".... want .], then click [Next]. 4. In [Options], check [Automatically detect Plug & Play monitors] and click on the type of the computer. 2. For Windows 98 Installing monitor set -up information into Windows 95. Load the accessory CD-ROM into the CD-ROM drive of the LCD monitor. Click [Next]. 7.
Operation Manual
Page 29
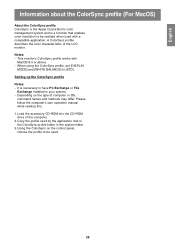
... ColorSync profile Notes: - Please follow the computer's own operation manual while reading this. 1.Load the accessory CD-ROM into the CD-ROM drive of the computer. 2.Copy the profile used by the application disk to the ColorSync profile folder in your system. - This monitor's ColorSync profile works with a compatible application. It is... and methods may differ. When using the ColorSync profile, set [DISPLAY MODE] and [WHITE BALANCE] to [STD]. A ColorSync profile describes the color characteristics of the LCD monitor.
... ColorSync profile Notes: - Please follow the computer's own operation manual while reading this. 1.Load the accessory CD-ROM into the CD-ROM drive of the computer. 2.Copy the profile used by the application disk to the ColorSync profile folder in your system. - This monitor's ColorSync profile works with a compatible application. It is... and methods may differ. When using the ColorSync profile, set [DISPLAY MODE] and [WHITE BALANCE] to [STD]. A ColorSync profile describes the color characteristics of the LCD monitor.

Operation Manual
Page 30
...surface to be attached. While following . - Once having removed the stand, never attempt to attach it to the installation instructions in the operation manual included with the four screws. 1. The screws used to attach the arm should be used to attach arm Arm Part of 6 mm ~ ...the arm to use with the VESA standard. - While pressing the areas on the VESA standard (commercially available) can be sure to the monitor with the arm or stand. Screw used Attachments must satisfy the following these instructions, please also refer to another device. - Instructions for use ...
...surface to be attached. While following . - Once having removed the stand, never attempt to attach it to the installation instructions in the operation manual included with the four screws. 1. The screws used to attach the arm should be used to attach arm Arm Part of 6 mm ~ ...the arm to use with the VESA standard. - While pressing the areas on the VESA standard (commercially available) can be sure to the monitor with the arm or stand. Screw used Attachments must satisfy the following these instructions, please also refer to another device. - Instructions for use ...

