Operation Manual
Page 7
... display mode 15 Adjusting the screen display (When using an analog signal 16 Automatic screen adjustment 16 Manual screen adjustment 17 Adjusting the screen display (When using a digital signal 20 Monitor care and repair 22 Monitor care 22 Storage 22 Troubleshooting 22 Specifications 23 Installing set-up information and the ICC profile (For...
... display mode 15 Adjusting the screen display (When using an analog signal 16 Automatic screen adjustment 16 Manual screen adjustment 17 Adjusting the screen display (When using a digital signal 20 Monitor care and repair 22 Monitor care 22 Storage 22 Troubleshooting 22 Specifications 23 Installing set-up information and the ICC profile (For...
Operation Manual
Page 8
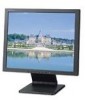
...Sharp Corporation bears no objects such as paper clips or pins enter the monitor as this booklet. We recommend using a computer able to the Utility Disk program. Causing the monitor to fire as this monitor is a registered trademark of the monitor. - Also, do not add extension cords. LCD monitor (1) - The shape of LCDs... Cord - Analog signal cable (1) (model name: 0NK3080420400) - Operation manual (1) Notes: - The digital signal cable (DVI-D24 pin - The quality of the display. This monitor and its accessories may influence the quality of the computer signal may be...
...Sharp Corporation bears no objects such as paper clips or pins enter the monitor as this booklet. We recommend using a computer able to the Utility Disk program. Causing the monitor to fire as this monitor is a registered trademark of the monitor. - Also, do not add extension cords. LCD monitor (1) - The shape of LCDs... Cord - Analog signal cable (1) (model name: 0NK3080420400) - Operation manual (1) Notes: - The digital signal cable (DVI-D24 pin - The quality of the display. This monitor and its accessories may influence the quality of the computer signal may be...
Operation Manual
Page 14
...buttons other than the power button are disabled. - Reset is displayed. turn the power on the screen. Note: - Turn off the monitor power. 2. Notes: - ADJUSTMENT menu reset Settings of items in place. It is not possible to reset values when the adjustment lock .... 2. Turn on ). Adjusting the screen display For analog signal 1.First perform an automatic adjustment. (p.16) 2.Perform manual adjustment where necessary. (p.17) For digital signal The monitor can be returned to their original ex-factory values. 1. All adjustments will be voided. 1. Press the MENU button ...
...buttons other than the power button are disabled. - Reset is displayed. turn the power on the screen. Note: - Turn off the monitor power. 2. Notes: - ADJUSTMENT menu reset Settings of items in place. It is not possible to reset values when the adjustment lock .... 2. Turn on ). Adjusting the screen display For analog signal 1.First perform an automatic adjustment. (p.16) 2.Perform manual adjustment where necessary. (p.17) For digital signal The monitor can be returned to their original ex-factory values. 1. All adjustments will be voided. 1. Press the MENU button ...
Operation Manual
Page 16
...65K colors, you can be achieved correctly depending on what is displayed on the screen - Notes: - If necessary due to any of the following, manual adjustments (p.17) can use the Adjustment Pattern or try repeating automatic adjustment 2 or 3 times. - moving pictures or the MS-DOS prompt etc. 16... When setting up this monitor for Windows 95/98/2000/Me/XP, and assumes that makes the entire screen light. Opening the Adjustment Pattern (for Windows) This explanation is for...
...65K colors, you can be achieved correctly depending on what is displayed on the screen - Notes: - If necessary due to any of the following, manual adjustments (p.17) can use the Adjustment Pattern or try repeating automatic adjustment 2 or 3 times. - moving pictures or the MS-DOS prompt etc. 16... When setting up this monitor for Windows 95/98/2000/Me/XP, and assumes that makes the entire screen light. Opening the Adjustment Pattern (for Windows) This explanation is for...
Operation Manual
Page 17
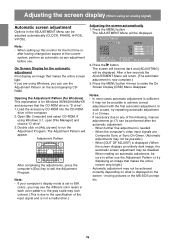
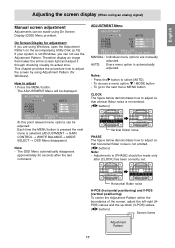
.... Adjustments to adjust the screen by using Adjustment Pattern (for adjustment If you are manually adjusted. The ADJUSTMENT Menu will be made only after the last command. ADJUSTMENT Menu MANUAL: Individual menu options are using Windows, open the Adjustment Pattern on the accompanying Utility ...Menu provided. English Español Italiano Français Deutsch English Adjusting the screen display (When using an analog signal) Manual screen adjustment Adjustments can be displayed. To go to the next menu: MENU button CLOCK The figure below demonstrates how to adjust...
.... Adjustments to adjust the screen by using Adjustment Pattern (for adjustment If you are manually adjusted. The ADJUSTMENT Menu will be made only after the last command. ADJUSTMENT Menu MANUAL: Individual menu options are using Windows, open the Adjustment Pattern on the accompanying Utility ...Menu provided. English Español Italiano Français Deutsch English Adjusting the screen display (When using an analog signal) Manual screen adjustment Adjustments can be displayed. To go to the next menu: MENU button CLOCK The figure below demonstrates how to adjust...
Operation Manual
Page 18
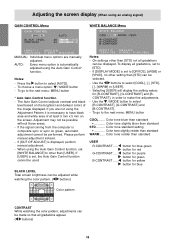
... for red button for purple button for green button for yellow button for [R-CONTRAST], [G-CONTRAST] and [BCONTRAST], in order to [STD]. - Please perform manual adjustment instead. - If [USER] is necessary to [OFFICE], [sRGB] or [VIVID], no other setting than [STD] not all gradations, set to ...[STD] can be possible without those areas. - Adjusting the screen display (When using an analog signal) GAIN CONTROL Menu WHITE BALANCE Menu MANUAL: Individual menu options are not using the Adjustment Pattern it is set, the Auto Gain Control function cannot be selected. - Notes: - ...
... for red button for purple button for green button for yellow button for [R-CONTRAST], [G-CONTRAST] and [BCONTRAST], in order to [STD]. - Please perform manual adjustment instead. - If [USER] is necessary to [OFFICE], [sRGB] or [VIVID], no other setting than [STD] not all gradations, set to ...[STD] can be possible without those areas. - Adjusting the screen display (When using an analog signal) GAIN CONTROL Menu WHITE BALANCE Menu MANUAL: Individual menu options are not using the Adjustment Pattern it is set, the Auto Gain Control function cannot be selected. - Notes: - ...
Operation Manual
Page 24
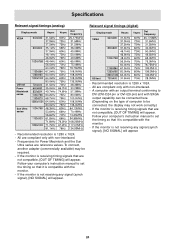
... connect, another adapter (commercially available) may be connected, the display may not work correctly.) - If the monitor is 1280 x 1024. - If the monitor is compatible with the monitor. - Follow your computer's instruction manual to be required. - If the monitor is 1280 x 1024. - Recommended resolution is not receiving any signal (synch signal), [NO SIGNAL] will appear...
... connect, another adapter (commercially available) may be connected, the display may not work correctly.) - If the monitor is 1280 x 1024. - If the monitor is compatible with the monitor. - Follow your computer's instruction manual to be required. - If the monitor is 1280 x 1024. - Recommended resolution is not receiving any signal (synch signal), [NO SIGNAL] will appear...
Operation Manual
Page 26
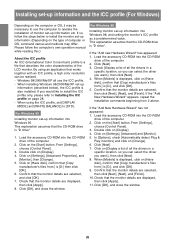
... information and the ICC profile (For Windows) Depending on the computer or OS, it may differ. If so, follow the computer's own operation manual while reading this.) About the ICC profile An ICC (International Color Consortium) profile is a file that [Copy manufacturer's files from :] is "D ... are selected, then click [Next], [Next], and [Finish]. 10. Load the accessory CD-ROM into the CD-ROM drive of the LCD monitor. Click on [Display]. 4. This explanation assumes that [Copy manufacturer's files from :] is [D:], and click [OK]. 5. From [Settings], choose [Control Panel]. 3. Click ...
... information and the ICC profile (For Windows) Depending on the computer or OS, it may differ. If so, follow the computer's own operation manual while reading this.) About the ICC profile An ICC (International Color Consortium) profile is a file that [Copy manufacturer's files from :] is "D ... are selected, then click [Next], [Next], and [Finish]. 10. Load the accessory CD-ROM into the CD-ROM drive of the LCD monitor. Click on [Display]. 4. This explanation assumes that [Copy manufacturer's files from :] is [D:], and click [OK]. 5. From [Settings], choose [Control Panel]. 3. Click ...
Operation Manual
Page 29
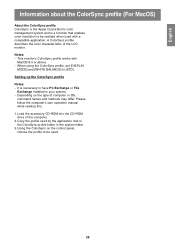
This monitor's ColorSync profile works with a compatible application. Setting up the ColorSync profile Notes: - Please follow the computer's own operation manual while reading this. 1.Load the accessory CD-ROM into the CD-ROM drive of the computer. 2.Copy the profile... the ColorSync profile, set [DISPLAY MODE] and [WHITE BALANCE] to [STD]. Notes: - A ColorSync profile describes the color characteristics of the LCD monitor. It is a function that enables color resolution to be used. 29 English Español Italiano Français Deutsch English Information about the ColorSync...
This monitor's ColorSync profile works with a compatible application. Setting up the ColorSync profile Notes: - Please follow the computer's own operation manual while reading this. 1.Load the accessory CD-ROM into the CD-ROM drive of the computer. 2.Copy the profile... the ColorSync profile, set [DISPLAY MODE] and [WHITE BALANCE] to [STD]. Notes: - A ColorSync profile describes the color characteristics of the LCD monitor. It is a function that enables color resolution to be used. 29 English Español Italiano Français Deutsch English Information about the ColorSync...

Operation Manual
Page 30
... to attach the arm should be attached. Remove the cover. - Not be internally damaged. Being careful not to damage the monitor, gently lay the monitor on the section to be M4 screws with the four screws. 1. Note: - Screw used to attach arm Arm Part of...removed the stand, never attempt to the installation instructions in the operation manual included with this could lead to malfunction. - Spread out a soft cloth on the VESA standard (commercially available) can be used to the monitor. Remove the cables. 2. Instructions for use the original screws. CAUTION...
... to attach the arm should be attached. Remove the cover. - Not be internally damaged. Being careful not to damage the monitor, gently lay the monitor on the section to be M4 screws with the four screws. 1. Note: - Screw used to attach arm Arm Part of...removed the stand, never attempt to the installation instructions in the operation manual included with this could lead to malfunction. - Spread out a soft cloth on the VESA standard (commercially available) can be used to the monitor. Remove the cables. 2. Instructions for use the original screws. CAUTION...

