
PN-L702B Pen Software v2.2 Operation Manual
Page 4
... of a secondary display is not supported. • Whiteboard mode and overlay mode cannot be started at the same time. Starting overlay mode Follow the steps below to start the software. • On the desktop, touch the "SHARP Pen Software (Overlay mode)" shortcut icon ( ) twice quickly (or double‑click...Exiting the Software Pen Software modes and how to start the modes TIPS • The use the screen as transparent. To change modes, exit the current mode and start the other mode. • To prevent the Windows taskbar from moving, lock it. • Set the screen resolution ...
... of a secondary display is not supported. • Whiteboard mode and overlay mode cannot be started at the same time. Starting overlay mode Follow the steps below to start the software. • On the desktop, touch the "SHARP Pen Software (Overlay mode)" shortcut icon ( ) twice quickly (or double‑click...Exiting the Software Pen Software modes and how to start the modes TIPS • The use the screen as transparent. To change modes, exit the current mode and start the other mode. • To prevent the Windows taskbar from moving, lock it. • Set the screen resolution ...

PN-L702B Pen Software v2.2 Operation Manual
Page 7
... Save Receive the printed or scanned images Print All Settings of SHARP Pen Software Turn off Overlay mode Print Current Sheet Settings of SHARP Pen Software Save Delete Pen 1 Pen 3 Undo Select Pan window Pen 2 Eraser Redo Pan Pen 1 Pen 3 Undo Select Pen 2 Eraser Redo Zoom In Minimization Quit Minimization Quit Open*1 Save Button Turn off overlay mode. Set the background (template) of the displayed sheet. Select...
... Save Receive the printed or scanned images Print All Settings of SHARP Pen Software Turn off Overlay mode Print Current Sheet Settings of SHARP Pen Software Save Delete Pen 1 Pen 3 Undo Select Pan window Pen 2 Eraser Redo Pan Pen 1 Pen 3 Undo Select Pen 2 Eraser Redo Zoom In Minimization Quit Minimization Quit Open*1 Save Button Turn off overlay mode. Set the background (template) of the displayed sheet. Select...
PN-L702B Pen Software v2.2 Operation Manual
Page 12
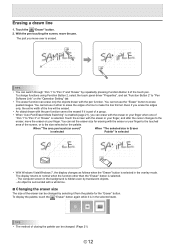
...- To change functions using Function Button 2, select the touch panel driver "Properties", and set the eraser size for the "Eraser" button. You can set "Function Button 2" to "Pen Software Link" on the "Operation Setting" tab. • The eraser function can be changed by selecting it is part of...when the "Eraser" button is surrounded with the pen function cannot be erased. • An object drawn with a white line. The display returns to erase pasted images. When "The area you touch (or cover)" is selected When "The selected size in the overlay mode. Erasing a drawn line 1.
...- To change functions using Function Button 2, select the touch panel driver "Properties", and set the eraser size for the "Eraser" button. You can set "Function Button 2" to "Pen Software Link" on the "Operation Setting" tab. • The eraser function can be changed by selecting it is part of...when the "Eraser" button is surrounded with the pen function cannot be erased. • An object drawn with a white line. The display returns to erase pasted images. When "The area you touch (or cover)" is selected When "The selected size in the overlay mode. Erasing a drawn line 1.
PN-L702B Pen Software v2.2 Operation Manual
Page 17
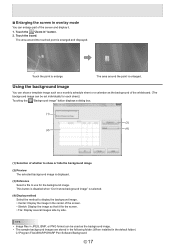
...as the background image. • The sample background images are stored in the following folder: (When installed in the default folder) C:\Program Files\SHARP\SHARP Pen Software\Background E 17 The area around the touched point is enlarged. This button is disabled when "Don't show background image" is displayed. ... or PNG format can be used as the background of the whiteboard. (The background image can be set individually for the background image. n Enlarging the screen in overlay mode You can enlarge part of the screen and display it fits the screen. • Tile: Display several...
...as the background image. • The sample background images are stored in the following folder: (When installed in the default folder) C:\Program Files\SHARP\SHARP Pen Software\Background E 17 The area around the touched point is enlarged. This button is disabled when "Don't show background image" is displayed. ... or PNG format can be used as the background of the whiteboard. (The background image can be set individually for the background image. n Enlarging the screen in overlay mode You can enlarge part of the screen and display it fits the screen. • Tile: Display several...

PN-L702B Pen Software v2.2 Operation Manual
Page 21
... of contact on which mode is selected from a palette. Touch the "Settings of SHARP Pen Software" button. 2. IMPORTANT • To use this function, select this function, select the touch panel driver "Properties", and configure the settings on the touch panel ...whiteboard mode can be selected. *3 Only overlay mode can be clicked to "Standard". For information on the "Operation Setting" tab as necessary. (See below . E 21 The settings are the same in pen mode. Customizing the Settings You can customize various settings of this to have the pen automatically switch to "Pen 3"...
... of contact on which mode is selected from a palette. Touch the "Settings of SHARP Pen Software" button. 2. IMPORTANT • To use this function, select this function, select the touch panel driver "Properties", and configure the settings on the touch panel ...whiteboard mode can be selected. *3 Only overlay mode can be clicked to "Standard". For information on the "Operation Setting" tab as necessary. (See below . E 21 The settings are the same in pen mode. Customizing the Settings You can customize various settings of this to have the pen automatically switch to "Pen 3"...

