
PNG655U Operation Manual
Page 8
Contents Introduction IMPORTANT INFORMATION 1 DEAR SHARP CUSTOMER 3 SAFETY PRECAUTIONS 3 TIPS AND SAFETY INSTRUCTIONS 5 Supplied Accessories 7 Part Names 7 Front view 7 Rear view 8 Remote control unit 8 Connection and Installation How to Install the Monitor 9 Mounting precautions 9 Connecting Peripheral Equipment 10 Connection ... 12 Remote control operation range 12 Removing the Temporary Stand 13 Basic Operation Turning Power On/Off 14 Turning on the main power 14 Turning power on/off 14 Disabling power on/off operations 14 Basic Operation 15 Menu Items 17 Displaying the ...
Contents Introduction IMPORTANT INFORMATION 1 DEAR SHARP CUSTOMER 3 SAFETY PRECAUTIONS 3 TIPS AND SAFETY INSTRUCTIONS 5 Supplied Accessories 7 Part Names 7 Front view 7 Rear view 8 Remote control unit 8 Connection and Installation How to Install the Monitor 9 Mounting precautions 9 Connecting Peripheral Equipment 10 Connection ... 12 Remote control operation range 12 Removing the Temporary Stand 13 Basic Operation Turning Power On/Off 14 Turning on the main power 14 Turning power on/off 14 Disabling power on/off operations 14 Basic Operation 15 Menu Items 17 Displaying the ...
PNG655U Operation Manual
Page 9
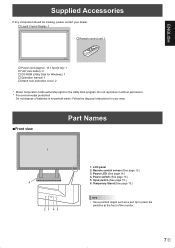
...8226; Use a pointed object such as a pen tip to the Utility Disk program. Follow the disposal instructions for your dealer. � Liquid Crystal Display: 1 � Remote control unit: 1 � Power cord (Approx. 13.1 feet [4 m]): 1 � "AA" size battery: 2 � CD-ROM (...: 2 * Sharp Corporation holds authorship rights to press the switches at the front of batteries in household waste. Power switch (See page 14.) 5. LCD panel 2. Input switch (See page 15.) 6. Do not reproduce it without permission. * For environmental protection! Remote control sensor (See...
...8226; Use a pointed object such as a pen tip to the Utility Disk program. Follow the disposal instructions for your dealer. � Liquid Crystal Display: 1 � Remote control unit: 1 � Power cord (Approx. 13.1 feet [4 m]): 1 � "AA" size battery: 2 � CD-ROM (...: 2 * Sharp Corporation holds authorship rights to press the switches at the front of batteries in household waste. Power switch (See page 14.) 5. LCD panel 2. Input switch (See page 15.) 6. Do not reproduce it without permission. * For environmental protection! Remote control sensor (See...

PNG655U Operation Manual
Page 14
...Replace the batteries when they run low as air conditioner, stereo components, etc. This could lead to a malfunction. • Do not expose the remote control unit to liquids, and do not place it with their plus (+) and minus (-) sides oriented correctly. 3. Connecting the Power Cord Caution •... interfere with the monitor. Close the cover. Using power supply other than the one supplied with proper operation. • Do not use the remote control for a long time, remove the batteries. • Use manganese or alkaline batteries only. E 12 Plug the power cord (supplied) ...
...Replace the batteries when they run low as air conditioner, stereo components, etc. This could lead to a malfunction. • Do not expose the remote control unit to liquids, and do not place it with their plus (+) and minus (-) sides oriented correctly. 3. Connecting the Power Cord Caution •... interfere with the monitor. Close the cover. Using power supply other than the one supplied with proper operation. • Do not use the remote control for a long time, remove the batteries. • Use manganese or alkaline batteries only. E 12 Plug the power cord (supplied) ...
PNG655U Operation Manual
Page 16
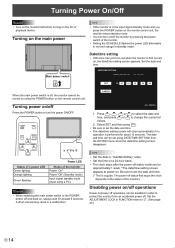
... 24.) E 14 Turning Power On/Off Caution • Turn on the monitor first before turning on , always wait for at power-on the remote control unit. INPUT Status of a power LED Green lighting Orange lighting Green flashing Power LED Status of the monitor. • Setting the SCHEDULE &#.... 2. OK···[MENU] 1. TIPS • Set the date in the input signal standby mode and you press the POWER button on the remote control unit, the monitor enters standby mode. • You can be turned on using a PC) Caution • When switching the main power switch or...
... 24.) E 14 Turning Power On/Off Caution • Turn on the monitor first before turning on , always wait for at power-on the remote control unit. INPUT Status of a power LED Green lighting Orange lighting Green flashing Power LED Status of the monitor. • Setting the SCHEDULE &#.... 2. OK···[MENU] 1. TIPS • Set the date in the input signal standby mode and you press the POWER button on the remote control unit, the monitor enters standby mode. • You can be turned on using a PC) Caution • When switching the main power switch or...

PNG655U Operation Manual
Page 20
...TINT (AV input) Adjusts the hue. changes it towards green, and selecting - WHITE BALANCE THRU Displays the input signal level as is flickering in it . * Adjustments to USER. B-CONTRAST Adjusts...also be made only after CLOCK has been correctly set to PHASE should be changed using a remote control unit. (See page 15.) * sRGB is PC input only. Selects the color ...value. COLORS (AV input) Adjusts the color intensity. See page 15 for applicable video. SHARPNESS Adjusts the sharpness of bass-level sound. COPY TO USER Copies the value set to the USER setting. BASS...
...TINT (AV input) Adjusts the hue. changes it towards green, and selecting - WHITE BALANCE THRU Displays the input signal level as is flickering in it . * Adjustments to USER. B-CONTRAST Adjusts...also be made only after CLOCK has been correctly set to PHASE should be changed using a remote control unit. (See page 15.) * sRGB is PC input only. Selects the color ...value. COLORS (AV input) Adjusts the color intensity. See page 15 for applicable video. SHARPNESS Adjusts the sharpness of bass-level sound. COPY TO USER Copies the value set to the USER setting. BASS...
PNG655U Operation Manual
Page 26
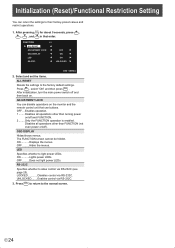
...Restriction Setting You can disable operations on /off ). OFF .........Hides the menus. Press MENU to return to light power LEDs. OSD DISPLAY Hides/shows menus. LED Specifies whether to the normal screen. Select and set the items. ALL RESET Resets the settings to... about 5 seconds, press , , , and in that use buttons. Disables all operations other than turning power on the monitor and the remote control unit that order. ADJUSTMENT LOCK You can return the settings to their factory-preset values and restrict operations. 1. OFF .........Does not light...
...Restriction Setting You can disable operations on /off ). OFF .........Hides the menus. Press MENU to return to light power LEDs. OSD DISPLAY Hides/shows menus. LED Specifies whether to the normal screen. Select and set the items. ALL RESET Resets the settings to... about 5 seconds, press , , , and in that use buttons. Disables all operations other than turning power on the monitor and the remote control unit that order. ADJUSTMENT LOCK You can return the settings to their factory-preset values and restrict operations. 1. OFF .........Does not light...

PNG655U Operation Manual
Page 28
... ID number to control a particular monitor in a daisy chain by designating ID numbers, you can assign ID numbers either from the menu screen (using the remote control) or from the PC. Do not send any duplication of ID numbers. To set a timeout for the command response, specify 10 seconds or longer...
... ID number to control a particular monitor in a daisy chain by designating ID numbers, you can assign ID numbers either from the menu screen (using the remote control) or from the PC. Do not send any duplication of ID numbers. To set a timeout for the command response, specify 10 seconds or longer...
PNG655U Operation Manual
Page 35
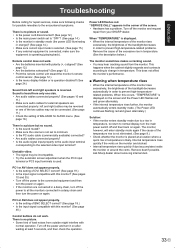
... • If the monitor enters standby mode due to a rise in temperature, to return to normal display, turn the main power switch off the power and turn it on again. Ask Sharp dealer about removing internal dust. The monitor, however, will enter standby mode again if the cause of...8226; Are the batteries exhausted? (See page 12.) • Point the remote control unit toward the monitor's remote control sensor. (See page 12.) • Is the menu display hidden or is operation disabled? (See page 24.) Sound from your SHARP dealer. PC3 or AV2 does not appear properly. • Is the ...
... • If the monitor enters standby mode due to a rise in temperature, to return to normal display, turn the main power switch off the power and turn it on again. Ask Sharp dealer about removing internal dust. The monitor, however, will enter standby mode again if the cause of...8226; Are the batteries exhausted? (See page 12.) • Point the remote control unit toward the monitor's remote control sensor. (See page 12.) • Is the menu display hidden or is operation disabled? (See page 24.) Sound from your SHARP dealer. PC3 or AV2 does not appear properly. • Is the ...


