PN-465U Operation Manual
Page 8
Contents Introduction IMPORTANT INFORMATION 1 DEAR SHARP CUSTOMER 3 SAFETY PRECAUTIONS 3 TIPS AND SAFETY INSTRUCTIONS 5 Supplied Accessories 7 Part ...Connecting external speakers 11 Connecting multiple monitors 11 Connecting the Power Cord 12 Mounting the Temporary Stands 12 Binding Cables 13 Preparing the Remote Control Unit 13 Setting the batteries 13 Remote ...power on/off operations 14 Basic Operation 15 Menu Items 17 Displaying the menu screen 17 Menu item details 18 Adjustments for PC screen display 23 Initialization (Reset)/ Functional Restriction Setting 24 PC Operation ...
Contents Introduction IMPORTANT INFORMATION 1 DEAR SHARP CUSTOMER 3 SAFETY PRECAUTIONS 3 TIPS AND SAFETY INSTRUCTIONS 5 Supplied Accessories 7 Part ...Connecting external speakers 11 Connecting multiple monitors 11 Connecting the Power Cord 12 Mounting the Temporary Stands 12 Binding Cables 13 Preparing the Remote Control Unit 13 Setting the batteries 13 Remote ...power on/off operations 14 Basic Operation 15 Menu Items 17 Displaying the menu screen 17 Menu item details 18 Adjustments for PC screen display 23 Initialization (Reset)/ Functional Restriction Setting 24 PC Operation ...
PN-465U Operation Manual
Page 9
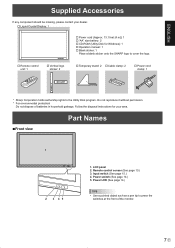
...stand: 2 � Cable clamp: 2 � Power cord clamp: 1 INPUT * Sharp Corporation holds authorship rights to press the switches at the front of batteries in household garbage. Power LED (See page 14.) TIPS • Use a pointed object such as a pen tip to the Utility Disk program. LCD panel... 2. Power switch (See page 14.) 5. ENGLISH Supplied Accessories If any component should be missing, please contact your dealer. � Liquid Crystal Display: 1 � Power cord (Approx. 13.1 feet [4 m]): 1...
...stand: 2 � Cable clamp: 2 � Power cord clamp: 1 INPUT * Sharp Corporation holds authorship rights to press the switches at the front of batteries in household garbage. Power LED (See page 14.) TIPS • Use a pointed object such as a pen tip to the Utility Disk program. LCD panel... 2. Power switch (See page 14.) 5. ENGLISH Supplied Accessories If any component should be missing, please contact your dealer. � Liquid Crystal Display: 1 � Power cord (Approx. 13.1 feet [4 m]): 1...
PN-465U Operation Manual
Page 11
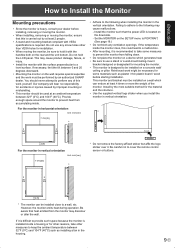
... some measures to prevent the monitor from falling down. • Do not place the monitor on a device which can be sure to hold the LCD panel. For the monitor in vertical orientation Unit: inch [cm] 7-7/8 [20] * * Do not remove the factory-affixed sticker but af...8226; After mounting, it with the surface perpendicular to a wall, etc. Do not use a stand or a wall-mount/ceiling-mount bracket designed or designated for accidents or injuries caused by an authorized SHARP dealer. You should be necessary for installation. • When moving the monitor, ensure that this ...
... some measures to prevent the monitor from falling down. • Do not place the monitor on a device which can be sure to hold the LCD panel. For the monitor in vertical orientation Unit: inch [cm] 7-7/8 [20] * * Do not remove the factory-affixed sticker but af...8226; After mounting, it with the surface perpendicular to a wall, etc. Do not use a stand or a wall-mount/ceiling-mount bracket designed or designated for accidents or injuries caused by an authorized SHARP dealer. You should be necessary for installation. • When moving the monitor, ensure that this ...

PN-465U Operation Manual
Page 14
Turn off the main power switch. 2. Power outlet Main power switch 3 1 2 AC input terminal Power cord (Supplied) Mounting the Temporary Stands Caution • The monitor is properly mounted. E 12 Plug the power cord (supplied) into the AC power outlet. It must be mounted...the monitor. Remove the screws from the monitor and mount the temporary stand using the screws. Screws Temporary stand Caution • After detaching the temporary stand, be sure to use a power outlet of AC 120 V (60 Hz). The temporary stand can be handled by 2 or more people. • Please ...
Turn off the main power switch. 2. Power outlet Main power switch 3 1 2 AC input terminal Power cord (Supplied) Mounting the Temporary Stands Caution • The monitor is properly mounted. E 12 Plug the power cord (supplied) into the AC power outlet. It must be mounted...the monitor. Remove the screws from the monitor and mount the temporary stand using the screws. Screws Temporary stand Caution • After detaching the temporary stand, be sure to use a power outlet of AC 120 V (60 Hz). The temporary stand can be handled by 2 or more people. • Please ...
PN-465U Operation Manual
Page 36
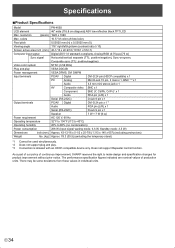
...product improvement without prior notice. Specifications Product Specifications Model LCD element Max. resolution Max. colors (pixels) PN-465U 46" wide (116.8 cm diagonal) ASV low-reflection black TFT LCD 1920 x 1080 16.77 M colors (8 bits/color) Pixel pitch 0.53025 mm... only. As a part of our policy of production units. E 34 The performance specification figures indicated are nominal values of continuous improvement, SHARP reserves the right to 80% (no condensation) 266 W (Input signal waiting mode: 6.5 W, Standby mode: 3.5 W) Approx. 43-13/16 x ...
...product improvement without prior notice. Specifications Product Specifications Model LCD element Max. resolution Max. colors (pixels) PN-465U 46" wide (116.8 cm diagonal) ASV low-reflection black TFT LCD 1920 x 1080 16.77 M colors (8 bits/color) Pixel pitch 0.53025 mm... only. As a part of our policy of production units. E 34 The performance specification figures indicated are nominal values of continuous improvement, SHARP reserves the right to 80% (no condensation) 266 W (Input signal waiting mode: 6.5 W, Standby mode: 3.5 W) Approx. 43-13/16 x ...


