PN-465U Operation Manual
Page 3
ENGLISH PN-465U LCD MONITOR ENGLISH IMPORTANT: To aid reporting in case of the product. The numbers are located in the rear of loss or theft, please record the product's model and serial numbers in the literature accompanying the product. NO USER-SERVICEABLE PARTS INSIDE. The lightning flash with arrowhead symbol, within an equilateral triangle, is intended to alert the user to the presence...
ENGLISH PN-465U LCD MONITOR ENGLISH IMPORTANT: To aid reporting in case of the product. The numbers are located in the rear of loss or theft, please record the product's model and serial numbers in the literature accompanying the product. NO USER-SERVICEABLE PARTS INSIDE. The lightning flash with arrowhead symbol, within an equilateral triangle, is intended to alert the user to the presence...
PN-465U Operation Manual
Page 5
... LCD panel used to perform many years of trouble-free operation of inadequate attachments can result in this product is provided or the manufacturer's instructions are designed for ventilation. All operating instructions must be observed closely. 4. Observe warnings - Do not use can result in a safe place for your LCD product, please read the following instructions when installing, operating and cleaning the product. Servicing - When the power cord or plug...
... LCD panel used to perform many years of trouble-free operation of inadequate attachments can result in this product is provided or the manufacturer's instructions are designed for ventilation. All operating instructions must be observed closely. 4. Observe warnings - Do not use can result in a safe place for your LCD product, please read the following instructions when installing, operating and cleaning the product. Servicing - When the power cord or plug...

PN-465U Operation Manual
Page 6
.... Upon completion of service or repair work, request the service technician to perform safety checks to ensure that , could lead directly to take adequate measures. E 4 Use of the monitor must not be required to death, personal injury, severe physical damage or other danger. 16. Safety checks - When mounting the product on a wall, be sure to install the product according...
.... Upon completion of service or repair work, request the service technician to perform safety checks to ensure that , could lead directly to take adequate measures. E 4 Use of the monitor must not be required to death, personal injury, severe physical damage or other danger. 16. Safety checks - When mounting the product on a wall, be sure to install the product according...
PN-465U Operation Manual
Page 7
... power cord supplied with hard objects. - Adding an extension cord may not exactly represent the actual product or display. - Fluorescent Tubes ● The fluorescent tubes in fire or electric shock. - The TFT color LCD panel used in this manual may lead to fire as this product arising during the initial period of the monitor and turn on again to repair the power cord...
... power cord supplied with hard objects. - Adding an extension cord may not exactly represent the actual product or display. - Fluorescent Tubes ● The fluorescent tubes in fire or electric shock. - The TFT color LCD panel used in this manual may lead to fire as this product arising during the initial period of the monitor and turn on again to repair the power cord...
PN-465U Operation Manual
Page 8
... AND SAFETY INSTRUCTIONS 5 Supplied Accessories 7 Part Names 7 Front view 7 Rear view 8 Remote control unit 8 Connection and Installation How to Install the Monitor 9 Mounting precautions 9 Connecting Peripheral Equipment 10 Connection with a PC 10 Connection with AV equipment 10 Other terminals 11 Connecting external speakers 11 Connecting multiple monitors 11 Connecting the Power Cord 12 Mounting the Temporary Stands 12 Binding Cables 13 Preparing the Remote Control Unit 13 Setting the batteries 13 Remote control operation range 13 Basic Operation Turning Power On/Off...
... AND SAFETY INSTRUCTIONS 5 Supplied Accessories 7 Part Names 7 Front view 7 Rear view 8 Remote control unit 8 Connection and Installation How to Install the Monitor 9 Mounting precautions 9 Connecting Peripheral Equipment 10 Connection with a PC 10 Connection with AV equipment 10 Other terminals 11 Connecting external speakers 11 Connecting multiple monitors 11 Connecting the Power Cord 12 Mounting the Temporary Stands 12 Binding Cables 13 Preparing the Remote Control Unit 13 Setting the batteries 13 Remote control operation range 13 Basic Operation Turning Power On/Off...
PN-465U Operation Manual
Page 9
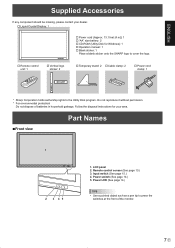
... Disk program. Follow the disposal instructions for your dealer. � Liquid Crystal Display: 1 � Power cord (Approx. 13.1 feet [4 m]): 1 � "AA" size battery: 2 � CD-ROM (Utility Disk for Windows): 1 � Operation manual: 1 � Blank sticker: 1 Place a blank sticker onto the SHARP logo to cover the logo. � Remote control unit: 1 � Vertical logo sticker: 2 � Temporary stand: 2 � Cable clamp: 2 � Power cord clamp: 1 INPUT * Sharp...
... Disk program. Follow the disposal instructions for your dealer. � Liquid Crystal Display: 1 � Power cord (Approx. 13.1 feet [4 m]): 1 � "AA" size battery: 2 � CD-ROM (Utility Disk for Windows): 1 � Operation manual: 1 � Blank sticker: 1 Place a blank sticker onto the SHARP logo to cover the logo. � Remote control unit: 1 � Vertical logo sticker: 2 � Temporary stand: 2 � Cable clamp: 2 � Power cord clamp: 1 INPUT * Sharp...
PN-465U Operation Manual
Page 11
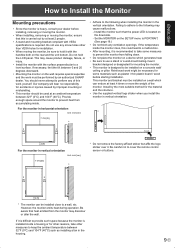
... the LCD panel. If necessary, limit the tilt between 32°F (0°C) and 104°F (40°C). Reinforced work might be necessary for installation. • When moving the monitor, ensure that this is carried out by at least 2 people. • A stand and mounting bracket compliant with VESA specifications is located on the downside. - Install the monitor such that the power LED is...
... the LCD panel. If necessary, limit the tilt between 32°F (0°C) and 104°F (40°C). Reinforced work might be necessary for installation. • When moving the monitor, ensure that this is carried out by at least 2 people. • A stand and mounting bracket compliant with VESA specifications is located on the downside. - Install the monitor such that the power LED is...
PN-465U Operation Manual
Page 12
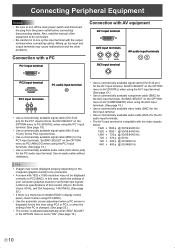
... to PC (ANALOG) when using the AV1 input terminal. (See page 19.) • Use a commercially available component cable (BNC) for the AV audio input terminals. • The AV1 input terminal is set to be connected. • A screen with 1920 x 1080 resolution may not be displayed properly depending on the OPTION menu to turn off the main power switch and disconnect the plug from the power outlet before connecting/ disconnecting cables. Set BNC SELECT...
... to PC (ANALOG) when using the AV1 input terminal. (See page 19.) • Use a commercially available component cable (BNC) for the AV audio input terminals. • The AV1 input terminal is set to be connected. • A screen with 1920 x 1080 resolution may not be displayed properly depending on the OPTION menu to turn off the main power switch and disconnect the plug from the power outlet before connecting/ disconnecting cables. Set BNC SELECT...

PN-465U Operation Manual
Page 13
... right speakers properly. • Avoid short circuiting the + and - terminals. Connecting multiple monitors You can be adjusted using the AUDIO menu. While pushing the tab, insert the tip of this case, turn off the power to all the monitors connected in a daisy chain via DVI cable (commercially available). (See the description on the input mode selection. (See page 15.) • The volume level can control the monitor...
... right speakers properly. • Avoid short circuiting the + and - terminals. Connecting multiple monitors You can be adjusted using the AUDIO menu. While pushing the tab, insert the tip of this case, turn off the power to all the monitors connected in a daisy chain via DVI cable (commercially available). (See the description on the input mode selection. (See page 15.) • The volume level can control the monitor...

PN-465U Operation Manual
Page 14
... people. • Please note that the temporary stands are for temporary use only until the monitor is heavy. The temporary stand can be mounted at a position shown in the illustration. Plug the power cord (supplied) into the AC input terminal. 3. Connecting the Power Cord Caution • Do not use a power cord other than the one specified may cause fire. 1. Remove the screws from the monitor and mount the temporary stand using the screws.
... people. • Please note that the temporary stands are for temporary use only until the monitor is heavy. The temporary stand can be mounted at a position shown in the illustration. Plug the power cord (supplied) into the AC input terminal. 3. Connecting the Power Cord Caution • Do not use a power cord other than the one specified may cause fire. 1. Remove the screws from the monitor and mount the temporary stand using the screws.

PN-465U Operation Manual
Page 15
... cable clamp The cables connected to the power cord, making sure the power cord clamp is circular holesidedown. 2. ENGLISH Binding Cables Cable clamp positions Cable clamp attachment Insert the cable clamp into the hole for the power cord clamp. 3. Preparing the Remote Control Unit Setting the batteries 1. This will not use it in the direction of the band, slide the fastened part toward the AC input terminal. Attach the supplied power cord...
... cable clamp The cables connected to the power cord, making sure the power cord clamp is circular holesidedown. 2. ENGLISH Binding Cables Cable clamp positions Cable clamp attachment Insert the cable clamp into the hole for the power cord clamp. 3. Preparing the Remote Control Unit Setting the batteries 1. This will not use it in the direction of the band, slide the fastened part toward the AC input terminal. Attach the supplied power cord...

PN-465U Operation Manual
Page 16
... power-off operations can be turned on using the POWER button on the PC or playback device. Set the ADJUSTMENT LOCK in FUNCTION menu to set when the monitor is a guide. Set the date and time. Status of a power LED Green lighting Orange lighting Green flashing Power LED Status of the monitor. • Setting the SCHEDULE flashes the power LED alternately in red and orange in a malfunction. A short interval may result in standby mode. Turning on the main power Main power switch...
... power-off operations can be turned on using the POWER button on the PC or playback device. Set the ADJUSTMENT LOCK in FUNCTION menu to set when the monitor is a guide. Set the date and time. Status of a power LED Green lighting Orange lighting Green flashing Power LED Status of the monitor. • Setting the SCHEDULE flashes the power LED alternately in red and orange in a malfunction. A short interval may result in standby mode. Turning on the main power Main power switch...
PN-465U Operation Manual
Page 17
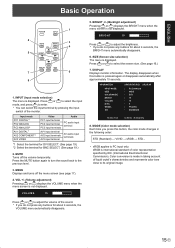
... XXX XX:XX:XX INPUT MODE SIZE COLOR MODE BRIGHT VOLUME ID No. VOLUME 15 Press or to adjust the brightness. * If you do not press any buttons for about 4 seconds, the VOLUME menu automatically disappears. 5. Input mode PC1 DIGITAL*1 PC2 ANALOG PC3 ANALOG*2 AV1 DIGITAL*1 AV2 COMPONENT*2 AV3 VIDEO Video PC1 input terminal PC2 input terminal PC3 input terminals AV1 input terminal AV2 input terminals AV3 input terminal Audio PC audio input terminal AV audio input terminals *1 Select the terminal...
... XXX XX:XX:XX INPUT MODE SIZE COLOR MODE BRIGHT VOLUME ID No. VOLUME 15 Press or to adjust the brightness. * If you do not press any buttons for about 4 seconds, the VOLUME menu automatically disappears. 5. Input mode PC1 DIGITAL*1 PC2 ANALOG PC3 ANALOG*2 AV1 DIGITAL*1 AV2 COMPONENT*2 AV3 VIDEO Video PC1 input terminal PC2 input terminal PC3 input terminals AV1 input terminal AV2 input terminals AV3 input terminal Audio PC audio input terminal AV audio input terminals *1 Select the terminal...
PN-465U Operation Manual
Page 19
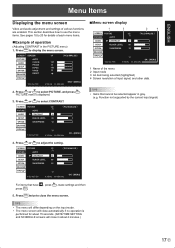
...Press or to display the menu screen. Press or to adjust the setting. TIPS • Items that have press . ENGLISH Menu Items Displaying the menu screen Video and audio adjustment and settings of input signal, and other data. SCREEN PICTURE 1/2 PC2 ANALOG PICTURE AUTO AUDIO CONTRAST 30 SETUP BLACK LEVEL 96 OPTION SHARPNESS 12 ENLARGE PIP/PbyP 1024x768 V: 60 Hz H: 48.4 kHz OK...[MENU] Menu screen display 1 3 2 4 SCREEN PICTURE 1/2 PC2 ANALOG PICTURE AUTO AUDIO CONTRAST 30 SETUP BLACK LEVEL 96 OPTION SHARPNESS 12 ENLARGE PIP/PbyP 1024x768 OK...
...Press or to display the menu screen. Press or to adjust the setting. TIPS • Items that have press . ENGLISH Menu Items Displaying the menu screen Video and audio adjustment and settings of input signal, and other data. SCREEN PICTURE 1/2 PC2 ANALOG PICTURE AUTO AUDIO CONTRAST 30 SETUP BLACK LEVEL 96 OPTION SHARPNESS 12 ENLARGE PIP/PbyP 1024x768 V: 60 Hz H: 48.4 kHz OK...[MENU] Menu screen display 1 3 2 4 SCREEN PICTURE 1/2 PC2 ANALOG PICTURE AUTO AUDIO CONTRAST 30 SETUP BLACK LEVEL 96 OPTION SHARPNESS 12 ENLARGE PIP/PbyP 1024x768 OK...
PN-465U Operation Manual
Page 20
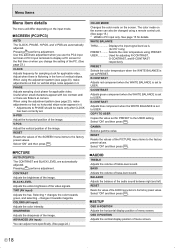
.... * Adjustments to the factory preset values. CONTRAST Adjusts the brightness of treble-level sound. COLORS (AV input) Adjusts the color intensity. ADVANCED (AV input) You can also be made only after CLOCK has been correctly set to the USER setting. R-CONTRAST Adjusts red component when the WHITE BALANCE is set for applicable video. COPY TO USER Copies the value set to display a PC screen for the first time or when you use the...
.... * Adjustments to the factory preset values. CONTRAST Adjusts the brightness of treble-level sound. COLORS (AV input) Adjusts the color intensity. ADVANCED (AV input) You can also be made only after CLOCK has been correctly set to the USER setting. R-CONTRAST Adjusts red component when the WHITE BALANCE is set for applicable video. COPY TO USER Copies the value set to display a PC screen for the first time or when you use the...

PN-465U Operation Manual
Page 21
... of the screen. PATTERN 1 PATTERN 2 PATTERN 3 PATTERN 4 MOTION TIME 1 Specify a time period (operating interval) until SCREEN MOTION starts. SET Assigns ID numbers to appear. PICTURE FLIP A picture flips to monitors connected in a daisy chain (see page 26), using VOLUME. This function is disabled when 0 is automatically adjusted when the timing of 1024 x 768, 1280 x 768 or 1360 x 768, make a selection according to the PC3/AV2 input terminals. FIXED Fixes the sounds. 480LINES (PC2...
... of the screen. PATTERN 1 PATTERN 2 PATTERN 3 PATTERN 4 MOTION TIME 1 Specify a time period (operating interval) until SCREEN MOTION starts. SET Assigns ID numbers to appear. PICTURE FLIP A picture flips to monitors connected in a daisy chain (see page 26), using VOLUME. This function is disabled when 0 is automatically adjusted when the timing of 1024 x 768, 1280 x 768 or 1360 x 768, make a selection according to the PC3/AV2 input terminals. FIXED Fixes the sounds. 480LINES (PC2...

PN-465U Operation Manual
Page 22
... enlarged screen. PIP H-POS Adjusts the horizontal position of AV input signals. AUTO Displays the main screen as two types of PC input signals or two types of the sub screen in PIP, PbyP, or PbyP2 mode. PIP A sub screen is displayed on a copyright of the author which is output in NORMAL size except when it is disabled. 3D-NR, MPEG-NR and 3D-Y/C E 20 PIP BLEND In PIP mode, use this function with "PIP MODES" in...
... enlarged screen. PIP H-POS Adjusts the horizontal position of AV input signals. AUTO Displays the main screen as two types of PC input signals or two types of the sub screen in PIP, PbyP, or PbyP2 mode. PIP A sub screen is displayed on a copyright of the author which is output in NORMAL size except when it is disabled. 3D-NR, MPEG-NR and 3D-Y/C E 20 PIP BLEND In PIP mode, use this function with "PIP MODES" in...

PN-465U Operation Manual
Page 24
... time to execute the SCHEDULE. Input modes displayed on "PC3/AV2" depend on the specified day. However, it may improve the image quality. Menu Items SCHEDULE You can be registered. • Setting the SCHEDULE flashes the power LED alternately in red and orange in standby mode. • A SCHEDULE that has a large number has precedence over that the set the time...
... time to execute the SCHEDULE. Input modes displayed on "PC3/AV2" depend on the specified day. However, it may improve the image quality. Menu Items SCHEDULE You can be registered. • Setting the SCHEDULE flashes the power LED alternately in red and orange in standby mode. • A SCHEDULE that has a large number has precedence over that the set the time...
PN-465U Operation Manual
Page 35
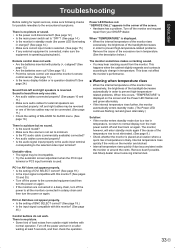
... the power cord disconnected? (See page 12.) • Is the main power switch set to minimum. • Is the PC audio cable (commercially available) connected? • Are audio cables connected properly? • Is the audio signal input properly to the audio input terminal corresponding to the selected video input terminal? Turn off the power and turn it on the monitor are connected in a daisy chain, turn the power on the screen and the Power LED flashes red and green...
... the power cord disconnected? (See page 12.) • Is the main power switch set to minimum. • Is the PC audio cable (commercially available) connected? • Are audio cables connected properly? • Is the audio signal input properly to the audio input terminal corresponding to the selected video input terminal? Turn off the power and turn it on the monitor are connected in a daisy chain, turn the power on the screen and the Power LED flashes red and green...
PN-465U Operation Manual
Page 36
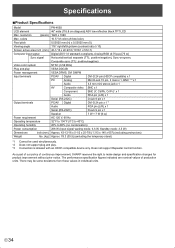
... There may be used simultaneously. *2 Does not support plug and play VESA DDC2B Power management VESA DPMS, DVI DMPM Input terminals PC/AV Digital PC Analog DVI-D 24 pin (HDCP compatible) x 1 Mini D-sub 15 pin, 3 rows x 1, BNC *1*2 x 1 Audio 3.5 mm mini stereo jack x 1 AV Composite video BNC x 1 Component BNC (Y, Cb/Pb, Cr/Pr)*1 x 1 Output terminals Power requirement Operating temperature Operating humidity Power consumption Dimensions inch (mm) Weight lbs. (kg) Audio RCA pin (L/R) x 1 Serial (RS-232C...
... There may be used simultaneously. *2 Does not support plug and play VESA DDC2B Power management VESA DPMS, DVI DMPM Input terminals PC/AV Digital PC Analog DVI-D 24 pin (HDCP compatible) x 1 Mini D-sub 15 pin, 3 rows x 1, BNC *1*2 x 1 Audio 3.5 mm mini stereo jack x 1 AV Composite video BNC x 1 Component BNC (Y, Cb/Pb, Cr/Pr)*1 x 1 Output terminals Power requirement Operating temperature Operating humidity Power consumption Dimensions inch (mm) Weight lbs. (kg) Audio RCA pin (L/R) x 1 Serial (RS-232C...


