
PG-M20X Operation Manual
Page 5
... service and labor warranty applicable to your new SHARP Projector, using the projector, please read this product may be required to take adequate measures. -1 Be especially careful that SHARP may cause radio interference in which case the ...user will promptly receive any unauthorized changes or modifications to this equipment not expressly approved by the manufacturer could void the user's authority to operate this equipment in a residential area is operated in a commercial environment. NO USER-SERVICEABLE PARTS EXCEPT LAMP...
... service and labor warranty applicable to your new SHARP Projector, using the projector, please read this product may be required to take adequate measures. -1 Be especially careful that SHARP may cause radio interference in which case the ...user will promptly receive any unauthorized changes or modifications to this equipment not expressly approved by the manufacturer could void the user's authority to operate this equipment in a residential area is operated in a commercial environment. NO USER-SERVICEABLE PARTS EXCEPT LAMP...

PG-M20X Operation Manual
Page 6
... QUE PAR UNE LAMPE SHARP DE TYPE BQC-PGM20X//1. Caution Concerning the Lamp Replacement See "Replacing the Lamp" on the remote control. POTENTIAL HAZARD OF GLASS PARTICLES IF LAMP HAS RUPTURED. LAMPE A MOYENNE PRESSION : RISQUE D'EXPLOSION. LAMP REPLACEMENT CAUTION BEFORE REMOVING THE SCREW, DISCONNECT POWER CORD. SEE OPERATION MANUAL. DURING NORMAL OPERATION, NEVER TURN THE PROJECTOR OFF BY...
... QUE PAR UNE LAMPE SHARP DE TYPE BQC-PGM20X//1. Caution Concerning the Lamp Replacement See "Replacing the Lamp" on the remote control. POTENTIAL HAZARD OF GLASS PARTICLES IF LAMP HAS RUPTURED. LAMPE A MOYENNE PRESSION : RISQUE D'EXPLOSION. LAMP REPLACEMENT CAUTION BEFORE REMOVING THE SCREW, DISCONNECT POWER CORD. SEE OPERATION MANUAL. DURING NORMAL OPERATION, NEVER TURN THE PROJECTOR OFF BY...

PG-M20X Operation Manual
Page 8
... and Projection Distance 18 Projecting a Reversed/Inverted Image 19 Connecting the Projector to Other Devices .... 20 Before Connecting 20 This projector can be connected to 20 Connecting the Power Cord 20 Connecting the Projector to a Computer .......... 21 Connecting to Video Equipment 23 Connecting to ...Image 57 Using an RGB Monitor Loop-out Adaptor ...... 58 Displaying the Lamp Usage Time 58 Displaying the Break Timer 59 Reversing/Inverting Projected Images 60 Locking the Operation Buttons on the Projector 60 Setting up the Keylock 60 Canceling the Keylock Setting 61 Setting ...
... and Projection Distance 18 Projecting a Reversed/Inverted Image 19 Connecting the Projector to Other Devices .... 20 Before Connecting 20 This projector can be connected to 20 Connecting the Power Cord 20 Connecting the Projector to a Computer .......... 21 Connecting to Video Equipment 23 Connecting to ...Image 57 Using an RGB Monitor Loop-out Adaptor ...... 58 Displaying the Lamp Usage Time 58 Displaying the Break Timer 59 Reversing/Inverting Projected Images 60 Locking the Operation Buttons on the Projector 60 Setting up the Keylock 60 Canceling the Keylock Setting 61 Setting ...
PG-M20X Operation Manual
Page 9
Introduction Setting the Anti-Theft 63 Entering the Keycode 63 Changing the Keycode 64 Initializing the Settings 65 Displaying the Adjustment Settings 66 Appendix Carrying the Projector 68 Maintenance 69 Maintenance Indicators 70 Regarding the Lamp 71 Lamp 71 Caution Concerning the Lamp 71 Replacing the Lamp 71 Removing and Installing the Lamp Unit 72 Resetting the Lamp Timer 73 Connecting Pin Assignments 74 Computer Compatibility Chart 75 Troubleshooting 76 For SHARP Assistance 78 Specifications 79 Dimensions 80 Glossary 81 Index 82 -5
Introduction Setting the Anti-Theft 63 Entering the Keycode 63 Changing the Keycode 64 Initializing the Settings 65 Displaying the Adjustment Settings 66 Appendix Carrying the Projector 68 Maintenance 69 Maintenance Indicators 70 Regarding the Lamp 71 Lamp 71 Caution Concerning the Lamp 71 Replacing the Lamp 71 Removing and Installing the Lamp Unit 72 Resetting the Lamp Timer 73 Connecting Pin Assignments 74 Computer Compatibility Chart 75 Troubleshooting 76 For SHARP Assistance 78 Specifications 79 Dimensions 80 Glossary 81 Index 82 -5
PG-M20X Operation Manual
Page 12
... with high or low temperature. Internal cleaning should be connected. This will shut off the projector and the equipment to rise, the lamp will automatically turn off the projector. If the temperature continues to be within ±10 degrees. Light falling directly on page...intake vent and the exhaust vent are using the projector overseas, be sure to the projector, make your nearest Sharp Authorized Projector Dealer or Service Center for the country you are not obstructed. Using the projector in direct sunlight or room light. Temperature monitor function...
... with high or low temperature. Internal cleaning should be connected. This will shut off the projector and the equipment to rise, the lamp will automatically turn off the projector. If the temperature continues to be within ±10 degrees. Light falling directly on page...intake vent and the exhaust vent are using the projector overseas, be sure to the projector, make your nearest Sharp Authorized Projector Dealer or Service Center for the country you are not obstructed. Using the projector in direct sunlight or room light. Temperature monitor function...
PG-M20X Operation Manual
Page 14
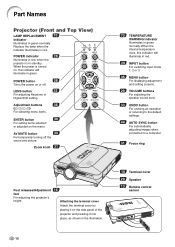
...AUTO SYNC button For automatically adjusting images when connected to a computer. 31 Focus ring Foot releases/Adjustment feet For adjusting the projector's height. 16 Attaching the terminal cover Attach the terminal cover by placing it on or off the sound and picture. POWER...indicator 28 Illuminates in red, when the projector is turned on the menu. LENS button 32 For adjusting Keystone or Digital Shift setting. Part Names Projector (Front and Top View) LAMP REPLACEMENT 70 indicator Illuminates in standby. Replace the lamp when the indicator illuminates in green normally...
...AUTO SYNC button For automatically adjusting images when connected to a computer. 31 Focus ring Foot releases/Adjustment feet For adjusting the projector's height. 16 Attaching the terminal cover Attach the terminal cover by placing it on or off the sound and picture. POWER...indicator 28 Illuminates in red, when the projector is turned on the menu. LENS button 32 For adjusting Keystone or Digital Shift setting. Part Names Projector (Front and Top View) LAMP REPLACEMENT 70 indicator Illuminates in standby. Replace the lamp when the indicator illuminates in green normally...

PG-M20X Operation Manual
Page 17
... match the and marks inside the battery compartment. 3 Slide the cover in the illustration. Please follow the precautions below. Under that circumstance, move the projector away from the remote control once they are included in the package. 1 Slide the cover in the direction of the arrow to leak. • ...Remove the batteries from the fluorescent lamp. This may shorten the life of new batteries or may be using the remote control: • Be sure not to drop, expose to the ...
... match the and marks inside the battery compartment. 3 Slide the cover in the illustration. Please follow the precautions below. Under that circumstance, move the projector away from the remote control once they are included in the package. 1 Slide the cover in the direction of the arrow to leak. • ...Remove the batteries from the fluorescent lamp. This may shorten the life of new batteries or may be using the remote control: • Be sure not to drop, expose to the ...
PG-M20X Operation Manual
Page 32
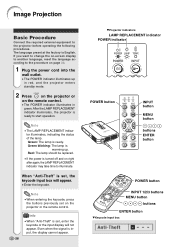
... indicator illuminates up . If you want to change the on-screen display to another language, reset the language according to the projector before operating the following procedures. Green blinking: The lamp is ready. Note • When entering the keycode, press the buttons previously set , enter the keycode or the input display will...
... indicator illuminates up . If you want to change the on-screen display to another language, reset the language according to the projector before operating the following procedures. Green blinking: The lamp is ready. Note • When entering the keycode, press the buttons previously set , enter the keycode or the input display will...

PG-M20X Operation Manual
Page 38
... 40 Sub menu Contrast -30 +30 Bright -30 +30 Color -30 +30 Tint -30 +30 Sharp -30 +30 Red -30 +30 Blue -30 +30 CLR Temp -3 +3 Reset Signal Type Progressive Mode... OFF Level 1 Level 3 Normal Level A Level B Save Image Delete Sharp Custom Blue None Sharp Custom None Disable Yes (Y Cable) Lamp Timer Break Timer PRJ Mode Keylock Level Password Anti-Theft All Reset English ...Sync Disp" can be set as "Component", in the "Picture" menu of INPUT 1 "Color", "Tint" and "Sharp" are displayed. • Some items cannot be used. • When the signal type is set in Options (2) has...
... 40 Sub menu Contrast -30 +30 Bright -30 +30 Color -30 +30 Tint -30 +30 Sharp -30 +30 Red -30 +30 Blue -30 +30 CLR Temp -3 +3 Reset Signal Type Progressive Mode... OFF Level 1 Level 3 Normal Level A Level B Save Image Delete Sharp Custom Blue None Sharp Custom None Disable Yes (Y Cable) Lamp Timer Break Timer PRJ Mode Keylock Level Password Anti-Theft All Reset English ...Sync Disp" can be set as "Component", in the "Picture" menu of INPUT 1 "Color", "Tint" and "Sharp" are displayed. • Some items cannot be used. • When the signal type is set in Options (2) has...

PG-M20X Operation Manual
Page 39
I INPUT 2 / 3 Mode Main menu Picture Page 40 Sub menu Contrast -30 +30 Bright -30 +30 Color -30 +30 Tint -30 +30 Sharp -30 +30 Red -30 +30 Blue -30 +30 CLR Temp -3 +3 Reset Progressive Mode 2D Progressive 3D Progressive Film Mode Options (1) Page 52 Power Save [ON/... [ON/OFF] OFF Level 1 Normal Level A Level B Level 3 Auto PAL (50/60Hz) SECAM NTSC4.43 NTSC3.58 PAL-M PAL-N Sharp Custom Blue None Sharp Custom None Main menu Options (2) Page 58 Sub menu Lamp Timer Break Timer PRJ Mode Language Page 31 Keylock Level Password Anti-Theft All Reset English Deutsch Españ...
I INPUT 2 / 3 Mode Main menu Picture Page 40 Sub menu Contrast -30 +30 Bright -30 +30 Color -30 +30 Tint -30 +30 Sharp -30 +30 Red -30 +30 Blue -30 +30 CLR Temp -3 +3 Reset Progressive Mode 2D Progressive 3D Progressive Film Mode Options (1) Page 52 Power Save [ON/... [ON/OFF] OFF Level 1 Normal Level A Level B Level 3 Auto PAL (50/60Hz) SECAM NTSC4.43 NTSC3.58 PAL-M PAL-N Sharp Custom Blue None Sharp Custom None Main menu Options (2) Page 58 Sub menu Lamp Timer Break Timer PRJ Mode Language Page 31 Keylock Level Password Anti-Theft All Reset English Deutsch Españ...

PG-M20X Operation Manual
Page 58
... Image Noise (DNR) Select "DNR" in the following cases: • When the image is pressed and warning displays (Power off the on or off /Temp./Lamp, etc.)) Turning Off the On-screen Display Select "OSD Display" in "OSD Display", the input mode display (e.g. Selected Item Normal Level A Level B Description All On...
... Image Noise (DNR) Select "DNR" in the following cases: • When the image is pressed and warning displays (Power off the on or off /Temp./Lamp, etc.)) Turning Off the On-screen Display Select "OSD Display" in "OSD Display", the input mode display (e.g. Selected Item Normal Level A Level B Description All On...

PG-M20X Operation Manual
Page 62
... Time This function allows you want to display computer images both on the projector and on a monitor. Using a RGB Monitor Loop-out Adaptor Select "Monitor Out" in the "Options (1)" menu ➝ For settings, see the lamp usage time. Note • It is not correct, the image may be... malfunction. • Make sure to set to " Yes (Y Cable)" when you to check the lamp usage time. For lamp replacement, contact your nearest Sharp Authorized Projector Dealer or Service Center. 58 -58 Lamp Usage Time Using an RGB Monitor Loop-out Adaptor Using an RGB monitor loop-out adaptor (sold separately...
... Time This function allows you want to display computer images both on the projector and on a monitor. Using a RGB Monitor Loop-out Adaptor Select "Monitor Out" in the "Options (1)" menu ➝ For settings, see the lamp usage time. Note • It is not correct, the image may be... malfunction. • Make sure to set to " Yes (Y Cable)" when you to check the lamp usage time. For lamp replacement, contact your nearest Sharp Authorized Projector Dealer or Service Center. 58 -58 Lamp Usage Time Using an RGB Monitor Loop-out Adaptor Using an RGB monitor loop-out adaptor (sold separately...

PG-M20X Operation Manual
Page 68
The following items cannot be displayed when selecting "All Reset". Note • If a password has been set, the pass- Initializing the Settings This function allows you to Use Functions Returning to the Default Settings Select "All Reset" in the projector. word input box will be initialized. • Fine Sync • Special Modes • Signal Info • Options • Lamp Timer • Anti-Theft • Language • Image stored using "Image Capture" -65 Easy to initialize the settings you have made in the "Options (2)" menu ➝ For resetting, see page 36.
The following items cannot be displayed when selecting "All Reset". Note • If a password has been set, the pass- Initializing the Settings This function allows you to Use Functions Returning to the Default Settings Select "All Reset" in the projector. word input box will be initialized. • Fine Sync • Special Modes • Signal Info • Options • Lamp Timer • Anti-Theft • Language • Image stored using "Image Capture" -65 Easy to initialize the settings you have made in the "Options (2)" menu ➝ For resetting, see page 36.
PG-M20X Operation Manual
Page 73
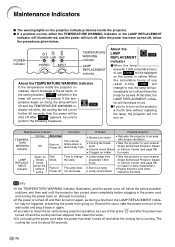
... shut off , follow the above possible solutions and then wait until the projector has cooled down Sharp Authorized Projector Dealer • Internal circuit failure or Service Center (see page 78) for repair or lamp replacement. • Please exercise care when replacing the lamp. Maintenance indicator Condition Problem Possible Solution TEMPERATURE WARNING indicator Normal Off Abnormal...
... shut off , follow the above possible solutions and then wait until the projector has cooled down Sharp Authorized Projector Dealer • Internal circuit failure or Service Center (see page 78) for repair or lamp replacement. • Please exercise care when replacing the lamp. Maintenance indicator Condition Problem Possible Solution TEMPERATURE WARNING indicator Normal Off Abnormal...

PG-M20X Operation Manual
Page 74
... one hour after operation of the projector. Purchase a replacement lamp unit of the projector. Appendix -71 I If the new lamp does not light after approximately 1,900 cumulative hours of use . Regarding the Lamp Lamp I It is recommended that the lamp (sold separately) be replaced after replacement, take your projector to the nearest Sharp Authorized Projector Dealer or Service Center for...
... one hour after operation of the projector. Purchase a replacement lamp unit of the projector. Appendix -71 I If the new lamp does not light after approximately 1,900 cumulative hours of use . Regarding the Lamp Lamp I It is recommended that the lamp (sold separately) be replaced after replacement, take your projector to the nearest Sharp Authorized Projector Dealer or Service Center for...
PG-M20X Operation Manual
Page 75
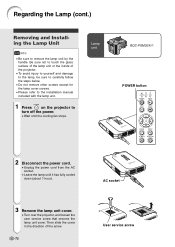
...cord. • Unplug the power cord from the AC socket. • Leave the lamp until the cooling fan stops. Then slide the cover in the direction of the projector. • To avoid injury to yourself and damage to the lamp, be sure to carefully follow the steps below. • Do not remove other... screws except for the lamp cover screws. • Please refer to the installation manual included with the lamp unit. 1 Press on the projector to remove the lamp unit by the handle. Be sure not to touch the glass surface of the lamp unit or the inside of the arrow. -72...
...cord. • Unplug the power cord from the AC socket. • Leave the lamp until the cooling fan stops. Then slide the cover in the direction of the projector. • To avoid injury to yourself and damage to the lamp, be sure to carefully follow the steps below. • Do not remove other... screws except for the lamp cover screws. • Please refer to the installation manual included with the lamp unit. 1 Press on the projector to remove the lamp unit by the handle. Be sure not to touch the glass surface of the lamp unit or the inside of the arrow. -72...
PG-M20X Operation Manual
Page 76
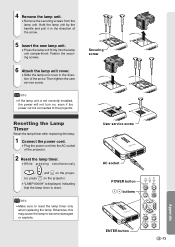
...will not turn on the projector. • "LAMP 0000H" is displayed, indicating that the lamp timer is connected to the projector. Info • Make sure to become damaged or explode. Otherwise, this may cause the lamp to reset the lamp timer only when replacing the lamp. Then tighten the user ...the arrow. 5 Insert the new lamp unit. • Press the lamp unit firmly into the AC socket of the projector. 2 Reset the lamp timer. •While pressing simultaneously , , and on the projector, press on , even if the power cord is reset. 4 Remove the lamp unit. • Remove the ...
...will not turn on the projector. • "LAMP 0000H" is displayed, indicating that the lamp timer is connected to the projector. Info • Make sure to become damaged or explode. Otherwise, this may cause the lamp to reset the lamp timer only when replacing the lamp. Then tighten the user ...the arrow. 5 Insert the new lamp unit. • Press the lamp unit firmly into the AC socket of the projector. 2 Reset the lamp timer. •While pressing simultaneously , , and on the projector, press on , even if the power cord is reset. 4 Remove the lamp unit. • Remove the ...

PG-M20X Operation Manual
Page 80
...buttons are incorrectly set to Level A, only the INPUT, VOLUME and AV MUTE buttons work. • Change the input signal type setting. • The LAMP REPLACEMENT indicator is blinking in Pict is working • during Enlarge (More than double size) • a dot by dot screen resolution larger the panel ... Out" is set to "Disable" when the RGB monitor loop-out adaptor is connected to Monitor Out. • "Monitor Out" is set . on the projector do not work Check • The Keylock level is set to "Yes (Y Cable)" when the RGB monitor loop-out adaptor is not connected to Monitor...
...buttons are incorrectly set to Level A, only the INPUT, VOLUME and AV MUTE buttons work. • Change the input signal type setting. • The LAMP REPLACEMENT indicator is blinking in Pict is working • during Enlarge (More than double size) • a dot by dot screen resolution larger the panel ... Out" is set to "Disable" when the RGB monitor loop-out adaptor is connected to Monitor Out. • "Monitor Out" is set . on the projector do not work Check • The Keylock level is set to "Yes (Y Cable)" when the RGB monitor loop-out adaptor is not connected to Monitor...
PG-M20X Operation Manual
Page 82
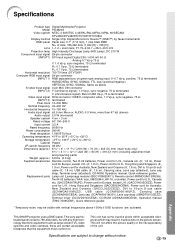
... Multimedia Projector Model PG-M20X Video system NTSC 3.58/NTSC 4.43/PAL/PAL-M/PAL-N/PAL 60/SECAM/ DTV480I/DTV480P/DTV720P/DTV1080I Display method Single Chip Digital Micromirror Device™ (DMD™) by Texas Instruments DMD panel Panel size: 0.7" (17.8 mm), 1 chip XGA DMD No. This SHARP projector uses ...dots: 786,432 dots (1,024 [H] × 768 [V]) Lens 1-1.2 × zoom lens, F1.75-2.04, f = 28.0-33.5 mm Projection lamp High Intensity Discharge Lamp (HID Lamp), DC 210 W Component input signal 29-pin connector (INPUT1) DVI input signal: Digital 250-1,000 mV 50 Ω Analog 0.7 Vp-p 75 ...
... Multimedia Projector Model PG-M20X Video system NTSC 3.58/NTSC 4.43/PAL/PAL-M/PAL-N/PAL 60/SECAM/ DTV480I/DTV480P/DTV720P/DTV1080I Display method Single Chip Digital Micromirror Device™ (DMD™) by Texas Instruments DMD panel Panel size: 0.7" (17.8 mm), 1 chip XGA DMD No. This SHARP projector uses ...dots: 786,432 dots (1,024 [H] × 768 [V]) Lens 1-1.2 × zoom lens, F1.75-2.04, f = 28.0-33.5 mm Projection lamp High Intensity Discharge Lamp (HID Lamp), DC 210 W Component input signal 29-pin connector (INPUT1) DVI input signal: Digital 250-1,000 mV 50 Ω Analog 0.7 Vp-p 75 ...
PG-M20X Operation Manual
Page 85
... AUDIO terminal 21 INPUT button 29 Intake vent 69 Kensington Security Standard connector 11 Keylock level 60 Keystone correction (adjustment 32 Lamp 71 LAMP REPLACEMENT indicator 70 Lamp Timer 58 Language selection 30 -82 Lens adjustment 31 LENS button 32 Lens cap 68 Lens cap strap 11 MENU button...Save Mode 52 PRJ mode 60 Progressive Mode 41 Remote control 12 Remote control sensor 13 Remote control signal transmitter 12 Replacing the lamp 71 RESIZE button 46 Reversing/Inverting Images 60 Save Setting 42 Select Setting 43 Signal Info 43 Signal Type 40 SMART STRETCH 47...
... AUDIO terminal 21 INPUT button 29 Intake vent 69 Kensington Security Standard connector 11 Keylock level 60 Keystone correction (adjustment 32 Lamp 71 LAMP REPLACEMENT indicator 70 Lamp Timer 58 Language selection 30 -82 Lens adjustment 31 LENS button 32 Lens cap 68 Lens cap strap 11 MENU button...Save Mode 52 PRJ mode 60 Progressive Mode 41 Remote control 12 Remote control sensor 13 Remote control signal transmitter 12 Replacing the lamp 71 RESIZE button 46 Reversing/Inverting Images 60 Save Setting 42 Select Setting 43 Signal Info 43 Signal Type 40 SMART STRETCH 47...


