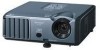
Operation Manual
Page 5
... equilateral triangle, is intended to alert the user to the presence of uninsulated "dangerous voltage" within a triangle is to assure that SHARP may be required to give under the 1972 Consumer Product Safety Act, PLEASE READ CAREFULLY THE IMPORTANT "LIMITED WARRANTY" CLAUSE. WARNING: To...beam of sufficient magnitude to constitute a risk or electric shock to operate this equipment. NO USER-SERVICEABLE PARTS EXCEPT LAMP UNIT. The lightning flash with the projector. 1. Do not stare into the beam of light. CONSUMER PRODUCT SAFETY ACT To ensure that you immediately receive...
... equilateral triangle, is intended to alert the user to the presence of uninsulated "dangerous voltage" within a triangle is to assure that SHARP may be required to give under the 1972 Consumer Product Safety Act, PLEASE READ CAREFULLY THE IMPORTANT "LIMITED WARRANTY" CLAUSE. WARNING: To...beam of sufficient magnitude to constitute a risk or electric shock to operate this equipment. NO USER-SERVICEABLE PARTS EXCEPT LAMP UNIT. The lightning flash with the projector. 1. Do not stare into the beam of light. CONSUMER PRODUCT SAFETY ACT To ensure that you immediately receive...
Operation Manual
Page 6
...and lamp containing a small amount of this product may cause harmful interference to provide reasonable protection against harmful interference when the equipment is provided to environmental considerations. Disposal of these materials may result in a commercial environment. This SHARP projector uses a DLP®... information, please contact your local authorities, the Electronics Industries Alliance: www.eiae.org, the lamp recycling organization www.lamprecycle.org, or Sharp at his own expense. U.S.A. INFORMATION This equipment has been tested and found to comply with...
...and lamp containing a small amount of this product may cause harmful interference to provide reasonable protection against harmful interference when the equipment is provided to environmental considerations. Disposal of these materials may result in a commercial environment. This SHARP projector uses a DLP®... information, please contact your local authorities, the Electronics Industries Alliance: www.eiae.org, the lamp recycling organization www.lamprecycle.org, or Sharp at his own expense. U.S.A. INFORMATION This equipment has been tested and found to comply with...

Operation Manual
Page 7
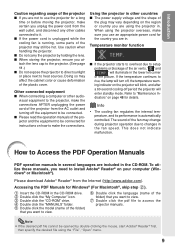
...Indicates safeguards for explanation, and may differ slightly from the actual display. ADJ Picture Mode Contrast Bright Red Blue CLR Temp Bright Boost Lamp Setting Reset PRJ - Note .........Indicates additional information for COMPUTER (RGB) input Menu item Picture SCR - Using the Menu Screen ENTER ...in the same manner. • In this operation manual, the illustration and the screen display are slightly different, depending on the projector. 1 Press MENU/HELP. • The "Picture" menu screen for the selected input mode is displayed. However, you can also be ...
...Indicates safeguards for explanation, and may differ slightly from the actual display. ADJ Picture Mode Contrast Bright Red Blue CLR Temp Bright Boost Lamp Setting Reset PRJ - Note .........Indicates additional information for COMPUTER (RGB) input Menu item Picture SCR - Using the Menu Screen ENTER ...in the same manner. • In this operation manual, the illustration and the screen display are slightly different, depending on the projector. 1 Press MENU/HELP. • The "Picture" menu screen for the selected input mode is displayed. However, you can also be ...
Operation Manual
Page 8
...10 Part Names and Functions 11 Inserting the Batteries 14 Usable Range 15 Quick Start Quick Start 16 Setup Setting up the Projector 18 Setting up the Projector 18 Standard Setup (Front Projection) ....... 18 Ceiling-mount Setup 18 Projection (PRJ) Mode 19 Screen Size and Projection ...Picture Adjustment ("Picture" Menu) .. 39 Selecting the Picture Mode 39 Adjusting the Image 40 Adjusting the Color Temperature ......... 40 Progressive 40 Lamp Setting 40 Adjusting the Projected Image ("SCR - ADJ" Menu 41 Setting the Resize Mode 41 Adjusting the Image Position 41 Keystone Correction...
...10 Part Names and Functions 11 Inserting the Batteries 14 Usable Range 15 Quick Start Quick Start 16 Setup Setting up the Projector 18 Setting up the Projector 18 Standard Setup (Front Projection) ....... 18 Ceiling-mount Setup 18 Projection (PRJ) Mode 19 Screen Size and Projection ...Picture Adjustment ("Picture" Menu) .. 39 Selecting the Picture Mode 39 Adjusting the Image 40 Adjusting the Color Temperature ......... 40 Progressive 40 Lamp Setting 40 Adjusting the Projected Image ("SCR - ADJ" Menu 41 Setting the Resize Mode 41 Adjusting the Image Position 41 Keystone Correction...

Operation Manual
Page 12
.../or vibration. ■ Protect the lens so as not to +60°C). Rest your nearest Sharp Authorized Projector Dealer or Service Center for a while. See "Replacing the Lamp" on the screen washes out the colors, making viewing difficult. As long as mountains (at altitudes...■ Allow at least 10 minutes. ticles if lamp ruptures. Caution regarding placing of the projector ■ For minimal servicing and to avoid personal injury caused by a Sharp Authorized Projector Dealer or Service Center. Caution concerning the lamp unit ■ Potential hazard of the optical system....
.../or vibration. ■ Protect the lens so as not to +60°C). Rest your nearest Sharp Authorized Projector Dealer or Service Center for a while. See "Replacing the Lamp" on the screen washes out the colors, making viewing difficult. As long as mountains (at altitudes...■ Allow at least 10 minutes. ticles if lamp ruptures. Caution regarding placing of the projector ■ For minimal servicing and to avoid personal injury caused by a Sharp Authorized Projector Dealer or Service Center. Caution concerning the lamp unit ■ Potential hazard of the optical system....
Operation Manual
Page 13
... be connected for a long time or before moving the projector, make the connections AFTER unplugging the power cord of the projector from the AC outlet and turning off , the temperature warn- If the temperature continues to rise, the lamp will turn off the equipment to be connected. ■... Please read the operation manuals of the projector and the equipment to be hot. Info • The cooling fan regulates the internal temperature,...
... be connected for a long time or before moving the projector, make the connections AFTER unplugging the power cord of the projector from the AC outlet and turning off , the temperature warn- If the temperature continues to rise, the lamp will turn off the equipment to be connected. ■... Please read the operation manuals of the projector and the equipment to be hot. Info • The cooling fan regulates the internal temperature,...
Operation Manual
Page 14
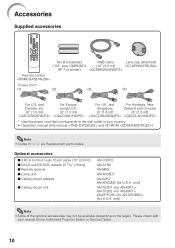
... to mini D-sub 15 pin cable (10n (3.0 m)) ■ DIN-D-sub RS-232C adaptor (5 57/64" (15cm)) ■ Remote receiver ■ Lamp unit ■ Ceiling-mount adaptor ■ Ceiling-mount unit AN-C3CP2 AN-A1RS AN-MR2 AN-XR30LP AN-60KT AN-XRCM30 (for U.S.A. only) Note ...depending on the region. Please check with your country. • Operation manual (this manual and CD-ROM ) Note • Codes in your nearest Sharp Authorized Projector Dealer or Service Center. 10 Optional accessories ■ 3 RCA to the wall outlet in "< >" are Replacement parts codes. and For Europe, ...
... to mini D-sub 15 pin cable (10n (3.0 m)) ■ DIN-D-sub RS-232C adaptor (5 57/64" (15cm)) ■ Remote receiver ■ Lamp unit ■ Ceiling-mount adaptor ■ Ceiling-mount unit AN-C3CP2 AN-A1RS AN-MR2 AN-XR30LP AN-60KT AN-XRCM30 (for U.S.A. only) Note ...depending on the region. Please check with your country. • Operation manual (this manual and CD-ROM ) Note • Codes in your nearest Sharp Authorized Projector Dealer or Service Center. 10 Optional accessories ■ 3 RCA to the wall outlet in "< >" are Replacement parts codes. and For Europe, ...
Operation Manual
Page 15
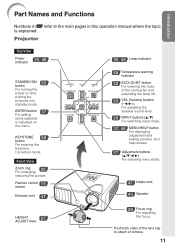
.../ON 25 button For turning the power on the menu. ENTER button For setting 37 items selected or adjusted on and putting the projector into standby mode. Introduction Part Names and Functions Numbers in this operation manual where the topic is explained. Push both sides of the... cooling fan and extending the lamp life. 29 VOL (Volume) buttons (-O/Q+) For adjusting the speaker sound level. 29 INPUT buttons (P/R) For switching input mode. 37, 46 MENU...
.../ON 25 button For turning the power on the menu. ENTER button For setting 37 items selected or adjusted on and putting the projector into standby mode. Introduction Part Names and Functions Numbers in this operation manual where the topic is explained. Push both sides of the... cooling fan and extending the lamp life. 29 VOL (Volume) buttons (-O/Q+) For adjusting the speaker sound level. 29 INPUT buttons (P/R) For switching input mode. 37, 46 MENU...
Operation Manual
Page 17
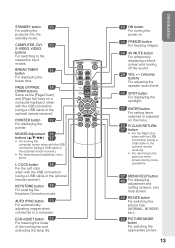
AUTO SYNC button 33 For automatically adjusting images when connected to the respective input modes. STANDBY button 25 For putting the projector into the standby mode. BREAK TIMER 32 button For displaying the break time. PAGE UP/PAGE 34 DOWN buttons Same as the [Page Down] ... computer. KEYSTONE button 28 For entering the Keystone Correction mode. ECO+QUIET button 32 For lowering the noise of the cooling fan and extending the lamp life. 25 ON button For turning the power on. 33 FREEZE button For freezing images. 29 AV MUTE button For temporarily displaying a black screen...
AUTO SYNC button 33 For automatically adjusting images when connected to the respective input modes. STANDBY button 25 For putting the projector into the standby mode. BREAK TIMER 32 button For displaying the break time. PAGE UP/PAGE 34 DOWN buttons Same as the [Page Down] ... computer. KEYSTONE button 28 For entering the Keystone Correction mode. ECO+QUIET button 32 For lowering the noise of the cooling fan and extending the lamp life. 25 ON button For turning the power on. 33 FREEZE button For freezing images. 29 AV MUTE button For temporarily displaying a black screen...

Operation Manual
Page 19
...malfunction under a fluorescent lamp. In this case, move the projector away from the remote control can be re- flected off a screen for easy operation. When using the remote control • Ensure that you do not drop it or expose it to control the projector within the ranges ...shown in the illustration. Remote control sensor Note • The signal from the fluorescent lamp. 30° 23n (7 m) Remote control Remote control signal transmitters 15 Introduction Usable Range...
...malfunction under a fluorescent lamp. In this case, move the projector away from the remote control can be re- flected off a screen for easy operation. When using the remote control • Ensure that you do not drop it or expose it to control the projector within the ranges ...shown in the illustration. Remote control sensor Note • The signal from the fluorescent lamp. 30° 23n (7 m) Remote control Remote control signal transmitters 15 Introduction Usable Range...

Operation Manual
Page 29
... STANDBY button ON button Basic Operation Turning the Power off when the projector is on, then the projector automatically turns on the remote control. • The power indicator illuminates green. • After the lamp indicator illuminates, the projec- tor is warming up. Info •... 43.) • English is plugged into standby mode. • The projector cannot be regarded as the lamp's control circuitry is still running. 25 Lamp indicator Note • About the Lamp Indicator The lamp indicator illuminates to indicate the status of the image may take some time to...
... STANDBY button ON button Basic Operation Turning the Power off when the projector is on, then the projector automatically turns on the remote control. • The power indicator illuminates green. • After the lamp indicator illuminates, the projec- tor is warming up. Info •... 43.) • English is plugged into standby mode. • The projector cannot be regarded as the lamp's control circuitry is still running. 25 Lamp indicator Note • About the Lamp Indicator The lamp indicator illuminates to indicate the status of the image may take some time to...
Operation Manual
Page 36
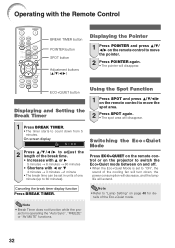
...again. • The spot area will extend. jector is set in units of one minute (up to "Lamp Setting" on page 40 for details of the Eco+Quiet mode. 32 Note • Refer to 60 ...minutes). Switching the Eco+Quiet Mode Press ECO+QUIET on the remote control or on the projector to switch the Eco+Quiet mode between on and off. • When the Eco+Quiet Mode is ... to "ON", the sound of the cooling fan will turn down, the power consumption will decrease, and the lamp life will disappear. 1 Press BREAK TIMER. • The timer starts to count down from 5 minutes. Note...
...again. • The spot area will extend. jector is set in units of one minute (up to "Lamp Setting" on page 40 for details of the Eco+Quiet mode. 32 Note • Refer to 60 ...minutes). Switching the Eco+Quiet Mode Press ECO+QUIET on the remote control or on the projector to switch the Eco+Quiet mode between on and off. • When the Eco+Quiet Mode is ... to "ON", the sound of the cooling fan will turn down, the power consumption will decrease, and the lamp life will disappear. 1 Press BREAK TIMER. • The timer starts to count down from 5 minutes. Note...

Operation Manual
Page 39
... need to adjust "Tone", but you can be set in the projector. ADJ Help Standard 0 0 0 0 0 0 1 3D Progressive Bright Sharp -30 +30 *2 Page 40 CLR Temp -2 2 Page 40 Bright Boost [0/1/2] Page 40 Progressive Page 40 Lamp Setting Page 40 Reset *4 2D Progressive 3D Progressive Film Mode Bright ...231;ais Italiano Svenska Português polski Türkçe Useful Features 35 ADJ Picture Mode Contrast Bright Color Tint Sharp CLR Temp Bright Boost Progressive Lamp Setting Reset PRJ - "Picture" menu Main menu Picture Picture Mode COMPUTER (RGB), DVI (RGB) input Page 39 ...
... need to adjust "Tone", but you can be set in the projector. ADJ Help Standard 0 0 0 0 0 0 1 3D Progressive Bright Sharp -30 +30 *2 Page 40 CLR Temp -2 2 Page 40 Bright Boost [0/1/2] Page 40 Progressive Page 40 Lamp Setting Page 40 Reset *4 2D Progressive 3D Progressive Film Mode Bright ...231;ais Italiano Svenska Português polski Türkçe Useful Features 35 ADJ Picture Mode Contrast Bright Color Tint Sharp CLR Temp Bright Boost Progressive Lamp Setting Reset PRJ - "Picture" menu Main menu Picture Picture Mode COMPUTER (RGB), DVI (RGB) input Page 39 ...

Operation Manual
Page 40
Menu Items (Continued) "Projector adjustment (PRJ-ADJ)" menu Picture SCR - ADJ Page 43 Auto Power Off [On/Off] Page ...On/Off] Page 43 Audio Input Page 43 RS-232C Page 44 Fan Mode Page 44 System Lock [Enable/Disable] Page 44 Lamp Timer(Life) Page 44 Sub menu Standard Eco Audio 1 Audio 2 9600bps 115200bps Normal High "Help" menu Picture SCR - ...ADJ On On Standard On On Audio 1 9600bps Normal Disable Help Lamp Timer(Life) 0h 0 min 100% SEL./ADJ. ADJ PRJ - ENTER END 36 The items you can set with the "Help" menu...
Menu Items (Continued) "Projector adjustment (PRJ-ADJ)" menu Picture SCR - ADJ Page 43 Auto Power Off [On/Off] Page ...On/Off] Page 43 Audio Input Page 43 RS-232C Page 44 Fan Mode Page 44 System Lock [Enable/Disable] Page 44 Lamp Timer(Life) Page 44 Sub menu Standard Eco Audio 1 Audio 2 9600bps 115200bps Normal High "Help" menu Picture SCR - ...ADJ On On Standard On On Audio 1 9600bps Normal Disable Help Lamp Timer(Life) 0h 0 min 100% SEL./ADJ. ADJ PRJ - ENTER END 36 The items you can set with the "Help" menu...

Operation Manual
Page 41
... "Picture" to adjust. Example: "Picture" screen menu for the selected input mode is displayed. ADJ Picture Mode Contrast Bright Red Blue CLR Temp Bright Boost Lamp Setting Reset PRJ - MENU/HELP button Useful Features Menu Selections (Adjustments) Example: Adjusting "Bright". • This operation can also be performed by using the buttons...
... "Picture" to adjust. Example: "Picture" screen menu for the selected input mode is displayed. ADJ Picture Mode Contrast Bright Red Blue CLR Temp Bright Boost Lamp Setting Reset PRJ - MENU/HELP button Useful Features Menu Selections (Adjustments) Example: Adjusting "Bright". • This operation can also be performed by using the buttons...

Operation Manual
Page 42
...4 Press O or Q to adjust. • The selected item is highlighted. SEL./ADJ. ADJ Picture Mode Contrast Bright Red Blue CLR Temp Bright Boost Lamp Setting Reset Standard 0 15 0 0 0 1 Bright Help 5 Press MENU/HELP. • The menu screen will be adjusted To adjust the projected image ... • When pressing P or R, the following item ("Red" after "Bright") will disappear. ADJ Picture Mode Contrast Bright Red Blue CLR Temp Bright Boost Lamp Setting Reset PRJ - Using the Menu Screen (Continued) 3 Press P or R and select "Bright" to adjust the item selected. • The adjustment ...
...4 Press O or Q to adjust. • The selected item is highlighted. SEL./ADJ. ADJ Picture Mode Contrast Bright Red Blue CLR Temp Bright Boost Lamp Setting Reset Standard 0 15 0 0 0 1 Bright Help 5 Press MENU/HELP. • The menu screen will be adjusted To adjust the projected image ... • When pressing P or R, the following item ("Red" after "Bright") will disappear. ADJ Picture Mode Contrast Bright Red Blue CLR Temp Bright Boost Lamp Setting Reset PRJ - Using the Menu Screen (Continued) 3 Press P or R and select "Bright" to adjust the item selected. • The adjustment ...

Operation Manual
Page 44
...such as sports. 3D Useful to display fast-moving images Progressive such as drama and documentary more color intensity. For more sharpness. The projector can adjust the picture tone with PAL50Hz and SECAM to progressive mode images. * The film source is a digital video ...red. For more contrast. For more brightness. mately 2,000 hours in the RGB input mode. *3 "Tone" will be selected. 5 Lamp Setting Selectable items Eco + Quiet Brightness and Power consumption Approx. 80% Selectable items Description Bright 100% For lower color temperature for general standard...
...such as sports. 3D Useful to display fast-moving images Progressive such as drama and documentary more color intensity. For more sharpness. The projector can adjust the picture tone with PAL50Hz and SECAM to progressive mode images. * The film source is a digital video ...red. For more contrast. For more brightness. mately 2,000 hours in the RGB input mode. *3 "Tone" will be selected. 5 Lamp Setting Selectable items Eco + Quiet Brightness and Power consumption Approx. 80% Selectable items Description Bright 100% For lower color temperature for general standard...

Operation Manual
Page 47
...AC outlet or the breaker switch is output from the internal speaker. 6 6 AMuodnioitIonrpOututput This function allows you to "On", 5 minutes before the projector enters standby mode, the message "Enter STANDBY mode in standby mode. The audio signal is used as an audio input terminal. ADJ On On ...Standard On On Audio 1 9600 bps Normal Disable Help Lamp Timer(Life) 0h 0 min 100% SEL./ADJ. The monitor output and RS-232C functions are switched off . Useful Features 43 ADJ Auto ...
...AC outlet or the breaker switch is output from the internal speaker. 6 6 AMuodnioitIonrpOututput This function allows you to "On", 5 minutes before the projector enters standby mode, the message "Enter STANDBY mode in standby mode. The audio signal is used as an audio input terminal. ADJ On On ...Standard On On Audio 1 9600 bps Normal Disable Help Lamp Timer(Life) 0h 0 min 100% SEL./ADJ. The monitor output and RS-232C functions are switched off . Useful Features 43 ADJ Auto ...

Operation Manual
Page 48
...to "Bright" Remaining lamp life 100% Approx. 3,000 hours Approx. 2,000 hours 5% Approx. 150 hours Approx. 100 hours Note • It is 4 R buttons on the projector for four times. When you lose or forget your keycode, contact your nearest Sharp Authorized Projector Dealer or Service ...Center (see page 63). Adjusting the Projector Function ("PRJ - Select this function is activated, users must ...
...to "Bright" Remaining lamp life 100% Approx. 3,000 hours Approx. 2,000 hours 5% Approx. 150 hours Approx. 100 hours Note • It is 4 R buttons on the projector for four times. When you lose or forget your keycode, contact your nearest Sharp Authorized Projector Dealer or Service ...Center (see page 63). Adjusting the Projector Function ("PRJ - Select this function is activated, users must ...
Operation Manual
Page 56
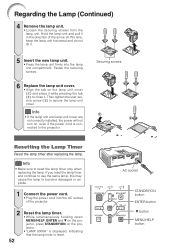
... screw (3) to reset the lamp timer only when replacing the lamp. Fasten the securing screws. 6 Replace the lamp unit cover. • Align the tab on the projector. • "LAMP 0000H" is displayed, indicating that the lamp timer is connected to the projector. Securing screws Resetting the Lamp Timer Reset the lamp timer after replacing the lamp. At this may cause...
... screw (3) to reset the lamp timer only when replacing the lamp. Fasten the securing screws. 6 Replace the lamp unit cover. • Align the tab on the projector. • "LAMP 0000H" is displayed, indicating that the lamp timer is connected to the projector. Securing screws Resetting the Lamp Timer Reset the lamp timer after replacing the lamp. At this may cause...


