Operation Manual
Page 1
For the best performance, read this SHARP product. PORTABLE MINIDISC RECORDER OPERATION MANUAL MODEL MD-SR60E Thank you in operating your SHARP product. Telephone number for purchasing this manual carefully. It will guide you for Customer support 0990 274277 Do not hesitate to call us **00-TOP/BOTTOM 3 02.07.2000, 10:01 AM
For the best performance, read this SHARP product. PORTABLE MINIDISC RECORDER OPERATION MANUAL MODEL MD-SR60E Thank you in operating your SHARP product. Telephone number for purchasing this manual carefully. It will guide you for Customer support 0990 274277 Do not hesitate to call us **00-TOP/BOTTOM 3 02.07.2000, 10:01 AM
Operation Manual
Page 2
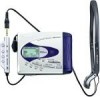
... 2-3 Precautions 4 Names of Controls and Indicators 5-6 Accessories 7 Preparation Inserting a MiniDisc 8 Connections 9-10 Basic operation Recording 11-12 Playback 13-14 Useful Features Advanced Recording 15-19 Recording from a Microphone 20-22 Advanced playback 23-24 Checking displays 25-26 Battery ... Function 29 Using with other equipment 30 Advanced Features Titling a MiniDisc 31-34 Editing a recorded MiniDisc 35-37 Changing default settings 38 References Other Features and Caution 39 MiniDisc System Limitations 40 Error Messages 41-42 Troubleshooting 43-44 Maintenance ...
... 2-3 Precautions 4 Names of Controls and Indicators 5-6 Accessories 7 Preparation Inserting a MiniDisc 8 Connections 9-10 Basic operation Recording 11-12 Playback 13-14 Useful Features Advanced Recording 15-19 Recording from a Microphone 20-22 Advanced playback 23-24 Checking displays 25-26 Battery ... Function 29 Using with other equipment 30 Advanced Features Titling a MiniDisc 31-34 Editing a recorded MiniDisc 35-37 Changing default settings 38 References Other Features and Caution 39 MiniDisc System Limitations 40 Error Messages 41-42 Troubleshooting 43-44 Maintenance ...
Operation Manual
Page 4
Please refer particularly to the provisions of Directives 89/336/EEC and 73/23/EEC as this may require consent, which SHARP is not recommendable to give. q This equipment complies with the interlock switch or make any other adjustment as this manual and do not...Performers Protection Act 1958, the Performers Protection Acts 1963 and 1972 and to a personal stereo may damage the user's hearing. q Use the Portable Minidisc Recorder only in accordance with the instructions given in the model number indicate the colour of any material may damage the product when sitting. q US and...
Please refer particularly to the provisions of Directives 89/336/EEC and 73/23/EEC as this may require consent, which SHARP is not recommendable to give. q This equipment complies with the interlock switch or make any other adjustment as this manual and do not...Performers Protection Act 1958, the Performers Protection Acts 1963 and 1972 and to a personal stereo may damage the user's hearing. q Use the Portable Minidisc Recorder only in accordance with the instructions given in the model number indicate the colour of any material may damage the product when sitting. q US and...

Operation Manual
Page 9
...the instructions on page 12. 98 9 02.07.2000, 10:05 AM Press the • s/:OFF button to the unit. q To prevent recordings being lost the MiniDisc can now be removed until the TOC has been written ("TOC" or "TOC EDIT ! partment door. 2 Lift it may cause damage to update...-protection tab is felt, remove the MiniDisc and reload it. q If any resistance is displayed ). Refer to release the com- If resistance is in the recordable position. " is felt, do not force the MiniDisc into the unit, as it up the compartment. 3 Insert a MiniDisc by pressing the middle of the edge...
...the instructions on page 12. 98 9 02.07.2000, 10:05 AM Press the • s/:OFF button to the unit. q To prevent recordings being lost the MiniDisc can now be removed until the TOC has been written ("TOC" or "TOC EDIT ! partment door. 2 Lift it may cause damage to update...-protection tab is felt, remove the MiniDisc and reload it. q If any resistance is displayed ). Refer to release the com- If resistance is in the recordable position. " is felt, do not force the MiniDisc into the unit, as it up the compartment. 3 Insert a MiniDisc by pressing the middle of the edge...

Operation Manual
Page 13
... 06 button. To stop mode. q The power turns off after recorded contents have been written on the stereo system con- q When recording stops, "TOC" appears. Whilst "TOC" appears, recorded contents haven't been written on the MiniDisc Press the • s/:OFF button whilst in the stop recording Press the • s/:OFF button. nected to this unit...
... 06 button. To stop mode. q The power turns off after recorded contents have been written on the stereo system con- q When recording stops, "TOC" appears. Whilst "TOC" appears, recorded contents haven't been written on the MiniDisc Press the • s/:OFF button whilst in the stop recording Press the • s/:OFF button. nected to this unit...

Operation Manual
Page 15
... at least 2 minutes whilst in the stop mode. To stop mode, the power will be switched as on the unit. 3 Insert a MiniDisc (page 8). 4 Press the 06 button. Volume control Press the VOL+ button to decrease the volume. BASS1 BASS2 Emphasised slightly Emphasised more BASS3... noise. To turn off automatically. Volume (0 - 30) Bass control Each time the BASS button is protected against accidental erasure (Auto-play . MiniDiscs, compared to turn off the power Press the • s/:OFF button whilst in the stop playback Press the • s/:OFF button. In particularly...
... at least 2 minutes whilst in the stop mode. To stop mode, the power will be switched as on the unit. 3 Insert a MiniDisc (page 8). 4 Press the 06 button. Volume control Press the VOL+ button to decrease the volume. BASS1 BASS2 Emphasised slightly Emphasised more BASS3... noise. To turn off automatically. Volume (0 - 30) Bass control Each time the BASS button is protected against accidental erasure (Auto-play . MiniDiscs, compared to turn off the power Press the • s/:OFF button whilst in the stop playback Press the • s/:OFF button. In particularly...
Operation Manual
Page 17
...q When the unit is from a stereo source, the sounds from the left and right channels will return to play on other MiniDisc players. 176 02.07.2000, 10:03 AM q MiniDiscs recorded in the monaural long-play mode may not play at double speed see page 24. 1 Press the MODE button whilst the... record- q If input is stopped after a recording has been made in this mode, the recording mode will be combined. q Although the monitor sound ...
...q When the unit is from a stereo source, the sounds from the left and right channels will return to play on other MiniDisc players. 176 02.07.2000, 10:03 AM q MiniDiscs recorded in the monaural long-play mode may not play at double speed see page 24. 1 Press the MODE button whilst the... record- q If input is stopped after a recording has been made in this mode, the recording mode will be combined. q Although the monitor sound ...

Operation Manual
Page 18
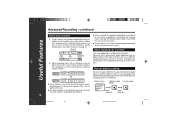
...tracks that point. (See "Editing a recorded MiniDisc", page 35.) 02.07.2000, 10:03 AM q All of the tracks and track names will start recording from the middle of track You can erase a portion of a track and make recording after that follow the newly recorded track will be erased, following the point... 4 2 3 187 **04-USEFUL FEATURES 1 18 q To cancel the operation, press the • s/:OFF button. 3 Press the ENTER/SYNC button. Advanced Recording : continued To start . q Recording will be erased. 1 During playback, press the 06 button at the point where you want to make a new...
...tracks that point. (See "Editing a recorded MiniDisc", page 35.) 02.07.2000, 10:03 AM q All of the tracks and track names will start recording from the middle of track You can erase a portion of a track and make recording after that follow the newly recorded track will be erased, following the point... 4 2 3 187 **04-USEFUL FEATURES 1 18 q To cancel the operation, press the • s/:OFF button. 3 Press the ENTER/SYNC button. Advanced Recording : continued To start . q Recording will be erased. 1 During playback, press the 06 button at the point where you want to make a new...
Operation Manual
Page 19
... pieces of the auto marker function. If the label is paused or whilst recording... q The MiniDisc will then be sure to note the following. Note: q When making digital recordings using a CD player or an MiniDisc player, track numbers will be created at any point by pressing the REC button. Helpful tip when attaching a label When attaching...
... pieces of the auto marker function. If the label is paused or whilst recording... q The MiniDisc will then be sure to note the following. Note: q When making digital recordings using a CD player or an MiniDisc player, track numbers will be created at any point by pressing the REC button. Helpful tip when attaching a label When attaching...
Operation Manual
Page 20
... a different sampling frequency (32 kHz or 48 kHz), recordings can not copy a MiniDisc that you recorded from digital inputs to be created in proper places, depending on the source to another MiniDisc or DAT. Digital signals Digitally recorded Cannot record MIniDisc CD player, MiniDisc player, etc. Track numbers are created automatically during recording via the analogue connection when a silence of tracks...
... a different sampling frequency (32 kHz or 48 kHz), recordings can not copy a MiniDisc that you recorded from digital inputs to be created in proper places, depending on the source to another MiniDisc or DAT. Digital signals Digitally recorded Cannot record MIniDisc CD player, MiniDisc player, etc. Track numbers are created automatically during recording via the analogue connection when a silence of tracks...

Operation Manual
Page 21
.... Level meter indicator 4 Stereo microphone (commercially available) 0dB 4dB q Adjust the recording level so that the maximum sound volume from a microphone 1 Connect a stereo microphone to the MIC 5 IN socket. 2 Insert a recordable MiniDisc (page 8). 3 Press the REC button. 4 Press the REC LEVEL ( ...5 or 4 ) button to adjust the recording level. To stop recording Press the • s/:OFF button. 210 **04-USEFUL FEATURES 1 21 02....
.... Level meter indicator 4 Stereo microphone (commercially available) 0dB 4dB q Adjust the recording level so that the maximum sound volume from a microphone 1 Connect a stereo microphone to the MIC 5 IN socket. 2 Insert a recordable MiniDisc (page 8). 3 Press the REC button. 4 Press the REC LEVEL ( ...5 or 4 ) button to adjust the recording level. To stop recording Press the • s/:OFF button. 210 **04-USEFUL FEATURES 1 21 02....

Operation Manual
Page 25
...of the tracks 1 Repeat play of a single track No display Normal playback To play at double speed (Mono recording only) Press the ENTER/SYNC button whilst a MiniDisc recorded in the stereo mode is reached during playback. q When "TOC" is displayed, random play or repeat play... will resume fast playback. Useful Features Advanced playback : continued Random play or repeat play is impossible. q Depending on the contents recorded on a MiniDisc, it may be cancelled. q During random play mode is being played. To return to select the playback mode. RANDOM Random play...
...of the tracks 1 Repeat play of a single track No display Normal playback To play at double speed (Mono recording only) Press the ENTER/SYNC button whilst a MiniDisc recorded in the stereo mode is reached during playback. q When "TOC" is displayed, random play or repeat play... will resume fast playback. Useful Features Advanced playback : continued Random play or repeat play is impossible. q Depending on the contents recorded on a MiniDisc, it may be cancelled. q During random play mode is being played. To return to select the playback mode. RANDOM Random play...

Operation Manual
Page 26
... is pressed, the display will not be displayed with a play-back only MiniDisc. Each time the button is pressed, the display will change as follows: Track number Track name Total number of the track To check the remaining recording time and the total playing time During playback, press the DISP button. q Elapsed... and remaining time of tracks Disc name Elapsed playback time Remaining playback time Notes: q If the disc name or the track name was not originally recorded on the MiniDisc, "NO NAME" will be displayed.
... is pressed, the display will not be displayed with a play-back only MiniDisc. Each time the button is pressed, the display will change as follows: Track number Track name Total number of the track To check the remaining recording time and the total playing time During playback, press the DISP button. q Elapsed... and remaining time of tracks Disc name Elapsed playback time Remaining playback time Notes: q If the disc name or the track name was not originally recorded on the MiniDisc, "NO NAME" will be displayed.

Operation Manual
Page 31
...04-USEFUL FEATURES 2 23 02.07.2000, 10:05 AM q Do not use any car adaptor except for the separately available AD-CA20X. Listening to a MiniDisc through a stereo system or a car stereo Listening through a stereo sytem Listening through a car stereo Useful Features Red: To the right To the LINE INPUT ...sockets White: To the left To the socket Separatly available cassette adaptor (AD-CT14) To the socket Connection cable Notes: q When recording with stereo system, eliminate the con- firmation sound (page 38). Otherwise, it will also be made in the analogue mode. q The...
...04-USEFUL FEATURES 2 23 02.07.2000, 10:05 AM q Do not use any car adaptor except for the separately available AD-CA20X. Listening to a MiniDisc through a stereo system or a car stereo Listening through a stereo sytem Listening through a car stereo Useful Features Red: To the right To the LINE INPUT ...sockets White: To the left To the socket Separatly available cassette adaptor (AD-CT14) To the socket Connection cable Notes: q When recording with stereo system, eliminate the con- firmation sound (page 38). Otherwise, it will also be made in the analogue mode. q The...

Operation Manual
Page 32
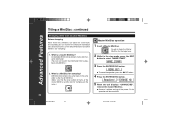
.... 4 Press the 5 or 4 button repeatedly to select the letter. 5 Press the ENTER/SYNC button to enter it. 2 Press the ENTER/SYNC button. Advanced Features Titling a MiniDisc Creating disc and track names One disc name and up to 255 track names can be entered). 1 Disc name Track name Whilst in the group...
.... 4 Press the 5 or 4 button repeatedly to select the letter. 5 Press the ENTER/SYNC button to enter it. 2 Press the ENTER/SYNC button. Advanced Features Titling a MiniDisc Creating disc and track names One disc name and up to 255 track names can be entered). 1 Disc name Track name Whilst in the group...

Operation Manual
Page 33
... enter a space Press the VOL + button to move the cursor to the right of the character, where you want to the right. Advanced Features Titling a MiniDisc : continued To erase a charactor Press the VOL + or VOL - Lower-case letters a b c d e f g h i j k l mn o pq r s t u vwx y z. , / Numbers and symbols 1234567890 ! button to move the cursor to...
... enter a space Press the VOL + button to move the cursor to the right of the character, where you want to the right. Advanced Features Titling a MiniDisc : continued To erase a charactor Press the VOL + or VOL - Lower-case letters a b c d e f g h i j k l mn o pq r s t u vwx y z. , / Numbers and symbols 1234567890 ! button to move the cursor to...
Operation Manual
Page 34
... the ENTER/SYNC button. 2. What is a MiniDisc for stamping? Do not mistake the Master MiniDisc for the target one for stamping are recorded, you can not transfer the information from another MiniDisc (for stamping). 1. Titling a MiniDisc : continued Advanced Features Stamping titles from a playback-only MiniDisc.) Master MiniDisc operation 1 Insert a Master MiniDisc. q Remove it without turning off the power...
... the ENTER/SYNC button. 2. What is a MiniDisc for stamping? Do not mistake the Master MiniDisc for the target one for stamping are recorded, you can not transfer the information from another MiniDisc (for stamping). 1. Titling a MiniDisc : continued Advanced Features Stamping titles from a playback-only MiniDisc.) Master MiniDisc operation 1 Insert a Master MiniDisc. q Remove it without turning off the power...
Operation Manual
Page 35
... and turn off the power. 7 Press the ENTER/SYNC button. q Use a MiniDisc that on the newly recorded MiniDisc using the edit operation. Character information may not be transferred if you record the TOC. In such a case, enter at least one character for stamping. You... can transfer information once you use a MiniDisc recorded by this happens, adjust the total number of tracks on the MiniDisc for stamping. Advanced Features Titling a MiniDisc : continued Operation of the MiniDisc for stamping 6 Load a MiniDisc for the disc name or the track names. Notes...
... and turn off the power. 7 Press the ENTER/SYNC button. q Use a MiniDisc that on the newly recorded MiniDisc using the edit operation. Character information may not be transferred if you record the TOC. In such a case, enter at least one character for stamping. You... can transfer information once you use a MiniDisc recorded by this happens, adjust the total number of tracks on the MiniDisc for stamping. Advanced Features Titling a MiniDisc : continued Operation of the MiniDisc for stamping 6 Load a MiniDisc for the disc name or the track names. Notes...

Operation Manual
Page 36
... all of the tracks will be recovered. Check the track number before erasing it can not be erased. 5 To erase other tracks, repeat steps 1 - 4. Editing a recorded MiniDisc Advanced features To erase tracks one at once 1 Whilst in the stop mode, press the EDIT button to select "ALL ERASE". 2 Press the ENTER/SYNC...
... all of the tracks will be recovered. Check the track number before erasing it can not be erased. 5 To erase other tracks, repeat steps 1 - 4. Editing a recorded MiniDisc Advanced features To erase tracks one at once 1 Whilst in the stop mode, press the EDIT button to select "ALL ERASE". 2 Press the ENTER/SYNC...

Operation Manual
Page 37
...; s/:OFF button. 4 Press the ENTER/SYNC button again. q The track will pause at the beginning of the two tracks to select "DIVIDE". Advanced features Editing a recorded MiniDisc : continued To divide a track 1 Start playing the track to be combined, and press the 06 button. 2 Press the EDIT button to select "COMBINE". 3 Press the...
...; s/:OFF button. 4 Press the ENTER/SYNC button again. q The track will pause at the beginning of the two tracks to select "DIVIDE". Advanced features Editing a recorded MiniDisc : continued To divide a track 1 Start playing the track to be combined, and press the 06 button. 2 Press the EDIT button to select "COMBINE". 3 Press the...