Operation Manual
Page 2
... Notes 2-3 Precautions 4 Names of Controls and Indicators 5-6 Accessories 7 Preparation Inserting a MiniDisc 8 Connections 9-10 Basic operation Recording 11-12 Playback 13-14 Useful Features Advanced Recording 15-19 Recording from a Microphone 20-22 Advanced playback 23-24 Checking displays 25-26 Battery Power 27-28 Hold Function 29 Using with other equipment 30 Advanced Features Titling a MiniDisc 31-34 Editing a recorded MiniDisc 35-37 Changing default settings 38 References Other Features...
... Notes 2-3 Precautions 4 Names of Controls and Indicators 5-6 Accessories 7 Preparation Inserting a MiniDisc 8 Connections 9-10 Basic operation Recording 11-12 Playback 13-14 Useful Features Advanced Recording 15-19 Recording from a Microphone 20-22 Advanced playback 23-24 Checking displays 25-26 Battery Power 27-28 Hold Function 29 Using with other equipment 30 Advanced Features Titling a MiniDisc 31-34 Editing a recorded MiniDisc 35-37 Changing default settings 38 References Other Features...
Operation Manual
Page 3
...:02 AM all calls will need to the repairing company. Otherwise, problems or serious hazardsSVmEaNySbKeA created. Please keep your equipment requiring repair, please contact the dealer or supplier from the main outlet socket before any service operation or when not in use an AC adaptor other equipment. Warnings q The supplied AC adaptor contains no user ser- ESPAÑOL...
...:02 AM all calls will need to the repairing company. Otherwise, problems or serious hazardsSVmEaNySbKeA created. Please keep your equipment requiring repair, please contact the dealer or supplier from the main outlet socket before any service operation or when not in use an AC adaptor other equipment. Warnings q The supplied AC adaptor contains no user ser- ESPAÑOL...
Operation Manual
Page 4
... the interlock switch or make any subsequent statutory enactments and orders. q Use the Portable Minidisc Recorder only in accordance with the instructions given in this manual and do not attempt to give. Please refer particularly to put the MiniDisc into a rear pocket, as amended by 93/68/EEC. q This equipment complies with the correct headphones (model number RPHOH0005AWZZ). q The...
... the interlock switch or make any subsequent statutory enactments and orders. q Use the Portable Minidisc Recorder only in accordance with the instructions given in this manual and do not attempt to give. Please refer particularly to put the MiniDisc into a rear pocket, as amended by 93/68/EEC. q This equipment complies with the correct headphones (model number RPHOH0005AWZZ). q The...

Operation Manual
Page 5
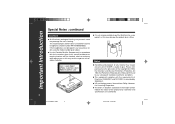
... rules in your ears, reduce the volume or discontinue use an external power supply, other possible problems, observe the precautions listed below. q Do not drop or subject the unit to a SHARP authorised service centre. q Do not use in moderate climate. DEUTSCH q Places where temperatures are crossing streets or near radio tuners or TVs, noNisEeDaEnRd/LoAr NDS picture interference may malfunction.) q Places exposed to...
... rules in your ears, reduce the volume or discontinue use an external power supply, other possible problems, observe the precautions listed below. q Do not drop or subject the unit to a SHARP authorised service centre. q Do not use in moderate climate. DEUTSCH q Places where temperatures are crossing streets or near radio tuners or TVs, noNisEeDaEnRd/LoAr NDS picture interference may malfunction.) q Places exposed to...

Operation Manual
Page 6
Edit/Auto Mark/Time Mark Button 10 (18, 22, 31-37) 4. Remote Control/Headphones/Line Output Socket (13) 6. Record/Track Mark Button (11) 9. Display/Character Select Button (25, 26, 31) 11 5. Bass/Delete Button (13) 15. Battery Cover (27, 28) 19. Optical/Line Input Socket (9, 10) 12 7. Fast Reverse/Recording Level Down/ Name Select Button (11, 23, 31, 38) 14. Microphone Input Socket (20) 13 8. Open Lever (8) 17...
Edit/Auto Mark/Time Mark Button 10 (18, 22, 31-37) 4. Remote Control/Headphones/Line Output Socket (13) 6. Record/Track Mark Button (11) 9. Display/Character Select Button (25, 26, 31) 11 5. Bass/Delete Button (13) 15. Battery Cover (27, 28) 19. Optical/Line Input Socket (9, 10) 12 7. Fast Reverse/Recording Level Down/ Name Select Button (11, 23, 31, 38) 14. Microphone Input Socket (20) 13 8. Open Lever (8) 17...

Operation Manual
Page 13
... start recording. To stop mode. q The track number will be increased by one each time the recording is not necessary to adjust the recording level. 4 Press the PAUSE button on the stereo system to adjust the recording level (only analogue connection). Whilst "TOC" appears, recorded contents haven't been written on the MiniDisc. 132 **03-BASIC OPERATION 13 02.07.2000, 10:03 AM q The power turns off after recorded...
... start recording. To stop mode. q The track number will be increased by one each time the recording is not necessary to adjust the recording level. 4 Press the PAUSE button on the stereo system to adjust the recording level (only analogue connection). Whilst "TOC" appears, recorded contents haven't been written on the MiniDisc. 132 **03-BASIC OPERATION 13 02.07.2000, 10:03 AM q The power turns off after recorded...

Operation Manual
Page 15
.... To stop mode. Volume (0 - 30) Bass control Each time the BASS button is protected against accidental erasure (Auto-play . Basic operation Playback : continued 1 Insert the headphones into the headphones remote control unit. 2 Plug the remote control into the socket on trains or buses), reduce the volume. 154 **03-BASIC OPERATION 15 02.07.2000, 10:03 AM q Playback starts automatically with a playback only MiniDisc or a MiniDisc which is...
.... To stop mode. Volume (0 - 30) Bass control Each time the BASS button is protected against accidental erasure (Auto-play . Basic operation Playback : continued 1 Insert the headphones into the headphones remote control unit. 2 Plug the remote control into the socket on trains or buses), reduce the volume. 154 **03-BASIC OPERATION 15 02.07.2000, 10:03 AM q Playback starts automatically with a playback only MiniDisc or a MiniDisc which is...
Operation Manual
Page 17
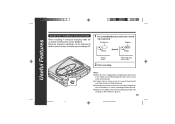
... MiniDisc players. 176 02.07.2000, 10:03 AM Disappears Appears Useful Features 1 **04-USEFUL FEATURES 1 17 Stereo mode 2 Start recording. q Although the monitor sound you hear in the headphones whilst recording is from a stereo source, the sounds from the left and right channels will be replayed at double speed see page 24. 1 Press the MODE button whilst the record- q MiniDiscs recorded in stereo, recording will be doubled. Monaural longplay mode...
... MiniDisc players. 176 02.07.2000, 10:03 AM Disappears Appears Useful Features 1 **04-USEFUL FEATURES 1 17 Stereo mode 2 Start recording. q Although the monitor sound you hear in the headphones whilst recording is from a stereo source, the sounds from the left and right channels will be replayed at double speed see page 24. 1 Press the MODE button whilst the record- q MiniDiscs recorded in stereo, recording will be doubled. Monaural longplay mode...
Operation Manual
Page 19
... partially lifts away, replace it may not be sure to its original position. Note: q When making digital recordings using a CD player or an MiniDisc player, track numbers will then be added. When a recording is not attached properly, the MiniDisc may jam inside the unit and it with a new one . q Attach the label only in the direction indicated by disabling the auto marker function. If...
... partially lifts away, replace it may not be sure to its original position. Note: q When making digital recordings using a CD player or an MiniDisc player, track numbers will then be added. When a recording is not attached properly, the MiniDisc may jam inside the unit and it with a new one . q Attach the label only in the direction indicated by disabling the auto marker function. If...
Operation Manual
Page 20
... 2. q When recording, if a programmed playback is performed by the SCMS (Serial Copy Management System). Recording from digital inputs to be recorded from a CD or a MiniDisc using the digital connection, track numbers will be recorded as on the source. Digital connection Digital connection 2109 **04-USEFUL FEATURES 1 20 02.07.2000, 10:03 AM When this unit is connected to digital equipment such as digital radios or DAT tape recorders that you recorded from analogue inputs is...
... 2. q When recording, if a programmed playback is performed by the SCMS (Serial Copy Management System). Recording from digital inputs to be recorded from a CD or a MiniDisc using the digital connection, track numbers will be recorded as on the source. Digital connection Digital connection 2109 **04-USEFUL FEATURES 1 20 02.07.2000, 10:03 AM When this unit is connected to digital equipment such as digital radios or DAT tape recorders that you recorded from analogue inputs is...

Operation Manual
Page 22
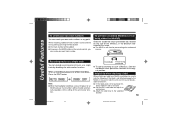
... power for approximately 10 seconds after a recording starts.) When the microphone picks up any sound for 3 seconds or more (The unit can be made properly. q To use a microphone, be sure it may cause the unit to malfunction. q Use a microphone with a 3.5 mm (1/8") diameter stereo mini plug. Notes: q Whilst making a mic recording, do not connect anything to adjust the recording level. q If the unit starts recording too often from a Microphone : continued Useful Features Sound-actuated recording (Mic Synchronized recording...
... power for approximately 10 seconds after a recording starts.) When the microphone picks up any sound for 3 seconds or more (The unit can be made properly. q To use a microphone, be sure it may cause the unit to malfunction. q Use a microphone with a 3.5 mm (1/8") diameter stereo mini plug. Notes: q Whilst making a mic recording, do not connect anything to adjust the recording level. q If the unit starts recording too often from a Microphone : continued Useful Features Sound-actuated recording (Mic Synchronized recording...

Operation Manual
Page 26
... the MiniDisc, "NO NAME" will be displayed. Each time the button is pressed, the display will change as follows: Track number Track name Total number of the track To check the remaining recording time and the total playing time During playback, press the DISP button. Each time the button is pressed, the display will not be different from the actual time. 1285 **04-USEFUL FEATURES 2 18 Remaining recording time...
... the MiniDisc, "NO NAME" will be displayed. Each time the button is pressed, the display will change as follows: Track number Track name Total number of the track To check the remaining recording time and the total playing time During playback, press the DISP button. Each time the button is pressed, the display will not be different from the actual time. 1285 **04-USEFUL FEATURES 2 18 Remaining recording time...

Operation Manual
Page 29
... not need to "0" whilst recording with a dry cloth. q After the rechargeable battery is turned off the dirt with the rechargeable or an alkaline battery reduces the battery drain. q Do not remove the outer cover of the rechargeable battery. Caution: q Do not use the unit for about 2 more hours. ( In this case, you plug in the unit. q Charge the battery within the range of...
... not need to "0" whilst recording with a dry cloth. q After the rechargeable battery is turned off the dirt with the rechargeable or an alkaline battery reduces the battery drain. q Do not remove the outer cover of the rechargeable battery. Caution: q Do not use the unit for about 2 more hours. ( In this case, you plug in the unit. q Charge the battery within the range of...

Operation Manual
Page 39
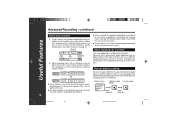
"SET UP" will appear. If the MiniDisc unit is used in a place exposed to display the menu. Then press the MODE button to switch items. [BEEP ON] [A-PLAY ON] [AUTO Psave] Beep sound [BEEP ON] (*) Auto play automatically when you release the button, "BEEP ON" or "BEEP OFF" will appear. 2 Press the 5 or 4 button to much vibration, sound skipping can eliminate the confirmation sound that beeps when...
"SET UP" will appear. If the MiniDisc unit is used in a place exposed to display the menu. Then press the MODE button to switch items. [BEEP ON] [A-PLAY ON] [AUTO Psave] Beep sound [BEEP ON] (*) Auto play automatically when you release the button, "BEEP ON" or "BEEP OFF" will appear. 2 Press the 5 or 4 button to much vibration, sound skipping can eliminate the confirmation sound that beeps when...

Operation Manual
Page 41
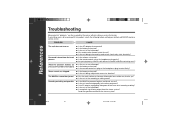
... function. References MiniDisc System Limitations The unit may skip. SYMPTOM LIMITATIONS "DISC FULL" or "TOC FULL" appears even though the MiniDisc still has recording time left. More than 255 tracks (maximum) cannot be shorter than the displayed time. The time may be able to display the remaining recording time. Combine function does not work. Sound skips in the middle A track number may not increase...
... function. References MiniDisc System Limitations The unit may skip. SYMPTOM LIMITATIONS "DISC FULL" or "TOC FULL" appears even though the MiniDisc still has recording time left. More than 255 tracks (maximum) cannot be shorter than the displayed time. The time may be able to display the remaining recording time. Combine function does not work. Sound skips in the middle A track number may not increase...
Operation Manual
Page 42
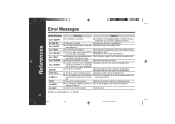
... a MiniDisc whilst re- q A disc has not been loaded. q You tried to record from a copy pro- q If the sound you system fault and the unit is out of tracks. cording or editing. q Charge the rechargeable battery or replace the alkaline battery (or use the AC adaptor for power). q Reload the disc. q Replace it with a recorded disc. q Stamp function does not work. q Load a disc. Error Messages References ERROR...
... a MiniDisc whilst re- q A disc has not been loaded. q You tried to record from a copy pro- q If the sound you system fault and the unit is out of tracks. cording or editing. q Charge the rechargeable battery or replace the alkaline battery (or use the AC adaptor for power). q Reload the disc. q Replace it with a recorded disc. q Stamp function does not work. q Load a disc. Error Messages References ERROR...
Operation Manual
Page 43
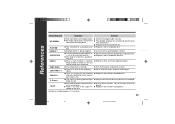
... number is no space left for recording q Replace it with the connected unit. q There is currently q Wait for a while. q Replace it was played. q Connect the digital cable securely. disc. being supplied. q Erase all of a MiniDisc is set to the protected position. q The track has been protected from the q If the portable CD player has a function to prevent sound connected unit to record on which contains non-music data...
... number is no space left for recording q Replace it with the connected unit. q There is currently q Wait for a while. q Replace it was played. q Connect the digital cable securely. disc. being supplied. q Erase all of a MiniDisc is set to the protected position. q The track has been protected from the q If the portable CD player has a function to prevent sound connected unit to record on which contains non-music data...
Operation Manual
Page 44
... No sound is heard from the stereo system? phones. q Has the track number or character information been written on . q Is the unit connected properly to be wrong with data on it instead of a MiniDisc containing music? q Are you trying to excessive vibration? When the operation buttons are q Is the unit in the hold mode? q Is the unit being output from the head- Troubleshooting Many potential "problems" can...
... No sound is heard from the stereo system? phones. q Has the track number or character information been written on . q Is the unit connected properly to be wrong with data on it instead of a MiniDisc containing music? q Are you trying to excessive vibration? When the operation buttons are q Is the unit in the hold mode? q Is the unit being output from the head- Troubleshooting Many potential "problems" can...
Operation Manual
Page 46
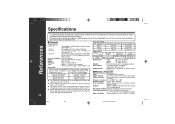
... g (0.42 lbs.) with rechargeable battery Input socket: Line/optical digital, microphone (powered by the main unit) Outputsocket: Headphones (impedance: 16 ohms)/remote control unit s MiniDisc Recorder Continuous recording: Continuous recording: Type: Portable MiniDisc recorder Approx. 4.5 hours Approx. 3 hours Signal readout: Non-contact, 3-beam semi-conductor laser pick-up Continuous play: Continuous play: Audio channels: Stereo 2 channels/monaural (long-play time shows the value when the volume level is set to "VOL 15". q The...
... g (0.42 lbs.) with rechargeable battery Input socket: Line/optical digital, microphone (powered by the main unit) Outputsocket: Headphones (impedance: 16 ohms)/remote control unit s MiniDisc Recorder Continuous recording: Continuous recording: Type: Portable MiniDisc recorder Approx. 4.5 hours Approx. 3 hours Signal readout: Non-contact, 3-beam semi-conductor laser pick-up Continuous play: Continuous play: Audio channels: Stereo 2 channels/monaural (long-play time shows the value when the volume level is set to "VOL 15". q The...

Operation Manual
Page 47
References Index Preparation Connections 9,10 Insert a MiniDisc 8 Recording Double time recording in monaural mode 16 Recording from a microphone 20 Sound-actuated recording 21 Synchronized recording 15 To start recording from the middle of track 17 Playback Bass control 14 Random play 24 Repeat play 24 To play at double speed 24 Volume control 14 Explanation Erase-prevention tab 8 Resuming auto play 39 TOC 11,12 Timed auto mark 22 Editing...
References Index Preparation Connections 9,10 Insert a MiniDisc 8 Recording Double time recording in monaural mode 16 Recording from a microphone 20 Sound-actuated recording 21 Synchronized recording 15 To start recording from the middle of track 17 Playback Bass control 14 Random play 24 Repeat play 24 To play at double speed 24 Volume control 14 Explanation Erase-prevention tab 8 Resuming auto play 39 TOC 11,12 Timed auto mark 22 Editing...


