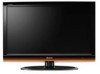
LC-40E67UN | LC-40E77UN Operation Manual
Page 5
... often require extensive work by the manufacturer. 3 The wide blade or the third prong are provided for service. 19) Replacement Parts-When replacement parts are required, be operated only from the apparatus. 11) Only use this product. In order to the operating instructions. 16) Overloading-Do not overload wall outlets, extension cords, or integral convenience receptacles as the original part. A grounding type plug has two...
... often require extensive work by the manufacturer. 3 The wide blade or the third prong are provided for service. 19) Replacement Parts-When replacement parts are required, be operated only from the apparatus. 11) Only use this product. In order to the operating instructions. 16) Overloading-Do not overload wall outlets, extension cords, or integral convenience receptacles as the original part. A grounding type plug has two...
LC-40E67UN | LC-40E77UN Operation Manual
Page 6
... power-line surges. • Power Lines - NATIONAL ELECTRICAL CODE • Turn off the main power and unplug the AC cord from the wall outlet and disconnect the antenna. No objects filled with no direct sunlight and good ventilation. • Ventilation - do not use liquid or aerosol cleaners. • Water and Moisture - or near the TV set or other electric light or power...
... power-line surges. • Power Lines - NATIONAL ELECTRICAL CODE • Turn off the main power and unplug the AC cord from the wall outlet and disconnect the antenna. No objects filled with no direct sunlight and good ventilation. • Ventilation - do not use liquid or aerosol cleaners. • Water and Moisture - or near the TV set or other electric light or power...
LC-40E67UN | LC-40E77UN Operation Manual
Page 7
... cables connected to the flat panel displays are not always supported on the proper stands or installed according to safely install your flat panel display, contact your flat panel displays are mounting the display is appropriate. Note: CEA is committed to walls with furniture and television sets. • Don't place flat panel display. IMPORTANT SAFETY INSTRUCTIONS CHILD SAFETY: It Makes A Difference How and Where You Use Your Flat Panel Display...
... cables connected to the flat panel displays are not always supported on the proper stands or installed according to safely install your flat panel display, contact your flat panel displays are mounting the display is appropriate. Note: CEA is committed to walls with furniture and television sets. • Don't place flat panel display. IMPORTANT SAFETY INSTRUCTIONS CHILD SAFETY: It Makes A Difference How and Where You Use Your Flat Panel Display...
LC-40E67UN | LC-40E77UN Operation Manual
Page 8
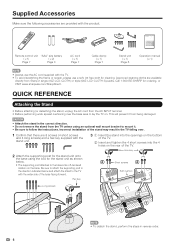
... not remove the stand from being damaged. Remote control unit "AAA" size battery (g1) (g2) Page 7 Page 8 AC cord (g1) Page 7 Cable clamp (g1) Page 7 Stand unit (g1) Page 6 Operation manual (g1) • Always use a soft, lint free cloth for cleaning. This will prevent it . • Be sure to follow the instructions. Be sure to attach the supporting post in the TV falling over the base...
... not remove the stand from being damaged. Remote control unit "AAA" size battery (g1) (g2) Page 7 Page 8 AC cord (g1) Page 7 Cable clamp (g1) Page 7 Stand unit (g1) Page 6 Operation manual (g1) • Always use a soft, lint free cloth for cleaning. This will prevent it . • Be sure to follow the instructions. Be sure to attach the supporting post in the TV falling over the base...
LC-40E67UN | LC-40E77UN Operation Manual
Page 9
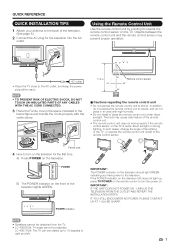
... turn the power on. QUICK REFERENCE QUICK INSTALLATION TIPS 1 Attach your antenna to the back of the television lights GREEN. POWER B) The POWER indicator on the TV is under direct sunlight. Using the Remote Control Unit Use the remote control unit by pointing it towards the remote control sensor on the television. Objects between the remote control unit and the remote control sensor may not work properly if the remote control sensor on the front of the television. (See page 8.) 2 Connect the AC plug...
... turn the power on. QUICK REFERENCE QUICK INSTALLATION TIPS 1 Attach your antenna to the back of the television lights GREEN. POWER B) The POWER indicator on the TV is under direct sunlight. Using the Remote Control Unit Use the remote control unit by pointing it towards the remote control sensor on the television. Objects between the remote control unit and the remote control sensor may not work properly if the remote control sensor on the front of the television. (See page 8.) 2 Connect the AC plug...
LC-40E67UN | LC-40E77UN Operation Manual
Page 11
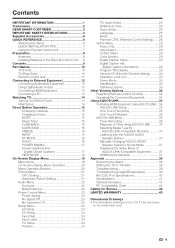
... TV (Rear/Side 10 Remote Control Unit 11 Connecting to External Equipment 12 Connecting Audiovisual Equipment 12 Using Digital Audio Output 13 Connecting HDMI Equipment 13 Connecting a PC 13 Watching TV 14 Turning On/Off the Power 14 Initial Setup 14 Direct Button Operation 15 Changing Channels 15 Changing Volume 15 MUTE 15 Sleep Timer 15 FLASHBACK 15 SURROUND 15 FREEZE 15 INPUT 15 AV MODE 16 AUDIO 16 POWER SAVING 17 Closed Captions and Digital Closed Captions 17 VIEW MODE 18 On-Screen Display Menu 19 Menu Items 19 On-Screen Display Menu Operation...
... TV (Rear/Side 10 Remote Control Unit 11 Connecting to External Equipment 12 Connecting Audiovisual Equipment 12 Using Digital Audio Output 13 Connecting HDMI Equipment 13 Connecting a PC 13 Watching TV 14 Turning On/Off the Power 14 Initial Setup 14 Direct Button Operation 15 Changing Channels 15 Changing Volume 15 MUTE 15 Sleep Timer 15 FLASHBACK 15 SURROUND 15 FREEZE 15 INPUT 15 AV MODE 16 AUDIO 16 POWER SAVING 17 Closed Captions and Digital Closed Captions 17 VIEW MODE 18 On-Screen Display Menu 19 Menu Items 19 On-Screen Display Menu Operation...
LC-40E67UN | LC-40E77UN Operation Manual
Page 12
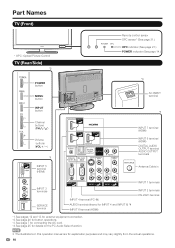
...* OPC: Optical Picture Control TV (Rear/Side) *2 Remote control sensor OPC sensor* (See page 21.) OPC indicator (See page 21.) POWER indicator (See page 14.) POWER button MENU button INPUT button Channel buttons (CHU/V) Volume buttons (VOLk/l) *1 INPUT 5 terminal (HDMI) *3 AC INPUT terminal *1 INPUT 7 terminal (HDMI) INPUT 8 terminal (HDMI) DIGITAL AUDIO OUTPUT terminal AUDIO OUTPUT terminals Antenna/Cable in this operation manual are for details on the PC Audio Select function. INPUT 1 terminals INPUT 2 terminals RS-232C terminal • The illustrations in INPUT 3 terminals SERVICE...
...* OPC: Optical Picture Control TV (Rear/Side) *2 Remote control sensor OPC sensor* (See page 21.) OPC indicator (See page 21.) POWER indicator (See page 14.) POWER button MENU button INPUT button Channel buttons (CHU/V) Volume buttons (VOLk/l) *1 INPUT 5 terminal (HDMI) *3 AC INPUT terminal *1 INPUT 7 terminal (HDMI) INPUT 8 terminal (HDMI) DIGITAL AUDIO OUTPUT terminal AUDIO OUTPUT terminals Antenna/Cable in this operation manual are for details on the PC Audio Select function. INPUT 1 terminals INPUT 2 terminals RS-232C terminal • The illustrations in INPUT 3 terminals SERVICE...

LC-40E67UN | LC-40E77UN Operation Manual
Page 13
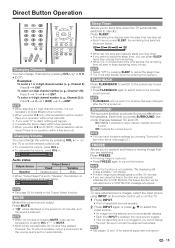
... external input 30 mode. (See page 15.) 22 CHU/V: Select the channel. (See page 15.) 23 MUTE: Mute the sound. (See page 15.) 24 MENU: Display the menu screen. 25 a/b/c/d, ENTER: Select a desired item on the remote control unit will 26 light. This button is used. (See pages 34 to press FUNCTION and DISPLAY at the TV. 11 When the input source is INPUT 4, 5, 6, 7 or 8: STANDARD, MOVIE, GAME, PC, USER, DYNAMIC (Fixed...
... external input 30 mode. (See page 15.) 22 CHU/V: Select the channel. (See page 15.) 23 MUTE: Mute the sound. (See page 15.) 24 MENU: Display the menu screen. 25 a/b/c/d, ENTER: Select a desired item on the remote control unit will 26 light. This button is used. (See pages 34 to press FUNCTION and DISPLAY at the TV. 11 When the input source is INPUT 4, 5, 6, 7 or 8: STANDARD, MOVIE, GAME, PC, USER, DYNAMIC (Fixed...
LC-40E67UN | LC-40E77UN Operation Manual
Page 16
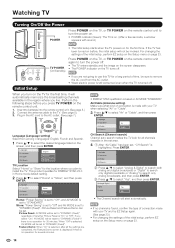
... be set to "DYNAMIC (Fixed)". Language TV Location Air/Cable CH Search English Français Español TV Location Select "Home" or "Store" for 30 minutes. Press ENTER. Watching TV Turning On/Off the Power POWER Press POWER on the TV, or TV POWER on the remote control unit to turn the power on. • POWER indicator (Green): The TV is found, confirm the type of connection made with sound.) TV POWER (On/Standby...
... be set to "DYNAMIC (Fixed)". Language TV Location Air/Cable CH Search English Français Español TV Location Select "Home" or "Store" for 30 minutes. Press ENTER. Watching TV Turning On/Off the Power POWER Press POWER on the TV, or TV POWER on the remote control unit to turn the power on. • POWER indicator (Green): The TV is found, confirm the type of connection made with sound.) TV POWER (On/Standby...
LC-40E67UN | LC-40E77UN Operation Manual
Page 17
... current sound output. Off: Outputs the normal sound. • You can change the volume by pressing SLEEP to 0 automatically. g., Channel 115): Press 1 1 5 ENT. However, the TV will not suddenly output a loud sound as shown below . 60 • See page 29 for external equipment connection. 15 g., Channel 5): Press 5 ENT. To select a 3-digit channel number (e. Press SLEEP. • The remaining time displays when the sleep timer has been set to cancel the sleep timer. • The TV will...
... current sound output. Off: Outputs the normal sound. • You can change the volume by pressing SLEEP to 0 automatically. g., Channel 115): Press 1 1 5 ENT. However, the TV will not suddenly output a loud sound as shown below . 60 • See page 29 for external equipment connection. 15 g., Channel 5): Press 5 ENT. To select a 3-digit channel number (e. Press SLEEP. • The remaining time displays when the sleep timer has been set to cancel the sleep timer. • The TV will...
LC-40E67UN | LC-40E77UN Operation Manual
Page 22
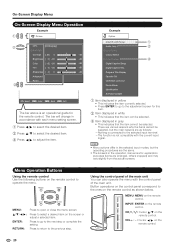
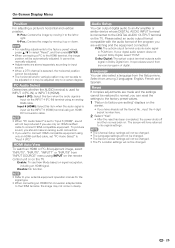
... menu with the current input signal. • Menu options differ in the operation manual are for the remote control. Example Option AQUOS LINK Setup Audio Only Input Select Output Select Color System Digital Caption Setup Digital Caption Info. There are various reasons why the items cannot be selected. On-Screen Display Menu On-Screen Display Menu Operation Example Picture OPC [On(Display)] Backlight Contrast [ 30] 0 b40 Brightness [ 0] a30 b30 Color [ b2] a30 b30 Tint [ 0] a30 b30 Sharpness [ 4] 0 b20 Advanced Reset...
... menu with the current input signal. • Menu options differ in the operation manual are for the remote control. Example Option AQUOS LINK Setup Audio Only Input Select Output Select Color System Digital Caption Setup Digital Caption Info. There are various reasons why the items cannot be selected. On-Screen Display Menu On-Screen Display Menu Operation Example Picture OPC [On(Display)] Backlight Contrast [ 30] 0 b40 Brightness [ 0] a30 b30 Color [ b2] a30 b30 Tint [ 0] a30 b30 Sharpness [ 4] 0 b20 Advanced Reset...
LC-40E67UN | LC-40E77UN Operation Manual
Page 25
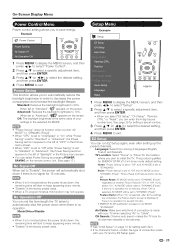
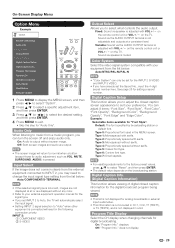
...; "Disable" is selected, after setting up the preset channels. Setup Menu Example Setup EZ Setup CH Setup Input Skip Input Label Parental CTRL Position PC Setup PC Audio Select HDMI Auto View Audio Setup Language Reset 1 Press MENU to display the MENU screen, and then press c/d to select "Setup". 2 Press a/b to 80%. EZ Setup You can select Power Saving by pressing POWER SAVING on the screen. This product qualifies for ENERGY STAR V3.0 in order to install...
...; "Disable" is selected, after setting up the preset channels. Setup Menu Example Setup EZ Setup CH Setup Input Skip Input Label Parental CTRL Position PC Setup PC Audio Select HDMI Auto View Audio Setup Language Reset 1 Press MENU to display the MENU screen, and then press c/d to select "Setup". 2 Press a/b to 80%. EZ Setup You can select Power Saving by pressing POWER SAVING on the screen. This product qualifies for ENERGY STAR V3.0 in order to install...
LC-40E67UN | LC-40E77UN Operation Manual
Page 27
... the audio signal is connected to the HDMI terminal, the image position will be changed . • The TV Location settings will have already set "PC Audio Select" to the left or right. To produce sound, you should make an analog audio connection. • If you have returned to connect HDMI-compatible equipment. PCM: The optical output terminal outputs audio signal in Dolby Digital form. Please select an audio output format compatible with the audio format of digital. On-Screen Display Menu Position For adjusting a picture...
... the audio signal is connected to the HDMI terminal, the image position will be changed . • The TV Location settings will have already set "PC Audio Select" to the left or right. To produce sound, you should make an analog audio connection. • If you have returned to connect HDMI-compatible equipment. PCM: The optical output terminal outputs audio signal in Dolby Digital form. Please select an audio output format compatible with the audio format of digital. On-Screen Display Menu Position For adjusting a picture...
LC-40E67UN | LC-40E77UN Operation Manual
Page 31
..., images are not displayed at a consistent level. Type 3: Monospaced without any color. • Refer to your external equipment operation manual for the signal type. • If you may need to normal when a button (except those for "Audio Only". Type 5: Casual font type. Color System Select the video signal system compatible with serifs. does not display. 29 displays. Program Title Display Favorite CH Operation Lock Out Demo Mode Identification Software Update 1 Press MENU to display the MENU screen, and then...
..., images are not displayed at a consistent level. Type 3: Monospaced without any color. • Refer to your external equipment operation manual for the signal type. • If you may need to normal when a button (except those for "Audio Only". Type 5: Casual font type. Color System Select the video signal system compatible with serifs. does not display. 29 displays. Program Title Display Favorite CH Operation Lock Out Demo Mode Identification Software Update 1 Press MENU to display the MENU screen, and then...

LC-40E67UN | LC-40E77UN Operation Manual
Page 32
.... RC Control Lock: All buttons on the TV. CAUTION • Do not remove the USB memory device or unplug the AC cord while the software is displayed. Option AQUOS LINK Setup Demo Mode Identification Software Update 30 Press a/b/c/ d to program 4 favorite channels, in 4 different categories. Press a/b/c/d to select the channel you to select the position in demo mode when it is turned back on the TV, except POWER, are locked. To...
.... RC Control Lock: All buttons on the TV. CAUTION • Do not remove the USB memory device or unplug the AC cord while the software is displayed. Option AQUOS LINK Setup Demo Mode Identification Software Update 30 Press a/b/c/ d to program 4 favorite channels, in 4 different categories. Press a/b/c/d to select the channel you to select the position in demo mode when it is turned back on the TV, except POWER, are locked. To...
LC-40E67UN | LC-40E77UN Operation Manual
Page 38
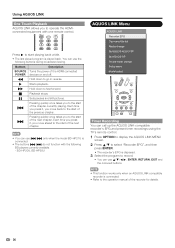
... HDMI connected POWER devices on and off. * Hold down to fast forward. + Playback stops. ) 7 Sets pauses and still pictures. BD-HP20U, BD-HP50U AQUOS LINK Menu AQUOS LINK Recorder EPG Top menu/title list Media change By AQUOS AUDIO SP By AQUOS SP Sound mode change Setup menu Model select Timer Recording You can call up the AQUOS LINK-compatible recorder's EPG and preset timer recordings using the TV's remote control. 1 Press OPTION to display...
... HDMI connected POWER devices on and off. * Hold down to fast forward. + Playback stops. ) 7 Sets pauses and still pictures. BD-HP20U, BD-HP50U AQUOS LINK Menu AQUOS LINK Recorder EPG Top menu/title list Media change By AQUOS AUDIO SP By AQUOS SP Sound mode change Setup menu Model select Timer Recording You can call up the AQUOS LINK-compatible recorder's EPG and preset timer recordings using the TV's remote control. 1 Press OPTION to display...
LC-40E67UN | LC-40E77UN Operation Manual
Page 39
... works only when AQUOS LINK-compatible equipment is connected. Manually Changing AQUOS AUDIO Speaker System's Sound Mode 1 Press OPTION to display the AQUOS LINK MENU screen. 2 Press a/b to select "Sound mode change ", and then press ENTER. 3 Select the desired media such as DVD or HDD. • The Media type toggles each time you can use VOLk/l and MUTE. Listening with the AQUOS AUDIO Speaker System You can switch the media (HDD or DVD) for details. compatible equipment displays...
... works only when AQUOS LINK-compatible equipment is connected. Manually Changing AQUOS AUDIO Speaker System's Sound Mode 1 Press OPTION to display the AQUOS LINK MENU screen. 2 Press a/b to select "Sound mode change ", and then press ENTER. 3 Select the desired media such as DVD or HDD. • The Media type toggles each time you can use VOLk/l and MUTE. Listening with the AQUOS AUDIO Speaker System You can switch the media (HDD or DVD) for details. compatible equipment displays...
LC-40E67UN | LC-40E77UN Operation Manual
Page 40
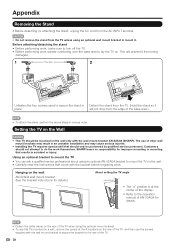
...;ed service personnel. Hanging on the wall AN-52AG4 wall mount bracket. (See the bracket instructions for details.) About setting the TV angle 0/5/10/15/20° • The "d" position is at the 4 locations on . This will not drop from the AC INPUT terminal. The use the screws supplied with the wall mount bracket to secure the bracket to mount it place. CAUTION • Do not remove the stand from the TV...
...;ed service personnel. Hanging on the wall AN-52AG4 wall mount bracket. (See the bracket instructions for details.) About setting the TV angle 0/5/10/15/20° • The "d" position is at the 4 locations on . This will not drop from the AC INPUT terminal. The use the screws supplied with the wall mount bracket to secure the bracket to mount it place. CAUTION • Do not remove the stand from the TV...
LC-40E67UN | LC-40E77UN Operation Manual
Page 41
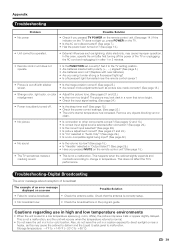
... cord disconnected? (See page 7.) • Has the power been turned on the remote control unit? (See page 15.) • The TV sometimes makes a cracking sound. • This is not a malfunction. Troubleshooting-Digital Broadcasting The error message about reception of broadcast The example of an error message displayed on a screen Possible Solution • Failed to normal. • Do not leave the unit in the program guide...
... cord disconnected? (See page 7.) • Has the power been turned on the remote control unit? (See page 15.) • The TV sometimes makes a cracking sound. • This is not a malfunction. Troubleshooting-Digital Broadcasting The error message about reception of broadcast The example of an error message displayed on a screen Possible Solution • Failed to normal. • Do not leave the unit in the program guide...
LC-40E67UN | LC-40E77UN Operation Manual
Page 45
... model number affixed to the Product has been removed, defaced, changed, altered or tampered with servicing the Product. Sharp does not warrant nor shall Sharp be liable or in a commercial setting or application; This warranty does not cover installation or signal reception problems. This limited warranty will not apply if the Product has been or is being displayed for long periods of time...
... model number affixed to the Product has been removed, defaced, changed, altered or tampered with servicing the Product. Sharp does not warrant nor shall Sharp be liable or in a commercial setting or application; This warranty does not cover installation or signal reception problems. This limited warranty will not apply if the Product has been or is being displayed for long periods of time...


