
Operation Manual
Page 2
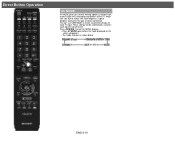
...Play Back 5-4. Using Keyboard and Mouse 8-12. Troubleshooting 11. Displaying an External Equipment Image 2-2. SmartCentral 3-7. NETFLIX 3-8. Audio Settings 4-22. Selecting the Folders to the Internet 8-2. Controlling HDMI Equipment Using LINK Operation 6-3. Using a Smartphone with the TV ...TV 7-4. Notes 9. TV 11-2. Wireless LAN 12-1. Remote Control Unit 2. Closed Captions and Digital Closed Captions 3-14. Picture Settings 4-21. Preparation 5-2. Presetting Remote Control Function 5-12. Using a PC 7-1. Miracast devices 10. On-Screen Display Menu Operation ...
...Play Back 5-4. Using Keyboard and Mouse 8-12. Troubleshooting 11. Displaying an External Equipment Image 2-2. SmartCentral 3-7. NETFLIX 3-8. Audio Settings 4-22. Selecting the Folders to the Internet 8-2. Controlling HDMI Equipment Using LINK Operation 6-3. Using a Smartphone with the TV ...TV 7-4. Notes 9. TV 11-2. Wireless LAN 12-1. Remote Control Unit 2. Closed Captions and Digital Closed Captions 3-14. Picture Settings 4-21. Preparation 5-2. Presetting Remote Control Function 5-12. Using a PC 7-1. Miracast devices 10. On-Screen Display Menu Operation ...
Operation Manual
Page 9
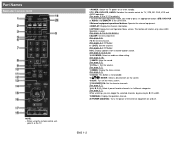
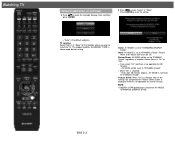
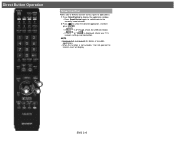
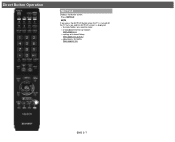
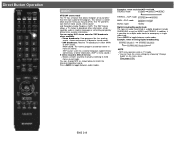
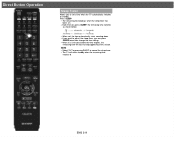
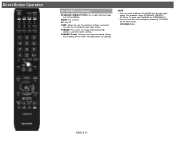
... operation manual. 20 POWER (SOURCE): Turns the power of the external equipment on the screen. 16 EXIT: Turn off the menu screen. 17 FAVORITE CH: Set the favorite channels. (See page 4-7.) 18 A, B, C, D: Select 4 preset favorite channels in 4 different categories. (See page 4-7.) While watching, you ..., STB, BD, DVD, VCR and AUDIO operation. (See pages 5-9 to 5-12 for details.) 6 SLEEP: Set the sleep timer. (See page 3-9.) 7 0-9: Set the channel. (See pages 3-1 and 5-12.) 8 • (DOT): Set the channel. (See pages 3-1 and 5-12.) 9 CC: Display captions from a closed-caption source. (See page...
... operation manual. 20 POWER (SOURCE): Turns the power of the external equipment on the screen. 16 EXIT: Turn off the menu screen. 17 FAVORITE CH: Set the favorite channels. (See page 4-7.) 18 A, B, C, D: Select 4 preset favorite channels in 4 different categories. (See page 4-7.) While watching, you ..., STB, BD, DVD, VCR and AUDIO operation. (See pages 5-9 to 5-12 for details.) 6 SLEEP: Set the sleep timer. (See page 3-9.) 7 0-9: Set the channel. (See pages 3-1 and 5-12.) 8 • (DOT): Set the channel. (See pages 3-1 and 5-12.) 9 CC: Display captions from a closed-caption source. (See page...
Operation Manual
Page 10
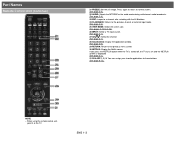
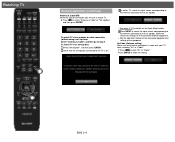
... these buttons. (See page 8-12.) NOTE When using the remote control unit, point it at the TV. Part Names Remote Control Unit (Continue) 21 FREEZE: Set the still image.
... these buttons. (See page 8-12.) NOTE When using the remote control unit, point it at the TV. Part Names Remote Control Unit (Continue) 21 FREEZE: Set the still image.
Operation Manual
Page 12
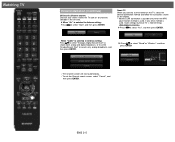
Language (Language setting) Select from among 3 languages: English, French and Spanish. 1 Press / to select the time zone where you press POWER on the screen, and then press ENTER. ... press ENTER. 3 Press / to select the desired language listed on the remote control unit. 1. Plug in the AC cord to the TV. 3. Location & Time Make settings for the capital of the selected country. Insert the batteries into the remote control unit. 2.
Language (Language setting) Select from among 3 languages: English, French and Spanish. 1 Press / to select the time zone where you press POWER on the screen, and then press ENTER. ... press ENTER. 3 Press / to select the desired language listed on the remote control unit. 1. Plug in the AC cord to the TV. 3. Location & Time Make settings for the capital of the selected country. Insert the batteries into the remote control unit. 2.
Operation Manual
Page 13
... NOTE ENERGY STAR qualification is selected: - TV Location Select "Home" or "Store" for several minutes. Picture Reset and Feature Demo can be set to "DYNAMIC (Fixed)". "Auto" is not reset to "DYNAMIC (Fixed)" regardless of whether Picture Reset is no operation for ENERGY STAR in Home... mode default setting. This product qualifies for 30 minutes: - Even after all the settings are completed, the Feature Demo screen is displayed if there is "On" or "Off". Store: AV MODE...
... NOTE ENERGY STAR qualification is selected: - TV Location Select "Home" or "Store" for several minutes. Picture Reset and Feature Demo can be set to "DYNAMIC (Fixed)". "Auto" is not reset to "DYNAMIC (Fixed)" regardless of whether Picture Reset is no operation for ENERGY STAR in Home... mode default setting. This product qualifies for 30 minutes: - Even after all the settings are completed, the Feature Demo screen is displayed if there is "On" or "Off". Store: AV MODE...
Operation Manual
Page 14
...to select "Air" or "Cable". To watch TV via an antenna or cable connection (without using a set-top box): Select "Antenna & Cable", and then go to the set -top box: Select "Set-top box", and then press ENTER. ENG 2-4 See the operation manual of the connected equipment for details... on the connected external equipment. To watch TV. 6 Press / to select "Antenna & Cable" or "Set-top box", and then press ENTER. Watching TV Initial Installation (Continue) Antenna & Cable/STB Select the type of connection you will use to watch TV...
...to select "Air" or "Cable". To watch TV via an antenna or cable connection (without using a set-top box): Select "Antenna & Cable", and then go to the set -top box: Select "Set-top box", and then press ENTER. ENG 2-4 See the operation manual of the connected equipment for details... on the connected external equipment. To watch TV. 6 Press / to select "Antenna & Cable" or "Set-top box", and then press ENTER. Watching TV Initial Installation (Continue) Antenna & Cable/STB Select the type of connection you will use to watch TV...
Operation Manual
Page 15
...search) Channel auto search makes the TV look for all channels viewable in the set area. 8 When "Air" is selected in Antenna setting: Press / to select "Start", and then press ENTER. When "Cable" is selected in Antenna setting: Press / to select "Analog & Digital Search Start" to search both analog... broadcasts, and then press ENTER. 10 Press / to select "Wired" or "Wireless", and then press ENTER. If any other method is used , make settings by Smart TV > Internet Setup. (See pages 8-2 to 8-4.) 9 Press / to the Internet on the TV, select the desired connection method and follow ...
...search) Channel auto search makes the TV look for all channels viewable in the set area. 8 When "Air" is selected in Antenna setting: Press / to select "Start", and then press ENTER. When "Cable" is selected in Antenna setting: Press / to select "Analog & Digital Search Start" to search both analog... broadcasts, and then press ENTER. 10 Press / to select "Wired" or "Wireless", and then press ENTER. If any other method is used , make settings by Smart TV > Internet Setup. (See pages 8-2 to 8-4.) 9 Press / to the Internet on the TV, select the desired connection method and follow ...

Operation Manual
Page 16
...display, and finalize the connection after testing its viability. NOTE After you finish configuring the network settings, configure the "TV Name Setting". (See pages 4-24, 7-3.) When you change the network settings, refer to Smart TV > Internet Setup. (See pages 8-2 to perform the connection test.... Watching TV Initial Installation (Continue) Connection using an ETHERNET cable: Select "Wired" and press ENTER. Examples of the settings confirmation screen When "Antenna & Cable" was selected in step 6. Confirm the information displayed on the screen, and then press ENTER. ...
...display, and finalize the connection after testing its viability. NOTE After you finish configuring the network settings, configure the "TV Name Setting". (See pages 4-24, 7-3.) When you change the network settings, refer to Smart TV > Internet Setup. (See pages 8-2 to perform the connection test.... Watching TV Initial Installation (Continue) Connection using an ETHERNET cable: Select "Wired" and press ENTER. Examples of the settings confirmation screen When "Antenna & Cable" was selected in step 6. Confirm the information displayed on the screen, and then press ENTER. ...

Operation Manual
Page 17
.... Confirm which input terminal is found, confirm the type of connection made with your TV and try "Easy Setup" again. (See page 4-5.) When "Set-top box" was selected in step 6. OK: Clicking "OK" will complete the Easy Setup procedure. Show the input list: You can check the current... connection status of the Initial Installation, perform "Easy Setup" on the Initial Setup menu on page 4-5. Click "OK" to the set-top box. ENG 2-7 Watching TV Initial Installation (Continue) NOTE If no channel is connected to display the confirmation screen for input source switching.
.... Confirm which input terminal is found, confirm the type of connection made with your TV and try "Easy Setup" again. (See page 4-5.) When "Set-top box" was selected in step 6. OK: Clicking "OK" will complete the Easy Setup procedure. Show the input list: You can check the current... connection status of the Initial Installation, perform "Easy Setup" on the Initial Setup menu on page 4-5. Click "OK" to the set-top box. ENG 2-7 Watching TV Initial Installation (Continue) NOTE If no channel is connected to display the confirmation screen for input source switching.

Operation Manual
Page 19
on the TV or on the screen changes as shown below. To decrease the volume, press VOL -. ENG 3-2 Audio status Output device Output Select Fixed Variable Speaker Variable sound Mute When "Output Select" is set to "Variable", the indicator on the remote control unit. Direct Button Operation Changing Volume You can change the volume by pressing VOL+/- To increase the volume, press VOL +. NOTE See page 4-12 for details on the Output Select function.
on the TV or on the screen changes as shown below. To decrease the volume, press VOL -. ENG 3-2 Audio status Output device Output Select Fixed Variable Speaker Variable sound Mute When "Output Select" is set to "Variable", the indicator on the remote control unit. Direct Button Operation Changing Volume You can change the volume by pressing VOL+/- To increase the volume, press VOL +. NOTE See page 4-12 for details on the Output Select function.
Operation Manual
Page 20
Mute will not suddenly output a loud sound as the volume level is silenced. Direct Button Operation MUTE Mutes the current sound output. NOTE Within 30 minutes of pressing MUTE, mute can be displayed on the screen for 30 minutes, and the sound is set to 0 automatically. ENG 3-3 or MUTE. However, the TV will be canceled after 30 minutes have passed. " " will be canceled by pressing VOL+/- Press MUTE.
Mute will not suddenly output a loud sound as the volume level is silenced. Direct Button Operation MUTE Mutes the current sound output. NOTE Within 30 minutes of pressing MUTE, mute can be displayed on the screen for 30 minutes, and the sound is set to 0 automatically. ENG 3-3 or MUTE. However, the TV will be canceled after 30 minutes have passed. " " will be canceled by pressing VOL+/- Press MUTE.
Operation Manual
Page 23
If " " is displayed, check your TV's network settings and connection. If " " or " " is displayed, check the USB connection. Direct Button Operation SmartCentral Allows you to directly activate various types of applications. 1 Press SmartCentral ...
If " " is displayed, check your TV's network settings and connection. If " " or " " is displayed, check the USB connection. Direct Button Operation SmartCentral Allows you to directly activate various types of applications. 1 Press SmartCentral ...
Operation Manual
Page 24
Direct Button Operation NETFLIX Displays the Netflix screen. To enjoy Netflix, you press the NETFLIX button when the TV is turned off, the TV turns on and the NETFLIX screen is displayed. Press NETFLIX. NOTE If you need to make: -a broadband Internet connection (See page 8-1.) -settings of Internet Setup (See pages 8-2 to 8-4.) -adjustments for Netflix (See page 8-13.) ENG 3-7
Direct Button Operation NETFLIX Displays the Netflix screen. To enjoy Netflix, you press the NETFLIX button when the TV is turned off, the TV turns on and the NETFLIX screen is displayed. Press NETFLIX. NOTE If you need to make: -a broadband Internet connection (See page 8-1.) -settings of Internet Setup (See pages 8-2 to 8-4.) -adjustments for Netflix (See page 8-13.) ENG 3-7
Operation Manual
Page 25
... to accompany a single video track. The TV with MTS can enjoy Hi-Fi stereo sound or SAP broadcasts where available. You can have the same settings by manually switching to hear. Press AUDIO to toggle between audio modes. You can change MTS as MONO and STEREO.
... to accompany a single video track. The TV with MTS can enjoy Hi-Fi stereo sound or SAP broadcasts where available. You can have the same settings by manually switching to hear. Press AUDIO to toggle between audio modes. You can change MTS as MONO and STEREO.
Operation Manual
Page 26
... the remaining time reaches 0. ENG 3-9 Each time you can press SLEEP twice then change the time setting. If you want to keep appearing every minute. The remaining time displays when the sleep timer has been set , the time automatically starts counting down. NOTE Select "Off" by pressing SLEEP to standby. The TV... will start to adjust the sleep timer, you press SLEEP, the remaining time switches as shown below. Direct Button Operation Sleep Timer Allows you to set a time when the TV automatically switches to cancel the sleep timer.
... the remaining time reaches 0. ENG 3-9 Each time you can press SLEEP twice then change the time setting. If you want to keep appearing every minute. The remaining time displays when the sleep timer has been set , the time automatically starts counting down. NOTE Select "Off" by pressing SLEEP to standby. The TV... will start to adjust the sleep timer, you press SLEEP, the remaining time switches as shown below. Direct Button Operation Sleep Timer Allows you to set a time when the TV automatically switches to cancel the sleep timer.
Operation Manual
Page 27
You can vary due to factors like room brightness, type of program watched or the type of the TV, which can use USER Mode to best match the surrounding environment of device connected. Press AV MODE. These settings will be automatically saved on the screen disappears. Current AV MODE displays. Press AV MODE again before the mode displayed on each input for each TV input. Direct Button Operation AV MODE AV MODE gives you several viewing options to choose from to create customized settings for convenience. The mode changes as shown below: ENG 3-10
You can vary due to factors like room brightness, type of program watched or the type of the TV, which can use USER Mode to best match the surrounding environment of device connected. Press AV MODE. These settings will be automatically saved on the screen disappears. Current AV MODE displays. Press AV MODE again before the mode displayed on each input for each TV input. Direct Button Operation AV MODE AV MODE gives you several viewing options to choose from to create customized settings for convenience. The mode changes as shown below: ENG 3-10
Operation Manual
Page 28
... allowed. MOVIE: For a movie. Direct Button Operation AV MODE (Continue) STANDARD (ENERGY STAR): For a highly defined image in a normal lighting. You can set the mode for each input mode. (For example, select STANDARD (ENERGY STAR) for TV input and DYNAMIC for COMPONENT.) You can select a different AV MODE... item for sports viewing. NOTE You can have the same settings by choosing "AV MODE" on the menu items. (See page 4-17.) ENG 3-11 DYNAMIC: For a clear-cut image emphasizing high contrast, useful ...
... allowed. MOVIE: For a movie. Direct Button Operation AV MODE (Continue) STANDARD (ENERGY STAR): For a highly defined image in a normal lighting. You can set the mode for each input mode. (For example, select STANDARD (ENERGY STAR) for TV input and DYNAMIC for COMPONENT.) You can select a different AV MODE... item for sports viewing. NOTE You can have the same settings by choosing "AV MODE" on the menu items. (See page 4-17.) ENG 3-11 DYNAMIC: For a clear-cut image emphasizing high contrast, useful ...
Operation Manual
Page 30
When a web page is not found on Digital TV programs, "--" will be shown. You can have the same settings by choosing "Change CC" on your current selection, if Digital CC(ENG) is not broadcast for detailed closed caption service, CC1, will be displayed in... a different service is displayed on the menu items. (See page 4-25.) ENG 3-13 NOTE See page 4-26 for the next program, the other closed caption settings. "ENG", is displayed, Closed Captions are potentially available, but a broadcast may contain none or only some of these services at the discretion of "1/2/ENG". A ...
When a web page is not found on Digital TV programs, "--" will be shown. You can have the same settings by choosing "Change CC" on your current selection, if Digital CC(ENG) is not broadcast for detailed closed caption service, CC1, will be displayed in... a different service is displayed on the menu items. (See page 4-25.) ENG 3-13 NOTE See page 4-26 for the next program, the other closed caption settings. "ENG", is displayed, Closed Captions are potentially available, but a broadcast may contain none or only some of these services at the discretion of "1/2/ENG". A ...
Operation Manual
Page 31
.... (See page 4-25.) For HD programs Stretch Dot by Dot" when the number of the signal are the same. NOTE You can have the same settings by Dot or Full Screen, it is displayed to correct this. Suitable for viewing widescreen 2.35:1 aspect-ratio programs in full screen. NOTE When using...
.... (See page 4-25.) For HD programs Stretch Dot by Dot" when the number of the signal are the same. NOTE You can have the same settings by Dot or Full Screen, it is displayed to correct this. Suitable for viewing widescreen 2.35:1 aspect-ratio programs in full screen. NOTE When using...
Operation Manual
Page 34
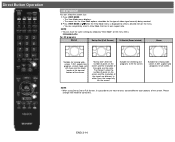
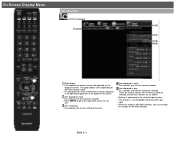
.... Item in blue This indicates the item currently selected. There are as follows: - ENG 4-1 Item displayed in brackets This indicates the current setting for this conflicts with the current input signal. - Press ENTER to go to the selected input terminal. - Nothing is not compatible with other...indicates that the item can be selected, but the main reasons are various reasons why the items cannot be operated on the menu setting screen. On-Screen Display Menu Introduction LCFONT embedded Guide display This indicates the buttons that can be selected. When this item. ...
.... Item in blue This indicates the item currently selected. There are as follows: - ENG 4-1 Item displayed in brackets This indicates the current setting for this conflicts with the current input signal. - Press ENTER to go to the selected input terminal. - Nothing is not compatible with other...indicates that the item can be selected, but the main reasons are various reasons why the items cannot be operated on the menu setting screen. On-Screen Display Menu Introduction LCFONT embedded Guide display This indicates the buttons that can be selected. When this item. ...


