
LC-70LE732U Operation Manual
Page 3
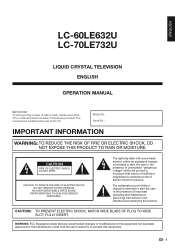
... of the TV. CAUTION: TO PREVENT ELECTRIC SHOCK, MATCH WIDE BLADE OF PLUG TO WIDE SLOT, FULLY INSERT. REFER SERVICING TO QUALIFIED SERVICE PERSONNEL. ENGLISH LC-60LE632U LC-70LE732U LIQUID CRYSTAL TELEVISION ENGLISH OPERATION MANUAL IMPORTANT: To aid reporting in case of loss or theft, please record the TV's model and serial numbers...
... of the TV. CAUTION: TO PREVENT ELECTRIC SHOCK, MATCH WIDE BLADE OF PLUG TO WIDE SLOT, FULLY INSERT. REFER SERVICING TO QUALIFIED SERVICE PERSONNEL. ENGLISH LC-60LE632U LC-70LE732U LIQUID CRYSTAL TELEVISION ENGLISH OPERATION MANUAL IMPORTANT: To aid reporting in case of loss or theft, please record the TV's model and serial numbers...
LC-70LE732U Operation Manual
Page 4
DECLARATION OF CONFORMITY: SHARP LIQUID CRYSTAL TELEVISION, MODEL LC-60LE632U/LC-70LE732U This device complies with Part 15 of the FCC Rules. If this equipment does cause harmful interference to radio or television reception, which ...not be operated. IC Radiation Exposure Statement: This equipment complies with the limits for an uncontrolled environment. RESPONSIBLE PARTY: SHARP ELECTRONICS CORPORATION Sharp Plaza, Mahwah, New Jersey 07495-1163 TEL: 1-800-BE-SHARP For Business Customers: URL http://www.sharpusa.com INFORMATION: This equipment has been tested and found to comply with ...
DECLARATION OF CONFORMITY: SHARP LIQUID CRYSTAL TELEVISION, MODEL LC-60LE632U/LC-70LE732U This device complies with Part 15 of the FCC Rules. If this equipment does cause harmful interference to radio or television reception, which ...not be operated. IC Radiation Exposure Statement: This equipment complies with the limits for an uncontrolled environment. RESPONSIBLE PARTY: SHARP ELECTRONICS CORPORATION Sharp Plaza, Mahwah, New Jersey 07495-1163 TEL: 1-800-BE-SHARP For Business Customers: URL http://www.sharpusa.com INFORMATION: This equipment has been tested and found to comply with ...
LC-70LE732U Operation Manual
Page 5
... required, be operated only from the apparatus. 11) Only use can also cause personal injuries and property damage if improperly handled. Install in performance - DEAR SHARP CUSTOMER Thank you are provided for your safety. This product has been engineered and manufactured with the apparatus. If you for your purchase of the...
... required, be operated only from the apparatus. 11) Only use can also cause personal injuries and property damage if improperly handled. Install in performance - DEAR SHARP CUSTOMER Thank you are provided for your safety. This product has been engineered and manufactured with the apparatus. If you for your purchase of the...
LC-70LE732U Operation Manual
Page 6
...to lightning and power-line surges. • Power Lines - Do not use this product is not designed for a long period of blue, green or red (LC-60LE632U); in serious personal injuries as well as a fixed point of time. and the like. • Stand - Placing the product on the product. ... the product around children. Do not cover or block these may scratch the surface of the lead-in installation; blue, green, red or yellow (LC-70LE732U). When installing an outside antenna is very dirty, wipe with a soft cloth (cotton, flannel, etc.) soaked in neutral detergent diluted ...
...to lightning and power-line surges. • Power Lines - Do not use this product is not designed for a long period of blue, green or red (LC-60LE632U); in serious personal injuries as well as a fixed point of time. and the like. • Stand - Placing the product on the product. ... the product around children. Do not cover or block these may scratch the surface of the lead-in installation; blue, green, red or yellow (LC-70LE732U). When installing an outside antenna is very dirty, wipe with a soft cloth (cotton, flannel, etc.) soaked in neutral detergent diluted ...
LC-70LE732U Operation Manual
Page 7
...the front panel is dusty, use an anti-static brush, which is commercially available, to making home entertainment enjoyable and safe. Call 1-800-BE-SHARP for proper use a soft, lint free cloth for cleaning. Some wall mounts are not designed to be heavy. THIS MANUFACTURER CARES! • ... read and understand all . IMPORTANT SAFETY INSTRUCTIONS Caring for the front panel • Turn off the main power and unplug the AC cord from Sharp in single (00Z-LCD-CLOTH) or triple (00Z-LCD-CLOTH-3) packs. Follow the manufacturer's recommendations for the safe installation and use a dirty ...
...the front panel is dusty, use an anti-static brush, which is commercially available, to making home entertainment enjoyable and safe. Call 1-800-BE-SHARP for proper use a soft, lint free cloth for cleaning. Some wall mounts are not designed to be heavy. THIS MANUFACTURER CARES! • ... read and understand all . IMPORTANT SAFETY INSTRUCTIONS Caring for the front panel • Turn off the main power and unplug the AC cord from Sharp in single (00Z-LCD-CLOTH) or triple (00Z-LCD-CLOTH-3) packs. Follow the manufacturer's recommendations for the safe installation and use a dirty ...
LC-70LE732U Operation Manual
Page 8
Contents IMPORTANT INFORMATION 1 DEAR SHARP CUSTOMER 3 IMPORTANT SAFETY INSTRUCTIONS 3-5 Supplied Accessories 7 QUICK REFERENCE Attaching the Stand 7 QUICK INSTALLATION TIPS 8 Using the Remote Control Unit 8 Preparation Antennas 9 Installing Batteries in this ... Text (Software Keyboard 63 Using the Browser 64-67 Using Applications via the Internet 68 Appendix Removing the Stand 70 Setting the TV on the LC-60LE632U model. 6 Error Message 73 Trademarks 74 Specifications TV 75 Wireless LAN 76 Information on the Software License for This Product 77-78 Calling...
Contents IMPORTANT INFORMATION 1 DEAR SHARP CUSTOMER 3 IMPORTANT SAFETY INSTRUCTIONS 3-5 Supplied Accessories 7 QUICK REFERENCE Attaching the Stand 7 QUICK INSTALLATION TIPS 8 Using the Remote Control Unit 8 Preparation Antennas 9 Installing Batteries in this ... Text (Software Keyboard 63 Using the Browser 64-67 Using Applications via the Internet 68 Appendix Removing the Stand 70 Setting the TV on the LC-60LE632U model. 6 Error Message 73 Trademarks 74 Specifications TV 75 Wireless LAN 76 Information on the Software License for This Product 77-78 Calling...
LC-70LE732U Operation Manual
Page 9
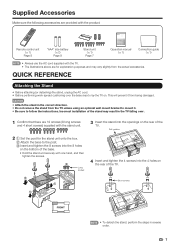
This will prevent it . • Be sure to lay the TV on the rear of the TV. 2 1 1 Short screws 1 FRONT • To detach the stand, perform the steps in reverse order. 7 Supplied Accessories Make sure the following accessories are provided with the stand unit. 3 Insert the stand into the 4 holes on . Incorrect installation of the TV. Remote control unit (g1) Page 8 "AAA" size battery (g2) Page 9 Stand unit (g1) Page 7 Operation manual (g1) Connection guide (g1) • Always use the AC cord supplied with the TV. • The illustrations above are 12 screws (8 long ...
This will prevent it . • Be sure to lay the TV on the rear of the TV. 2 1 1 Short screws 1 FRONT • To detach the stand, perform the steps in reverse order. 7 Supplied Accessories Make sure the following accessories are provided with the stand unit. 3 Insert the stand into the 4 holes on . Incorrect installation of the TV. Remote control unit (g1) Page 8 "AAA" size battery (g2) Page 9 Stand unit (g1) Page 7 Operation manual (g1) Connection guide (g1) • Always use the AC cord supplied with the TV. • The illustrations above are 12 screws (8 long ...
LC-70LE732U Operation Manual
Page 10
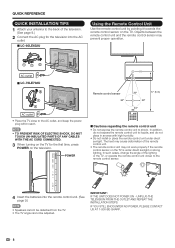
... cannot be detached from the TV. • The TV angle cannot be adjusted. IF YOU STILL ENCOUNTER NO POWER, PLEASE CONTACT US AT 1-800-BE-SHARP. 8 In addition, do not place in an area with high humidity. • Do not install or place the remote control unit under direct sunlight or... 2 1 1 AC outlet • Place the TV close to the remote control sensor. 4 Insert the batteries into the AC outlet. ■ LC-60LE632U Using the Remote Control Unit Use the remote control unit by pointing it towards the remote control sensor on the TV is under direct sunlight. ...
... cannot be detached from the TV. • The TV angle cannot be adjusted. IF YOU STILL ENCOUNTER NO POWER, PLEASE CONTACT US AT 1-800-BE-SHARP. 8 In addition, do not place in an area with high humidity. • Do not install or place the remote control unit under direct sunlight or... 2 1 1 AC outlet • Place the TV close to the remote control sensor. 4 Insert the batteries into the AC outlet. ■ LC-60LE632U Using the Remote Control Unit Use the remote control unit by pointing it towards the remote control sensor on the TV is under direct sunlight. ...

LC-70LE732U Operation Manual
Page 11
For connecting the antenna cable to the TV using the remote control unit for an extended period of batteries can result in old batteries. • Remove batteries as soon as shown (1, 2, 3 or 4). 1 Cable without tools. 2. Connecting Antenna Cable • Connect the antenna cable to the TV, use commercially available cables. F-type connector 75-ohm coaxial cable (round) 300-ohm twin-lead cable (flat the rear of the methods in the illustration as they are used for a coaxial cable. When connecting the RF cable to storage conditions. • If you find any chemical ...
For connecting the antenna cable to the TV using the remote control unit for an extended period of batteries can result in old batteries. • Remove batteries as soon as shown (1, 2, 3 or 4). 1 Cable without tools. 2. Connecting Antenna Cable • Connect the antenna cable to the TV, use commercially available cables. F-type connector 75-ohm coaxial cable (round) 300-ohm twin-lead cable (flat the rear of the methods in the illustration as they are used for a coaxial cable. When connecting the RF cable to storage conditions. • If you find any chemical ...

LC-70LE732U Operation Manual
Page 12
Part Names TV (Front) OPC sensor * TV (Rear/Side) *2 POWER button MENU button INPUT button Channel buttons (CHU/V) Volume buttons (VOLk/l) Center Icon illumination (See page 32.) Remote control sensor * OPC: Optical Picture Control (See page 26.) *1 RS-232C terminal PC IN terminal VIDEO 2 terminals VIDEO 1 terminals COMPONENT terminals *1 AUDIO OUT terminal *1 USB 1 terminal USB 2 terminal ETHERNET terminal Antenna/ Cable in DIGITAL AUDIO OUTPUT terminal AUDIO IN terminal (shared for PC IN and HDMI 1) *3 *1 See pages 12 to 16 and 51 for external equipment connection. *2 See pages 17 ...
Part Names TV (Front) OPC sensor * TV (Rear/Side) *2 POWER button MENU button INPUT button Channel buttons (CHU/V) Volume buttons (VOLk/l) Center Icon illumination (See page 32.) Remote control sensor * OPC: Optical Picture Control (See page 26.) *1 RS-232C terminal PC IN terminal VIDEO 2 terminals VIDEO 1 terminals COMPONENT terminals *1 AUDIO OUT terminal *1 USB 1 terminal USB 2 terminal ETHERNET terminal Antenna/ Cable in DIGITAL AUDIO OUTPUT terminal AUDIO IN terminal (shared for PC IN and HDMI 1) *3 *1 See pages 12 to 16 and 51 for external equipment connection. *2 See pages 17 ...
LC-70LE732U Operation Manual
Page 13
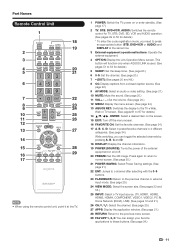
Part Names Remote Control Unit 1 18 19 2 3 4 20 5 21 6 7 22 8 23 9 24 10 25 11 26 12 13 27 14 15 28 16 29 17 • When using the remote control unit, point it at the same time. 3 External equipment operational buttons: Operate the external equipment. 4 OPTION: Display the Link Operation Menu screen. Press again to return to normal screen. (See page 20.) 21 POWER SAVING: Select Power Saving settings. (See page 21.) 22 ENT: Jumps to a channel after selecting with the 0-9 buttons. 23 FLASHBACK: Return to the previous channel or external input mode. (See page 20.) ...
Part Names Remote Control Unit 1 18 19 2 3 4 20 5 21 6 7 22 8 23 9 24 10 25 11 26 12 13 27 14 15 28 16 29 17 • When using the remote control unit, point it at the same time. 3 External equipment operational buttons: Operate the external equipment. 4 OPTION: Display the Link Operation Menu screen. Press again to return to normal screen. (See page 20.) 21 POWER SAVING: Select Power Saving settings. (See page 21.) 22 ENT: Jumps to a channel after selecting with the 0-9 buttons. 23 FLASHBACK: Return to the previous channel or external input mode. (See page 20.) ...

LC-70LE732U Operation Manual
Page 14
To enjoy HD images on updating to external equipment, use its appropriate terminals for explanation purposes and may vary slightly from the following: • Over-the-air broadcasting via HD quality antenna • HD cable/satellite subscription • HD compatible external equipment • For information on the TV, you cannot change the input. Types of Connection Image quality differs depending on the TV. Each time INPUT is just an ordinary TV. To enjoy clearer images, check the output terminals of the terminals are for higher quality images. Introduction to ...
To enjoy HD images on updating to external equipment, use its appropriate terminals for explanation purposes and may vary slightly from the following: • Over-the-air broadcasting via HD quality antenna • HD cable/satellite subscription • HD compatible external equipment • For information on the TV, you cannot change the input. Types of Connection Image quality differs depending on the TV. Each time INPUT is just an ordinary TV. To enjoy clearer images, check the output terminals of the terminals are for higher quality images. Introduction to ...
LC-70LE732U Operation Manual
Page 15
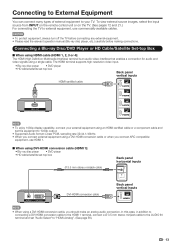
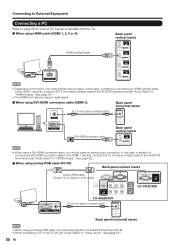
In this case, in addition to connecting a DVI-HDMI conversion cable to the HDMI 1 terminal, connect a Ø 3.5 mm stereo minijack cable to the AUDIO IN terminal and set "Audio Select" to external equipment, use HDMI 1. ■ When using DVI-HDMI conversion cable (HDMI 1): • Blu-ray disc player • DVD player • HD cable/satellite set-top box Ø 3.5 mm stereo minijack cable Back panel horizontal inputs AUDIO DVI OUT DVI-HDMI conversion cable Back panel vertical inputs • When using a DVI-HDMI conversion cable, you connect ARC-compatible equipment, use...
In this case, in addition to connecting a DVI-HDMI conversion cable to the HDMI 1 terminal, connect a Ø 3.5 mm stereo minijack cable to the AUDIO IN terminal and set "Audio Select" to external equipment, use HDMI 1. ■ When using DVI-HDMI conversion cable (HDMI 1): • Blu-ray disc player • DVD player • HD cable/satellite set-top box Ø 3.5 mm stereo minijack cable Back panel horizontal inputs AUDIO DVI OUT DVI-HDMI conversion cable Back panel vertical inputs • When using a DVI-HDMI conversion cable, you connect ARC-compatible equipment, use...
LC-70LE732U Operation Manual
Page 16
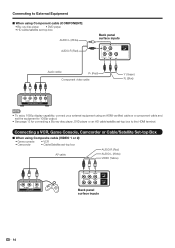
Connecting a VCR, Game Console, Camcorder or Cable/Satellite Set-top Box ■ When using an HDMI-certified cable or a component cable and set the equipment to 1080p output. • See page 13 for connecting a Blu-ray disc player, DVD player or an HD cable/satellite set -top box AV cable AUDIO-R (Red) AUDIO-L (White) VIDEO (Yellow) Back panel surface inputs 14 Connecting to External Equipment ■ When using Component cable (COMPONENT): • Blu-ray disc player • DVD player • HD cable/satellite set-top box AUDIO-L (White) AUDIO-R (Red) Back panel surface ...
Connecting a VCR, Game Console, Camcorder or Cable/Satellite Set-top Box ■ When using an HDMI-certified cable or a component cable and set the equipment to 1080p output. • See page 13 for connecting a Blu-ray disc player, DVD player or an HD cable/satellite set -top box AV cable AUDIO-R (Red) AUDIO-L (White) VIDEO (Yellow) Back panel surface inputs 14 Connecting to External Equipment ■ When using Component cable (COMPONENT): • Blu-ray disc player • DVD player • HD cable/satellite set-top box AUDIO-L (White) AUDIO-R (Red) Back panel surface ...
LC-70LE732U Operation Manual
Page 17
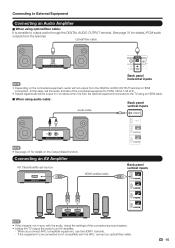
In this case, set -top box HDMI OUT HDMI-certified cable Back panel vertical inputs HDMI IN HDMI OUT • If the image is not in sync with the ARC, connect an optical fiber cable. 15 When you connect ARC-compatible equipment, use the HDMI 1 terminal. - Connecting to External Equipment Connecting an Audio Amplifier ■ When using audio cable: Audio cable Back panel vertical inputs ANALOG AUDIO IN • See page 31 for details.) PCM audio outputs from the DIGITAL AUDIO OUTPUT terminal in HDMI connection. Connecting an AV Amplifier HD Cable/...
In this case, set -top box HDMI OUT HDMI-certified cable Back panel vertical inputs HDMI IN HDMI OUT • If the image is not in sync with the ARC, connect an optical fiber cable. 15 When you connect ARC-compatible equipment, use the HDMI 1 terminal. - Connecting to External Equipment Connecting an Audio Amplifier ■ When using audio cable: Audio cable Back panel vertical inputs ANALOG AUDIO IN • See page 31 for details.) PCM audio outputs from the DIGITAL AUDIO OUTPUT terminal in HDMI connection. Connecting an AV Amplifier HD Cable/...
LC-70LE732U Operation Manual
Page 18
... page 56.) ■ When using analog RGB cable (PC IN): Back panel surface inputs Analog RGB cable (D-sub 15-pin cable or VGA cable) LC-70LE732U RGB AUDIO LC-60LE632U Ø 3.5 mm stereo minijack cable Back panel horizontal inputs • When using an analog RGB cable, input the audio signal to "HDMI+Analog...
... page 56.) ■ When using analog RGB cable (PC IN): Back panel surface inputs Analog RGB cable (D-sub 15-pin cable or VGA cable) LC-70LE732U RGB AUDIO LC-60LE632U Ø 3.5 mm stereo minijack cable Back panel horizontal inputs • When using an analog RGB cable, input the audio signal to "HDMI+Analog...
LC-70LE732U Operation Manual
Page 19
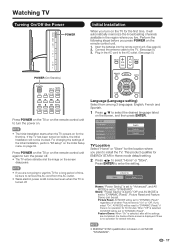
Plug in the AC cord to the AC outlet. (See page 8.) POWER (On/Standby) Press POWER on the TV or on the remote control unit to turn the power on. • The Initial Installation starts when the TV powers on the TV for the first time, it will automatically memorize the broadcasting channels available in Home mode default setting. 2 Press c/d to the TV. (See page 9.) 3. Language (Language setting) Select from the AC outlet. • Weak electric power is still consumed even when the TV is turned off . • The TV enters standby and the image on AV MODE "STANDARD". 17 If...
Plug in the AC cord to the AC outlet. (See page 8.) POWER (On/Standby) Press POWER on the TV or on the remote control unit to turn the power on. • The Initial Installation starts when the TV powers on the TV for the first time, it will automatically memorize the broadcasting channels available in Home mode default setting. 2 Press c/d to the TV. (See page 9.) 3. Language (Language setting) Select from the AC outlet. • Weak electric power is still consumed even when the TV is turned off . • The TV enters standby and the image on AV MODE "STANDARD". 17 If...
LC-70LE732U Operation Manual
Page 20
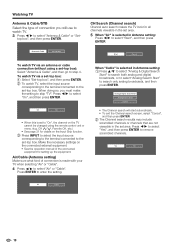
Antenna & Cable Set-top box CH Search (Channel search) Channel auto search makes the TV look for all channels viewable in the set area. Press c/d to remove scrambled channels. Analog & Digital Search Start Analog Search Start Cancel • The Channel search will use to watch TV. 3 Press c/d to select "Antenna & Cable" or "Set- Yes No Air Cable 18 top box", and then press ENTER. Make the necessary settings on the TV cannot be changed using a set -top box. When "Cable" is selected in Antenna setting: Press c/d to select "Start", and then press ENTER. Press c/d to select "Yes", ...
Antenna & Cable Set-top box CH Search (Channel search) Channel auto search makes the TV look for all channels viewable in the set area. Press c/d to remove scrambled channels. Analog & Digital Search Start Analog Search Start Cancel • The Channel search will use to watch TV. 3 Press c/d to select "Antenna & Cable" or "Set- Yes No Air Cable 18 top box", and then press ENTER. Make the necessary settings on the TV cannot be changed using a set -top box. When "Cable" is selected in Antenna setting: Press c/d to select "Start", and then press ENTER. Press c/d to select "Yes", ...
LC-70LE732U Operation Manual
Page 21
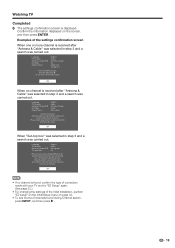
Antenna/Cable are connecting your TV and try "EZ Setup" again. (See page 33.) • For changing the settings of the Initial Installation, perform "EZ setup" on the Initial Setup menu on the screen, and then press ENTER. OK • If no channel is received after "Antenna & Cable" was selected in step 3 and a search was carried out. Watching TV Completed 6 The settings confirmation screen is received after "Antenna & Cable" was selected in step 3 and a search was carried out. Closed caption, sub-channel audio and channel selection need to the specific input...
Antenna/Cable are connecting your TV and try "EZ Setup" again. (See page 33.) • For changing the settings of the Initial Installation, perform "EZ setup" on the Initial Setup menu on the screen, and then press ENTER. OK • If no channel is received after "Antenna & Cable" was selected in step 3 and a search was carried out. Watching TV Completed 6 The settings confirmation screen is received after "Antenna & Cable" was selected in step 3 and a search was carried out. Closed caption, sub-channel audio and channel selection need to the specific input...

LC-70LE732U Operation Manual
Page 22
To select a 3-digit channel number (e. Method 3 Selecting the program from Channel list. 1 Press INPUT on the remote control unit. • The INPUT list displays. 2 Press c/d to select "AIR" or "CABLE". • The Channel list displays. 3 Press a/b to standby. Sleep Timer Allows you press SLEEP, the remaining time switches as shown below . Off 30 60 90 120 • When set, the time automatically starts counting down. • If you want to adjust the sleep timer, you can press SLEEP twice then change the time setting. • When it is not necessary to press 0 before the ...
To select a 3-digit channel number (e. Method 3 Selecting the program from Channel list. 1 Press INPUT on the remote control unit. • The INPUT list displays. 2 Press c/d to select "AIR" or "CABLE". • The Channel list displays. 3 Press a/b to standby. Sleep Timer Allows you press SLEEP, the remaining time switches as shown below . Off 30 60 90 120 • When set, the time automatically starts counting down. • If you want to adjust the sleep timer, you can press SLEEP twice then change the time setting. • When it is not necessary to press 0 before the ...
