
LC-70LE732U Operation Manual
Page 5
... 6) Clean only with the manufacturer's instructions. 8) Do not install near any ventilation openings. DEAR SHARP CUSTOMER Thank you are required, be operated only from the type of the Sharp Liquid Crystal Television. If you for service. 19) Replacement Parts-When replacement parts are not sure... or damaged in any way, and f) When the product exhibits a distinct change in proper operating condition. 21) Wall or ceiling mounting-When mounting the product on a wall or ceiling, be sure to install the product according to the method recommended by following conditions: a) When the AC...
... 6) Clean only with the manufacturer's instructions. 8) Do not install near any ventilation openings. DEAR SHARP CUSTOMER Thank you are required, be operated only from the type of the Sharp Liquid Crystal Television. If you for service. 19) Replacement Parts-When replacement parts are not sure... or damaged in any way, and f) When the product exhibits a distinct change in proper operating condition. 21) Wall or ceiling mounting-When mounting the product on a wall or ceiling, be sure to install the product according to the method recommended by following conditions: a) When the AC...
LC-70LE732U Operation Manual
Page 6
... circuits, or where it can block ventilation openings. Do not cover or block these may scratch the surface of blue, green or red (LC-60LE632U); This product is dropped or applied with two hands - An outside antenna system should be sure the antenna system is very dirty, wipe...may result in this television equipment during a lightning storm, or when it from the wall outlet and disconnect the antenna. Placing the product on the top or near water - Use only the mounting hardware recommended by the manufacturer or sold with no direct sunlight and good ventilation. •...
... circuits, or where it can block ventilation openings. Do not cover or block these may scratch the surface of blue, green or red (LC-60LE632U); This product is dropped or applied with two hands - An outside antenna system should be sure the antenna system is very dirty, wipe...may result in this television equipment during a lightning storm, or when it from the wall outlet and disconnect the antenna. Placing the product on the top or near water - Use only the mounting hardware recommended by the manufacturer or sold with no direct sunlight and good ventilation. •...
LC-70LE732U Operation Manual
Page 7
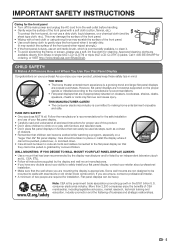
... down. • Care should be used as steps, such as UL, CSA, ETL). • Follow all . WALL MOUNTING: IF YOU DECIDE TO WALL MOUNT YOUR FLAT PANEL DISPLAY, ALWAYS: • Use a mount that they cannot be pulled or grabbed by an independent laboratory (such as a chest of drawers. • Remember that...should be taken to route all enclosed instructions for the front panel • Turn off the main power and unplug the AC cord from Sharp in the $161 billion U.S. If you enjoy your purchase! Note: CEA is commercially available, to making home entertainment enjoyable and safe. ...
... down. • Care should be used as steps, such as UL, CSA, ETL). • Follow all . WALL MOUNTING: IF YOU DECIDE TO WALL MOUNT YOUR FLAT PANEL DISPLAY, ALWAYS: • Use a mount that they cannot be pulled or grabbed by an independent laboratory (such as a chest of drawers. • Remember that...should be taken to route all enclosed instructions for the front panel • Turn off the main power and unplug the AC cord from Sharp in the $161 billion U.S. If you enjoy your purchase! Note: CEA is commercially available, to making home entertainment enjoyable and safe. ...
LC-70LE732U Operation Manual
Page 9
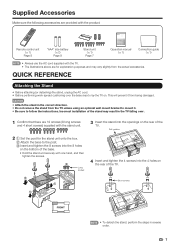
... hand, and then tighten the screws. 2 Long screws 4 Insert and tighten the 4 screws into the openings on . This will prevent it . • Be sure to mount it from being damaged. CAUTION • Attach the stand in the correct direction. • Do not remove the stand from the actual accessories. Soft cushion...) • Always use the AC cord supplied with the product. Incorrect installation of the stand may vary slightly from the TV unless using an optional wall mount bracket to follow the instructions.
... hand, and then tighten the screws. 2 Long screws 4 Insert and tighten the 4 screws into the openings on . This will prevent it . • Be sure to mount it from being damaged. CAUTION • Attach the stand in the correct direction. • Do not remove the stand from the actual accessories. Soft cushion...) • Always use the AC cord supplied with the product. Incorrect installation of the stand may vary slightly from the TV unless using an optional wall mount bracket to follow the instructions.
LC-70LE732U Operation Manual
Page 27
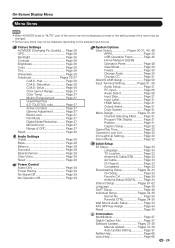
... Page 46 Individual Setup Pages 34-36 Secret No Page 34 Parental CTRL Pages 34-36 Wall Mount Audio Setup Page 34 FAV APP Key Assign Page 34 Reset Page 34 Information Identifi...Page 26 Backlight Page 26 Contrast Page 26 Brightness Page 26 Color Page 26 Tint Page 26 Sharpness Page 26 Advanced Pages 26-27 C.M.S.-Hue Page 26 C.M.S.-Saturation Page 26 C.M.S.-Value Page 26 Color... Gamut Range Page 27 Color Temp Page 27 Motion Enhancement Page 27 Quad Pixel Plus (LC-70LE732U only Page 27 Active Contrast Page 27 Gamma Adjustment Page 27 Black Level Page 27 Film Mode...
... Page 46 Individual Setup Pages 34-36 Secret No Page 34 Parental CTRL Pages 34-36 Wall Mount Audio Setup Page 34 FAV APP Key Assign Page 34 Reset Page 34 Information Identifi...Page 26 Backlight Page 26 Contrast Page 26 Brightness Page 26 Color Page 26 Tint Page 26 Sharpness Page 26 Advanced Pages 26-27 C.M.S.-Hue Page 26 C.M.S.-Saturation Page 26 C.M.S.-Value Page 26 Color... Gamut Range Page 27 Color Temp Page 27 Motion Enhancement Page 27 Quad Pixel Plus (LC-70LE732U only Page 27 Active Contrast Page 27 Gamma Adjustment Page 27 Black Level Page 27 Film Mode...

LC-70LE732U Operation Manual
Page 35
... On-Screen Display Menu Initial Setup Example Initial Setup Initial Setup Menu EZ Setup Broadcasting Setup Internet Setup Language DivX® Setup [English] Individual Setup Wall Mount Audio Setup [No] FAV APP Key Assign Reset 1 Press MENU to display the MENU screen, and then press c/d to select "Initial Setup". 2 Press a/b to select...
... On-Screen Display Menu Initial Setup Example Initial Setup Initial Setup Menu EZ Setup Broadcasting Setup Internet Setup Language DivX® Setup [English] Individual Setup Wall Mount Audio Setup [No] FAV APP Key Assign Reset 1 Press MENU to display the MENU screen, and then press c/d to select "Initial Setup". 2 Press a/b to select...
LC-70LE732U Operation Manual
Page 36
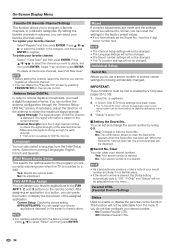
...your favorite channels easily. Yes: Your secret number is registered. 2. To delete your favorite channel: Select "Register" and then press ENTER. Wall Mount Audio Setup This selects the optimal audio for DIGITAL (Air) only. Individual Setup Secret No. appears when the Secret No. When the Secret...be changed. • The Secret number settings will not be changed. • The TV Location settings will not be changed . "Status" is mounted to 36): 1. This function will not be selectable from among 3 languages: English, French and Spanish. Select "Yes" and then press ENTER. ...
...your favorite channels easily. Yes: Your secret number is registered. 2. To delete your favorite channel: Select "Register" and then press ENTER. Wall Mount Audio Setup This selects the optimal audio for DIGITAL (Air) only. Individual Setup Secret No. appears when the Secret No. When the Secret...be changed. • The Secret number settings will not be changed. • The TV Location settings will not be changed . "Status" is mounted to 36): 1. This function will not be selectable from among 3 languages: English, French and Spanish. Select "Yes" and then press ENTER. ...

LC-70LE732U Operation Manual
Page 72
Before attaching/detaching the stand • Before performing work, make sure to turn off the TV. 1 2 Unfasten the four screws used to mount it. place. • To attach the stand, perform the above steps in Detach the stand from the TV unless using an optional wall mount bracket to secure the stand in reverse order. 70 CAUTION • Do not remove the stand from the TV. Appendix Removing the Stand • Before detaching (or attaching) the stand, unplug the AC cord.
Before attaching/detaching the stand • Before performing work, make sure to turn off the TV. 1 2 Unfasten the four screws used to mount it. place. • To attach the stand, perform the above steps in Detach the stand from the TV unless using an optional wall mount bracket to secure the stand in reverse order. 70 CAUTION • Do not remove the stand from the TV. Appendix Removing the Stand • Before detaching (or attaching) the stand, unplug the AC cord.

LC-70LE732U Operation Manual
Page 73
.... ■ LC-60LE632U ■ LC-70LE732U 1 1 2 1 2 1 Optional Accessory The listed optional accessory is enough space between the wall and the TV for compatibility and check the availability. 71 Vertical mounting Angular mounting • Due to the terminal configuration on this TV, when you wall-mount this TV mounted on the wall only with the wall mount bracket AN-52AG4 (SHARP). Customers...
.... ■ LC-60LE632U ■ LC-70LE732U 1 1 2 1 2 1 Optional Accessory The listed optional accessory is enough space between the wall and the TV for compatibility and check the availability. 71 Vertical mounting Angular mounting • Due to the terminal configuration on this TV, when you wall-mount this TV mounted on the wall only with the wall mount bracket AN-52AG4 (SHARP). Customers...


