
LC-42D62U Operation Manual
Page 10
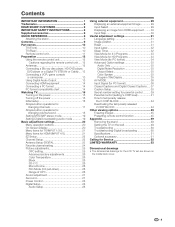
...SHARP CUSTOMER 3 IMPORTANT SAFETY INSTRUCTIONS 3 Supplied accessories 6 QUICK REFERENCE 6 Attaching the stand 6 Contents 9 Part names 10 TV (Front 10 TV... player, HD-DVD player, DVD player or a Digital TV STB (Air or Cable) .... 13 Connecting a VCR,... 14 PC format compatibility chart 14 Watching TV 15 Turning on the power 15 Turning ... On-Screen Display 20 Menu items for TV/INPUT 1/2/3 21 Menu items for HDMI ... 31 Language setting 31 Image position 31 Reset 31 Input Label 32 Sleep Timer 32 View... Removing the stand 49 Setting the TV on the wall 49 Troubleshooting 50 ...
...SHARP CUSTOMER 3 IMPORTANT SAFETY INSTRUCTIONS 3 Supplied accessories 6 QUICK REFERENCE 6 Attaching the stand 6 Contents 9 Part names 10 TV (Front 10 TV... player, HD-DVD player, DVD player or a Digital TV STB (Air or Cable) .... 13 Connecting a VCR,... 14 PC format compatibility chart 14 Watching TV 15 Turning on the power 15 Turning ... On-Screen Display 20 Menu items for TV/INPUT 1/2/3 21 Menu items for HDMI ... 31 Language setting 31 Image position 31 Reset 31 Input Label 32 Sleep Timer 32 View... Removing the stand 49 Setting the TV on the wall 49 Troubleshooting 50 ...
LC-42D62U Operation Manual
Page 22
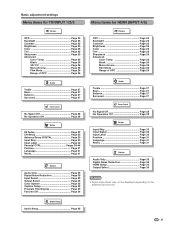
Basic adjustment settings Menu items for TV/INPUT 1/2/3 Picture OPC Page 25 Backlight Page 25 Contrast Page 25 Brightness Page 25 Color Page 25 Tint Page 25 Sharpness Page 25 Advanced Color Temp Page 26 Black ... 30 Input Label Page 32 Parental CTRL Pages 39-44 Position Page 31 Language Page 31 Reset Page 31 Option Audio Only Page 35 Digital Noise Reduction Page 35 Input Select Page 29 ...Skip Page 30 Input Signal Page 36 Input Label Page 32 Position Page 31 Language Page 31 Reset Page 31 Option Audio Only Page 35 Digital Noise Reduction Page 35 HDMI Setup Page 30 Output...
Basic adjustment settings Menu items for TV/INPUT 1/2/3 Picture OPC Page 25 Backlight Page 25 Contrast Page 25 Brightness Page 25 Color Page 25 Tint Page 25 Sharpness Page 25 Advanced Color Temp Page 26 Black ... 30 Input Label Page 32 Parental CTRL Pages 39-44 Position Page 31 Language Page 31 Reset Page 31 Option Audio Only Page 35 Digital Noise Reduction Page 35 Input Select Page 29 ...Skip Page 30 Input Signal Page 36 Input Label Page 32 Position Page 31 Language Page 31 Reset Page 31 Option Audio Only Page 35 Digital Noise Reduction Page 35 HDMI Setup Page 30 Output...
LC-42D62U Operation Manual
Page 26
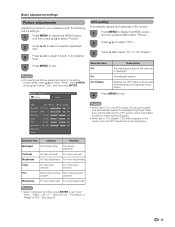
...: Display". OPC setting Automatically adjusts the brightness of OPC". OPC Off On Backlight [b12] a16 Contrast [b30] 0 Brightness [ 0] a30 Color [ 0] a30 Tint [ 0] a30 Sharpness [ b2] a10 Advanced Reset On : Display b16 b40 b30 b30 b30 b10 NOTE • When set "Color Temp.", "Black", "3D-Y/C", "Monochrome", "Film Mode" or "Range of the screen...
...: Display". OPC setting Automatically adjusts the brightness of OPC". OPC Off On Backlight [b12] a16 Contrast [b30] 0 Brightness [ 0] a30 Color [ 0] a30 Tint [ 0] a30 Sharpness [ b2] a10 Advanced Reset On : Display b16 b40 b30 b30 b30 b10 NOTE • When set "Color Temp.", "Black", "3D-Y/C", "Monochrome", "Film Mode" or "Range of the screen...
LC-42D62U Operation Manual
Page 28
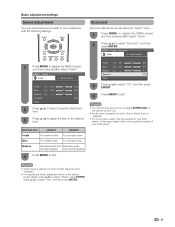
...sound quality to the desired level. MENU [Audio] Audio Power Control Treble [ 0] a15 b15 Bass [ 0] a15 b15 Balance [ 0] L R Surround [Off] Reset 2 Press a/b to select a specific adjustment item. 3 Press c/d to adjust the item to your preference with the following settings. NOTE • You .... In this case, please refer to exit. MENU [Audio ... Treble [ 0] a15 b15 Bass [ 0] a15 b15 Balance [ 0] L R Surround [Off] Reset 3 Press c/d to select "On", and then press ENTER. 4 Press MENU to select "Yes", and then press ENTER. 27 NOTE • Audio menu is ...
...sound quality to the desired level. MENU [Audio] Audio Power Control Treble [ 0] a15 b15 Bass [ 0] a15 b15 Balance [ 0] L R Surround [Off] Reset 2 Press a/b to select a specific adjustment item. 3 Press c/d to adjust the item to your preference with the following settings. NOTE • You .... In this case, please refer to exit. MENU [Audio ... Treble [ 0] a15 b15 Bass [ 0] a15 b15 Balance [ 0] L R Surround [Off] Reset 3 Press c/d to select "On", and then press ENTER. 4 Press MENU to select "Yes", and then press ENTER. 27 NOTE • Audio menu is ...
LC-42D62U Operation Manual
Page 32
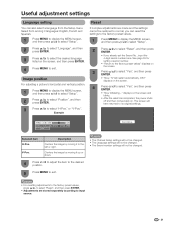
.... 5 Press MENU to select "Yes", and then press ENTER. • "Now, TV will have returned to the left or right. H-Pos. [ 0] a10 b10 V-Pos. [ 0] a20 b20 Reset Now initializing... NOTE • For resetting adjustments to the factory preset values, press a/b to select "Reset", and then press ENTER. • Adjustments are made and the settings...
.... 5 Press MENU to select "Yes", and then press ENTER. • "Now, TV will have returned to the left or right. H-Pos. [ 0] a10 b10 V-Pos. [ 0] a20 b20 Reset Now initializing... NOTE • For resetting adjustments to the factory preset values, press a/b to select "Reset", and then press ENTER. • Adjustments are made and the settings...
LC-42D62U Operation Manual
Page 39
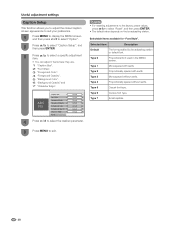
... Opacity" and 7 "Character Edge". ABC 123 Caption Size Font Style Foreground Color Foreground Opacity Background Color Background Opacity Character Edge Reset Default Default Default Default Default Default Default 4 Press c/d to exit. 38 Selected item Description Default The font specified ... spaced without serifs. Selectable items available for "Font Style". Monospaced without serifs. Type 6 Cursive font type. NOTE • For resetting adjustments to the factory preset values, press a/b to select a specific adjustment item. • You can adjust 7 items ...
... Opacity" and 7 "Character Edge". ABC 123 Caption Size Font Style Foreground Color Foreground Opacity Background Color Background Opacity Character Edge Reset Default Default Default Default Default Default Default 4 Press c/d to exit. 38 Selected item Description Default The font specified ... spaced without serifs. Selectable items available for "Font Style". Monospaced without serifs. Type 6 Cursive font type. NOTE • For resetting adjustments to the factory preset values, press a/b to select a specific adjustment item. • You can adjust 7 items ...

LC-42D62U Operation Manual
Page 53
MENU [Setup ... The secret number is . aaaa 3 Press and hold both CHr and VOLk on the TV simultaneously until the message appears on the screen. Parental CTRL] Setup Option Secret No. NOTE • As a precautionary measure, make a note of your secret number ... following procedure. 1 Press MENU to display the MENU screen, and then press c/d to select "Setup". 2 Press a/b to select "EZ Setup", "CH Setup", "Parental CTRL" or "Reset", and the Secret number input screen displays.
MENU [Setup ... The secret number is . aaaa 3 Press and hold both CHr and VOLk on the TV simultaneously until the message appears on the screen. Parental CTRL] Setup Option Secret No. NOTE • As a precautionary measure, make a note of your secret number ... following procedure. 1 Press MENU to display the MENU screen, and then press c/d to select "Setup". 2 Press a/b to select "EZ Setup", "CH Setup", "Parental CTRL" or "Reset", and the Secret number input screen displays.


