
LC-26D40U | LC-32D40U Operation Manual
Page 1
ENGLISH LC-26D40U LC-32D40U LIQUID CRYSTAL TELEVISION ENGLISH OPERATION MANUAL • The illustrations and on the LC-32D40U model. NO USER-SERVICEABLE PARTS INSIDE. CAUTION RISK OF ELECTRIC SHOCK DO NOT OPEN CAUTION: TO REDUCE THE RISK OF ELECTRIC SHOCK, DO NOT ... grayed out. • The examples used throughout this manual are based on -screen displays in this operation manual are located at the rear of loss or theft, please record the TV's model and serial numbers in case of the TV. The numbers are for explanation purposes and may vary slightly from the actual...
ENGLISH LC-26D40U LC-32D40U LIQUID CRYSTAL TELEVISION ENGLISH OPERATION MANUAL • The illustrations and on the LC-32D40U model. NO USER-SERVICEABLE PARTS INSIDE. CAUTION RISK OF ELECTRIC SHOCK DO NOT OPEN CAUTION: TO REDUCE THE RISK OF ELECTRIC SHOCK, DO NOT ... grayed out. • The examples used throughout this manual are based on -screen displays in this operation manual are located at the rear of loss or theft, please record the TV's model and serial numbers in case of the TV. The numbers are for explanation purposes and may vary slightly from the actual...
LC-26D40U | LC-32D40U Operation Manual
Page 4
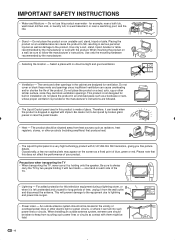
Do not place the product on the screen as a fixed point of the TV. • Lightning - Use only the mounting hardware ... it with no direct sunlight and good ventilation. • Ventilation - Precautions when transporting the TV • When transporting the TV, never carry it is left unattended and unused for long periods of overhead power lines or...;lm transistors, giving you fine picture details. The product should be sure to always carry the TV by broken glass pieces in installation; Be sure to follow the manufacturer's instructions. For added protection for ...
Do not place the product on the screen as a fixed point of the TV. • Lightning - Use only the mounting hardware ... it with no direct sunlight and good ventilation. • Ventilation - Precautions when transporting the TV • When transporting the TV, never carry it is left unattended and unused for long periods of overhead power lines or...;lm transistors, giving you fine picture details. The product should be sure to always carry the TV by broken glass pieces in installation; Be sure to follow the manufacturer's instructions. For added protection for ...

LC-26D40U | LC-32D40U Operation Manual
Page 7
...broken when dropped or impacted. The AQUOS television is glass and can be adjusted. 7 A) Press POWER on the screen. Bundle the cords properly with water to the back of the TV. (See page 13.) 4. Remove the cardboard; Ventilation & Cleaning Tips Keep your antenna to lightly moisten. QUICK ...your AQUOS television in a well ventilated area and make sure not to turn on either side of the AQUOS television lights GREEN. Clean the screen by a heat source or use 2 people to use near water. Gently wipe and avoid pressing on AQUOS television. 2. To safely remove...
...broken when dropped or impacted. The AQUOS television is glass and can be adjusted. 7 A) Press POWER on the screen. Bundle the cords properly with water to the back of the TV. (See page 13.) 4. Remove the cardboard; Ventilation & Cleaning Tips Keep your antenna to lightly moisten. QUICK ...your AQUOS television in a well ventilated area and make sure not to turn on either side of the AQUOS television lights GREEN. Clean the screen by a heat source or use 2 people to use near water. Gently wipe and avoid pressing on AQUOS television. 2. To safely remove...

LC-26D40U | LC-32D40U Operation Manual
Page 12
... FAVORITE: Display the Favorite channel menu. (See page 20.) 25 CC: Display captions during closed-caption source. (See page 30.) 26 AV MODE: Select an adjusted picture setting. (SPORTS, STANDARD, MOVIE, MEMORY.) (See page 27.) NOTE • When using the remote control unit, point it at... 14 menu. (See page 18.) 8 FREEZE: Set the still image. Part names Remote control unit 1 12 2 3 4 5 6 7 8 9 10 11 1 TV POWER: Switch the TV power on the remote control unit will turn off the menu screen. 15 10 SLEEP: Set the sleep timer. (See page 29.) 11 AUDIO: Display the MTS setting menu. (See...
... FAVORITE: Display the Favorite channel menu. (See page 20.) 25 CC: Display captions during closed-caption source. (See page 30.) 26 AV MODE: Select an adjusted picture setting. (SPORTS, STANDARD, MOVIE, MEMORY.) (See page 27.) NOTE • When using the remote control unit, point it at... 14 menu. (See page 18.) 8 FREEZE: Set the still image. Part names Remote control unit 1 12 2 3 4 5 6 7 8 9 10 11 1 TV POWER: Switch the TV power on the remote control unit will turn off the menu screen. 15 10 SLEEP: Set the sleep timer. (See page 29.) 11 AUDIO: Display the MTS setting menu. (See...
LC-26D40U | LC-32D40U Operation Manual
Page 14
...AC outlet. (See page 7.) Turning on the power Press POWER on the TV, or TV POWER on the remote control. • POWER indicator (Green): The TV is on. ("PLEASE WAIT" will appear for a few seconds on the screen.) NOTE • The LANGUAGE setup menu will appear automatically when MENU is ...turned off the power Press POWER on the TV, or TV POWER on the remote control. • The TV enters standby mode and the image on the screen disappears. • The POWER indicator on the remote control unit. 1. Select from among 3 languages:...
...AC outlet. (See page 7.) Turning on the power Press POWER on the TV, or TV POWER on the remote control. • POWER indicator (Green): The TV is on. ("PLEASE WAIT" will appear for a few seconds on the screen.) NOTE • The LANGUAGE setup menu will appear automatically when MENU is ...turned off the power Press POWER on the TV, or TV POWER on the remote control. • The TV enters standby mode and the image on the screen disappears. • The POWER indicator on the remote control unit. 1. Select from among 3 languages:...
LC-26D40U | LC-32D40U Operation Manual
Page 15
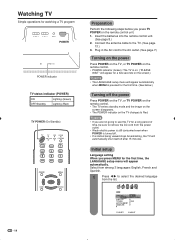
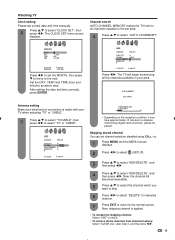
.... After setting the date and time correctly, press ENTER. Channel search AUTO CHANNEL MEMORY makes the TV look for selected channel. 7 Press EXIT to return to the normal screen. Now, the channel list becomes selectable. 5 Press / to select the channel which you want to... select "ADD/DELETE", and then press / . The CLOCK SET menu screen displays. SETUP LANGUAGE ENGLISH CLOCK SET TV/CABLE CABLE AUTO CH MEMORY ADD/DELETE :SELECT :ADJUST Press / . SETUP LANGUAGE ENGLISH CLOCK SET TV/CABLE TV/CABLE AUTO CH MEMORY ADD/DELETE :SELECT :ADJUST PROGRAMMING NOW PLEASE WAIT...
.... After setting the date and time correctly, press ENTER. Channel search AUTO CHANNEL MEMORY makes the TV look for selected channel. 7 Press EXIT to return to the normal screen. Now, the channel list becomes selectable. 5 Press / to select the channel which you want to... select "ADD/DELETE", and then press / . The CLOCK SET menu screen displays. SETUP LANGUAGE ENGLISH CLOCK SET TV/CABLE CABLE AUTO CH MEMORY ADD/DELETE :SELECT :ADJUST Press / . SETUP LANGUAGE ENGLISH CLOCK SET TV/CABLE TV/CABLE AUTO CH MEMORY ADD/DELETE :SELECT :ADJUST PROGRAMMING NOW PLEASE WAIT...
LC-26D40U | LC-32D40U Operation Manual
Page 17
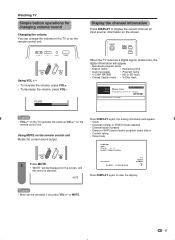
...To increase the volume, press VOL+. • To decrease the volume, press VOL-. NOTE • Mute can change the volume on the TV or on the screen. or MUTE. 17 Press DISPLAY again, the analog information will appear. • Clock • Channel number or VIDEO mode selected •...No program information is silenced. VOLUME 25 When the TV receives a digital signal, press once, the digital information will be canceled if you press VOL+/- Using MUTE on the screen, and the sound is available. Watching TV Simple button operations for changing volume/sound Changing the...
...To increase the volume, press VOL+. • To decrease the volume, press VOL-. NOTE • Mute can change the volume on the TV or on the screen. or MUTE. 17 Press DISPLAY again, the analog information will appear. • Clock • Channel number or VIDEO mode selected •...No program information is silenced. VOLUME 25 When the TV receives a digital signal, press once, the digital information will be canceled if you press VOL+/- Using MUTE on the screen, and the sound is available. Watching TV Simple button operations for changing volume/sound Changing the...
LC-26D40U | LC-32D40U Operation Manual
Page 18
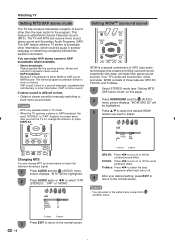
... sound by manually switching to turn on this page). 2 Press SURROUND and the (AUDIO) menu screen displays. The SAP feature allows a TV station to select "STR (STEREO)", "SAP" or "MONO". Your TV's audio will be highlighted. 2 Press AUDIO again or / to broadcast other information, which could be...3 Press / to select the desired WOW feature you turn on , change MTS as shown below to the normal screen. Watching TV Setting MTS/SAP stereo mode The TV has a feature that creates a thrilling surround sound experience with MTS can receive mono sound, stereo sound and Secondary Audio...
... sound by manually switching to turn on this page). 2 Press SURROUND and the (AUDIO) menu screen displays. The SAP feature allows a TV station to select "STR (STEREO)", "SAP" or "MONO". Your TV's audio will be highlighted. 2 Press AUDIO again or / to broadcast other information, which could be...3 Press / to select the desired WOW feature you turn on , change MTS as shown below to the normal screen. Watching TV Setting MTS/SAP stereo mode The TV has a feature that creates a thrilling surround sound experience with MTS can receive mono sound, stereo sound and Secondary Audio...
LC-26D40U | LC-32D40U Operation Manual
Page 19
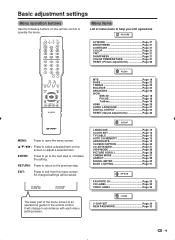
... Page 21 CONTRAST Page 21 COLOR Page 21 TINT Page 21 SHARPNESS Page 21 COLOR TEMPERATURE Page 21 RESET (Picture adjustments Page 26 AUDIO MTS Page 18 BASS Page 22 TREBLE Page 22 BALANCE...18 HDMI Page 25 AUDIO LANGUAGE Page 27 DIGITAL OUTPUT Page 22 RESET (Sound adjustments Page 26 MENU: Press to open the menu screen. / / / : Press to select a desired item on the remote control to the... next step or complete the setting. SETUP LANGUAGE Page 14 CLOCK SET Page 15 TV/CABLE Page 15 AUTO...
... Page 21 CONTRAST Page 21 COLOR Page 21 TINT Page 21 SHARPNESS Page 21 COLOR TEMPERATURE Page 21 RESET (Picture adjustments Page 26 AUDIO MTS Page 18 BASS Page 22 TREBLE Page 22 BALANCE...18 HDMI Page 25 AUDIO LANGUAGE Page 27 DIGITAL OUTPUT Page 22 RESET (Sound adjustments Page 26 MENU: Press to open the menu screen. / / / : Press to select a desired item on the remote control to the... next step or complete the setting. SETUP LANGUAGE Page 14 CLOCK SET Page 15 TV/CABLE Page 15 AUTO...

LC-26D40U | LC-32D40U Operation Manual
Page 20
...CH LABEL", then press / . RETURN :SELECT :ADJUST ENTER: SET The characters rotation as a favorite channel. 2 Press FAVORITE and the FAVORITE CH menu screen displays. 3 Press / to select "SET", and then press ENTER. 4 Press / to select the position, and then press ENTER to register. Press... which you to program 4 favorite channels. To erase channel labels 1 Select a channel with a label which you want appears on the screen. Basic adjustment settings Favorite channel setting This function allows you want to remove. 2 Press MENU, then press / to select (OPTION). ...
...CH LABEL", then press / . RETURN :SELECT :ADJUST ENTER: SET The characters rotation as a favorite channel. 2 Press FAVORITE and the FAVORITE CH menu screen displays. 3 Press / to select "SET", and then press ENTER. 4 Press / to select the position, and then press ENTER to register. Press... which you to program 4 favorite channels. To erase channel labels 1 Select a channel with a label which you want appears on the screen. Basic adjustment settings Favorite channel setting This function allows you want to remove. 2 Press MENU, then press / to select (OPTION). ...

LC-26D40U | LC-32D40U Operation Manual
Page 21
...more contrast For more color intensity Skin tones become greenish For more sharpness 5 Press EXIT to return to the desired level. Color temperature For a better white balance, use color temperature correction. 1 Press MENU and the MENU screen displays. 2 Press / to select (PICTURE). 3 Press / ... to select "RESET", and then press / (see page 26 for improved picture clarity. 1 Press MENU and the MENU screen displays. 2 Press / to select (SETUP). 3 Press / to select "BACK LIGHTING". 4 Press / to adjust the screen brightness. 5 Press EXIT to return to FILM when you ...
...more contrast For more color intensity Skin tones become greenish For more sharpness 5 Press EXIT to return to the desired level. Color temperature For a better white balance, use color temperature correction. 1 Press MENU and the MENU screen displays. 2 Press / to select (PICTURE). 3 Press / ... to select "RESET", and then press / (see page 26 for improved picture clarity. 1 Press MENU and the MENU screen displays. 2 Press / to select (SETUP). 3 Press / to select "BACK LIGHTING". 4 Press / to adjust the screen brightness. 5 Press EXIT to return to FILM when you ...
LC-26D40U | LC-32D40U Operation Manual
Page 22
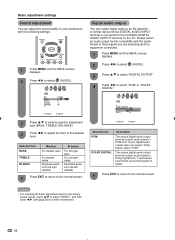
...from the left speaker 5 Press EXIT to return to select "RESET", and then press / (see page 26 for further information). 22 AUDIO MTS BASS TREBLE BALANCE SPEAKERS STEREO 25 25 0 ON :SELECT :ADJUST 2 ... For resetting all Audio adjustment items to the factory preset values, press / to the normal screen. :SELECT :ADJUST Selected item PCM DOLBY DIGITAL Description The coaxial digital audio output terminal outputs ...AUDIO INPUT terminal is connected to the COAXIAL DIGITAL AUDIO OUTPUT terminal on the TV. Digital audio output You can adjust the sound quality to your digital audio ...
...from the left speaker 5 Press EXIT to return to select "RESET", and then press / (see page 26 for further information). 22 AUDIO MTS BASS TREBLE BALANCE SPEAKERS STEREO 25 25 0 ON :SELECT :ADJUST 2 ... For resetting all Audio adjustment items to the factory preset values, press / to the normal screen. :SELECT :ADJUST Selected item PCM DOLBY DIGITAL Description The coaxial digital audio output terminal outputs ...AUDIO INPUT terminal is connected to the COAXIAL DIGITAL AUDIO OUTPUT terminal on the TV. Digital audio output You can adjust the sound quality to your digital audio ...
LC-26D40U | LC-32D40U Operation Manual
Page 25
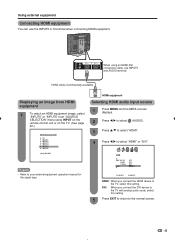
...HDMI OFF OFF OFF HDMI/DVI :SELECT :ADJUST HDMI: When you connect the DVI device to the normal screen. 25 HDMI equipment Selecting HDMI audio input source 1 Press MENU and the MENU screen displays. 2 Press / to select (AUDIO). 3 Press / to select "HDMI". 4 Press / to... your external equipment operation manual for the signal type. INPUT1 2. INPUT2 3. INPUT3 4. DVI: When you connect the HDMI device to the TV, select this setting. 5 Press ...
...HDMI OFF OFF OFF HDMI/DVI :SELECT :ADJUST HDMI: When you connect the DVI device to the normal screen. 25 HDMI equipment Selecting HDMI audio input source 1 Press MENU and the MENU screen displays. 2 Press / to select (AUDIO). 3 Press / to select "HDMI". 4 Press / to... your external equipment operation manual for the signal type. INPUT1 2. INPUT2 3. INPUT3 4. DVI: When you connect the HDMI device to the TV, select this setting. 5 Press ...
LC-26D40U | LC-32D40U Operation Manual
Page 26
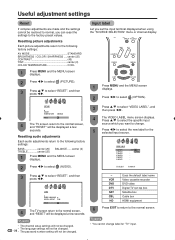
... Press / to change label for the selected input source. PICTURE COLOR TEMPERATURE RESET MEDIUM 4 The TV screen return to the factory preset values. INPUT4 5. INPUT2 3. NOTE • The channel setup settings ...26 • The password number setting will not be desplayed a few seconds. Resetting audio adjustments Each audio adjustments return to the normal screen, and "RESET" will not be changed . - INPUT1 2. INPUT3 4. AUDIO AUDIO LANGUAGE DIGITAL OUTPUT PCM RESET 4 The TV screen return to the following factory settings: AV MODE STANDARD BRIGHTNESS / COLOR / SHARPNESS...
... Press / to change label for the selected input source. PICTURE COLOR TEMPERATURE RESET MEDIUM 4 The TV screen return to the factory preset values. INPUT4 5. INPUT2 3. NOTE • The channel setup settings ...26 • The password number setting will not be desplayed a few seconds. Resetting audio adjustments Each audio adjustments return to the normal screen, and "RESET" will not be changed . - INPUT1 2. INPUT3 4. AUDIO AUDIO LANGUAGE DIGITAL OUTPUT PCM RESET 4 The TV screen return to the following factory settings: AV MODE STANDARD BRIGHTNESS / COLOR / SHARPNESS...

LC-26D40U | LC-32D40U Operation Manual
Page 27
...languages are included in a normal lighting For a movie Allows the user to the normal screen. NO INFO 7. PICTURE AV MODE STANDARD SPORTS/STANDARD/MOVIE/MEMORY BRIGHTNESS 25 CONTRAST 40 COLOR 25 TINT 0 SHARPNESS 25 :SELECT :ADJUST Selected item SPORTS STANDARD MOVIE MEMORY Description For a clear-cut ...PCM RESET :SELECT :ADJUST 4 Press / to the normal screen. NOTE • Each time AV MODE is pressed, AV MODE item toggles. • You can set the mode for each input mode. (For example, select STANDARD for TV input and SPORTS for each input source. 3 Press EXIT ...
...languages are included in a normal lighting For a movie Allows the user to the normal screen. NO INFO 7. PICTURE AV MODE STANDARD SPORTS/STANDARD/MOVIE/MEMORY BRIGHTNESS 25 CONTRAST 40 COLOR 25 TINT 0 SHARPNESS 25 :SELECT :ADJUST Selected item SPORTS STANDARD MOVIE MEMORY Description For a clear-cut ...PCM RESET :SELECT :ADJUST 4 Press / to the normal screen. NOTE • Each time AV MODE is pressed, AV MODE item toggles. • You can set the mode for each input mode. (For example, select STANDARD for TV input and SPORTS for each input source. 3 Press EXIT ...

LC-26D40U | LC-32D40U Operation Manual
Page 28
... for 1.78:1 DVDs. VIEW MODE 0. View mode for HD programs Stretch mode is ON) Side Bar Stretch Stretch User-set to ON and the TV recieves a 480i signal, the picture size is not available, "NOT AVAILABLE" will still show very thin black bands at the top and bottom of... that has its own aspect ratio. Aspect When the ASPECT is set mode To lower the picture, press . Side Bar 1. Zoom: Suitable for viewing wide-screen 1.78:1 aspect-ratio programs. When viewing 1.85:1 programs, the stretch mode will display. When viewing 1.85:1 DVDs, stretch mode will not work. NOTE •...
... for 1.78:1 DVDs. VIEW MODE 0. View mode for HD programs Stretch mode is ON) Side Bar Stretch Stretch User-set to ON and the TV recieves a 480i signal, the picture size is not available, "NOT AVAILABLE" will still show very thin black bands at the top and bottom of... that has its own aspect ratio. Aspect When the ASPECT is set mode To lower the picture, press . Side Bar 1. Zoom: Suitable for viewing wide-screen 1.78:1 aspect-ratio programs. When viewing 1.85:1 programs, the stretch mode will display. When viewing 1.85:1 DVDs, stretch mode will not work. NOTE •...

LC-26D40U | LC-32D40U Operation Manual
Page 29
.... • The remaining time displays when the sleep timer has been set a time when the TV automatically switches to standby. 1 Each time you to select what controls the audio output. 1 Press MENU and the MENU screen displays. 2 Press / to select (AUDIO). 3 Press / to select "SPEAKERS". 4 Press .../ to the normal screen. SLEEP 0h07m NOTE • Select "0h00m" by 10 minutes SLEEP 1h50m SLEEP 2h00m This display will enter the standby mode when the remaining time reaches zero. 29 on the remote control unit or VOL -/+ on the TV. • Sound via speaker is...
.... • The remaining time displays when the sleep timer has been set a time when the TV automatically switches to standby. 1 Each time you to select what controls the audio output. 1 Press MENU and the MENU screen displays. 2 Press / to select (AUDIO). 3 Press / to select "SPEAKERS". 4 Press .../ to the normal screen. SLEEP 0h07m NOTE • Select "0h00m" by 10 minutes SLEEP 1h50m SLEEP 2h00m This display will enter the standby mode when the remaining time reaches zero. 29 on the remote control unit or VOL -/+ on the TV. • Sound via speaker is...

LC-26D40U | LC-32D40U Operation Manual
Page 30
...program being viewed (e.g., weather or news). The "C1" and "C2" services display subtitles of TV programs superimposed over the program currently being displayed, on-screen displays, such as subtitles on digital TV programs (also at the discretion of the Digital Closed Captions: ENG (English), SPA (Spanish),... FRA (French) or other languages are available on some TV programs and on -screen. SETUP CLOSED CAPTION OFF C1/C2/T1/T2/OFF CC ADVANCED VIEW MODE PICTURE SCROLL :SELECT :ADJUST • When a Digital ...
...program being viewed (e.g., weather or news). The "C1" and "C2" services display subtitles of TV programs superimposed over the program currently being displayed, on-screen displays, such as subtitles on digital TV programs (also at the discretion of the Digital Closed Captions: ENG (English), SPA (Spanish),... FRA (French) or other languages are available on some TV programs and on -screen. SETUP CLOSED CAPTION OFF C1/C2/T1/T2/OFF CC ADVANCED VIEW MODE PICTURE SCROLL :SELECT :ADJUST • When a Digital ...

LC-26D40U | LC-32D40U Operation Manual
Page 31
..., BLUE, YELLOW, MAGENTA, CYAN :SELECT :ADJUST NOTE • This feature is designed to customize Digital Captions 4 Press / to the normal screen. 31 parameter of each adjustment item. SERIF, PROP. SERIF, MONO W/O SERIF, PROP. The CC ADVANCED menu displayed. • You can ...;c adjustment item, then press / . Useful adjustment settings Caption setup This function allows you to adjust the closed caption screen appearance to suit your preference. 1 Press MENU and the MENU screen displays. 2 Press / to select (SETUP). 3 Press / to select "CC ADVANCED", and then press / ....
..., BLUE, YELLOW, MAGENTA, CYAN :SELECT :ADJUST NOTE • This feature is designed to customize Digital Captions 4 Press / to the normal screen. 31 parameter of each adjustment item. SERIF, PROP. SERIF, MONO W/O SERIF, PROP. The CC ADVANCED menu displayed. • You can ...;c adjustment item, then press / . Useful adjustment settings Caption setup This function allows you to adjust the closed caption screen appearance to suit your preference. 1 Press MENU and the MENU screen displays. 2 Press / to select (SETUP). 3 Press / to select "CC ADVANCED", and then press / ....

LC-26D40U | LC-32D40U Operation Manual
Page 32
...to use a password to V-CHIP SET menu. Setting a password 1 Press MENU and the MENU screen displays. 2 Press / to select "NEW PASSWORD", then press / . LOCKS V-CHIP SET V-CHIP OFF TV RATING OFF MOVIE RATING OFF NEW PASSWORD :SELECT :ADJUST 4 Enter a new password using the number...0-9, then press ENTER. LOCKS CONFIRM PASSWORD LOCKS CONFIRM PASSWORD [0-9]:SELECT ENTER:SET EXIT:END [0-9]:SELECT ENTER:SET EXIT:END 6 The screen returns to protect certain settings from being accidentally changed. Your new password has been set to confirm, then press ENTER. ...
...to use a password to V-CHIP SET menu. Setting a password 1 Press MENU and the MENU screen displays. 2 Press / to select "NEW PASSWORD", then press / . LOCKS V-CHIP SET V-CHIP OFF TV RATING OFF MOVIE RATING OFF NEW PASSWORD :SELECT :ADJUST 4 Enter a new password using the number...0-9, then press ENTER. LOCKS CONFIRM PASSWORD LOCKS CONFIRM PASSWORD [0-9]:SELECT ENTER:SET EXIT:END [0-9]:SELECT ENTER:SET EXIT:END 6 The screen returns to protect certain settings from being accidentally changed. Your new password has been set to confirm, then press ENTER. ...


