
Service Manual
Page 2
... PREVENT DIRECT EXPOSURE TO LASER BEAM, DO NOT TRY TO OPEN THE ENCLOSURE. A1-1 TO ENSURE PROPER USE OF THIS PRODUCT, PLEASE READ THIS SERVICE MANUAL CAREFULLY AND RETAIN FOR FUTURE REFERENCE. USE OF CONTROLS, ADJUSTMENTS OR THE PERFORMANCE OF PROCEDURES OTHER THAN THOSE SPECIFIED HEREIN MAY RESULT IN HAZARDOUS LASER...
... PREVENT DIRECT EXPOSURE TO LASER BEAM, DO NOT TRY TO OPEN THE ENCLOSURE. A1-1 TO ENSURE PROPER USE OF THIS PRODUCT, PLEASE READ THIS SERVICE MANUAL CAREFULLY AND RETAIN FOR FUTURE REFERENCE. USE OF CONTROLS, ADJUSTMENTS OR THE PERFORMANCE OF PROCEDURES OTHER THAN THOSE SPECIFIED HEREIN MAY RESULT IN HAZARDOUS LASER...
Service Manual
Page 4
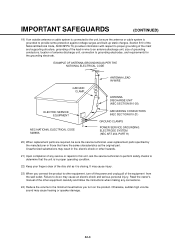
... off the power and unplug all of antenna discharge unit, connection to determine that have the same characteristics as the original part. Read the owner's manual of the disc slot as it is grounded to provide some protection against voltage surges and built-up static charges, Section 810 of the National...
... off the power and unplug all of antenna discharge unit, connection to determine that have the same characteristics as the original part. Read the owner's manual of the disc slot as it is grounded to provide some protection against voltage surges and built-up static charges, Section 810 of the National...
Service Manual
Page 6
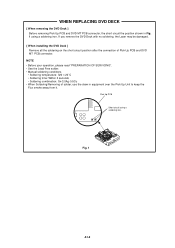
... the Flux smoke away from it. Fig. 1 A1-5 NOTE • Before your operation, please read "PREPARATION OF SERVICING". • Use the Lead Free solder. • Manual soldering conditions • Soldering temperature: 320 ± 20˚C • Soldering time: Within 3 seconds • Soldering combination: Sn-3.0Ag-0.5Cu • When Soldering/Removing of...
... the Flux smoke away from it. Fig. 1 A1-5 NOTE • Before your operation, please read "PREPARATION OF SERVICING". • Use the Lead Free solder. • Manual soldering conditions • Soldering temperature: 320 ± 20˚C • Soldering time: Within 3 seconds • Soldering combination: Sn-3.0Ag-0.5Cu • When Soldering/Removing of...
Service Manual
Page 16
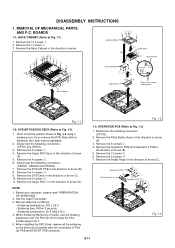
... from it. 5. If you remove the DVD Deck with no soldering, the Laser may be damaged. 2. Remove the Angle DVD-1 in the direction of arrow (D). Manual soldering conditions • Soldering temperature: 320 ± 20˚C • Soldering time: Within 3 seconds • Soldering combination: Sn-3.0Ag-0.5Cu 4. Remove the Operation PCB and...
... from it. 5. If you remove the DVD Deck with no soldering, the Laser may be damaged. 2. Remove the Angle DVD-1 in the direction of arrow (D). Manual soldering conditions • Soldering temperature: 320 ± 20˚C • Soldering time: Within 3 seconds • Soldering combination: Sn-3.0Ag-0.5Cu 4. Remove the Operation PCB and...

Service Manual
Page 18
.... 5. Remove the Rack Feed Ass'y. 7. Remove the Gear Feed. 11. Remove the Gear Motor. When installing the Rack Feed Ass'y, push both ends to Fig. 2-2-A) 1. Manual soldering conditions • Soldering temperature: 320 ± 20˚C • Soldering time: Within 3 seconds • Soldering combination: Sn-3.0Ag-0.5Cu 4. REMOVAL OF DVD DECK PARTS...
.... 5. Remove the Rack Feed Ass'y. 7. Remove the Gear Feed. 11. Remove the Gear Motor. When installing the Rack Feed Ass'y, push both ends to Fig. 2-2-A) 1. Manual soldering conditions • Soldering temperature: 320 ± 20˚C • Soldering time: Within 3 seconds • Soldering combination: Sn-3.0Ag-0.5Cu 4. REMOVAL OF DVD DECK PARTS...


