
LC-20S5U Operation Manual
Page 4
... in your home, consult your obsolete outlet. This is damaged. To ensure your safety and prolong the service life of your LCD color TV product, please read the following precautions carefully before using this manual in a safe place-These safety and operating instructions ...or local power company. When a liquid was spilled on the specification label. c. e. Do not defeat the safety purpose of the Sharp Liquid Crystal Television. Request a qualified service person to perform repairs. This plug will fit into the product through vents or openings...
... in your home, consult your obsolete outlet. This is damaged. To ensure your safety and prolong the service life of your LCD color TV product, please read the following precautions carefully before using this manual in a safe place-These safety and operating instructions ...or local power company. When a liquid was spilled on the specification label. c. e. Do not defeat the safety purpose of the Sharp Liquid Crystal Television. Request a qualified service person to perform repairs. This plug will fit into the product through vents or openings...
LC-20S5U Operation Manual
Page 7
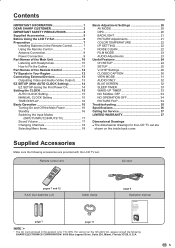
Supplied Accessories Make sure the following . Contents IMPORTANT INFORMATION 1 DEAR SHARP CUSTOMER 2 IMPORTANT SAFETY PRECAUTIONS 2 Supplied Accessories 5 Before Using the LCD TV Set 6 Preparation 7 Installing Batteries in the Remote Control 7 Using the Remote Control 7 Antenna Connection 8 Power Connection 9 Part Names of the Main ... How to Fix the Cables 11 Part Names of the Remote Control 12 TV Signals in this product is for the LCD TV set are provided with the LCD TV set. For using it on the 125-240V AC, please consult the following accessories are shown on the inside...
Supplied Accessories Make sure the following . Contents IMPORTANT INFORMATION 1 DEAR SHARP CUSTOMER 2 IMPORTANT SAFETY PRECAUTIONS 2 Supplied Accessories 5 Before Using the LCD TV Set 6 Preparation 7 Installing Batteries in the Remote Control 7 Using the Remote Control 7 Antenna Connection 8 Power Connection 9 Part Names of the Main ... How to Fix the Cables 11 Part Names of the Remote Control 12 TV Signals in this product is for the LCD TV set are provided with the LCD TV set. For using it on the 125-240V AC, please consult the following accessories are shown on the inside...
LC-20S5U Operation Manual
Page 8
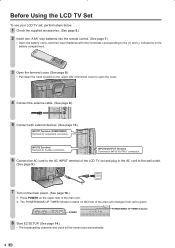
... unit changes from red to green. INPUT3/OUTPUT Terminal Terminal for INPUT/OUTPUT connection. 6 Connect the AC cord to the AC INPUT terminal of the LCD TV set , perform steps below. 1 Check the supplied accessories. (See page 5.) 2 Insert two "AAA" size batteries into the remote control. (...14.) • The broadcasting channels and clock will be memorized automatically. 6 INPUT2 Terminal Terminal for S-video connection. Before Using the LCD TV Set To use your LCD TV set and plug in the battery compartment. 3 Open the terminal cover. (See page 8.) • Pull down the hook located...
... unit changes from red to green. INPUT3/OUTPUT Terminal Terminal for INPUT/OUTPUT connection. 6 Connect the AC cord to the AC INPUT terminal of the LCD TV set , perform steps below. 1 Check the supplied accessories. (See page 5.) 2 Insert two "AAA" size batteries into the remote control. (...14.) • The broadcasting channels and clock will be memorized automatically. 6 INPUT2 Terminal Terminal for S-video connection. Before Using the LCD TV Set To use your LCD TV set and plug in the battery compartment. 3 Open the terminal cover. (See page 8.) • Pull down the hook located...
LC-20S5U Operation Manual
Page 9
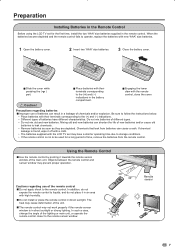
...9632; Do not install or place the remote control in direct sunlight. Be sure to follow the instructions below. • Place batteries with the LCD TV set for a long period of time, remove the batteries from batteries can shorten the life of the main unit. Chemicals that leak from ...to the remote sensor window. 17' (5m) 30° 30° Remote sensor 7 Preparation Installing Batteries in the Remote Control Before using the LCD TV set may have different characteristics. In addition, do not place it towards the remote sensor window of new batteries and/or cause old batteries...
...9632; Do not install or place the remote control in direct sunlight. Be sure to follow the instructions below. • Place batteries with the LCD TV set for a long period of time, remove the batteries from batteries can shorten the life of the main unit. Chemicals that leak from ...to the remote sensor window. 17' (5m) 30° 30° Remote sensor 7 Preparation Installing Batteries in the Remote Control Before using the LCD TV set may have different characteristics. In addition, do not place it towards the remote sensor window of new batteries and/or cause old batteries...

LC-20S5U Operation Manual
Page 10
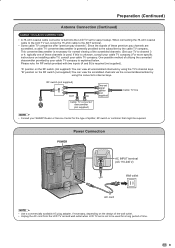
... flat "twin-lead" cable that can easily be finger-tightened only. 75-ohm coaxial cable When connecting the RF cable to the LCD TV set . (breaking of the main unit. A 300-ohm system is strongly recommended. A: Using a VHF/UHF combination outdoor antenna B: Using ...75-ohm coaxial cable Combiner (not supplied) IN OUT Antenna Cable (commercially available) NOTICE F-type connector F-type connector should be attached to your LCD TV set , do not tighten F-type connector with tools. F-type connector 2. Combination VHF/UHF antenna VHF/UHF antenna 300/75-ohm adapter ...
... flat "twin-lead" cable that can easily be finger-tightened only. 75-ohm coaxial cable When connecting the RF cable to the LCD TV set . (breaking of the main unit. A 300-ohm system is strongly recommended. A: Using a VHF/UHF combination outdoor antenna B: Using ...75-ohm coaxial cable Combiner (not supplied) IN OUT Antenna Cable (commercially available) NOTICE F-type connector F-type connector should be attached to your LCD TV set , do not tighten F-type connector with tools. F-type connector 2. Combination VHF/UHF antenna VHF/UHF antenna 300/75-ohm adapter ...
LC-20S5U Operation Manual
Page 11
...110-240 V) Wall outlet AC cord A • Use a commercially available AC plug adapter, if necessary, depending on installing cable TV, consult your SHARP Dealer or Service Center for the type of splitter, RF switch or combiner that might be used . When connecting the 75-ohm coaxial cable to... for easy hookup. Preparation (Continued) Antenna Connection (Continued) CABLE TV (CATV) CONNECTION • A 75-ohm coaxial cable connector is built into the LCD TV set , screw the 75-ohm cable to the ANT terminal. • Some cable TV companies offer "premium pay channels are scrambled, a cable ...
...110-240 V) Wall outlet AC cord A • Use a commercially available AC plug adapter, if necessary, depending on installing cable TV, consult your SHARP Dealer or Service Center for the type of splitter, RF switch or combiner that might be used . When connecting the 75-ohm coaxial cable to... for easy hookup. Preparation (Continued) Antenna Connection (Continued) CABLE TV (CATV) CONNECTION • A 75-ohm coaxial cable connector is built into the LCD TV set , screw the 75-ohm cable to the ANT terminal. • Some cable TV companies offer "premium pay channels are scrambled, a cable ...
LC-20S5U Operation Manual
Page 12
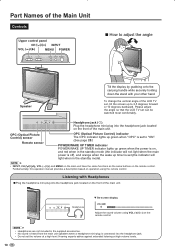
... main unit. A • Headphones are not included in the standby mode). Please adjust the angle so that the LCD TV set the volume at high volume levels. 10 Part Names of the LCD TV set (the indicator will not light when the main power is off), and orange when the wake up...
... main unit. A • Headphones are not included in the standby mode). Please adjust the angle so that the LCD TV set the volume at high volume levels. 10 Part Names of the LCD TV set (the indicator will not light when the main power is off), and orange when the wake up...
LC-20S5U Operation Manual
Page 13
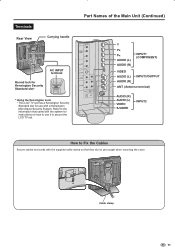
... (R) INPUT1 (COMPONENT) VIDEO AUDIO (L) AUDIO (R) INPUT3/OUTPUT ANT. (Antenna terminal) AUDIO (R) AUDIO (L) VIDEO S-VIDEO INPUT2 How to secure the LCD TV set has a Kensington Security Standard slot for use it to Fix the Cables Secure cables and cords with a Kensington MicroSaver Security System. Terminals Rear... View Carrying handle AC INPUT terminal Round lock for Kensington Security Standard slot* * Using the Kensington Lock • This LCD TV set . Refer to the information that came with the system for instructions on how to use with the supplied cable clamp...
... (R) INPUT1 (COMPONENT) VIDEO AUDIO (L) AUDIO (R) INPUT3/OUTPUT ANT. (Antenna terminal) AUDIO (R) AUDIO (L) VIDEO S-VIDEO INPUT2 How to secure the LCD TV set has a Kensington Security Standard slot for use it to Fix the Cables Secure cables and cords with a Kensington MicroSaver Security System. Terminals Rear... View Carrying handle AC INPUT terminal Round lock for Kensington Security Standard slot* * Using the Kensington Lock • This LCD TV set . Refer to the information that came with the system for instructions on how to use with the supplied cable clamp...
LC-20S5U Operation Manual
Page 15
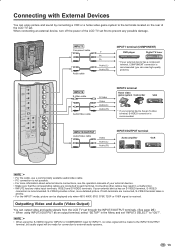
... to external audio systems. 13 S-VIDEO provides a finer, more information about external device connections, see the operation manuals of the LCD TV set. If your external device has an S-VIDEO terminal, S-VIDEO connection is recommended. Outputting Video and Audio (Video Output) You ...If your external device has an S-video terminal, S-VIDEO connection is recommended. When connecting an external device, turn off the power of the LCD TV set "INPUT3 SELECT" to prevent any possible damage. INPUT2 S-Video cable Audio/Video cable S-Video Video Audio (L) Audio (R) INPUT2 ...
... to external audio systems. 13 S-VIDEO provides a finer, more information about external device connections, see the operation manuals of the LCD TV set. If your external device has an S-VIDEO terminal, S-VIDEO connection is recommended. Outputting Video and Audio (Video Output) You ...If your external device has an S-video terminal, S-VIDEO connection is recommended. When connecting an external device, turn off the power of the LCD TV set "INPUT3 SELECT" to prevent any possible damage. INPUT2 S-Video cable Audio/Video cable S-Video Video Audio (L) Audio (R) INPUT2 ...
LC-20S5U Operation Manual
Page 16
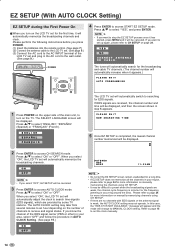
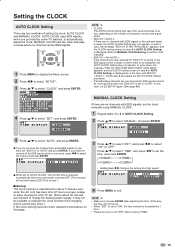
...signals are no channels with EDS signals or the antenna signal is weak, the AUTO CLOCK setting may not operate. When you select "ON", the LCD TV set will be displayed. ON OFF A • If you select "OFF", EZ SETUP will automatically adjust the clock to receive and signal ...3 Press ENTER to stop the EZ SETUP process once it has started, press MENU and it appears.) �PLEASE�WAIT AUTO�PROGRAMMING The LCD TV set will automatically memorize the broadcasting channels. Press '/" to select "ON" or "OFF". If you want to access AUTO CLOCK mode. Please refer...
...signals are no channels with EDS signals or the antenna signal is weak, the AUTO CLOCK setting may not operate. When you select "ON", the LCD TV set will be displayed. ON OFF A • If you select "OFF", EZ SETUP will automatically adjust the clock to receive and signal ...3 Press ENTER to stop the EZ SETUP process once it has started, press MENU and it appears.) �PLEASE�WAIT AUTO�PROGRAMMING The LCD TV set will automatically memorize the broadcasting channels. Press '/" to select "ON" or "OFF". If you want to access AUTO CLOCK mode. Please refer...
LC-20S5U Operation Manual
Page 17
... channels with EDS signals, set . (Since about 5 minutes even when the AC cord has been shut off due to a power outage or when moving the LCD TV set the clock manually using MANUAL CLOCK. 1 Repeat steps 1 to select "MANUAL", and press ENTER. In such a case, the message "EDS CH IS NOT...
... channels with EDS signals, set . (Since about 5 minutes even when the AC cord has been shut off due to a power outage or when moving the LCD TV set the clock manually using MANUAL CLOCK. 1 Repeat steps 1 to select "MANUAL", and press ENTER. In such a case, the message "EDS CH IS NOT...

LC-20S5U Operation Manual
Page 18
... You can display the current time on the screen. 1 Repeat steps 1 to 3 of AUTO CLOCK Setting on page 15. 2 Press '/" to green and the LCD TV set Press POWER. On-screen display STEREO SAP MONO A • The on . A • When you press DISPLAY, the current time is turned on ...9679; To turn green. 16 Standby 3 Press '/" to exit. To rewind the clock by 1 hour. The POWER/WAKE UP TIMER indicator will turn off the LCD TV set is displayed for about 10 seconds. No display 4 Press MENU to select "ON" or "OFF", and press ENTER. Selected item ON OFF Description...
... You can display the current time on the screen. 1 Repeat steps 1 to 3 of AUTO CLOCK Setting on page 15. 2 Press '/" to green and the LCD TV set Press POWER. On-screen display STEREO SAP MONO A • The on . A • When you press DISPLAY, the current time is turned on ...9679; To turn green. 16 Standby 3 Press '/" to exit. To rewind the clock by 1 hour. The POWER/WAKE UP TIMER indicator will turn off the LCD TV set is displayed for about 10 seconds. No display 4 Press MENU to select "ON" or "OFF", and press ENTER. Selected item ON OFF Description...
LC-20S5U Operation Manual
Page 20
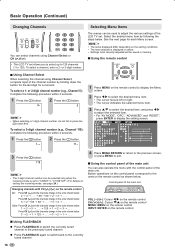
...and the channels change in memory. ■ Using the remote control ■ Using Channel Select When selecting the channel using Channel Select or CH This LCD TV set . To select a 3-digit channel number (e.g., Channel 115): Complete the following procedure within 4 seconds. 1 Press the button. 1-- 2 ...Press MENU RETURN to return to the previous screen, or press MENU to display the setting screen. To select a 1- Control panel of the LCD TV set allows you to select up to 125 channels (1 to the currently tuned channel. 18 Selecting Menu Items The menus can be saved in...
...and the channels change in memory. ■ Using the remote control ■ Using Channel Select When selecting the channel using Channel Select or CH This LCD TV set . To select a 3-digit channel number (e.g., Channel 115): Complete the following procedure within 4 seconds. 1 Press the button. 1-- 2 ...Press MENU RETURN to return to the previous screen, or press MENU to display the setting screen. To select a 1- Control panel of the LCD TV set allows you to select up to 125 channels (1 to the currently tuned channel. 18 Selecting Menu Items The menus can be saved in...

LC-20S5U Operation Manual
Page 26
... mode to AIR or CABLE channels to receive locally broadcast TV programs. ■ Saving broadcast TV channels in the memory 1 Repeat steps 1 to 3 of the LCD TV set the channel numbers and the time with the EZ SETUP function. EZ SETUP AIR/CABLE CH SEARCH CH MEMORY AIR CABLE 5 Press MENU...
... mode to AIR or CABLE channels to receive locally broadcast TV programs. ■ Saving broadcast TV channels in the memory 1 Repeat steps 1 to 3 of the LCD TV set the channel numbers and the time with the EZ SETUP function. EZ SETUP AIR/CABLE CH SEARCH CH MEMORY AIR CABLE 5 Press MENU...
LC-20S5U Operation Manual
Page 27
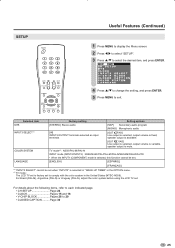
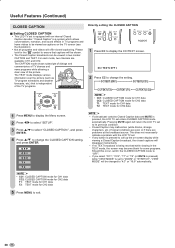
... select the desired item, and press ENTER. Page 30 25 For Brazil (PAL-M), Argentina (PAL-N) or Uruguay (PAL-N), adjust the color system before using the LCD TV set to 29 • CLOSED CAPTION .......... SETUP Useful Features (Continued) 1 Press MENU to display the Menu screen. 2 Press \/| to select "SETUP". 3 Press '/" to exit... INPUT1 (COMPONENT) mode is selected, this function cannot be set when "INPUT3" is selected in "WAKE-UP TIMER" in the OPTION menu. *2 TV mode: The LCD TV set is mute.
... select the desired item, and press ENTER. Page 30 25 For Brazil (PAL-M), Argentina (PAL-N) or Uruguay (PAL-N), adjust the color system before using the LCD TV set to 29 • CLOSED CAPTION .......... SETUP Useful Features (Continued) 1 Press MENU to display the Menu screen. 2 Press \/| to select "SETUP". 3 Press '/" to exit... INPUT1 (COMPONENT) mode is selected, this function cannot be set when "INPUT3" is selected in "WAKE-UP TIMER" in the OPTION menu. *2 TV mode: The LCD TV set is mute.
LC-20S5U Operation Manual
Page 32
...if there are available: CH1 and CH2. Useful Features (Continued) CLOSED CAPTION Directly setting the CLOSED CAPTION ■ Setting CLOSED CAPTION • This LCD TV set is a system which allows conversations, narration, and sound effects in TV programs and home videos to be viewed as TV program schedules ...viewed in two modes: CAPTION and TEXT. OFF CC1 CC2 T1 T2 A • If a broadcast contains Closed Caption data and MUTE is pressed, the LCD TV set to its previous condition. • Closed Caption may become blank for CH2 data 1 Press MENU to display the Menu screen. 2 Press \/|...
...if there are available: CH1 and CH2. Useful Features (Continued) CLOSED CAPTION Directly setting the CLOSED CAPTION ■ Setting CLOSED CAPTION • This LCD TV set is a system which allows conversations, narration, and sound effects in TV programs and home videos to be viewed as TV program schedules ...viewed in two modes: CAPTION and TEXT. OFF CC1 CC2 T1 T2 A • If a broadcast contains Closed Caption data and MUTE is pressed, the LCD TV set to its previous condition. • Closed Caption may become blank for CH2 data 1 Press MENU to display the Menu screen. 2 Press \/|...
LC-20S5U Operation Manual
Page 35
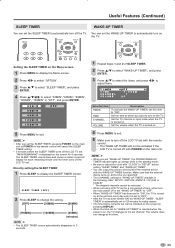
... the following order: INPUT1→INPUT2→INPUT3→TV (AIR or CABLE)* * The skipped channels cannot be selected. • When not using LCD TV set for safety reason. • The time that the external device turns on the TV. Useful Features (Continued) SLEEP TIMER WAKE-UP TIMER... "WAKE-UP TIMER" changes in 3 seconds. 1 Repeat steps 1 and 2 of the external device with "CLOCK" in "SETUP" before the SLEEP TIMER turns off the LCD TV set, "5MIN REMAINING" is turned on the Menu screen 1 Press MENU to display the Menu screen. 2 Press \/| to select "OPTION". 3 Press '/" to select...
... the following order: INPUT1→INPUT2→INPUT3→TV (AIR or CABLE)* * The skipped channels cannot be selected. • When not using LCD TV set for safety reason. • The time that the external device turns on the TV. Useful Features (Continued) SLEEP TIMER WAKE-UP TIMER... "WAKE-UP TIMER" changes in 3 seconds. 1 Repeat steps 1 and 2 of the external device with "CLOCK" in "SETUP" before the SLEEP TIMER turns off the LCD TV set, "5MIN REMAINING" is turned on the Menu screen 1 Press MENU to display the Menu screen. 2 Press \/| to select "OPTION". 3 Press '/" to select...
LC-20S5U Operation Manual
Page 37
... ON. 32 • Make sure the volume is not set to minimum. 17 • Make sure the sound is not set to the encountered symptoms. LCD TV set the clock using MANUAL CLOCK Setting. • External in 1 or 2 minutes. 21 21 36 7 7 - 14, 15, 24 15 - 35 Remote control does not...
... ON. 32 • Make sure the volume is not set to minimum. 17 • Make sure the sound is not set to the encountered symptoms. LCD TV set the clock using MANUAL CLOCK Setting. • External in 1 or 2 minutes. 21 21 36 7 7 - 14, 15, 24 15 - 35 Remote control does not...
LC-20S5U Operation Manual
Page 38
... unit as far apart as this may be interference from devices that may be interference between the antenna cable and AC cord. This is not sharp. The picture is spotted. AUDIO-IN, COMPONENT-IN AUDIO-IN, VIDEO-IN, S-VIDEO-IN AUDIO-IN, VIDEO-IN/AUDIO-OUT, VIDEO-OUT F-... W (0.6 W standby): AC 120V 13.9 lbs./6.3 kg 15.9 lbs./7.2 kg +32°F to +104°F (0°C to +60°C) Specifications Items Model LC-20S5U LCD panel Number of the broadcast may also be bad. • Make sure the antenna is facing the right direction. • Make sure the outside antenna...
... unit as far apart as this may be interference from devices that may be interference between the antenna cable and AC cord. This is not sharp. The picture is spotted. AUDIO-IN, COMPONENT-IN AUDIO-IN, VIDEO-IN, S-VIDEO-IN AUDIO-IN, VIDEO-IN/AUDIO-OUT, VIDEO-OUT F-... W (0.6 W standby): AC 120V 13.9 lbs./6.3 kg 15.9 lbs./7.2 kg +32°F to +104°F (0°C to +60°C) Specifications Items Model LC-20S5U LCD panel Number of the broadcast may also be bad. • Make sure the antenna is facing the right direction. • Make sure the outside antenna...
LC-20S5U Operation Manual
Page 39
... a new or remanufactured equivalent at 1-800-BE-SHARP. The limited warranty described herein is in design or construction. Correction of defects, in the United States. Some states do to Obtain Service: (Be sure to you . Model Specific Section Your Product Model Number & Description: LC-20S5U LCD Color Television Warranty Period for this Product...
... a new or remanufactured equivalent at 1-800-BE-SHARP. The limited warranty described herein is in design or construction. Correction of defects, in the United States. Some states do to Obtain Service: (Be sure to you . Model Specific Section Your Product Model Number & Description: LC-20S5U LCD Color Television Warranty Period for this Product...


