
User Guide
Page 1
Declaration of Conformity Hereby, Sharp Telecommunications of Europe Limited, declares that this GX17 is in compliance with the essential requirements and other relevant provisions of conformity can be found at the following Internet address: http://www.sharp-mobile.com A copy of the original declaration of Directive 1999/5/EC.
Declaration of Conformity Hereby, Sharp Telecommunications of Europe Limited, declares that this GX17 is in compliance with the essential requirements and other relevant provisions of conformity can be found at the following Internet address: http://www.sharp-mobile.com A copy of the original declaration of Directive 1999/5/EC.
User Guide
Page 2
..., repairs, defects, battery replacement, use of this reason, avoid the illegal use . from the actual one. If the user is only permitted for choosing the GX17. About This User Guide This User Guide is a registered trademark of material which has been made or modified in the United States and/or other...
..., repairs, defects, battery replacement, use of this reason, avoid the illegal use . from the actual one. If the user is only permitted for choosing the GX17. About This User Guide This User Guide is a registered trademark of material which has been made or modified in the United States and/or other...

User Guide
Page 3
... Aplix Corporation in physical media which is paid for on a title by title basis and/or (ii) data which is paid for on a title by Sharp is granted or implied for any other countries. Such additional license may be obtained from a licensed video provider. Euro. All rights reserved. Hong Kong Standard...
... Aplix Corporation in physical media which is paid for on a title by title basis and/or (ii) data which is paid for on a title by Sharp is granted or implied for any other countries. Such additional license may be obtained from a licensed video provider. Euro. All rights reserved. Hong Kong Standard...

User Guide
Page 4
Introduction 3 You can also download various applications from Vodafone via the mobile Internet. • Email for sending up to 2000 characters and receiving mail with attachments. • A melody editing function for creating original ringtones using up to 32 voices. • A voice recorder function for recording and playing back voice clips. • A Bluetooth® wireless technology interface for data communication. You can transmit pictures, sounds, and video clips to OBEX-enabled phones. • A data synchronization function for synchronizing the Contacts List and ...
Introduction 3 You can also download various applications from Vodafone via the mobile Internet. • Email for sending up to 2000 characters and receiving mail with attachments. • A melody editing function for creating original ringtones using up to 32 voices. • A voice recorder function for recording and playing back voice clips. • A Bluetooth® wireless technology interface for data communication. You can transmit pictures, sounds, and video clips to OBEX-enabled phones. • A data synchronization function for synchronizing the Contacts List and ...
User Guide
Page 5
Table of Contents Introduction 1 Useful Functions and Services 3 Your Phone 7 Optional Accessories 7 Getting Started 8 Inserting the SIM Card and the Battery .... 10 Charging the Battery 12 Turning Your Phone On and Off 13 Keypad Lock 14 Display Indicators 15 Navigating Functions 17 Call Functions 18 Making a Call 18 Speed Dialling 18 Redialling 19 Answering a Call 19 In Call Menu 20 Entering Characters 24 Changing the Input Languages 25 Changing the Input Method 25 Using Text Templates 26 4 Table of Contents Using the Menu 27 List of Menu Functions 28 Contacts List 30...
Table of Contents Introduction 1 Useful Functions and Services 3 Your Phone 7 Optional Accessories 7 Getting Started 8 Inserting the SIM Card and the Battery .... 10 Charging the Battery 12 Turning Your Phone On and Off 13 Keypad Lock 14 Display Indicators 15 Navigating Functions 17 Call Functions 18 Making a Call 18 Speed Dialling 18 Redialling 19 Answering a Call 19 In Call Menu 20 Entering Characters 24 Changing the Input Languages 25 Changing the Input Method 25 Using Text Templates 26 4 Table of Contents Using the Menu 27 List of Menu Functions 28 Contacts List 30...

User Guide
Page 6
Sending Messages 36 Dialling a Service Phone Number 37 Camera 38 Take Picture 38 Record Video 42 Messages 46 Multimedia (MMS 46 Text (SMS 52 Email 55 Cell Broadcasts 57 Vodafone live 58 Starting the WAP Browser 58 Navigating a WAP Page 59 My Items 62 Pictures 62 Games & More 64 Sounds 65 Videos 67 Text Templates 69 Memory Status 70 Games & More 71 Applications 71 Screensavers 72 More Games 72 Settings 73 Java™ Information 74 Applications 75 SIM Application 75 Alarms 75 Calculator 76 Voice Recorder 77 Melody Editor 78 Phone Help 82 Calendar 83 Contacts ...
Sending Messages 36 Dialling a Service Phone Number 37 Camera 38 Take Picture 38 Record Video 42 Messages 46 Multimedia (MMS 46 Text (SMS 52 Email 55 Cell Broadcasts 57 Vodafone live 58 Starting the WAP Browser 58 Navigating a WAP Page 59 My Items 62 Pictures 62 Games & More 64 Sounds 65 Videos 67 Text Templates 69 Memory Status 70 Games & More 71 Applications 71 Screensavers 72 More Games 72 Settings 73 Java™ Information 74 Applications 75 SIM Application 75 Alarms 75 Calculator 76 Voice Recorder 77 Melody Editor 78 Phone Help 82 Calendar 83 Contacts ...
User Guide
Page 7
Call Settings 100 Date & Time 104 Changing the Language 105 Network 105 Security 109 Master Reset 110 Connecting GX17 to Your PC 111 System Requirements 111 GSM/GPRS Modem 111 Handset Manager 112 Software Installation 112 Note 112 Troubleshooting 114 Safety Precautions and Conditions of Use 116 CONDITIONS OF USE 116 ENVIRONMENT 119 PRECAUTIONS CONCERNING VEHICLE USE 119 SAR 120 INFORMATION ON PROPER DISPOSAL 121 PRECAUTIONS FOR USE IN USA ...... 122 Index 125 6 Table of Contents
Call Settings 100 Date & Time 104 Changing the Language 105 Network 105 Security 109 Master Reset 110 Connecting GX17 to Your PC 111 System Requirements 111 GSM/GPRS Modem 111 Handset Manager 112 Software Installation 112 Note 112 Troubleshooting 114 Safety Precautions and Conditions of Use 116 CONDITIONS OF USE 116 ENVIRONMENT 119 PRECAUTIONS CONCERNING VEHICLE USE 119 SAR 120 INFORMATION ON PROPER DISPOSAL 121 PRECAUTIONS FOR USE IN USA ...... 122 Index 125 6 Table of Contents
User Guide
Page 8
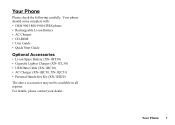
Your Phone 7 Your phone should come complete with: • GSM 900/1800/1900 GPRS phone • Rechargeable Li-ion Battery • AC Charger • CD-ROM • User Guide • Quick Start Guide Optional Accessories • Li-ion Spare Battery (XN-1BT30) • Cigarette Lighter Charger (XN-1CL30) • USB Data Cable (XN-1DC30) • AC Charger (XN-1QC30, XN-1QC31) • Personal Hands-free Kit (XN-1ER20) The above accessories may not be available in all regions. For details, please contact your dealer. Your Phone Please check the following carefully.
Your Phone 7 Your phone should come complete with: • GSM 900/1800/1900 GPRS phone • Rechargeable Li-ion Battery • AC Charger • CD-ROM • User Guide • Quick Start Guide Optional Accessories • Li-ion Spare Battery (XN-1BT30) • Cigarette Lighter Charger (XN-1CL30) • USB Data Cable (XN-1DC30) • AC Charger (XN-1QC30, XN-1QC31) • Personal Hands-free Kit (XN-1ER20) The above accessories may not be available in all regions. For details, please contact your dealer. Your Phone Please check the following carefully.

User Guide
Page 9
Getting Started 1 2 8 13 3 4 9 5 10 6 11 14 7 12 15 1. Up/Down arrow keys: Displays Contacts List a b entries in standby mode and executes functions. Displays Main menu in standby mode. Earpiece 2. Displays list of Applications in standby mode. 8 Getting Started 16 17 Right arrow key: d 3. Navigation Keys (Arrow Keys): Moves cursor to select menu items, etc. Left arrow key: c Displays list of Saved Pictures in this manual this key. d indicates in this key. a and b indicate in this manual this manual these keys. Centre Key: 18 19 20 c ...
Getting Started 1 2 8 13 3 4 9 5 10 6 11 14 7 12 15 1. Up/Down arrow keys: Displays Contacts List a b entries in standby mode and executes functions. Displays Main menu in standby mode. Earpiece 2. Displays list of Applications in standby mode. 8 Getting Started 16 17 Right arrow key: d 3. Navigation Keys (Arrow Keys): Moves cursor to select menu items, etc. Left arrow key: c Displays list of Saved Pictures in this manual this key. d indicates in this key. a and b indicate in this manual this manual these keys. Centre Key: 18 19 20 c ...

User Guide
Page 10
Right Soft Key: C 10.End/Power Key: F 11.Keypad Executes the function at the bottom right of the screen. by opening the browser in standby mode. Display 9. Press and hold this key on the text entry screen to shift text input method between Normal and Silent mode. Executes the function at the bottom left of the screen. Used to connect either the charger or USB Data Cable. 15.Microphone 16.Infrared Port: Sends and receives data via infrared. 17.Handsfree Kit Connector 18.RF Connector 19.Camera 20.Battery Cover Getting Started 9 Ends a call log in ...
Right Soft Key: C 10.End/Power Key: F 11.Keypad Executes the function at the bottom right of the screen. by opening the browser in standby mode. Display 9. Press and hold this key on the text entry screen to shift text input method between Normal and Silent mode. Executes the function at the bottom left of the screen. Used to connect either the charger or USB Data Cable. 15.Microphone 16.Infrared Port: Sends and receives data via infrared. 17.Handsfree Kit Connector 18.RF Connector 19.Camera 20.Battery Cover Getting Started 9 Ends a call log in ...
User Guide
Page 11
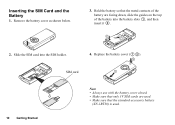
Slide the SIM card into the battery slots , and then insert it . 2 1 2. Inserting the SIM Card and the Battery 1. Remove the battery cover as shown below. 3. SIM card 4. Replace the battery cover ( ). 2 1 10 Getting Started Note • Always use with the battery cover closed. • Make sure that only 3V SIM cards are facing down, slide the guides on the top of the battery into the SIM holder. Hold the battery so that the standard accessory battery (XN-1BT30) is used . • Make sure that the metal contacts of the battery are used .
Slide the SIM card into the battery slots , and then insert it . 2 1 2. Inserting the SIM Card and the Battery 1. Remove the battery cover as shown below. 3. SIM card 4. Replace the battery cover ( ). 2 1 10 Getting Started Note • Always use with the battery cover closed. • Make sure that only 3V SIM cards are facing down, slide the guides on the top of the battery into the SIM holder. Hold the battery so that the standard accessory battery (XN-1BT30) is used . • Make sure that the metal contacts of the battery are used .

User Guide
Page 12
In order to protect the environment, please read the following points concerning battery disposal: • Take the used battery to your phone and disconnect the charger and other accessories. Hold down gently whilst sliding the SIM card out of the SIM holder . 2. Removing the SIM Card and the Battery 1. Getting Started 11 Pick up the battery using the protruding edge and remove the battery from the phone. 1 2 Battery Disposal The device is supported by a battery. Remove the battery cover. 3. Make sure you turn off your local waste depot, dealer or customer service centre for...
In order to protect the environment, please read the following points concerning battery disposal: • Take the used battery to your phone and disconnect the charger and other accessories. Hold down gently whilst sliding the SIM card out of the SIM holder . 2. Removing the SIM Card and the Battery 1. Getting Started 11 Pick up the battery using the protruding edge and remove the battery from the phone. 1 2 Battery Disposal The device is supported by a battery. Remove the battery cover. 3. Make sure you turn off your local waste depot, dealer or customer service centre for...

User Guide
Page 13
Connect the charger to an AC outlet. Note • Charging time may damage your phone for details. Disconnect the charger from the external connector. 3. Disconnect the charger from the AC outlet. 2. Standard charging time: Approx. 2 hours. 12 Getting Started Remove the cover of the screen displays the current status. Using the Charger 1. Note • Do not use any non approved charger, this may vary depending on the state of the battery and other conditions. (See "Battery" on page 117 for the first time. When the phone is complete, the battery indicator icon displays ...
Connect the charger to an AC outlet. Note • Charging time may damage your phone for details. Disconnect the charger from the external connector. 3. Disconnect the charger from the AC outlet. 2. Standard charging time: Approx. 2 hours. 12 Getting Started Remove the cover of the screen displays the current status. Using the Charger 1. Note • Do not use any non approved charger, this may vary depending on the state of the battery and other conditions. (See "Battery" on page 117 for the first time. When the phone is complete, the battery indicator icon displays ...

User Guide
Page 14
The phone may only last approximately five minutes before the phone itself powers down during use it. Enter your PIN code is entered incorrectly three times in a row, the SIM card is displayed in the upper right hand side of a car. Battery Indicators Charge Level Sufficiently charged Partially charged Charging recommended Charging required Empty Turning Your Phone On and Off To turn the power off, press and hold F for approximately 2 seconds. See "Enabling/ Disabling the PIN Code" on the screen. Note • If your PIN code. 2. To Charge Using the Cigarette Lighter ...
The phone may only last approximately five minutes before the phone itself powers down during use it. Enter your PIN code is entered incorrectly three times in a row, the SIM card is displayed in the upper right hand side of a car. Battery Indicators Charge Level Sufficiently charged Partially charged Charging recommended Charging required Empty Turning Your Phone On and Off To turn the power off, press and hold F for approximately 2 seconds. See "Enabling/ Disabling the PIN Code" on the screen. Note • If your PIN code. 2. To Charge Using the Cigarette Lighter ...

User Guide
Page 15
Select "From SIM to copy Contacts List entries on the SIM card (if using the Contacts List menu as follows: "Contacts" → "Contacts List" → [Options] → "Advanced" → "Copy All Entries" 1. The soft and centre keys are asked whether you are not displayed when locked. To unlock, press P, then [Yes]. Locking the Keypad 1. Press P, then [LockKeys] during standby. Keypad Lock You can do it from the SIM Card When you insert the SIM card into your phone for the first time and use the Contacts List function, you wish to Handset". Tip • Emergency ...
Select "From SIM to copy Contacts List entries on the SIM card (if using the Contacts List menu as follows: "Contacts" → "Contacts List" → [Options] → "Advanced" → "Copy All Entries" 1. The soft and centre keys are asked whether you are not displayed when locked. To unlock, press P, then [Yes]. Locking the Keypad 1. Press P, then [LockKeys] during standby. Keypad Lock You can do it from the SIM Card When you insert the SIM card into your phone for the first time and use the Contacts List function, you wish to Handset". Tip • Emergency ...

User Guide
Page 16
Display Indicators Left soft key Centre key Status indicators Right soft key Status Indicators 1. / : Strength of received signal / Service out of range 2. : GPRS enabled and within range - flashes during GPRS transmission. 3. / : Text message alerts [unread / mailbox full] 4. / : Multimedia message alerts [unread / mailbox full] 5. / : Email alerts [unread / mailbox full] 6. : WAP alert 7. / : Java™ application [executed (colour) / suspended (grey)] 8. (No display Current profile [Normal / Meeting / Activity / Car / Headset / Silent] 9. : T9 text input method enabled ...
Display Indicators Left soft key Centre key Status indicators Right soft key Status Indicators 1. / : Strength of received signal / Service out of range 2. : GPRS enabled and within range - flashes during GPRS transmission. 3. / : Text message alerts [unread / mailbox full] 4. / : Multimedia message alerts [unread / mailbox full] 5. / : Email alerts [unread / mailbox full] 6. : WAP alert 7. / : Java™ application [executed (colour) / suspended (grey)] 8. (No display Current profile [Normal / Meeting / Activity / Car / Headset / Silent] 9. : T9 text input method enabled ...

User Guide
Page 17
10. / / / : Current text input method [First letter upper case / Upper case / Lower case / Numeric] 11. : "All Calls" diverts set to "On" (p. 100) 12. / : Secured WAP page displayed 13. : Call incoming 14. : Call in progress 15. / : Current WAP or MMS communication mode [CSD / GPRS] 16. : Battery level 17. : Roaming outside network 18. : "Ringer Volume" (p. 92) set to "Silent" 19. : Vibration alert (p. 93) enabled 20. : USB Data Cable connected 21. / : "Infrared" connection [enabled (grey) / communicating (red)] 22. / : Bluetooth wireless setting [enabled / communicating...
10. / / / : Current text input method [First letter upper case / Upper case / Lower case / Numeric] 11. : "All Calls" diverts set to "On" (p. 100) 12. / : Secured WAP page displayed 13. : Call incoming 14. : Call in progress 15. / : Current WAP or MMS communication mode [CSD / GPRS] 16. : Battery level 17. : Roaming outside network 18. : "Ringer Volume" (p. 92) set to "Silent" 19. : Vibration alert (p. 93) enabled 20. : USB Data Cable connected 21. / : "Infrared" connection [enabled (grey) / communicating (red)] 22. / : Bluetooth wireless setting [enabled / communicating...
User Guide
Page 18
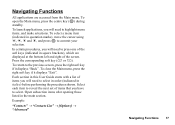
Navigating Functions All applications are displayed at the bottom left and right of items that you will need to select in order (indicated in italics) before performing the procedures shown. To launch applications, you will need to highlight menu items, and make selections. To return to select. Select each item to commit your selection. Open subsection items after opening those listed in quotation marks), move the cursor using a, b, c and d, and press to reveal the next set of the screen. To select a menu item (indicated in the main section. Press the ...
Navigating Functions All applications are displayed at the bottom left and right of items that you will need to select in order (indicated in italics) before performing the procedures shown. To launch applications, you will need to highlight menu items, and make selections. To return to select. Select each item to commit your selection. Open subsection items after opening those listed in quotation marks), move the cursor using a, b, c and d, and press to reveal the next set of the screen. To select a menu item (indicated in the main section. Press the ...
User Guide
Page 19
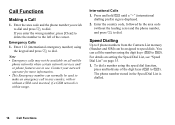
Call Functions Making a Call 1. If you wish to dial and press D to dial. Press and hold any country, with or without the leading zero) and the phone number, and press D to speed dials. International Calls 1. To dial a number using the speed dial function, press and hold Q until a "+" (international dialling prefix) sign is displayed. 2. Contact your network operator for more information. • This Emergency number can normally be assigned to dial. The phone number stored in any of the cursor. Emergency Calls 1. You can be used to make an emergency call the ...
Call Functions Making a Call 1. If you wish to dial and press D to dial. Press and hold any country, with or without the leading zero) and the phone number, and press D to speed dials. International Calls 1. To dial a number using the speed dial function, press and hold Q until a "+" (international dialling prefix) sign is displayed. 2. Contact your network operator for more information. • This Emergency number can normally be assigned to dial. The phone number stored in any of the cursor. Emergency Calls 1. You can be used to make an emergency call the ...

User Guide
Page 20
Select from "All Calls", "Dialled Nos.", "Missed Calls" or "Received Calls". If you wish to call . If the caller's name and number are displayed on the screen. Select the phone number you wish to stop redialling, press F or [End]. Press D to answer the call . 4. Select "On" or "Off". Press D, or [Answer] to redial the call log. Set the Any Key Answer function in the Contacts List, the caller's name and phone number are stored in the profile of each mode. (p. 96) Tip • When the Personal Hands-free Kit (option) is connected to the phone, you can redial ...
Select from "All Calls", "Dialled Nos.", "Missed Calls" or "Received Calls". If you wish to call . If the caller's name and number are displayed on the screen. Select the phone number you wish to stop redialling, press F or [End]. Press D to answer the call . 4. Select "On" or "Off". Press D, or [Answer] to redial the call log. Set the Any Key Answer function in the Contacts List, the caller's name and phone number are stored in the profile of each mode. (p. 96) Tip • When the Personal Hands-free Kit (option) is connected to the phone, you can redial ...
