

FO-DC500 | FO-DC525 | FO-DC600 Operation Manual
Page 52
... (set to ON, scanning will appear in the proper order. To change the setting, see page 207.) If Quick On-Line is established. Sending a Fax by pressing appropriate numeric keys. If Option Setting 23 (Quick On-line) is set for Chain Dialing can be combined with another autodial number or... digits entered manually with the numeric keys to dial one phone number up to ON at the factory. Press START/ ENTER after the final numeric key to clear...
... (set to ON, scanning will appear in the proper order. To change the setting, see page 207.) If Quick On-Line is established. Sending a Fax by pressing appropriate numeric keys. If Option Setting 23 (Quick On-line) is set for Chain Dialing can be combined with another autodial number or... digits entered manually with the numeric keys to dial one phone number up to ON at the factory. Press START/ ENTER after the final numeric key to clear...

FO-DC500 | FO-DC525 | FO-DC600 Operation Manual
Page 66
...procedure on the line connected to the machine. Setting the reception mode The reception mode is initially set to select AUTO RECEPTION or MANUAL 64 Receiving Faxes Receiving Faxes The machine has two modes for Line 1 (Line 2 is fixed at AUTO). 1 Press MENU . Make sure that the .../ ENTER . Note that RECEIVE MODE is selected in the display. MANUAL mode: Select this mode when you only want to select the reception mode. to AUTO. The machine will answer all calls automatically and receive incoming faxes. To change the reception mode, follow the steps below. ♦...
...procedure on the line connected to the machine. Setting the reception mode The reception mode is initially set to select AUTO RECEPTION or MANUAL 64 Receiving Faxes Receiving Faxes The machine has two modes for Line 1 (Line 2 is fixed at AUTO). 1 Press MENU . Make sure that the .../ ENTER . Note that RECEIVE MODE is selected in the display. MANUAL mode: Select this mode when you only want to select the reception mode. to AUTO. The machine will answer all calls automatically and receive incoming faxes. To change the reception mode, follow the steps below. ♦...

FO-DC500 | FO-DC525 | FO-DC600 Operation Manual
Page 67
... you pick up an extension phone before pressing START/ ENTER (otherwise the document will be transmitted). 3 When RECEIVING appears in the following section, Using MANUAL Reception Mode. Send/Receive Documents Receiving Faxes Using AUTO Reception Mode In AUTO reception mode, the machine automatically answers all calls on one ring and receives incoming...
... you pick up an extension phone before pressing START/ ENTER (otherwise the document will be transmitted). 3 When RECEIVING appears in the following section, Using MANUAL Reception Mode. Send/Receive Documents Receiving Faxes Using AUTO Reception Mode In AUTO reception mode, the machine automatically answers all calls on one ring and receives incoming...
FO-DC500 | FO-DC525 | FO-DC600 Operation Manual
Page 69
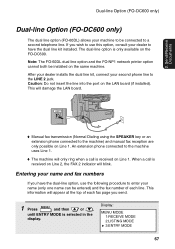
... one name can be entered) and the fax number of each line. Entering your name and fax numbers If you wish to use the following procedure to enter your second phone line to the machine) and manual fax reception are only possible on the FO-DC600. 2. The dual-line option is ...received on Line 2, the FAX 2 indicator will damage the LAN board. When a call is only available on Line 1. This ...
... one name can be entered) and the fax number of each line. Entering your name and fax numbers If you wish to use the following procedure to enter your second phone line to the machine) and manual fax reception are only possible on the FO-DC600. 2. The dual-line option is ...received on Line 2, the FAX 2 indicator will damage the LAN board. When a call is only available on Line 1. This ...

FO-DC500 | FO-DC525 | FO-DC600 Operation Manual
Page 84
... into a different address book, or delete a Scan to Desktop destination if the Network Scanner Tool has been uninstalled from the computer. ♦ Fax destinations can also be installed in Rapid Keys and Speed Dial numbers using the Web page. 82 However, the Web page can be used to... the Web page should not be previously stored in a Rapid Key or Speed Dial number. mail address at the time of transmission, or by manually entering the destination e- During installation and setup the Network Scanner Tool automatically stores the computer as a Scan to FTP, the destination must be stored...
... into a different address book, or delete a Scan to Desktop destination if the Network Scanner Tool has been uninstalled from the computer. ♦ Fax destinations can also be installed in Rapid Keys and Speed Dial numbers using the Web page. 82 However, the Web page can be used to... the Web page should not be previously stored in a Rapid Key or Speed Dial number. mail address at the time of transmission, or by manually entering the destination e- During installation and setup the Network Scanner Tool automatically stores the computer as a Scan to FTP, the destination must be stored...

FO-DC500 | FO-DC525 | FO-DC600 Operation Manual
Page 85
... Web page menu. Network Scanner Storing Network Scanning Destinations Storing destinations in the Web page To store a destination, click the desired destination type (E-mail, FTP, Fax or Group) under Destination Management in the Web page menu, select the destination you wish to edit or delete, and click Edit or Delete at..., enter the destination name and select a personal address book or the COMMON book. 3. To select a Rapid Key or Speed Dial number, select the Location Assigned Manually checkbox and select a Rapid Key or Speed Dial number from the list.
... Web page menu. Network Scanner Storing Network Scanning Destinations Storing destinations in the Web page To store a destination, click the desired destination type (E-mail, FTP, Fax or Group) under Destination Management in the Web page menu, select the destination you wish to edit or delete, and click Edit or Delete at..., enter the destination name and select a personal address book or the COMMON book. 3. To select a Rapid Key or Speed Dial number, select the Location Assigned Manually checkbox and select a Rapid Key or Speed Dial number from the list.

FO-DC500 | FO-DC525 | FO-DC600 Operation Manual
Page 90
...sure the Rapid Key overlay is FINE. This includes setting a default sender as explained in the procedure beginning on page 85 of this manual. ♦ If you wish to manually enter the e-mail address of a recipient for Scan to E-mail. of the recipient by pressing the letter entry keys (for scanning... use the procedure on page 85. 1 Load the document(s). • SEND READY will be completed. Note that STANDARD and SUPER FINE are primarily for faxing and are not recommended for details, see Step 5 on page 86; max. Scan to E-mail Using the E-mail Key Scan to E-mail Using the...
...sure the Rapid Key overlay is FINE. This includes setting a default sender as explained in the procedure beginning on page 85 of this manual. ♦ If you wish to manually enter the e-mail address of a recipient for Scan to E-mail. of the recipient by pressing the letter entry keys (for scanning... use the procedure on page 85. 1 Load the document(s). • SEND READY will be completed. Note that STANDARD and SUPER FINE are primarily for faxing and are not recommended for details, see Step 5 on page 86; max. Scan to E-mail Using the E-mail Key Scan to E-mail Using the...

FO-DC500 | FO-DC525 | FO-DC600 Operation Manual
Page 92
... is FINE. In the case of Scan to E-mail, this includes setting a default sender as explained in the procedure beginning on page 85 of this manual. ♦ If you don't need to enter a message or change the subject, use this procedure, the setup procedures outlined on page 85. 1 Load ... .) • If the destination is an FTP or Desktop destination, or if the destination is an e-mail destination and you are not recommended for faxing and are sending the image to an e-mail destination and need to change any of the recipient will appear in a Rapid Key. The default resolution...
... is FINE. In the case of Scan to E-mail, this includes setting a default sender as explained in the procedure beginning on page 85 of this manual. ♦ If you don't need to enter a message or change the subject, use this procedure, the setup procedures outlined on page 85. 1 Load ... .) • If the destination is an FTP or Desktop destination, or if the destination is an e-mail destination and you are not recommended for faxing and are sending the image to an e-mail destination and need to change any of the recipient will appear in a Rapid Key. The default resolution...
FO-DC500 | FO-DC525 | FO-DC600 Operation Manual
Page 94
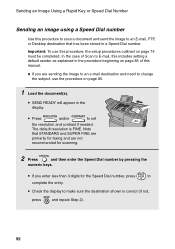
...Important: To use the procedure on page 85. 1 Load the document(s). • SEND READY will appear in the procedure beginning on page 85 of this manual. ♦ If you are not recommended for scanning. 2 SPEED DIAL Press and then enter the Speed Dial number by pressing the numeric keys. • ...If you enter less than 3 digits for faxing and are sending the image to an e-mail destination and need to change the subject, use this procedure, the setup procedures outlined on page 74...
...Important: To use the procedure on page 85. 1 Load the document(s). • SEND READY will appear in the procedure beginning on page 85 of this manual. ♦ If you are not recommended for scanning. 2 SPEED DIAL Press and then enter the Speed Dial number by pressing the numeric keys. • ...If you enter less than 3 digits for faxing and are sending the image to an e-mail destination and need to change the subject, use this procedure, the setup procedures outlined on page 74...

FO-DC500 | FO-DC525 | FO-DC600 Operation Manual
Page 196
Department Control Accessing the machine When Department Control is activated, you must enter your Department Code before using the machine. ♦ If you do not need to enter a Department Code to receive faxes manually (by picking up an extension phone connected to controlled access mode. Note: You do not begin the operation within one minute after entering the code, the machine will return to the same line and pressing START/ ENTER on the machine). 194
Department Control Accessing the machine When Department Control is activated, you must enter your Department Code before using the machine. ♦ If you do not need to enter a Department Code to receive faxes manually (by picking up an extension phone connected to controlled access mode. Note: You do not begin the operation within one minute after entering the code, the machine will return to the same line and pressing START/ ENTER on the machine). 194

FO-DC500 | FO-DC525 | FO-DC600 Operation Manual
Page 203
... optional setting appears, press START/ ENTER . 4 Enter a selection for each optional setting at the factory. OPTIONAL SETTING MODE 01:DEFAULT FAX RESOLUTION 02:# OF RINGS AUTO RX 03:# OF RINGS MANUAL RX 04: AUTO LISTING 3 Press the numeric keys to enter the 2-digit number ("01" to "38") of the optional setting that...
... optional setting appears, press START/ ENTER . 4 Enter a selection for each optional setting at the factory. OPTIONAL SETTING MODE 01:DEFAULT FAX RESOLUTION 02:# OF RINGS AUTO RX 03:# OF RINGS MANUAL RX 04: AUTO LISTING 3 Press the numeric keys to enter the 2-digit number ("01" to "38") of the optional setting that...

FO-DC500 | FO-DC525 | FO-DC600 Operation Manual
Page 204
...Initial setting: 0 (off . To turn the function off ) Setting 04: AUTO LISTING Select YES to have the machine automatically answer a call in MANUAL reception mode. Press or to 9 ). Enter a number from 1 to make the selection and then press START/ ENTER . ♦ Initial setting...: NO 202 Optional Settings Optional Settings Setting 01: DEFAULT FAX RESOLUTION This option sets the default resolution (the resolution used if a setting is entered, the machine will answer without ringing). ♦ ...
...Initial setting: 0 (off . To turn the function off ) Setting 04: AUTO LISTING Select YES to have the machine automatically answer a call in MANUAL reception mode. Press or to 9 ). Enter a number from 1 to make the selection and then press START/ ENTER . ♦ Initial setting...: NO 202 Optional Settings Optional Settings Setting 01: DEFAULT FAX RESOLUTION This option sets the default resolution (the resolution used if a setting is entered, the machine will answer without ringing). ♦ ...

FO-DC500 | FO-DC525 | FO-DC600 Operation Manual
Page 215
Printing Lists and Reports 8. Explanation of headings SENDER/ RECEIVER START TX/RX TIME PAGES TYPE NOTE The name or fax number of a Scan to E-mail transmission is performed. CONF. P.FAIL - One of the following notes will appear under NOTE in the ...operation will be overwritten each time a new operation is not indicated. If automatic print-out is turned off and the report is not printed manually for transmission/reception. The time at which transmission/reception started. Number of pages transmitted/received. A confidential operation was sent directly from the feeder,...
Printing Lists and Reports 8. Explanation of headings SENDER/ RECEIVER START TX/RX TIME PAGES TYPE NOTE The name or fax number of a Scan to E-mail transmission is performed. CONF. P.FAIL - One of the following notes will appear under NOTE in the ...operation will be overwritten each time a new operation is not indicated. If automatic print-out is turned off and the report is not printed manually for transmission/reception. The time at which transmission/reception started. Number of pages transmitted/received. A confidential operation was sent directly from the feeder,...

FO-DC500 | FO-DC525 | FO-DC600 Operation Manual
Page 242
... Printer driver, installing, 122-136 Program and Group List, 215 Programs, 178-187 M Mail server settings, 80 Manual reception mode, 64, 65 Memory Checking documents in, 51, 66 Sending faxes from, 45 Substitute reception to, 66 Memory retransmission, 53 Multi TTI, 207 N Network interface board Initializing, 78 ...22 Passcode List, 214 Pauses in automatic dialing, 40 PC Fax function, 72 Personal Book List, 215 Q Quick On-line, 207 R Rapid Key Dialing, 46 Recall Interval, 203 Recall Times, 203 Receive Reduce, 205 Reception mode Auto, 64, 65 Manual, 64, 65 Setting, 64 Redialing, 38, 53 Resolution,...
... Printer driver, installing, 122-136 Program and Group List, 215 Programs, 178-187 M Mail server settings, 80 Manual reception mode, 64, 65 Memory Checking documents in, 51, 66 Sending faxes from, 45 Substitute reception to, 66 Memory retransmission, 53 Multi TTI, 207 N Network interface board Initializing, 78 ...22 Passcode List, 214 Pauses in automatic dialing, 40 PC Fax function, 72 Personal Book List, 215 Q Quick On-line, 207 R Rapid Key Dialing, 46 Recall Interval, 203 Recall Times, 203 Receive Reduce, 205 Reception mode Auto, 64, 65 Manual, 64, 65 Setting, 64 Redialing, 38, 53 Resolution,...

FODC500|FODC600 Operation Manual
Page 52
...Option Setting 23 (Quick On-line) is established. Sending a Fax by pressing appropriate numeric keys. The document will appear. • If multiple fax numbers (or e-mail addresses) have been stored under a name, press A to display the fax numbers and then press or to ON at the factory. If ... Chain Dialing), then Rapid Key 02 (not set for Chain Dialing). ♦ Press a Rapid Key (set for Chain Dialing) and then manually enter a number by Automatic Dialing • If no numbers have been stored under the entered letter, NOT FOUND will be automatically transmitted once the...
...Option Setting 23 (Quick On-line) is established. Sending a Fax by pressing appropriate numeric keys. The document will appear. • If multiple fax numbers (or e-mail addresses) have been stored under a name, press A to display the fax numbers and then press or to ON at the factory. If ... Chain Dialing), then Rapid Key 02 (not set for Chain Dialing). ♦ Press a Rapid Key (set for Chain Dialing) and then manually enter a number by Automatic Dialing • If no numbers have been stored under the entered letter, NOT FOUND will be automatically transmitted once the...

FODC500|FODC600 Operation Manual
Page 65
... all calls automatically and receive incoming faxes. All calls, including faxes, must be selected for receiving faxes: AUTO mode: Select this mode when you only want to receive both faxes and voice calls. Display: MENU MODE 1:RECEIVE MODE 2:DESTINATION SETTING 3:ENTRY MODE 2 Press START/ ENTER . RECEIVE MODE 1 = AUTO RECEPTION 2 = MANUAL RECEPTION 3 Press or RECEPTION. 4 Press...
... all calls automatically and receive incoming faxes. All calls, including faxes, must be selected for receiving faxes: AUTO mode: Select this mode when you only want to receive both faxes and voice calls. Display: MENU MODE 1:RECEIVE MODE 2:DESTINATION SETTING 3:ENTRY MODE 2 Press START/ ENTER . RECEIVE MODE 1 = AUTO RECEPTION 2 = MANUAL RECEPTION 3 Press or RECEPTION. 4 Press...

FODC500|FODC600 Operation Manual
Page 66
...there is a document in the feeder, remove the document before the machine answers, you can talk to the same line. 2 If you hear a fax tone, press START/ ENTER on which the machine answers calls by changing Option Setting 2 (see page 190). ♦ If you pick up an ...extension phone before pressing START/ ENTER (otherwise the document will be transmitted). 3 When RECEIVING appears in the following section, Using MANUAL Reception Mode. Receiving Faxes Using AUTO Reception Mode In AUTO reception mode, the machine automatically answers all calls on one ring and receives incoming...
...there is a document in the feeder, remove the document before the machine answers, you can talk to the same line. 2 If you hear a fax tone, press START/ ENTER on which the machine answers calls by changing Option Setting 2 (see page 190). ♦ If you pick up an ...extension phone before pressing START/ ENTER (otherwise the document will be transmitted). 3 When RECEIVING appears in the following section, Using MANUAL Reception Mode. Receiving Faxes Using AUTO Reception Mode In AUTO reception mode, the machine automatically answers all calls on one ring and receives incoming...

FODC500|FODC600 Operation Manual
Page 184
Department Control Accessing the machine When Department Control is activated, you must enter your Department Code before using the machine. ♦ If you do not need to enter a Department Code to receive faxes manually (by picking up an extension phone connected to controlled access mode. Note: You do not begin the operation within one minute after entering the code, the machine will return to the same line and pressing START/ ENTER on the machine). 182
Department Control Accessing the machine When Department Control is activated, you must enter your Department Code before using the machine. ♦ If you do not need to enter a Department Code to receive faxes manually (by picking up an extension phone connected to controlled access mode. Note: You do not begin the operation within one minute after entering the code, the machine will return to the same line and pressing START/ ENTER on the machine). 182

FODC500|FODC600 Operation Manual
Page 65
...1:RECEIVE MODE 2:DESTINATION SETTING 3:ENTRY MODE 2 Press START/ ENTER . RECEIVE MODE 1 = AUTO RECEPTION 2 = MANUAL RECEPTION 3 Press or RECEPTION. 4 Press START/ ENTER . Receiving Faxes 2. MANUAL mode: Select this mode when you have an extension phone connected to the same line as the machine and you ...want to receive faxes on page 69 to select AUTO RECEPTION or MANUAL 63 Setting the reception mode The reception...
...1:RECEIVE MODE 2:DESTINATION SETTING 3:ENTRY MODE 2 Press START/ ENTER . RECEIVE MODE 1 = AUTO RECEPTION 2 = MANUAL RECEPTION 3 Press or RECEPTION. 4 Press START/ ENTER . Receiving Faxes 2. MANUAL mode: Select this mode when you have an extension phone connected to the same line as the machine and you ...want to receive faxes on page 69 to select AUTO RECEPTION or MANUAL 63 Setting the reception mode The reception...

FODC500|FODC600 Operation Manual
Page 173
Department Control Accessing the machine When Department Control is activated, you must enter your Department Code before performing an operation. ♦ If you do not have to enter a Department Code to receive faxes manually (by picking up an extension phone connected to controlled access mode. Note: You do not begin the operation within one minute after entering the code, the fax will return to the same line and pressing START/ ENTER on the machine). 6. Special Functions 171
Department Control Accessing the machine When Department Control is activated, you must enter your Department Code before performing an operation. ♦ If you do not have to enter a Department Code to receive faxes manually (by picking up an extension phone connected to controlled access mode. Note: You do not begin the operation within one minute after entering the code, the fax will return to the same line and pressing START/ ENTER on the machine). 6. Special Functions 171


