
FO-5550 Operation Manual
Page 3
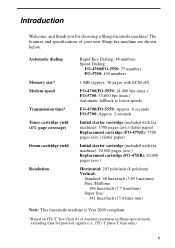
... Year 2000 compliant. *Based on ITU-T Test Chart #1 at standard resolution in Sharp special mode, excluding time for choosing a Sharp facsimile machine! FO-4700/FO-5550: Approx. 6 seconds FO-5700: Approx. 2 seconds Initial starter cartridge (included with fax machine): 3700 pages (ave.) (letter paper) Replacement cartridge (FO-47ND): 7500 pages (ave.) (letter paper) Initial starter cartridge (included with...
... Year 2000 compliant. *Based on ITU-T Test Chart #1 at standard resolution in Sharp special mode, excluding time for choosing a Sharp facsimile machine! FO-4700/FO-5550: Approx. 6 seconds FO-5700: Approx. 2 seconds Initial starter cartridge (included with fax machine): 3700 pages (ave.) (letter paper) Replacement cartridge (FO-47ND): 7500 pages (ave.) (letter paper) Initial starter cartridge (included with...

FO-5550 Operation Manual
Page 6
... than a cordless type) during an electrical storm. Important: • This facsimile machine is not compatible with digital telephone systems. 4 If you attempt to use the fax machine in the vicinity of the leak. • The power outlet must be installed near the equipment and must be easily accessible. The machine has...
... than a cordless type) during an electrical storm. Important: • This facsimile machine is not compatible with digital telephone systems. 4 If you attempt to use the fax machine in the vicinity of the leak. • The power outlet must be installed near the equipment and must be easily accessible. The machine has...

FO-5550 Operation Manual
Page 7
... 7 A Look at the Operation Panel 8 Connections 14 Installing the Print Cartridges 19 Loading Printing Paper 24 Entering Your Name and Fax Number 27 Setting the Date and Time 30 Volume Adjustment 32 2. Table of Contents Introduction 1 Important safety information 3 Table of ...Sending Documents 34 Transmittable Documents 34 Loading the Document 36 Adjusting the Resolution and Contrast 37 Sending a Fax by Normal Dialing 39 Programming Auto-Dial Numbers 41 Sending a Fax by Automatic Dialing 47 Cover Sheet 58 Batch Page Numbering 60 3. Making Copies 65 5. Receiving ...
... 7 A Look at the Operation Panel 8 Connections 14 Installing the Print Cartridges 19 Loading Printing Paper 24 Entering Your Name and Fax Number 27 Setting the Date and Time 30 Volume Adjustment 32 2. Table of Contents Introduction 1 Important safety information 3 Table of ...Sending Documents 34 Transmittable Documents 34 Loading the Document 36 Adjusting the Resolution and Contrast 37 Sending a Fax by Normal Dialing 39 Programming Auto-Dial Numbers 41 Sending a Fax by Automatic Dialing 47 Cover Sheet 58 Batch Page Numbering 60 3. Making Copies 65 5. Receiving ...

FO-5550 Operation Manual
Page 8
... Batch Transmission 112 Entering and Using Programs 115 Duplex Scanning for Two-sided Documents 130 Print Hold 132 Department Control 134 Blocking Reception of Unwanted Faxes 137 Telephone Billing 139 Distinctive Ring 141 6. Maintenance 161 Cleaning the Scanning Glass and Rollers 161 The Housing 162 Replacing the Verification Stamp 162...
... Batch Transmission 112 Entering and Using Programs 115 Duplex Scanning for Two-sided Documents 130 Print Hold 132 Department Control 134 Blocking Reception of Unwanted Faxes 137 Telephone Billing 139 Distinctive Ring 141 6. Maintenance 161 Cleaning the Scanning Glass and Rollers 161 The Housing 162 Replacing the Verification Stamp 162...

FO-5550 Operation Manual
Page 10
... FINE HALF TONE RESOLUTION 45 6 78 9 10 1 Display This displays messages and prompts during operation and programming. 2 LINE IN USE light This lights when the fax machine is using the telephone line. 3 STATUS CHECK light This lights when a paper size error or paper jam occurs, or when the print compartment cover...
... FINE HALF TONE RESOLUTION 45 6 78 9 10 1 Display This displays messages and prompts during operation and programming. 2 LINE IN USE light This lights when the fax machine is using the telephone line. 3 STATUS CHECK light This lights when a paper size error or paper jam occurs, or when the print compartment cover...

FO-5550 Operation Manual
Page 11
... display: prompts related to adjust the resolution before sending or copying a document. 9 Installation A Look at the Operation Panel 5 Paper out indicator This lights when the fax machine is out of information. 9 POWER SAVE key Press this key to turn on Power Save Mode, or set the Power Save Mode timer if... been selected with Option Setting 31 (Power Save Type). 10 RESOLUTION key Press this key to operations you are performing, and information about how the fax is not properly installed. 1.
... display: prompts related to adjust the resolution before sending or copying a document. 9 Installation A Look at the Operation Panel 5 Paper out indicator This lights when the fax machine is out of information. 9 POWER SAVE key Press this key to turn on Power Save Mode, or set the Power Save Mode timer if... been selected with Option Setting 31 (Power Save Type). 10 RESOLUTION key Press this key to operations you are performing, and information about how the fax is not properly installed. 1.

FO-5550 Operation Manual
Page 12
... UP SP CLEAR Rapid Key overlay up 20 21 22 23 24 25 26 11 Rapid Dial Keys Press one of these keys to dial a fax number automatically. (Note that you must attach the Rapid Key labels.) 12 CONTRAST key Press this key to adjust the contrast before sending or copying...
... UP SP CLEAR Rapid Key overlay up 20 21 22 23 24 25 26 11 Rapid Dial Keys Press one of these keys to dial a fax number automatically. (Note that you must attach the Rapid Key labels.) 12 CONTRAST key Press this key to adjust the contrast before sending or copying...

FO-5550 Operation Manual
Page 13
... the Operation Panel 16 RELAY key Press this key to send a document to another Sharp fax machine and have that machine in memory for transmission. 19 SEARCH DIAL key Press this key to search through your auto dial fax numbers by name. 20 COVER SHEET key Press this key to include a cover sheet... when sending a fax. 21 SPACE key Press this key to enter a space when programming a name. 22 SHIFT key Press this...
... the Operation Panel 16 RELAY key Press this key to send a document to another Sharp fax machine and have that machine in memory for transmission. 19 SEARCH DIAL key Press this key to search through your auto dial fax numbers by name. 20 COVER SHEET key Press this key to include a cover sheet... when sending a fax. 21 SPACE key Press this key to enter a space when programming a name. 22 SHIFT key Press this...

FO-5550 Operation Manual
Page 14
A Look at the Operation Panel 27 28 29 30 31 32 1 GHI 4 PRS 7 ABC 2 JKL 5 TUV 8 OPER 0 DEF 3 MNO 6 WXYZ 9 FUNCTION SPEED DIAL REDIAL SPEAKER COPY DOCUMENT DUPLEX SCAN BROADCAST PRIORITY REPORT STOP START 33 34 35 36 37 38 39 27 Dial keypad (numeric keys) Use these keys to dial and program fax numbers. 28 FUNCTION key Press this key to select various special functions. 29 SPEED DIAL key Press this key to dial a Speed Dial number. 30 COPY key Press this key to make a copy of a document. 31 DOCUMENT key Press this key to transmit a document without reading it first into memory. 12
A Look at the Operation Panel 27 28 29 30 31 32 1 GHI 4 PRS 7 ABC 2 JKL 5 TUV 8 OPER 0 DEF 3 MNO 6 WXYZ 9 FUNCTION SPEED DIAL REDIAL SPEAKER COPY DOCUMENT DUPLEX SCAN BROADCAST PRIORITY REPORT STOP START 33 34 35 36 37 38 39 27 Dial keypad (numeric keys) Use these keys to dial and program fax numbers. 28 FUNCTION key Press this key to select various special functions. 29 SPEED DIAL key Press this key to dial a Speed Dial number. 30 COPY key Press this key to make a copy of a document. 31 DOCUMENT key Press this key to transmit a document without reading it first into memory. 12

FO-5550 Operation Manual
Page 15
... when transmitting a document by Normal Dialling to listen to the line and verify the response of the receiving fax machine. 35 BROADCAST key Press this key to send a document to a group of receiving fax machines. 36 STOP key Press this key to cancel an operation before it is completed. 37 PRIORITY key...
... when transmitting a document by Normal Dialling to listen to the line and verify the response of the receiving fax machine. 35 BROADCAST key Press this key to send a document to a group of receiving fax machines. 36 STOP key Press this key to cancel an operation before it is completed. 37 PRIORITY key...
FO-5550 Operation Manual
Page 16
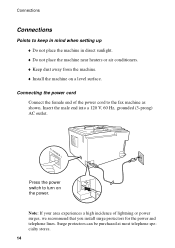
... into a 120 V, 60 Hz, grounded (3-prong) AC outlet. Surge protectors can be purchased at most telephone specialty stores. 14 Press the power switch to the fax machine as shown. Connecting the power cord Connect the female end of lightning or power surges, we recommend that you install surge protectors for the...
... into a 120 V, 60 Hz, grounded (3-prong) AC outlet. Surge protectors can be purchased at most telephone specialty stores. 14 Press the power switch to the fax machine as shown. Connecting the power cord Connect the female end of lightning or power surges, we recommend that you install surge protectors for the...

FO-5550 Operation Manual
Page 17
This procedure is set the fax machine for touch-tone dialing. Note: The fax machine is described in Chapter 6, Optional Settings. If you are on a pulse dial (rotary) line, you can connect a telephone to the TEL. Connecting a telephone (optional) ...
This procedure is set the fax machine for touch-tone dialing. Note: The fax machine is described in Chapter 6, Optional Settings. If you are on a pulse dial (rotary) line, you can connect a telephone to the TEL. Connecting a telephone (optional) ...

FO-5550 Operation Manual
Page 18
..., lift the end slightly and push in the right side of the document OUT tray. Important! The received document tray must be attached for the fax machine to operate properly. 16 Connections Attaching the document OUT tray Insert the protrusion on the right side of the machine into the hole in...
..., lift the end slightly and push in the right side of the document OUT tray. Important! The received document tray must be attached for the fax machine to operate properly. 16 Connections Attaching the document OUT tray Insert the protrusion on the right side of the machine into the hole in...

FO-5550 Operation Manual
Page 19
... of the cable to a computer (option) Note: This function is available as a laser printer for your dealer to the parallel port on the fax machine. Snap the clips on each side of the port onto the cable connector to secure it , consult your computer. If desired, you can...cable to have installed the provided printer software in your computer. 17 Important: Use only the provided IEEE P1284 parallel cable to connect the fax machine to the parallel port of your computer, you have the PC interface board installed. Installation Connections Connection to the port on the ...
... of the cable to a computer (option) Note: This function is available as a laser printer for your dealer to the parallel port on the fax machine. Snap the clips on each side of the port onto the cable connector to secure it , consult your computer. If desired, you can...cable to have installed the provided printer software in your computer. 17 Important: Use only the provided IEEE P1284 parallel cable to connect the fax machine to the parallel port of your computer, you have the PC interface board installed. Installation Connections Connection to the port on the ...

FO-5550 Operation Manual
Page 20
... Option Setting 31 (PC Interface Mode) to ON. (The option settings are fed through the scanner at once, which means that one of the fax machine. When transmitting a document, you can check to see the documentation that accompanies it . Connections 4 Press the panel keys as shown to set...Chapter 6, Optional Settings. 18 Verification Stamp (option) Note: This function is available as it is scanned. After scanning, you wish to use the fax machine as a printer, you must also install the printer software. Consult your dealer if you can have been stamped to verify that no double ...
... Option Setting 31 (PC Interface Mode) to ON. (The option settings are fed through the scanner at once, which means that one of the fax machine. When transmitting a document, you can check to see the documentation that accompanies it . Connections 4 Press the panel keys as shown to set...Chapter 6, Optional Settings. 18 Verification Stamp (option) Note: This function is available as it is scanned. After scanning, you wish to use the fax machine as a printer, you must also install the printer software. Consult your dealer if you can have been stamped to verify that no double ...
FO-5550 Operation Manual
Page 21
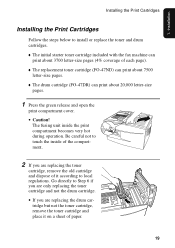
...very hot during operation. Go directly to install or replace the toner and drum cartridges. ♦ The initial starter toner cartridge included with the fax machine can print about 20,000 letter-size pages. 1 Press the green release and open the print compartment cover. • Caution! 1. The...the toner cartridge, remove the old cartridge and dispose of each page). ♦ The replacement toner cartridge (FO-47ND) can print about 7500 letter-size pages. ♦ The drum cartridge (FO-47DR) can print about 3700 letter-size pages (4% coverage of it on a sheet of paper. 19 ...
...very hot during operation. Go directly to install or replace the toner and drum cartridges. ♦ The initial starter toner cartridge included with the fax machine can print about 20,000 letter-size pages. 1 Press the green release and open the print compartment cover. • Caution! 1. The...the toner cartridge, remove the old cartridge and dispose of each page). ♦ The replacement toner cartridge (FO-47ND) can print about 7500 letter-size pages. ♦ The drum cartridge (FO-47DR) can print about 3700 letter-size pages (4% coverage of it on a sheet of paper. 19 ...

FO-5550 Operation Manual
Page 27
Installation 3 Insert a stack of paper into the tray, print side up. • If you loaded letter paper, make sure the end of the tray is pushed in the paper cassette 1 Grasp the hand-hold on the cassette and pull out the cassette until it stops. 25 Loading Printing Paper Loading paper in . 1. Otherwise a size error will result. 4 Replace the received document tray. • The received document tray must be attached for the fax machine to operate properly.
Installation 3 Insert a stack of paper into the tray, print side up. • If you loaded letter paper, make sure the end of the tray is pushed in the paper cassette 1 Grasp the hand-hold on the cassette and pull out the cassette until it stops. 25 Loading Printing Paper Loading paper in . 1. Otherwise a size error will result. 4 Replace the received document tray. • The received document tray must be attached for the fax machine to operate properly.

FO-5550 Operation Manual
Page 29
...: 3:OWN PASSCODE SET ENTER FAX # 27 Enter your name, telephone/fax number, and the date and time appear on each fax page you send. Installation Entering Your Name and Fax Number Entering Your Name and Fax Number Before you can begin using the fax machine, you send. 1. ...3:ENTRY MODE ENTER #(1-9,*,#) FUNCTION 3 2 Press the 3 key. 3 The display will appear automatically at the top of each fax message you must program your fax messages. Note: Make sure the display shows the date and time before beginning a programming operation. Once you program this information ...
...: 3:OWN PASSCODE SET ENTER FAX # 27 Enter your name, telephone/fax number, and the date and time appear on each fax page you send. Installation Entering Your Name and Fax Number Entering Your Name and Fax Number Before you can begin using the fax machine, you send. 1. ...3:ENTRY MODE ENTER #(1-9,*,#) FUNCTION 3 2 Press the 3 key. 3 The display will appear automatically at the top of each fax message you must program your fax messages. Note: Make sure the display shows the date and time before beginning a programming operation. Once you program this information ...

FO-5550 Operation Manual
Page 30
of 20 digits) by pressing the appropriate letter keys as shown below. (Max. Entering Your Name and Fax Number 3 Enter your name by pressing the numeric keys. 3 1 2 4 4 1 1 • To insert a space between digits, press the # key. (Example) • To clear a mistake, press the .... 4 Press the START key. The display will show: ENTER SENDER'S NAME START 5 Flip the Rapid Key overlay down (if it is up), and enter your fax number (max. of 24 characters.) A B C D E F G H I J K L M N O P Q R S T U V W X Y Z SPACE SHIFT SP CLEAR Example...
of 20 digits) by pressing the appropriate letter keys as shown below. (Max. Entering Your Name and Fax Number 3 Enter your name by pressing the numeric keys. 3 1 2 4 4 1 1 • To insert a space between digits, press the # key. (Example) • To clear a mistake, press the .... 4 Press the START key. The display will show: ENTER SENDER'S NAME START 5 Flip the Rapid Key overlay down (if it is up), and enter your fax number (max. of 24 characters.) A B C D E F G H I J K L M N O P Q R S T U V W X Y Z SPACE SHIFT SP CLEAR Example...

FO-5550 Operation Manual
Page 31
To select one of a name, press the appropriate numeric key. STOP STOP 29 To change case, press the SHIFT key. ♦ To clear a mistake, press the CLEAR key. ♦ To enter a number as part of the following special symbols, press the SP key one or more times 6 Press the START key. Installation Entering Your Name and Fax Number ♦ Press the SPACE key to the date and time display. The display will show: 4:DATE &TIME SET MODE PRESS START KEY START 7 Press the STOP key twice to return to enter a space. 1.
To select one of a name, press the appropriate numeric key. STOP STOP 29 To change case, press the SHIFT key. ♦ To clear a mistake, press the CLEAR key. ♦ To enter a number as part of the following special symbols, press the SP key one or more times 6 Press the START key. Installation Entering Your Name and Fax Number ♦ Press the SPACE key to the date and time display. The display will show: 4:DATE &TIME SET MODE PRESS START KEY START 7 Press the STOP key twice to return to enter a space. 1.


