
FO-2081 Operation Guide (for general information)
Page 16
... cost of operation. will be canceled. If the start ( ) key again, however, the scan size set duration of time elapses without the machine being used when the power is on the operation panel is pressed, an original is placed, a print job is received. Preheat mode This function automatically switches the machine to a state that consumes even less power than preheat mode if the set in "CHANGING A TRAY'S PAPER SIZE SETTING" (p.21) or "VALID COPY WIDTH" (program number 25...
... cost of operation. will be canceled. If the start ( ) key again, however, the scan size set duration of time elapses without the machine being used when the power is on the operation panel is pressed, an original is placed, a print job is received. Preheat mode This function automatically switches the machine to a state that consumes even less power than preheat mode if the set in "CHANGING A TRAY'S PAPER SIZE SETTING" (p.21) or "VALID COPY WIDTH" (program number 25...
FO-2081 Operation Guide (for general information)
Page 40
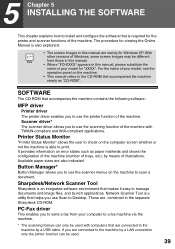
... paper sizes are contained in this manual are connected to use Scan to Desktop. If you use the printer function of the machine with computers that are mainly for Windows XP. 5 Chapter 5 INSTALLING THE SOFTWARE This chapter explains how to install and configure the software that is required for the printer and scanner functions of your model for "XXXX". PC-Fax driver This enables you to the machine by a LAN connection...
... paper sizes are contained in this manual are connected to use Scan to Desktop. If you use the printer function of the machine with computers that are mainly for Windows XP. 5 Chapter 5 INSTALLING THE SOFTWARE This chapter explains how to install and configure the software that is required for the printer and scanner functions of your model for "XXXX". PC-Fax driver This enables you to the machine by a LAN connection...

FO-2081 Operation Guide (for general information)
Page 42
... for right hand operation. • The scanner feature only works when using a USB cable. • If an error message appears, follow the instructions on the problem, you may have to click the "Cancel" button to exit the installer. If this case, reinstall the software from the language menu. You can show the "SOFTWARE LICENSE" in the selected language, continue the installation with a USB connection 1 The USB...
... for right hand operation. • The scanner feature only works when using a USB cable. • If an error message appears, follow the instructions on the problem, you may have to click the "Cancel" button to exit the installer. If this case, reinstall the software from the language menu. You can show the "SOFTWARE LICENSE" in the selected language, continue the installation with a USB connection 1 The USB...

FO-2081 Operation Guide (for general information)
Page 47
... and click the "Next" button. • Window confirming installation of the "Connect via the network" menu. 9 Printers connected to the network are installing multiple printer drivers, select the printer that the machine is powered on and connected to your default printer. Check the contents and then click the "Next" button. 11 Select whether or not you are detected. If you wish to use the custom installation procedure to set either printer driver as your computer and...
... and click the "Next" button. • Window confirming installation of the "Connect via the network" menu. 9 Printers connected to the network are installing multiple printer drivers, select the printer that the machine is powered on and connected to your default printer. Check the contents and then click the "Next" button. 11 Select whether or not you are detected. If you wish to use the custom installation procedure to set either printer driver as your computer and...
FO-2081 Operation Guide (for general information)
Page 54
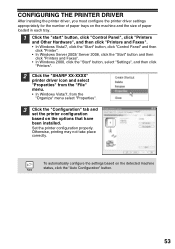
Set the printer configuration properly. Otherwise, printing may not take place correctly. CONFIGURING THE PRINTER DRIVER After installing the printer driver, you must configure the printer driver settings appropriately for the number of paper trays on the machine and the size of paper loaded in each tray. 1 Click the "start" button, click "Control Panel", click "Printers and Other Hardware", and then click "Printers and Faxes". • In Windows Vista/7, click the "Start" button, click "Control Panel" and then click "Printer". • In Windows...
Set the printer configuration properly. Otherwise, printing may not take place correctly. CONFIGURING THE PRINTER DRIVER After installing the printer driver, you must configure the printer driver settings appropriately for the number of paper trays on the machine and the size of paper loaded in each tray. 1 Click the "start" button, click "Control Panel", click "Printers and Other Hardware", and then click "Printers and Faxes". • In Windows Vista/7, click the "Start" button, click "Control Panel" and then click "Printer". • In Windows...

FO-2081 Operation Guide (for general information)
Page 71
... network printer. (This is not necessary if the software has already been installed and configured.) 70 Available paper sizes and paper remaining are also indicated. • In order to use the Printer Status Monitor, the machine must be connected to print. Printing via a server When the first print job is executed after starting up the Printer Status Monitor, the machine's IP address is automatically set in the software setup guide for general users) "Printer Status...
... network printer. (This is not necessary if the software has already been installed and configured.) 70 Available paper sizes and paper remaining are also indicated. • In order to use the Printer Status Monitor, the machine must be connected to print. Printing via a server When the first print job is executed after starting up the Printer Status Monitor, the machine's IP address is automatically set in the software setup guide for general users) "Printer Status...

FO-2081 Operation Guide (for general information)
Page 81
... one of the "CR" (return) code, "LF" (line break) code, and "FF" (page break) code. CR=CR; FF=CR+FF Enable, Disable Description This specifies which PCL font to repeatedly send the print data when multiple copies are installed. PRINTER FUNCTIONS Item Default Paper Source 2-Sided Print ROPM (Rip Once, Print Many) Selections Auto, Tray 1, Tray 2*, Bypass (Auto) 1-Sided, 2-Sided (Book), 2-Sided (Tablet) Enable, Disable Description Set the default paper tray. * Selections available depend on the transmitted...
... one of the "CR" (return) code, "LF" (line break) code, and "FF" (page break) code. CR=CR; FF=CR+FF Enable, Disable Description This specifies which PCL font to repeatedly send the print data when multiple copies are installed. PRINTER FUNCTIONS Item Default Paper Source 2-Sided Print ROPM (Rip Once, Print Many) Selections Auto, Tray 1, Tray 2*, Bypass (Auto) 1-Sided, 2-Sided (Book), 2-Sided (Tablet) Enable, Disable Description Set the default paper tray. * Selections available depend on the transmitted...

FO-2081 Operation Guide (for general information)
Page 89
... "Add/Remove Programs" icon. 3 Select the driver or utility that you wish to remove from these steps: Windows 1 Click the "start" button, and then click "Control Panel". For more information, refer to your operating manual or to make design and specification changes for your operating system. 4 Restart your computer. The performance specification figures indicated are nominal values of continuous improvement, SHARP reserves the right to the help...
... "Add/Remove Programs" icon. 3 Select the driver or utility that you wish to remove from these steps: Windows 1 Click the "start" button, and then click "Control Panel". For more information, refer to your operating manual or to make design and specification changes for your operating system. 4 Restart your computer. The performance specification figures indicated are nominal values of continuous improvement, SHARP reserves the right to the help...
FO-2081 Operation Guide (for general information)
Page 96
... transmission may not be successful if there is insufficient memory or disk capacity in the CD-ROM that accompanies the machine, the recipient must have less pages. • The scan settings stored in a scan mode cannot be used in a different format. • If the number of scanned originals is 200 dpi or 300 dpi. If the recipient cannot open the scanned image without using the software program...
... transmission may not be successful if there is insufficient memory or disk capacity in the CD-ROM that accompanies the machine, the recipient must have less pages. • The scan settings stored in a scan mode cannot be used in a different format. • If the number of scanned originals is 200 dpi or 300 dpi. If the recipient cannot open the scanned image without using the software program...
FO-2081 Operation Guide (for general information)
Page 98
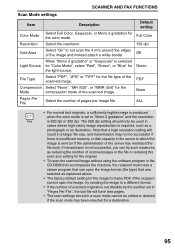
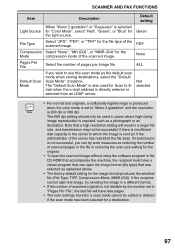
.... SCANNER AND FAX FUNCTIONS Item Description Default setting When "Mono 2 gradation" or "Grayscale" is 200 dpi or 300 dpi. Note that was selected as the default scan mode when storing destinations, select the "Default Scan Mode" checkbox. PDF Compression Select "None", "MH (G3)", or "MMR (G4)" for a destination. 97 If transmission is sent (or if the administrator of scanned pages in the file or reducing the scan size setting...
.... SCANNER AND FAX FUNCTIONS Item Description Default setting When "Mono 2 gradation" or "Grayscale" is 200 dpi or 300 dpi. Note that was selected as the default scan mode when storing destinations, select the "Default Scan Mode" checkbox. PDF Compression Select "None", "MH (G3)", or "MMR (G4)" for a destination. 97 If transmission is sent (or if the administrator of scanned pages in the file or reducing the scan size setting...

FO-2081 Operation Guide (for general information)
Page 127
... box. 8 [Help] button Click this button to configure six sets of scanning settings as a scan menu on installing Button Manager and establishing the Control Panel settings, see "SCANNING USING THE KEYS ON THE MACHINE" (p.117). For information on the machine. 2 "Application Selection" area Select the application that allows you adjust the scanning conditions. 4 "Scan Setup" area Set the scan conditions. 5 [OK] button Click to save your settings and close the dialog box. 6 [Cancel] button Click this button to close...
... box. 8 [Help] button Click this button to configure six sets of scanning settings as a scan menu on installing Button Manager and establishing the Control Panel settings, see "SCANNING USING THE KEYS ON THE MACHINE" (p.117). For information on the machine. 2 "Application Selection" area Select the application that allows you adjust the scanning conditions. 4 "Scan Setup" area Set the scan conditions. 5 [OK] button Click to save your settings and close the dialog box. 6 [Cancel] button Click this button to close...

FO-2081 Operation Guide (for general information)
Page 155
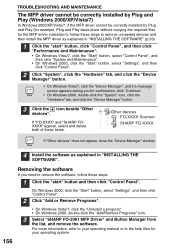
.../XP, follow these steps to check your computer. To remove the software, see "Removing the software" (p.156) MFP driver cannot be installed (Windows 2000/XP) If the MFP driver cannot be possible to take?" ("File signature verification" in Windows 2000). PROBLEMS DURING SETUP THE SOFTWARE If the software does not install correctly, check the following items on your computer's settings. 1 Click the "start" button and then click "Control Panel".
.../XP, follow these steps to check your computer. To remove the software, see "Removing the software" (p.156) MFP driver cannot be installed (Windows 2000/XP) If the MFP driver cannot be possible to take?" ("File signature verification" in Windows 2000). PROBLEMS DURING SETUP THE SOFTWARE If the software does not install correctly, check the following items on your computer's settings. 1 Click the "start" button and then click "Control Panel".
FO-2081 Operation Guide (for general information)
Page 157
... 2000, click the "Start" button, select "Settings", and then click "Control Panel". 2 Click "Add or Remove Programs". • On Windows Vista/7, click the "Uninstall a program". • On Windows 2000, double-click the "Add/Remove Programs" icon. 3 Select "SHARP FO-2081 MFP Driver" and Button Manager from the list, and remove the software. If "FO-XXXX" and "SHARP FOXXXX" appear, select and delete both of these items. Other devices FO-XXXX Scanner SHARP FO-XXXX If "Other...
... 2000, click the "Start" button, select "Settings", and then click "Control Panel". 2 Click "Add or Remove Programs". • On Windows Vista/7, click the "Uninstall a program". • On Windows 2000, double-click the "Add/Remove Programs" icon. 3 Select "SHARP FO-2081 MFP Driver" and Button Manager from the list, and remove the software. If "FO-XXXX" and "SHARP FOXXXX" appear, select and delete both of these items. Other devices FO-XXXX Scanner SHARP FO-XXXX If "Other...
FO-2081 Operation Manual
Page 4
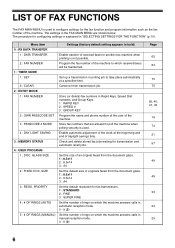
...; COVER SHEET 51 ● MESSAGE FUNCTION 52 ● TWO-SIDED ORIGINAL TRANSMISSION FUNCTION 53 DIALING AND TRANSMITTING 54 ● DIRECT KEYPAD DIALING 54 ● RAPID KEY DIALING 54 ● SPEED DIALING 54 ● CHAIN DIALING 55 ● NORMAL DIALING USING THE [SPEAKER] KEY 55 ● USING THE SEARCH KEY 56 ● REDIALING 56 IF THE MEMORY BECOMES FULL WHILE SCANNING AN ORIGINAL 57 CANCELING (DELETING) A STORED FAX JOB...57 RECEIVING FAXES 58 ● USING AUTO MODE 58 ● USING MAN. MODE...
...; COVER SHEET 51 ● MESSAGE FUNCTION 52 ● TWO-SIDED ORIGINAL TRANSMISSION FUNCTION 53 DIALING AND TRANSMITTING 54 ● DIRECT KEYPAD DIALING 54 ● RAPID KEY DIALING 54 ● SPEED DIALING 54 ● CHAIN DIALING 55 ● NORMAL DIALING USING THE [SPEAKER] KEY 55 ● USING THE SEARCH KEY 56 ● REDIALING 56 IF THE MEMORY BECOMES FULL WHILE SCANNING AN ORIGINAL 57 CANCELING (DELETING) A STORED FAX JOB...57 RECEIVING FAXES 58 ● USING AUTO MODE 58 ● USING MAN. MODE...
FO-2081 Operation Manual
Page 8
..., Speed Dial numbers, and Group Keys. 1 : RAPID KEY 2 : SPEED # 3 : GROUP KEY Program the name and phone number of the user of received faxes to take place automatically at the beginning and end of daylight savings time. Menu item 0 : RX DATA TRANSFER 1 : DATA TRANSFER 2 : FAX NUMBER 1 : TIMER MODE 1 : SET 2 : CLEAR 2 : ENTRY MODE 1 : FAX NUMBER 2 : OWN PASSCODE SET 3 : PASSCODE # MODE 4 : DAY LIGHT SAVING 3 : MEMORY STATUS 4 : USER PROGRAM 1 : DOC. SIZE 3 : RESO. Check and delete stored fax jobs waiting for configuring settings is explained in bold) Enable transfer of the machine...
..., Speed Dial numbers, and Group Keys. 1 : RAPID KEY 2 : SPEED # 3 : GROUP KEY Program the name and phone number of the user of received faxes to take place automatically at the beginning and end of daylight savings time. Menu item 0 : RX DATA TRANSFER 1 : DATA TRANSFER 2 : FAX NUMBER 1 : TIMER MODE 1 : SET 2 : CLEAR 2 : ENTRY MODE 1 : FAX NUMBER 2 : OWN PASSCODE SET 3 : PASSCODE # MODE 4 : DAY LIGHT SAVING 3 : MEMORY STATUS 4 : USER PROGRAM 1 : DOC. SIZE 3 : RESO. Check and delete stored fax jobs waiting for configuring settings is explained in bold) Enable transfer of the machine...

FO-2081 Operation Manual
Page 27
... to use (0 to select the number of rings. Selection "5:# OF RINGS (MANUAL)" 5 Press the [OK] key. 6 Press the [MENU] key. Press the [MENU] key to print received faxes. Selection "4:USER PROGRAM" 3 Press the [ ] key ( ) or [ ] key ( ) until "4:USER PROGRAM" appears, and then press the [OK] key. To set . SELECTING THE RECEPTION PAPER SIZE Set the size of paper to be set the paper size, see "LOADING PAPER" in Step 4 below. 1 Press the [MENU] key. 4 Press a numeric key to 9). 2 Press the [ ] key ( ) or [ ] key ( ) until "5:# OF RINGS (MANUAL)" appears...
... to use (0 to select the number of rings. Selection "5:# OF RINGS (MANUAL)" 5 Press the [OK] key. 6 Press the [MENU] key. Press the [MENU] key to print received faxes. Selection "4:USER PROGRAM" 3 Press the [ ] key ( ) or [ ] key ( ) until "4:USER PROGRAM" appears, and then press the [OK] key. To set . SELECTING THE RECEPTION PAPER SIZE Set the size of paper to be set the paper size, see "LOADING PAPER" in Step 4 below. 1 Press the [MENU] key. 4 Press a numeric key to 9). 2 Press the [ ] key ( ) or [ ] key ( ) until "5:# OF RINGS (MANUAL)" appears...

FO-2081 Operation Manual
Page 39
... not use distinctive ringing, select the ringing pattern to which you do not subscribe to select a ringing pattern. INITIAL SETTINGS DISTINCTIVE RINGING Distinctive ringing is a service offered by scrolling through them with a distinctive ringing pattern, on the same line will automatically answer and begin reception. Selection "21:DISTINCTIVE RING" 6 Press the [MENU] key. Selection "4:USER PROGRAM" 3 Press the [ ] key ( ) or [ ] key ( ) until the machine answers. If you subscribe to a distinctive ringing service, you have connected on your designated fax number is dialed...
... not use distinctive ringing, select the ringing pattern to which you do not subscribe to select a ringing pattern. INITIAL SETTINGS DISTINCTIVE RINGING Distinctive ringing is a service offered by scrolling through them with a distinctive ringing pattern, on the same line will automatically answer and begin reception. Selection "21:DISTINCTIVE RING" 6 Press the [MENU] key. Selection "4:USER PROGRAM" 3 Press the [ ] key ( ) or [ ] key ( ) until the machine answers. If you subscribe to a distinctive ringing service, you have connected on your designated fax number is dialed...
FO-2081 Operation Manual
Page 90
... Display 12, 14 Distinctive ringing 37 Document glass 11 E Entering your name and fax number 19 F Fax main menu 6 Fax setup - Distinctive ringing 37 - Number of alarm beeps 16 Answering machine - Number of rings for auto reception 24 - Remote reception 35 - Message function 52 - Unsuitable originals 46 P Paper output tray 11 Paper output tray extension 11 Paper tray 11 PC modem 34 Power cord 11 Power switch 11 Q Quick reference guide 3 88 Length of recall times 28 - Rapid key dialing 38 - Speed dialing 40 Contrast 50 Cover sheet...
... Display 12, 14 Distinctive ringing 37 Document glass 11 E Entering your name and fax number 19 F Fax main menu 6 Fax setup - Distinctive ringing 37 - Number of alarm beeps 16 Answering machine - Number of rings for auto reception 24 - Remote reception 35 - Message function 52 - Unsuitable originals 46 P Paper output tray 11 Paper output tray extension 11 Paper tray 11 PC modem 34 Power cord 11 Power switch 11 Q Quick reference guide 3 88 Length of recall times 28 - Rapid key dialing 38 - Speed dialing 40 Contrast 50 Cover sheet...
Startup Guide
Page 1
... scanning width 8-1/2" maximum Halftone transmission 256 levels Contrast (exposure) adjustment Light, Medium, Dark Extension telephone connection Possible (1 telephone) Auto dialing Combined total of the machine. This manual only explains the fax functions of 18 One-Touch Dial and Group keys; 100 Speed Dial numbers; Adobe® Reader® can be distinctive ring compatible.) Comments: 1.It is on the rear of the telephone line cord into a standard (RJ11C) single- Operation Guide for fax (on the FO-2081 Operation Guide CDROM) This manual...
... scanning width 8-1/2" maximum Halftone transmission 256 levels Contrast (exposure) adjustment Light, Medium, Dark Extension telephone connection Possible (1 telephone) Auto dialing Combined total of the machine. This manual only explains the fax functions of 18 One-Touch Dial and Group keys; 100 Speed Dial numbers; Adobe® Reader® can be distinctive ring compatible.) Comments: 1.It is on the rear of the telephone line cord into a standard (RJ11C) single- Operation Guide for fax (on the FO-2081 Operation Guide CDROM) This manual...
Startup Guide
Page 2
... into switch slots. TVOC When on the first page of the transmission, the date and time it back on. • Machine power must be connected to a line, as follows to maintain the performance of Apple Inc., registered in accordance with Part 68 of the FCC rules and the requirements adopted by the operation of spare parts for wet locations. • Never touch uninsulated telephone...
... into switch slots. TVOC When on the first page of the transmission, the date and time it back on. • Machine power must be connected to a line, as follows to maintain the performance of Apple Inc., registered in accordance with Part 68 of the FCC rules and the requirements adopted by the operation of spare parts for wet locations. • Never touch uninsulated telephone...


