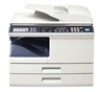
FO-2080 Online Operation Manual
Page 29
... name of the USB cable or LAN cable, and make sure that "SHARP FO-xxxx" is installed, and can be found in the "Print" window. Try a known good cable. The machine's IP address was selected. 2. If the machine is connected or the share settings have a solid connection. The machine is not correctly connected to solve...
... name of the USB cable or LAN cable, and make sure that "SHARP FO-xxxx" is installed, and can be found in the "Print" window. Try a known good cable. The machine's IP address was selected. 2. If the machine is connected or the share settings have a solid connection. The machine is not correctly connected to solve...

FO-2080 Online Operation Manual
Page 38
... 3 NIC Setup Change network settings. 4 NIC Restart To make new settings take effect, restart the network connection. You can check and change network settings in the Web page, and check the printer status. ● To access the Web page in the machine, the IP address must be assigned to access ...the Web page. 1 Open the Web browser on your Web browser, enter the IP address of your computer. Enter the IP address previously ...
... 3 NIC Setup Change network settings. 4 NIC Restart To make new settings take effect, restart the network connection. You can check and change network settings in the Web page, and check the printer status. ● To access the Web page in the machine, the IP address must be assigned to access ...the Web page. 1 Open the Web browser on your Web browser, enter the IP address of your computer. Enter the IP address previously ...

FO-2080 Operation Manual for General Use
Page 49
... the machine is connected with the machine. Make sure that you for your computer with that is already connected to the network and its IP address has been set the IP address of the software license, and then click the "Yes" button. The scanner function cannot be connected to your computer. • If you intend...
... the machine is connected with the machine. Make sure that you for your computer with that is already connected to the network and its IP address has been set the IP address of the software license, and then click the "Yes" button. The scanner function cannot be connected to your computer. • If you intend...

FO-2080 Operation Manual for General Use
Page 50
...detected. Be sure to ask your computer's firewall and then repeat the installation from the beginning. 10 Enter the IP address, subnet mask, and default gateway. The settings in the above window are examples. Follow the on-screen instructions to click the "OK" button and then the ..."Search" button. INSTALLING THE SOFTWARE Set the IP Address This setting is only required once when using the machine on a network. 8 Click the "Set the IP Address" button. 9 The printer or printers connected to the network will prevent printing.
...detected. Be sure to ask your computer's firewall and then repeat the installation from the beginning. 10 Enter the IP address, subnet mask, and default gateway. The settings in the above window are examples. Follow the on-screen instructions to click the "OK" button and then the ..."Search" button. INSTALLING THE SOFTWARE Set the IP Address This setting is only required once when using the machine on a network. 8 Click the "Set the IP Address" button. 9 The printer or printers connected to the network will prevent printing.

FO-2080 Operation Manual for General Use
Page 51
If you have not set the IP Address, click the "Set the IP Address" button first and go to step 8 on page 48. 9 Read the message in the confirmation dialog box that appears. Note If the machine's IP address cannot be detected. Click the printer to step 11. Go to be configured (the machine) and click the "Next" button... found, make sure the machine is powered on, make sure the network cable is connected correctly, and then click the "Search" button. 49 LPR (TCP/IP) direct printing After step 1-7 on page 47 8 Click the "Printer Driver" button.
If you have not set the IP Address, click the "Set the IP Address" button first and go to step 8 on page 48. 9 Read the message in the confirmation dialog box that appears. Note If the machine's IP address cannot be detected. Click the printer to step 11. Go to be configured (the machine) and click the "Next" button... found, make sure the machine is powered on, make sure the network cable is connected correctly, and then click the "Search" button. 49 LPR (TCP/IP) direct printing After step 1-7 on page 47 8 Click the "Printer Driver" button.

FO-2080 Operation Manual for General Use
Page 52
... "OK" button. 17 When the "Finish" screen appears, click the "Close" button. This completes the installation of the IP address and click the "Next" button. INSTALLING THE SOFTWARE 12 In the window for setting the destination print port name, make sure that the entries are correct and then click the "Finish" button. In... be sure to click "Install this case, click the "Yes" button to restart your default printer and click the "Next" button. If any of the SHARP software is complete." Make sure that ":lp" appears at the end of the software. 50
... "OK" button. 17 When the "Finish" screen appears, click the "Close" button. This completes the installation of the IP address and click the "Next" button. INSTALLING THE SOFTWARE 12 In the window for setting the destination print port name, make sure that the entries are correct and then click the "Finish" button. In... be sure to click "Install this case, click the "Yes" button to restart your default printer and click the "Next" button. If any of the SHARP software is complete." Make sure that ":lp" appears at the end of the software. 50
FO-2080 Operation Manual for General Use
Page 106
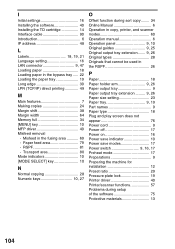
... function during setup of the software 75 Protective materials 13 104 I Initial settings 16 Installing the software 40 Installing the TD cartridge 14 Interface cable 90 Introduction 6 IP address 48 L Labels 18, 19, 21 Language setting 16 LAN connector 9, 47 Loading paper 18 Loading paper in the bypass ...tray ..... 22 Loading the paper tray 19 Long edge 30 LPR (TCP/IP) direct printing 49 M Main features 7...
... function during setup of the software 75 Protective materials 13 104 I Initial settings 16 Installing the software 40 Installing the TD cartridge 14 Interface cable 90 Introduction 6 IP address 48 L Labels 18, 19, 21 Language setting 16 LAN connector 9, 47 Loading paper 18 Loading paper in the bypass ...tray ..... 22 Loading the paper tray 19 Long edge 30 LPR (TCP/IP) direct printing 49 M Main features 7...

FO-2080 Operation Manual for General Use
Page 107
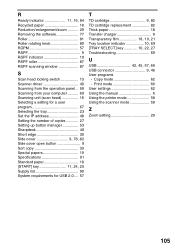
... Using the manual 6 Using the printer mode 58 Using the scanner mode 59 Z Zoom setting 29 105 Copy mode 62 - R Ready indicator 11, 16, 84 Recycled paper 18 Reduction/enlargement/zoom .......... 29 Removing the software 77 Roller 81 Roller ...Scanning from the operation panel .. 59 Scanning from your computer .......... 60 Scanning unit (scan head 16 Selecting a setting for a user program 67 Selecting the tray 23 Set the IP address 48 Setting the number of copies 27 Setting up button manager 53 Sharpdesk 40 Short edge 30 Side cover 9, 78, 82 Side cover open button 9 Sort...
... Using the manual 6 Using the printer mode 58 Using the scanner mode 59 Z Zoom setting 29 105 Copy mode 62 - R Ready indicator 11, 16, 84 Recycled paper 18 Reduction/enlargement/zoom .......... 29 Removing the software 77 Roller 81 Roller ...Scanning from the operation panel .. 59 Scanning from your computer .......... 60 Scanning unit (scan head 16 Selecting a setting for a user program 67 Selecting the tray 23 Set the IP address 48 Setting the number of copies 27 Setting up button manager 53 Sharpdesk 40 Short edge 30 Side cover 9, 78, 82 Side cover open button 9 Sort...

FO-2080 Operation Manual Suite
Page 153
... below. Note You can show the "SOFTWARE LICENSE" in the "Welcome" window and then click the "Next" button. Note To set , go to "LPR (TCP/IP) direct printing" (p.49). 47 To install the software in the selected language, continue the installation with that language selected. 7 Read...different language by selecting the desired language from the language menu. Make sure that is already connected to the network and its IP address has been set the IP address of the software license, and then click the "Yes" button. The scanner function cannot be connected to your computer are...
... below. Note You can show the "SOFTWARE LICENSE" in the "Welcome" window and then click the "Next" button. Note To set , go to "LPR (TCP/IP) direct printing" (p.49). 47 To install the software in the selected language, continue the installation with that language selected. 7 Read...different language by selecting the desired language from the language menu. Make sure that is already connected to the network and its IP address has been set the IP address of the software license, and then click the "Yes" button. The scanner function cannot be connected to your computer are...

FO-2080 Operation Manual Suite
Page 154
... automatically. Follow the on a network. 8 Click the "Set the IP Address" button. 9 The printer or printers connected to initialize the IP address. The settings in the above window are examples. In this event, select "Assign IP Address" and enter the IP address. 48 Click the printer to be entered. Note When "Get IP Address Automatically" is still not recognized, disable your network...
... automatically. Follow the on a network. 8 Click the "Set the IP Address" button. 9 The printer or printers connected to initialize the IP address. The settings in the above window are examples. In this event, select "Assign IP Address" and enter the IP address. 48 Click the printer to be entered. Note When "Get IP Address Automatically" is still not recognized, disable your network...

FO-2080 Operation Manual Suite
Page 155
LPR (TCP/IP) direct printing After step 1-7 on page 48. 9 Read the message in the confirmation dialog box that appears. Click the printer to step 11. INSTALLING THE ... printers connected to step 8 on page 47 8 Click the "Printer Driver" button. If you have not set the IP Address, click the "Set the IP Address" button first and go to the network will be detected. Note If the machine's IP address cannot be configured (the machine) and click the "Next" button. Go to be found, make sure...
LPR (TCP/IP) direct printing After step 1-7 on page 48. 9 Read the message in the confirmation dialog box that appears. Click the printer to step 11. INSTALLING THE ... printers connected to step 8 on page 47 8 Click the "Printer Driver" button. If you have not set the IP Address, click the "Set the IP Address" button first and go to the network will be detected. Note If the machine's IP address cannot be configured (the machine) and click the "Next" button. Go to be found, make sure...

FO-2080 Operation Manual Suite
Page 156
...restart your computer. appears, click the "OK" button. 17 When the "Finish" screen appears, click the "Close" button. If any of the IP address and click the "Next" button. Note After the installation, a message prompting you check your default printer and click the "Next" button. Follow the ...on-screen instructions. This completes the installation of the SHARP software is complete." Note Any name can be your entries. INSTALLING THE SOFTWARE 12 In the window for setting the destination print port name, make sure that the entries are correct and then...
...restart your computer. appears, click the "OK" button. 17 When the "Finish" screen appears, click the "Close" button. If any of the IP address and click the "Next" button. Note After the installation, a message prompting you check your default printer and click the "Next" button. Follow the ...on-screen instructions. This completes the installation of the SHARP software is complete." Note Any name can be your entries. INSTALLING THE SOFTWARE 12 In the window for setting the destination print port name, make sure that the entries are correct and then...

FO-2080 Operation Manual Suite
Page 210
... 40 Misfeed removal - Paper feed area 79 - RSPF 81 - I Initial settings 16 Installing the software 40 Installing the TD cartridge 14 Interface cable 90 Introduction 6 IP address 48 L Labels 18, 19, 21 Language setting 16 LAN connector 9, 47 Loading paper 18 Loading paper in the RSPF 26... P Paper 18 Paper holder arm 9, 26 Paper output tray 9 Paper output tray extension ......... 9, 26 Paper size setting 23 Paper tray 9, ...
... 40 Misfeed removal - Paper feed area 79 - RSPF 81 - I Initial settings 16 Installing the software 40 Installing the TD cartridge 14 Interface cable 90 Introduction 6 IP address 48 L Labels 18, 19, 21 Language setting 16 LAN connector 9, 47 Loading paper 18 Loading paper in the RSPF 26... P Paper 18 Paper holder arm 9, 26 Paper output tray 9 Paper output tray extension ......... 9, 26 Paper size setting 23 Paper tray 9, ...
FO-2080 Operation Manual Suite
Page 211
... Scanning from the operation panel .. 59 Scanning from your computer .......... 60 Scanning unit (scan head 16 Selecting a setting for a user program 67 Selecting the tray 23 Set the IP address 48 Setting the number of copies 27 Setting up button manager 53 Sharpdesk 40 Short edge 30 Side cover 9, 78, 82 Side cover open button 9 Sort... [TRAY SELECT] key 10, 22, 27 Troubleshooting 69 U USB 42, 45, 57, 66 USB connector 9, 46 User programs - Copy mode 62 - Print mode 66 User settings 62 Using the manual 6 Using the printer mode 58 Using the scanner mode 59 Z Zoom...
... Scanning from the operation panel .. 59 Scanning from your computer .......... 60 Scanning unit (scan head 16 Selecting a setting for a user program 67 Selecting the tray 23 Set the IP address 48 Setting the number of copies 27 Setting up button manager 53 Sharpdesk 40 Short edge 30 Side cover 9, 78, 82 Side cover open button 9 Sort... [TRAY SELECT] key 10, 22, 27 Troubleshooting 69 U USB 42, 45, 57, 66 USB connector 9, 46 User programs - Copy mode 62 - Print mode 66 User settings 62 Using the manual 6 Using the printer mode 58 Using the scanner mode 59 Z Zoom...

FO-2080 Operation Manual Suite
Page 245
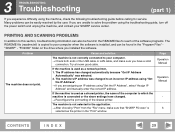
... check the following troubleshooting guide before calling for each of the USB cable or LAN cable, and make sure that "SHARP FO-xxxx" is used as a network printer, 1. Page Operation Manual Operation Manual - 5 CONTENTS INDEX 29 PRINTING AND...to an incorrect IP address using "Set the IP Address". → If you installed the software. 3 TROUBLESHOOTING Troubleshooting (part 1) If you are assigning an IP address using "Set the IP Address", select "Assign IP Address" and manually enter the correct IP address. Many problems can be found in the "Program Files" "SHARP" - Problem ...
... check the following troubleshooting guide before calling for each of the USB cable or LAN cable, and make sure that "SHARP FO-xxxx" is used as a network printer, 1. Page Operation Manual Operation Manual - 5 CONTENTS INDEX 29 PRINTING AND...to an incorrect IP address using "Set the IP Address". → If you installed the software. 3 TROUBLESHOOTING Troubleshooting (part 1) If you are assigning an IP address using "Set the IP Address", select "Assign IP Address" and manually enter the correct IP address. Many problems can be found in the "Program Files" "SHARP" - Problem ...

FO-2080 Operation Manual Suite
Page 254
Accessing the Web page Use the following procedure to the machine. Enter the IP address previously configured in your Web browser. 2 In the "Address" field of the machine as a network printer, you can check and change network settings in the Web page, and check the printer status. ● To access the ...Web page in the machine using a Web browser. CONTENTS INDEX 38 You can access the Web page in the machine, the IP address must be assigned to access the Web...
Accessing the Web page Use the following procedure to the machine. Enter the IP address previously configured in your Web browser. 2 In the "Address" field of the machine as a network printer, you can check and change network settings in the Web page, and check the printer status. ● To access the ...Web page in the machine using a Web browser. CONTENTS INDEX 38 You can access the Web page in the machine, the IP address must be assigned to access the Web...


