DT200 Operation Manual
Page 3
...; Connect the equipment into an outlet on the remote control. DURING NORMAL OPERATION, NEVER TURN THE PROJECTOR OFF BY DISCONNECTING THE POWER CORD. LAMP REPLACEMENT... on the projector or on a circuit different from that interference will not occur in accordance with Part 15 of Conformity SHARP PROJECTOR, MODEL DT-200 This device ...SHARP ELECTRONICS CORPORATION Sharp Plaza, Mahwah, New Jersey 07430 TEL: 1-800-BE-SHARP (1-800-237-4277) U.S.A. During normal operation, when turning the power off and on, the user is connected. • Consult the dealer or an experienced radio/TV...
...; Connect the equipment into an outlet on the remote control. DURING NORMAL OPERATION, NEVER TURN THE PROJECTOR OFF BY DISCONNECTING THE POWER CORD. LAMP REPLACEMENT... on the projector or on a circuit different from that interference will not occur in accordance with Part 15 of Conformity SHARP PROJECTOR, MODEL DT-200 This device ...SHARP ELECTRONICS CORPORATION Sharp Plaza, Mahwah, New Jersey 07430 TEL: 1-800-BE-SHARP (1-800-237-4277) U.S.A. During normal operation, when turning the power off and on, the user is connected. • Consult the dealer or an experienced radio/TV...

DT200 Operation Manual
Page 8
... The function can be used to select the values to suit the type of image input to the projector by pressing the PICTURE SETTING button on the projector or on the remote control. 13. Component Video Input Utilizes a component video input signal (Y, PB, PR). Direct Computer ...the five speed primary color wheel, to the input source for an exciting theater experience. * Digital Light Processing, DLP, Digital Micromirror Device and DMD are trademarks of images. Important Information Outstanding Features 1. E-7 DT-200(E)#p01_07.p65 7 02.11.21, 11:27 AM The function enables diagonal...
... The function can be used to select the values to suit the type of image input to the projector by pressing the PICTURE SETTING button on the projector or on the remote control. 13. Component Video Input Utilizes a component video input signal (Y, PB, PR). Direct Computer ...the five speed primary color wheel, to the input source for an exciting theater experience. * Digital Light Processing, DLP, Digital Micromirror Device and DMD are trademarks of images. Important Information Outstanding Features 1. E-7 DT-200(E)#p01_07.p65 7 02.11.21, 11:27 AM The function enables diagonal...
DT200 Operation Manual
Page 9
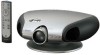
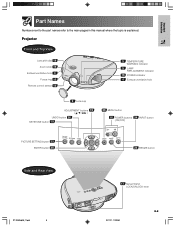
... to the part names refer to the main pages in this manual where the topic is explained. Projector Front and Top View Lens shift dial 18 Zoom knob 16 Exhaust ventilative hole 4 DT-200 Focus ring 16 Remote control sensor 15 5 TEMPERATURE WARNING indicator 5 LAMP REPLACEMENT indicator 16 POWER indicator 4 Exhaust ventilative hole 9 Lens... 24 INPUT button (ON/OFF) PICTURE SETTING button 32 ENTER button 26 24 RESIZE button Side and Rear View 17 Swivel Stand LOCK/UNLOCK lever DT-200(E)#p08_11.pm6 8 02.11.21, 11:29 AM E-8
... to the part names refer to the main pages in this manual where the topic is explained. Projector Front and Top View Lens shift dial 18 Zoom knob 16 Exhaust ventilative hole 4 DT-200 Focus ring 16 Remote control sensor 15 5 TEMPERATURE WARNING indicator 5 LAMP REPLACEMENT indicator 16 POWER indicator 4 Exhaust ventilative hole 9 Lens... 24 INPUT button (ON/OFF) PICTURE SETTING button 32 ENTER button 26 24 RESIZE button Side and Rear View 17 Swivel Stand LOCK/UNLOCK lever DT-200(E)#p08_11.pm6 8 02.11.21, 11:29 AM E-8

DT200 Operation Manual
Page 10
Important Information Part Names Numbers next to the part names refer to the lens. Projector Side and Rear View Remote control sensor 15 Intake ventilative hole 48 48 Intake ventilative hole INPUT 2 DVI digital port 13 INPUT 3 S-VIDEO terminal 13 (4-pin Mini DIN) RS-232C ... (RCA) INPUT 4 VIDEO terminal (RCA) 13 14 DIGITAL INPUT TYPE switch Attaching the Lens Cap DT-200 After putting the lens cap strap on the lens cap, pass the other end of the strap through the hole under the projector, next to the main pages in this manual where the topic is explained...
Important Information Part Names Numbers next to the part names refer to the lens. Projector Side and Rear View Remote control sensor 15 Intake ventilative hole 48 48 Intake ventilative hole INPUT 2 DVI digital port 13 INPUT 3 S-VIDEO terminal 13 (4-pin Mini DIN) RS-232C ... (RCA) INPUT 4 VIDEO terminal (RCA) 13 14 DIGITAL INPUT TYPE switch Attaching the Lens Cap DT-200 After putting the lens cap strap on the lens cap, pass the other end of the strap through the hole under the projector, next to the main pages in this manual where the topic is explained...

DT200 Operation Manual
Page 14
...output (for "Signal Type" on a DVD player or DTV decoder. on the remote control. (See page 36.) CAUTION • Make sure to the corresponding terminals on the OSD menu or press RGB/COMP. When connecting this projector to 15-pin D-sub cable (sold separately AN-C3CP) DVD player or DTV ...decoder 02.11.21, 11:30 AM Projector E-13 DVI to 15-pin D-sub adaptor (sold separately AN-A1DV) DT-200(E)#p12_14.p65 13 3 RCA to analog RGB output of the cable to turn both the projector and the video equipment off , before switching the "DIGITAL INPUT TYPE"...
...output (for "Signal Type" on a DVD player or DTV decoder. on the remote control. (See page 36.) CAUTION • Make sure to the corresponding terminals on the OSD menu or press RGB/COMP. When connecting this projector to 15-pin D-sub cable (sold separately AN-C3CP) DVD player or DTV ...decoder 02.11.21, 11:30 AM Projector E-13 DVI to 15-pin D-sub adaptor (sold separately AN-A1DV) DT-200(E)#p12_14.p65 13 3 RCA to analog RGB output of the cable to turn both the projector and the video equipment off , before switching the "DIGITAL INPUT TYPE"...

DT200 Operation Manual
Page 15
...decoder, select "Component" for "Signal Type" on the OSD menu or press RGB/COMP. on the OSD menu or press RGB/COMP. When connecting this projector to a DVD player or DTV decoder, select "RGB" for "Signal Type" on a DVD player and DTV decorder. Setup & Connections Connecting to a ... remote control. (See page 36.) DVI to D-sub 15-pin cable 2 (sold separately AN-A1DV) DTV decoder Connecting to a Computer Connecting a computer with analog RGB output 1 Connect the DVI to 15-pin D-Sub adaptor. 2 Use the above cables to 15-pin D-sub adaptor (sold separately AN-A1DV) 1 DT-200(E)#p12_14...
...decoder, select "Component" for "Signal Type" on the OSD menu or press RGB/COMP. on the OSD menu or press RGB/COMP. When connecting this projector to a DVD player or DTV decoder, select "RGB" for "Signal Type" on a DVD player and DTV decorder. Setup & Connections Connecting to a ... remote control. (See page 36.) DVI to D-sub 15-pin cable 2 (sold separately AN-A1DV) DTV decoder Connecting to a Computer Connecting a computer with analog RGB output 1 Connect the DVI to 15-pin D-Sub adaptor. 2 Use the above cables to 15-pin D-sub adaptor (sold separately AN-A1DV) 1 DT-200(E)#p12_14...

DT200 Operation Manual
Page 16
... of the DVI cable (commercially available) to the DIGITAL INPUT port on the projector. 3 Connect the other than those listed may cause some Macintosh computers. Contact your nearest Sharp Authorized Service Center or Dealer. DT-200 45˚ 30˚ Remote Control E-15 DT-200(E)#p15_21.p65 15 02.11.21, 11:30 AM However, the effective...
... of the DVI cable (commercially available) to the DIGITAL INPUT port on the projector. 3 Connect the other than those listed may cause some Macintosh computers. Contact your nearest Sharp Authorized Service Center or Dealer. DT-200 45˚ 30˚ Remote Control E-15 DT-200(E)#p15_21.p65 15 02.11.21, 11:30 AM However, the effective...

DT200 Operation Manual
Page 20
Horizontal Keystone Correction FREEZE Vertical Keystone Correction 1 Press KEYSTONE on the projector or on the remote control. 2 Press / to select "H Keystone" or "V Keystone". 3 Press / to move the mark on the selected adjustment item to the desired setting. 4 To ...returned to adjust the Keystone settings. 1, 4 2, 3 • For details about using the menu screen, see page 26. Vertically adjusts the keystone settings. E-19 DT-200(E)#p15_21.p65 19 02.11.21, 11:30 AM Setup & Connections Keystone Correction This function can be adjusted when Keystone correction is applied.
Horizontal Keystone Correction FREEZE Vertical Keystone Correction 1 Press KEYSTONE on the projector or on the remote control. 2 Press / to select "H Keystone" or "V Keystone". 3 Press / to move the mark on the selected adjustment item to the desired setting. 4 To ...returned to adjust the Keystone settings. 1, 4 2, 3 • For details about using the menu screen, see page 26. Vertically adjusts the keystone settings. E-19 DT-200(E)#p15_21.p65 19 02.11.21, 11:30 AM Setup & Connections Keystone Correction This function can be adjusted when Keystone correction is applied.

DT200 Operation Manual
Page 25
... you can choose NORMAL, BORDER or STRETCH image. 1 Press RESIZE. Depending on the remote control to select the desired input mode. Operation Buttons Using the Operation Buttons Selecting the Input Signal Source Press INPUT on the projector, INPUT 1, INPUT 2, INPUT 3, INPUT 4 or DIGITAL INPUT on the input signal,...or customize the picture display mode to enhance the input image. When a signal that the projector is not preset to receive is pressed, the picture mode changes as shown on the next page. 1 DT-200(E)#p24_25.p65 24 02.11.21, 11:40 AM E-24 will be displayed. Each ...
... you can choose NORMAL, BORDER or STRETCH image. 1 Press RESIZE. Depending on the remote control to select the desired input mode. Operation Buttons Using the Operation Buttons Selecting the Input Signal Source Press INPUT on the projector, INPUT 1, INPUT 2, INPUT 3, INPUT 4 or DIGITAL INPUT on the input signal,...or customize the picture display mode to enhance the input image. When a signal that the projector is not preset to receive is pressed, the picture mode changes as shown on the next page. 1 DT-200(E)#p24_25.p65 24 02.11.21, 11:40 AM E-24 will be displayed. Each ...

DT200 Operation Manual
Page 27
...Only the selected adjustment item will be operated from the projector or the remote control with the following procedure. 64 2, 3, 5 1, 7 On-screen Display INPUT 1 (COMPONENT), 2 (COMPONENT or analog RGB) or DIGITAL INPUT (digital RGB) mode 1 2 INPUT 3 or 4 (VIDEO) mode 1 2 3 3 Basic Operation 4 5 DT-200(E)#p26_32.p65 26 1 Press MENU. E-26 02.... / to select a specific adjustment item. 4 Press ENTER after selecting the item if you want . Using the Menu Screen Basic Operations This projector has two sets of menu screens that allow you to display a single adjustment item.
...Only the selected adjustment item will be operated from the projector or the remote control with the following procedure. 64 2, 3, 5 1, 7 On-screen Display INPUT 1 (COMPONENT), 2 (COMPONENT or analog RGB) or DIGITAL INPUT (digital RGB) mode 1 2 INPUT 3 or 4 (VIDEO) mode 1 2 3 3 Basic Operation 4 5 DT-200(E)#p26_32.p65 26 1 Press MENU. E-26 02.... / to select a specific adjustment item. 4 Press ENTER after selecting the item if you want . Using the Menu Screen Basic Operations This projector has two sets of menu screens that allow you to display a single adjustment item.

DT200 Operation Manual
Page 33
... Memory 4 Storing the Adjustment Values for the picture settings. 4 Press ENTER to 31. Basic Operation DT-200(E)#p26_32.p65 32 02.11.21, 11:38 AM E-32 Even when the input mode or signal is... SETTING is pressed, the memory number changes as the OSD menu screen. Adjust the settings described on the remote control, as well as shown below. The "Picture" menu screen appears. 2 Press / to select ...INPUT 1 to "Memory 5", other settings can be operated using the PICTURE SETTING button on the projector or on pages 29 to save the settings. Five settings can be selected in "Picture". ...
... Memory 4 Storing the Adjustment Values for the picture settings. 4 Press ENTER to 31. Basic Operation DT-200(E)#p26_32.p65 32 02.11.21, 11:38 AM E-32 Even when the input mode or signal is... SETTING is pressed, the memory number changes as the OSD menu screen. Adjust the settings described on the remote control, as well as shown below. The "Picture" menu screen appears. 2 Press / to select ...INPUT 1 to "Memory 5", other settings can be operated using the PICTURE SETTING button on the projector or on pages 29 to save the settings. Five settings can be selected in "Picture". ...

DT200 Operation Manual
Page 36
...Auto Sync Adjustment Using the Remote Control 1 Press AUTO SYNC button on the image of the computer connected to the projector. • "Auto Sync" cannot be synchronized automatically when switching the signal with "ON" or "OFF". Basic Operation E-35 DT-200(E)#p34_35.p65 35 02.11...Auto Sync adjustment, use manual adjustments. (See page 33.) • The Auto Sync adjustment may take some time to complete, depending on the Remote Control. ON ( ) • Synchronized adjustment is not automatically performed. • Press AUTO SYNC to perform manual adjustment. Adjusting the Computer ...
...Auto Sync Adjustment Using the Remote Control 1 Press AUTO SYNC button on the image of the computer connected to the projector. • "Auto Sync" cannot be synchronized automatically when switching the signal with "ON" or "OFF". Basic Operation E-35 DT-200(E)#p34_35.p65 35 02.11...Auto Sync adjustment, use manual adjustments. (See page 33.) • The Auto Sync adjustment may take some time to complete, depending on the Remote Control. ON ( ) • Synchronized adjustment is not automatically performed. • Press AUTO SYNC to perform manual adjustment. Adjusting the Computer ...

DT200 Operation Manual
Page 54
...; terminated HORIZONTAL SYNC. Appendix E-53 DT-200(E)#p50_59.p65 53 02.11.21, 11:45 AM SIGNAL: Same as above Horizontal resolution 520 TV lines (NTSC 3.58 input) RGB...XVZ90+++1), Remote control (RRMCGA088WJSA), AA size batteries, Power cord (QACCDA007WJPZ), Video cable (QCNWGA001WJZZ), Lens cap (CCAPHA004WJ01), Lens cap strap (UBNDT0013CEZZ), Operation manual (TINS-A287WJZZA) This SHARP projector uses a...positive/negative) or composite sync (Apple only) VERTICAL SYNC. Specifications Product type Projector Model DT-200 Video system PAL/PAL 60/PAL-M/PAL-N/SECAM/NTSC 3.58/NTSC 4.43 DTV ...
...; terminated HORIZONTAL SYNC. Appendix E-53 DT-200(E)#p50_59.p65 53 02.11.21, 11:45 AM SIGNAL: Same as above Horizontal resolution 520 TV lines (NTSC 3.58 input) RGB...XVZ90+++1), Remote control (RRMCGA088WJSA), AA size batteries, Power cord (QACCDA007WJPZ), Video cable (QCNWGA001WJZZ), Lens cap (CCAPHA004WJ01), Lens cap strap (UBNDT0013CEZZ), Operation manual (TINS-A287WJZZA) This SHARP projector uses a...positive/negative) or composite sync (Apple only) VERTICAL SYNC. Specifications Product type Projector Model DT-200 Video system PAL/PAL 60/PAL-M/PAL-N/SECAM/NTSC 3.58/NTSC 4.43 DTV ...

DT200 Operation Manual
Page 58
...Web site: www.sharp.ca Appendix E-57 DT-200(E)#p50_59.p65 57 02.11.21, 11:45 AM Sharp Electronics of Canada Ltd. (hereinafter called "Sharp") gives the ...container and sold or distributed in Canada by Sharp or by external or environmental conditions, including but not limited to earphones, remote controls, AC adapters, batteries, temperature probe,...Sharp. WARRANTY PERIODS Projector 1 years (bulb 90 days) To obtain the name and address of the Sharp product together with , modified, adjusted or repaired by Sharp and no other than Sharp, Sharp's Authorized Service Centres or Sharp...
...Web site: www.sharp.ca Appendix E-57 DT-200(E)#p50_59.p65 57 02.11.21, 11:45 AM Sharp Electronics of Canada Ltd. (hereinafter called "Sharp") gives the ...container and sold or distributed in Canada by Sharp or by external or environmental conditions, including but not limited to earphones, remote controls, AC adapters, batteries, temperature probe,...Sharp. WARRANTY PERIODS Projector 1 years (bulb 90 days) To obtain the name and address of the Sharp product together with , modified, adjusted or repaired by Sharp and no other than Sharp, Sharp's Authorized Service Centres or Sharp...
DT-200 Operation Manual
Page 3
... connected. • Consult the dealer or an experienced radio/TV technician for about 90 seconds after the projector is subject to the following measures: • Reorient or... Connect the equipment into an outlet on the remote control. Responsible Party: SHARP ELECTRONICS CORPORATION Sharp Plaza, Mahwah, New Jersey 07430 TEL: 1-800-BE-SHARP (1-800-237-4277) U.S.A. ALLOW 1 HOUR ... are designed to radio communications. HOT SURFACE INSIDE. ONLY Declaration of Conformity SHARP PROJECTOR, MODEL DT-200 This device complies with the operation manual, may not copy, modify, adapt, ...
... connected. • Consult the dealer or an experienced radio/TV technician for about 90 seconds after the projector is subject to the following measures: • Reorient or... Connect the equipment into an outlet on the remote control. Responsible Party: SHARP ELECTRONICS CORPORATION Sharp Plaza, Mahwah, New Jersey 07430 TEL: 1-800-BE-SHARP (1-800-237-4277) U.S.A. ALLOW 1 HOUR ... are designed to radio communications. HOT SURFACE INSIDE. ONLY Declaration of Conformity SHARP PROJECTOR, MODEL DT-200 This device complies with the operation manual, may not copy, modify, adapt, ...

DT-200 Operation Manual
Page 8
...range settings. 7. Low Noise Design A new optical engine has been developed for this product to the projector by pressing the PICTURE SETTING button on the projector or on the remote control. 13. For Use with DTV Allows projection of projected images. Gamma Correction Function The gamma value...1. Picture Setting Function The values in the DMD chip and the five speed primary color wheel, to the input source for an exciting theater experience. * Digital Light Processing, DLP, Digital Micromirror Device and DMD are trademarks of images. The video signal is designed for the first...
...range settings. 7. Low Noise Design A new optical engine has been developed for this product to the projector by pressing the PICTURE SETTING button on the projector or on the remote control. 13. For Use with DTV Allows projection of projected images. Gamma Correction Function The gamma value...1. Picture Setting Function The values in the DMD chip and the five speed primary color wheel, to the input source for an exciting theater experience. * Digital Light Processing, DLP, Digital Micromirror Device and DMD are trademarks of images. The video signal is designed for the first...

DT-200 Operation Manual
Page 9
Projector Front and Top View Lens shift dial 18 Zoom knob 16 Exhaust ventilative hole 4 DT-200 Focus ring 16 Remote control sensor 15 5 TEMPERATURE WARNING indicator 5 LAMP REPLACEMENT indicator 16 POWER indicator 4 Exhaust ventilative hole 9 Lens cap ADJUSTMENT buttons 19 UNDO button 26 KEYSTONE button ...
Projector Front and Top View Lens shift dial 18 Zoom knob 16 Exhaust ventilative hole 4 DT-200 Focus ring 16 Remote control sensor 15 5 TEMPERATURE WARNING indicator 5 LAMP REPLACEMENT indicator 16 POWER indicator 4 Exhaust ventilative hole 9 Lens cap ADJUSTMENT buttons 19 UNDO button 26 KEYSTONE button ...

DT-200 Operation Manual
Page 10
...Remote control sensor 15 Intake ventilative hole 48 48 Intake ventilative hole INPUT 2 DVI digital port 13 INPUT 3 S-VIDEO terminal 13 (4-pin Mini DIN) RS-232C port (Serviceman only) 12 AC socket INPUT 1 COMPONENT 13 terminals (RCA) INPUT 4 VIDEO terminal (RCA) 13 14 DIGITAL INPUT TYPE switch Attaching the Lens Cap DT-200... After putting the lens cap strap on the lens cap, pass the other end of the strap through the hole under the projector, next to the main pages in this manual where the topic is explained...
...Remote control sensor 15 Intake ventilative hole 48 48 Intake ventilative hole INPUT 2 DVI digital port 13 INPUT 3 S-VIDEO terminal 13 (4-pin Mini DIN) RS-232C port (Serviceman only) 12 AC socket INPUT 1 COMPONENT 13 terminals (RCA) INPUT 4 VIDEO terminal (RCA) 13 14 DIGITAL INPUT TYPE switch Attaching the Lens Cap DT-200... After putting the lens cap strap on the lens cap, pass the other end of the strap through the hole under the projector, next to the main pages in this manual where the topic is explained...

DT-200 Operation Manual
Page 14
...remote control. (See page 36.) CAUTION • Make sure to turn both the projector and the video equipment off , before switching the "DIGITAL INPUT TYPE" swich and connecting. When connecting this projector to analog RGB output of the cable to the corresponding terminals on a DVD player or DTV decoder. Projector... decoder with Component output (for INPUT 1) 1 Connect each RCA connector of a component cable to the corresponding RCA INPUT 1 terminals on the projector. 2 Connect the other end of the DTV decoder, select "Component" for INPUT 2) 1 Connect the 3 RCA to 15-pin D-Sub ...
...remote control. (See page 36.) CAUTION • Make sure to turn both the projector and the video equipment off , before switching the "DIGITAL INPUT TYPE" swich and connecting. When connecting this projector to analog RGB output of the cable to the corresponding terminals on a DVD player or DTV decoder. Projector... decoder with Component output (for INPUT 1) 1 Connect each RCA connector of a component cable to the corresponding RCA INPUT 1 terminals on the projector. 2 Connect the other end of the DTV decoder, select "Component" for INPUT 2) 1 Connect the 3 RCA to 15-pin D-Sub ...

DT-200 Operation Manual
Page 15
... the video equipment off , before switching the "DIGITAL INPUT TYPE" swich and connecting. on the remote control. (See page 36.) DVI to connect the projector and the DTV decoder. When connecting this projector to analog RGB output of the DTV decoder, select "Component" for "Signal Type" on the OSD... menu or press RGB/COMP. on the remote control. (See page 36.) CAUTION • Make sure to turn both the projector and the video equipment off , before switching the "DIGITAL INPUT TYPE" swich and connecting. When connecting this...
... the video equipment off , before switching the "DIGITAL INPUT TYPE" swich and connecting. on the remote control. (See page 36.) DVI to connect the projector and the DTV decoder. When connecting this projector to analog RGB output of the DTV decoder, select "Component" for "Signal Type" on the OSD... menu or press RGB/COMP. on the remote control. (See page 36.) CAUTION • Make sure to turn both the projector and the video equipment off , before switching the "DIGITAL INPUT TYPE" swich and connecting. When connecting this...


