

AL-1600 | AL-1610 Operation Manual
Page 3
... useful to the user. GETTING STARTED q CAUTIONS 2 q MAIN FEATURES 3 q PART NAMES AND FUNCTIONS 4 - Genuine supplies statement 41 q MOVING INSTRUCTIONS 42 q SPECIFICATIONS 43 q INDEX 45 STATUS INDICATORS GENERAL INFORMATION 1 Operation panel 6 q COPIER INSTALLATION 8 q CAUTIONS ON HANDLING 9 q CHECKING PACKED COMPONENTS AND ACCESSORIES 10 q SET-UP 11 q LOADING COPY PAPER 13 MAKING COPIES q NORMAL COPYING 15 q REDUCTION/ENLARGEMENT/ZOOM 17 q BYPASS FEED (special paper 18 q TWO-SIDED COPYING 20 q INTERRUPTING A COPY RUN 21 q AUTOMATIC EXPOSURE ADJUSTMENT...
... useful to the user. GETTING STARTED q CAUTIONS 2 q MAIN FEATURES 3 q PART NAMES AND FUNCTIONS 4 - Genuine supplies statement 41 q MOVING INSTRUCTIONS 42 q SPECIFICATIONS 43 q INDEX 45 STATUS INDICATORS GENERAL INFORMATION 1 Operation panel 6 q COPIER INSTALLATION 8 q CAUTIONS ON HANDLING 9 q CHECKING PACKED COMPONENTS AND ACCESSORIES 10 q SET-UP 11 q LOADING COPY PAPER 13 MAKING COPIES q NORMAL COPYING 15 q REDUCTION/ENLARGEMENT/ZOOM 17 q BYPASS FEED (special paper 18 q TWO-SIDED COPYING 20 q INTERRUPTING A COPY RUN 21 q AUTOMATIC EXPOSURE ADJUSTMENT...
AL-1600 | AL-1610 Operation Manual
Page 4
..., be easily accessible. Use of controls or adjustments or performance of the CDRH standards. q The fusing area is rated Class 1 and complies with a dust cover, cloth or plastic film while the power is not used for a long time, for example, during prolonged holidays, turn the power switch off and remove the power cord from the outlet. q Do not look directly at the light source. q When...
..., be easily accessible. Use of controls or adjustments or performance of the CDRH standards. q The fusing area is rated Class 1 and complies with a dust cover, cloth or plastic film while the power is not used for a long time, for example, during prolonged holidays, turn the power switch off and remove the power cord from the outlet. q Do not look directly at the light source. q When...

AL-1600 | AL-1610 Operation Manual
Page 5
... laser copying q First-copy time is only 7.2 seconds (except in five steps. w High-quality digital image q High-quality copying at 600 dpi is equipped with a 1-page memory buffer. e Substantial copying features q Zoom copying from the copier and reduced wear and tear on ). t Environmentally friendly design q Paper output tray is housed in 1% increments can be performed. This feature allows for energy efficiency. q Preheat mode and auto power...
... laser copying q First-copy time is only 7.2 seconds (except in five steps. w High-quality digital image q High-quality copying at 600 dpi is equipped with a 1-page memory buffer. e Substantial copying features q Zoom copying from the copier and reduced wear and tear on ). t Environmentally friendly design q Paper output tray is housed in 1% increments can be performed. This feature allows for energy efficiency. q Preheat mode and auto power...
AL-1600 | AL-1610 Operation Manual
Page 6
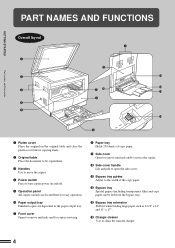
... when feeding large paper such as 8-1/2" x 14" and 11" x 17". ! 4 Charger cleaner Use to turn copier power on the original table and close the platen cover before copying starts. r Power switch Press to clean the transfer charger. 4 o Side cover Open to remove misfeeds and to service the copier. ! 0 Side cover handle Lift and pull to open the side cover. ! 1 Bypass tray guides Adjust to move the copier. e Handles Use to the width of copy paper. y Paper output tray Finished copies are located...
... when feeding large paper such as 8-1/2" x 14" and 11" x 17". ! 4 Charger cleaner Use to turn copier power on the original table and close the platen cover before copying starts. r Power switch Press to clean the transfer charger. 4 o Side cover Open to remove misfeeds and to service the copier. ! 0 Side cover handle Lift and pull to open the side cover. ! 1 Bypass tray guides Adjust to move the copier. e Handles Use to the width of copy paper. y Paper output tray Finished copies are located...
AL-1600 | AL-1610 Operation Manual
Page 8
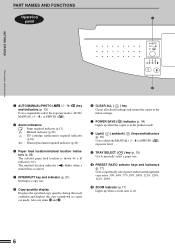
... misfeed location indicator ( ) blinks when a misfeed has occurred. i Light ( ) and dark ( ) keys and indicators (p. 15) Use to sequentially select the exposure modes: AUTO, MANUAL ( ), or PHOTO ( ). PART NAMES AND FUNCTIONS Operation panel GETTING STARTED Part names and functions q AUTO/MANUAL/PHOTO ( / / ) key and indicators (p. 15) Use to adjust the MANUAL ( ) or PHOTO ( ) exposure level. r INTERRUPT key and indicator (p. 21) Interrupts a copy run. Also see items !3 and !.5 y CLEAR ALL ( ) key Clears all selected settings and...
... misfeed location indicator ( ) blinks when a misfeed has occurred. i Light ( ) and dark ( ) keys and indicators (p. 15) Use to sequentially select the exposure modes: AUTO, MANUAL ( ), or PHOTO ( ). PART NAMES AND FUNCTIONS Operation panel GETTING STARTED Part names and functions q AUTO/MANUAL/PHOTO ( / / ) key and indicators (p. 15) Use to adjust the MANUAL ( ) or PHOTO ( ) exposure level. r INTERRUPT key and indicator (p. 21) Interrupts a copy run. Also see items !3 and !.5 y CLEAR ALL ( ) key Clears all selected settings and...

AL-1600 | AL-1610 Operation Manual
Page 9
... or to make user program entries. !5 CLEAR ( ) key Clears the copy quantity display or terminates a copy run. See page 32, USER PROGRAMS. Press and hold down the key. 12,345 sheets output Note: 11" x 17" size copies are counted as two copies. 7 PART NAMES AND FUNCTIONS GETTING STARTED Part names and functions ! 2 Zoom keys (p. 17) Use to select any mode. Press during standby to display the total number of copies made to...
... or to make user program entries. !5 CLEAR ( ) key Clears the copy quantity display or terminates a copy run. See page 32, USER PROGRAMS. Press and hold down the key. 12,345 sheets output Note: 11" x 17" size copies are counted as two copies. 7 PART NAMES AND FUNCTIONS GETTING STARTED Part names and functions ! 2 Zoom keys (p. 17) Use to select any mode. Press during standby to display the total number of copies made to...

AL-1600 | AL-1610 Operation Manual
Page 14
... not used for the first time, be sure to turn the power switch on in advance. Do not use user program No. 21 to set the paper size. Screw Set-up Power on the relevant location. q When loading copy paper for other than 8-1/2" x 11" (default size), use extension cords or power strips. Only insert the power cord into the nearest outlet. q For loading copy paper, see steps 2 to 4 of the copier is connected to fix it...
... not used for the first time, be sure to turn the power switch on in advance. Do not use user program No. 21 to set the paper size. Screw Set-up Power on the relevant location. q When loading copy paper for other than 8-1/2" x 11" (default size), use extension cords or power strips. Only insert the power cord into the nearest outlet. q For loading copy paper, see steps 2 to 4 of the copier is connected to fix it...
AL-1600 | AL-1610 Operation Manual
Page 15
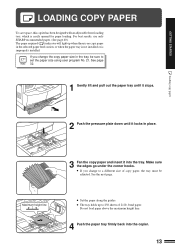
... page 40.) The paper required ( ) indicator will light up to set the paper size using user program No. 21. See the next page. q If you change to a different size of copy paper, the tray must be sure to 250 sheets of 21 lb. Maximum height line q Set the paper along the guides. bond paper. If you change the copy paper size in the selected paper feed station, or when the paper tray is not installed or is easily opened for paper loading...
... page 40.) The paper required ( ) indicator will light up to set the paper size using user program No. 21. See the next page. q If you change to a different size of copy paper, the tray must be sure to 250 sheets of 21 lb. Maximum height line q Set the paper along the guides. bond paper. If you change the copy paper size in the selected paper feed station, or when the paper tray is not installed or is easily opened for paper loading...
AL-1600 | AL-1610 Operation Manual
Page 17
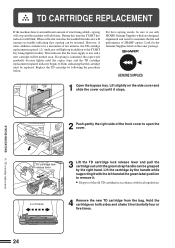
.... 4 or 5 times 4 Remove the new TD cartridge from the bag. Lift the cartridge by following the procedure below. q Dispose of the front cover to blink, indicating that copying can be resumed. When sufficient toner has been added the indicator will be replaced. If copying is low and a new cartridge will remain on both sides and shake it stops. Replace the TD cartridge by the handle while supporting it . Look...
.... 4 or 5 times 4 Remove the new TD cartridge from the bag. Lift the cartridge by following the procedure below. q Dispose of the front cover to blink, indicating that copying can be resumed. When sufficient toner has been added the indicator will be replaced. If copying is low and a new cartridge will remain on both sides and shake it stops. Replace the TD cartridge by the handle while supporting it . Look...
AL-1600 | AL-1610 Operation Manual
Page 19
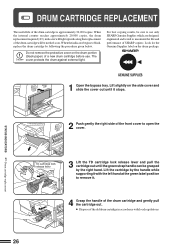
... of a new drum cartridge before use only SHARP Genuine Supplies which are designed, engineered and tested to blink, replace the drum cartridge by the right hand. GENUINE SUPPLIES 1 Open the bypass tray. Lift slightly on the drum portion (black paper) of SHARP copiers. q Dispose of the drum cartridge and gently pull the cartridge out. The cover protects the drum against external light. Do not remove the protective cover on the side cover and slide the cover out...
... of a new drum cartridge before use only SHARP Genuine Supplies which are designed, engineered and tested to blink, replace the drum cartridge by the right hand. GENUINE SUPPLIES 1 Open the bypass tray. Lift slightly on the drum portion (black paper) of SHARP copiers. q Dispose of the drum cartridge and gently pull the cartridge out. The cover protects the drum against external light. Do not remove the protective cover on the side cover and slide the cover out...

AL-1600 | AL-1610 Operation Manual
Page 20
... the side cover by pressing the handle on the copies. 6 Remove the protective cover from the protective bag and gently insert the lead end of the cartridge. DRUM CARTRIDGE REPLACEMENT 5 Remove the new drum cartridge from the drum cartridge and then push the cartridge all the way into the copier. 7 Gently install the TD cartridge. Do not touch the surface of the drum (green portion) of the drum cartridge along the guides.
... the side cover by pressing the handle on the copies. 6 Remove the protective cover from the protective bag and gently insert the lead end of the cartridge. DRUM CARTRIDGE REPLACEMENT 5 Remove the new drum cartridge from the drum cartridge and then push the cartridge all the way into the copier. 7 Gently install the TD cartridge. Do not touch the surface of the drum (green portion) of the drum cartridge along the guides.

AL-1600 | AL-1610 Operation Manual
Page 25
... shown in the tray. Enables or disables the auto power shut-off timer, enter 3. 3 Press the START ( ) key. q The selected program number will return to change the setting of the auto power shut-off mode. Sets the time that elapses before the copier enters the auto power shut-off setting 21 Paper size setting Description Sets the auto clear time. Program name 1 Auto clear time 2 Preheat mode 3 Auto power shut-off timer 5 Auto power shut-off mode after the last copy is made...
... shown in the tray. Enables or disables the auto power shut-off timer, enter 3. 3 Press the START ( ) key. q The selected program number will return to change the setting of the auto power shut-off mode. Sets the time that elapses before the copier enters the auto power shut-off setting 21 Paper size setting Description Sets the auto clear time. Program name 1 Auto clear time 2 Preheat mode 3 Auto power shut-off timer 5 Auto power shut-off mode after the last copy is made...
AL-1600 | AL-1610 Operation Manual
Page 27
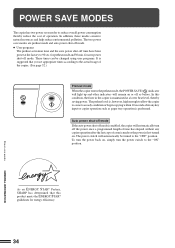
... preheat mode and auto power shut-off mode. Auto power shut-off mode If the auto power shut-off mode is enabled, the copier will remain on , simply turn the power switch to the actual usage of the copier. (See page 32.) Preheat mode When the copier enters the preheat mode, the POWER SAVE ( ) indicator will light up and other indicators will automatically turn off as paper tray operation is maintained at the factory...
... preheat mode and auto power shut-off mode. Auto power shut-off mode If the auto power shut-off mode is enabled, the copier will remain on , simply turn the power switch to the actual usage of the copier. (See page 32.) Preheat mode When the copier enters the preheat mode, the POWER SAVE ( ) indicator will light up and other indicators will automatically turn off as paper tray operation is maintained at the factory...

AL-1600 | AL-1610 Operation Manual
Page 28
... mode first and then the auto power shut- q The copier will go out and copying will start to blink. q When the START ( ) key is made, the POWER SAVE ( ) indicator will have priority. For these settings, see page 32. q When any key input is made or any operation is set with user programs No. 3 and No.5, the last program set manually. off mode. q If conflicting settings...
... mode first and then the auto power shut- q The copier will go out and copying will start to blink. q When the START ( ) key is made, the POWER SAVE ( ) indicator will have priority. For these settings, see page 32. q When any key input is made or any operation is set with user programs No. 3 and No.5, the last program set manually. off mode. q If conflicting settings...

AL-1600 | AL-1610 Operation Manual
Page 31
q Power switch ON? q Paper too heavy? See page 41. Clean the transfer charger. q Paper properly installed? q Pieces of misfed paper. q Original table or platen cover dirty? Use standard paper. Copier trouble? COPIER TROUBLE? Problem Copier does not operate. Blank copies Copies smear if rubbed. See page 8. See page 37. Copies are too dark or too light. q Original smudged or blotchy? See pages 18 and 40. See pages 13 and 18. Store copy paper flat in the wrapper in...
q Power switch ON? q Paper too heavy? See page 41. Clean the transfer charger. q Paper properly installed? q Pieces of misfed paper. q Original table or platen cover dirty? Use standard paper. Copier trouble? COPIER TROUBLE? Problem Copier does not operate. Blank copies Copies smear if rubbed. See page 8. See page 37. Copies are too dark or too light. q Original smudged or blotchy? See pages 18 and 40. See pages 13 and 18. Store copy paper flat in the wrapper in...
AL-1600 | AL-1610 Operation Manual
Page 32
... same power outlet used for the lighting fixture and the copier? Problem Power is complete. Wait until the START key ( ) indicator stops blinking. The TD cartridge must be replaced. q Is the indicator blinking? See page 28, MISFEED REMOVAL. Wait until warm-up is on ? Self-diagnostic function An automatic self-diagnostic function is not installed. COPIER TROUBLE? Copy paper is open. Side cover is needed. q Is the START key ( ) indicator blinking? Install...
... same power outlet used for the lighting fixture and the copier? Problem Power is complete. Wait until the START key ( ) indicator stops blinking. The TD cartridge must be replaced. q Is the indicator blinking? See page 28, MISFEED REMOVAL. Wait until warm-up is on ? Self-diagnostic function An automatic self-diagnostic function is not installed. COPIER TROUBLE? Copy paper is open. Side cover is needed. q Is the START key ( ) indicator blinking? Install...

AL-1600 | AL-1610 Operation Manual
Page 35
... cover to open the cover. See page 10, CHECKING PACKED COMPONENTS AND ACCESSORIES. 42 GENERAL INFORMATION If the covers are closed in the wrong order, the covers may be sure to remove the TD cartridge in the front of the copier the screw that has been stored in advance. 1 Turn the power switch off and disconnect the power cord. 2 Open the bypass tray. See page 11, SET...
... cover to open the cover. See page 10, CHECKING PACKED COMPONENTS AND ACCESSORIES. 42 GENERAL INFORMATION If the covers are closed in the wrong order, the covers may be sure to remove the TD cartridge in the front of the copier the screw that has been stored in advance. 1 Turn the power switch off and disconnect the power cord. 2 Open the bypass tray. See page 11, SET...

AL-1600 | AL-1610 Operation Manual
Page 36
SPECIFICATIONS Type Copy system Originals Original sizes Copy sizes Copying speed (at 100% copy ratio) Continuous copy First-copy time Warm-up time Copy ratio Exposure system Copy paper feed Fusing system Developer system Light source Resolution Gradation Power supply Power consumption Digital copying machine, desktop Dry, electrostatic transfer Sheets, bound documents Max. 11" x 17" Max. 11" x 17" Min. 5-1/2" x 8-1/2" Image loss: Max. 5/32" (4 mm) (leading and trailing edges) Max. 5/32" (4 mm) (along other edges in a power save...
SPECIFICATIONS Type Copy system Originals Original sizes Copy sizes Copying speed (at 100% copy ratio) Continuous copy First-copy time Warm-up time Copy ratio Exposure system Copy paper feed Fusing system Developer system Light source Resolution Gradation Power supply Power consumption Digital copying machine, desktop Dry, electrostatic transfer Sheets, bound documents Max. 11" x 17" Max. 11" x 17" Min. 5-1/2" x 8-1/2" Image loss: Max. 5/32" (4 mm) (leading and trailing edges) Max. 5/32" (4 mm) (along other edges in a power save...

AL-1600 | AL-1610 Operation Manual
Page 38
... Features 3 Fixed copy ratio 17 Fusing unit release lever 30 I Initial settings 7 Interrupt 21 L Light key 15, 32 Loading copy paper 13 M Maintenance - bypass tray 28 - special 18 - operation panel 6 - through bypass tray 18 - in the copier 28 - part 4 O Operation panel 6 Original table 4 P Packed components 10 Paper - loading 13 - large original 16 - user maintenance 36 Manual exposure 15 Manual feeding 18 Misfeed removal - specifications 40 Paper output tray 4 Paper size 40 Paper tray 13 Part names 4 Photo mode 16 Platen cover 4 Power cord...
... Features 3 Fixed copy ratio 17 Fusing unit release lever 30 I Initial settings 7 Interrupt 21 L Light key 15, 32 Loading copy paper 13 M Maintenance - bypass tray 28 - special 18 - operation panel 6 - through bypass tray 18 - in the copier 28 - part 4 O Operation panel 6 Original table 4 P Packed components 10 Paper - loading 13 - large original 16 - user maintenance 36 Manual exposure 15 Manual feeding 18 Misfeed removal - specifications 40 Paper output tray 4 Paper size 40 Paper tray 13 Part names 4 Photo mode 16 Platen cover 4 Power cord...

AL-1600 | AL-1610 Operation Manual
Page 39
INDEX S Screw 11, 42 Special paper 18 Specifications - part number 40 - original table 36 - transfer charger 36 User programs 32 Z Zoom 17 Index GENERAL INFORMATION 46 storage 41 T TD cartridge replacement 24 Toner save mode 23 Total number of copies 6 Troubleshooting 38 Two-sided copying 20 U User maintenance - paper 40 Status indicators 24 Supply - life 40 - platen cover 36 - bypass tray paper feed roller 36 - copier 43 -
INDEX S Screw 11, 42 Special paper 18 Specifications - part number 40 - original table 36 - transfer charger 36 User programs 32 Z Zoom 17 Index GENERAL INFORMATION 46 storage 41 T TD cartridge replacement 24 Toner save mode 23 Total number of copies 6 Troubleshooting 38 Two-sided copying 20 U User maintenance - paper 40 Status indicators 24 Supply - life 40 - platen cover 36 - bypass tray paper feed roller 36 - copier 43 -


