
32C241 Operation Manual
Page 1
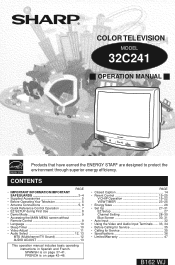
...; Quick Reference Control Operation 7 • EZ SETUP during First Use 8 • Demo Mode 9 • Accessing the MAIN MENU screen without Remote Control 9 • Language 10 • Sleep Timer 10 • Video Adjust 11 • Audio Select 12, 13 MTS (Multichannel TV Sound 12 AUDIO ADJUST 13 This operation manual includes basic operating instructions in Spanish and French. FRENCH is on page 42-46. PAGE • Closed Caption 14 • Parent Control 15-25 V-CHIP Operation 15-22 VIEW TIMER 23-25 • Energy...
...; Quick Reference Control Operation 7 • EZ SETUP during First Use 8 • Demo Mode 9 • Accessing the MAIN MENU screen without Remote Control 9 • Language 10 • Sleep Timer 10 • Video Adjust 11 • Audio Select 12, 13 MTS (Multichannel TV Sound 12 AUDIO ADJUST 13 This operation manual includes basic operating instructions in Spanish and French. FRENCH is on page 42-46. PAGE • Closed Caption 14 • Parent Control 15-25 V-CHIP Operation 15-22 VIEW TIMER 23-25 • Energy...
32C241 Operation Manual
Page 2
... (CRT) containing lead and tin-lead solder. REFER SERVICING TO QUALIFIED SERVICE PERSONNEL. "Note to CATV system installer: This reminder is tuned and adjusted for years to your new SHARP television set for proper color and sound, and has passed through the most stringent quality control tests at the rear of these instructions carefully, and keep them handy for proper grounding and...
... (CRT) containing lead and tin-lead solder. REFER SERVICING TO QUALIFIED SERVICE PERSONNEL. "Note to CATV system installer: This reminder is tuned and adjusted for years to your new SHARP television set for proper color and sound, and has passed through the most stringent quality control tests at the rear of these instructions carefully, and keep them handy for proper grounding and...
32C241 Operation Manual
Page 4
..., electric shock, or other controls may result in wire to keep from touching such power lines or circuits as the original part. D. E. this television equipment from the wall outlet and disconnect the antenna. When replacement parts are required, be sure the service technician has used replacement parts specified by the manufacturer that are covered by the operating instructions as improper adjustment of any kind on...
..., electric shock, or other controls may result in wire to keep from touching such power lines or circuits as the original part. D. E. this television equipment from the wall outlet and disconnect the antenna. When replacement parts are required, be sure the service technician has used replacement parts specified by the manufacturer that are covered by the operating instructions as improper adjustment of any kind on...
32C241 Operation Manual
Page 5
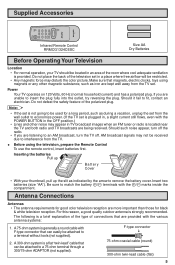
... a flat "twin-lead" cable that can be located in an area of connections that magnets, electric clocks, toys using the television, prepare the Remote Control To use the remote control, insert batteries first. Do not defeat the safety feature of the television set in a place where free airflow will be received due to interference from the wall outlet to economize power. (If the TV set is plugged...
... a flat "twin-lead" cable that can be located in an area of connections that magnets, electric clocks, toys using the television, prepare the Remote Control To use the remote control, insert batteries first. Do not defeat the safety feature of the television set in a place where free airflow will be received due to interference from the wall outlet to economize power. (If the TV set is plugged...
32C241 Operation Manual
Page 6
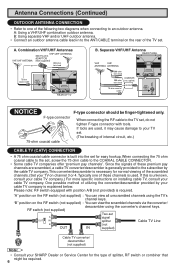
... supplied) : You can view the scrambled channels via the converter/ RF switch (not supplied) descrambler using the TV's channel keys. Two-set A signal OUT IN splitter Cable TV Line B OUT (not IN supplied) Cable TV converter/ descrambler (not supplied) Note: • Consult your cable TV company. If this is unknown, consult your cable TV company.) For more specific instructions on channel 3 or 4. A. When connecting the RF cable to the TV set , screw...
... supplied) : You can view the scrambled channels via the converter/ RF switch (not supplied) descrambler using the TV's channel keys. Two-set A signal OUT IN splitter Cable TV Line B OUT (not IN supplied) Cable TV converter/ descrambler (not supplied) Note: • Consult your cable TV company. If this is unknown, consult your cable TV company.) For more specific instructions on channel 3 or 4. A. When connecting the RF cable to the TV set , screw...
32C241 Operation Manual
Page 7
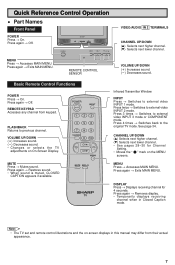
...; Switches to external video INPUT 3 mode or COMPONENT mode. CHANNEL UP/DOWN (a) Selects next higher channel. (s) Selects next lower channel. • See pages 28-30 for 4 seconds. Press again → Removes display. • Temporarily displays receiving channel when in this manual may differ from keypad. Press again → Off. VOLUME UP/DOWN (k) Increases sound. (l) Decreases sound. • Changes or selects the TV adjustments on the MENU screens. Press again → Restores sound. • When sound is muted, CLOSED CAPTION...
...; Switches to external video INPUT 3 mode or COMPONENT mode. CHANNEL UP/DOWN (a) Selects next higher channel. (s) Selects next lower channel. • See pages 28-30 for 4 seconds. Press again → Removes display. • Temporarily displays receiving channel when in this manual may differ from keypad. Press again → Off. VOLUME UP/DOWN (k) Increases sound. (l) Decreases sound. • Changes or selects the TV adjustments on the MENU screens. Press again → Restores sound. • When sound is muted, CLOSED CAPTION...
32C241 Operation Manual
Page 8
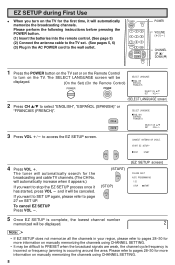
... access the EZ SETUP screen. Please perform the following instructions before pressing the POWER button. (1) Insert the batteries into the remote control. (See page 5) (2) Connect the antenna cable to the TV set or on the Remote Control to stop the EZ SETUP process once it has started, press VOL l and it will automatically memorize the broadcasting channels. EZ SETUP during First Use • When you turn on the TV. POWER VOLUME (k)/(l) CHANNEL...
... access the EZ SETUP screen. Please perform the following instructions before pressing the POWER button. (1) Insert the batteries into the remote control. (See page 5) (2) Connect the antenna cable to the TV set or on the Remote Control to stop the EZ SETUP process once it has started, press VOL l and it will automatically memorize the broadcasting channels. EZ SETUP during First Use • When you turn on the TV. POWER VOLUME (k)/(l) CHANNEL...
32C241 Operation Manual
Page 9
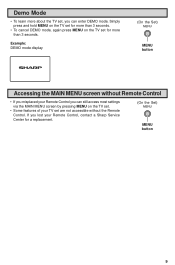
... features of your Remote Control, contact a Sharp Service Center for more than 3 seconds. • To cancel DEMO mode, again press MENU on the TV set are not accessible without Remote Control • If you misplaced your Remote Control you can enter DEMO mode. Simply press and hold MENU on the TV set , you lost your TV set for more about the TV set for a replacement. (On the Set) MENU button 9 Demo Mode • To learn...
... features of your Remote Control, contact a Sharp Service Center for more than 3 seconds. • To cancel DEMO mode, again press MENU on the TV set are not accessible without Remote Control • If you misplaced your Remote Control you can enter DEMO mode. Simply press and hold MENU on the TV set , you lost your TV set for more about the TV set for a replacement. (On the Set) MENU button 9 Demo Mode • To learn...
32C241 Operation Manual
Page 10
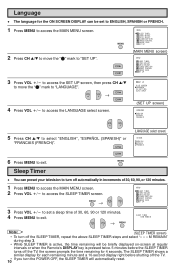
... CLOSED CAPT I ON PARENT CONTROL ES ENERGY SAVE SET UP 3 Press VOL k/l to set to ENGLISH, SPANISH or FRENCH. 1 Press MENU to exit. → SLEEP T I MER 12 0M REMA I S 6 Press MENU to access the LANGUAGE select screen. The SLEEP TIMER shows a similar display for each remaining minute and a 10-second display right before the SLEEP TIMER turns off the TV, the screen prompts the time remaining for the ON SCREEN DISPLAY can preset your television...
... CLOSED CAPT I ON PARENT CONTROL ES ENERGY SAVE SET UP 3 Press VOL k/l to set to ENGLISH, SPANISH or FRENCH. 1 Press MENU to exit. → SLEEP T I MER 12 0M REMA I S 6 Press MENU to access the LANGUAGE select screen. The SLEEP TIMER shows a similar display for each remaining minute and a 10-second display right before the SLEEP TIMER turns off the TV, the screen prompts the time remaining for the ON SCREEN DISPLAY can preset your television...
32C241 Operation Manual
Page 11
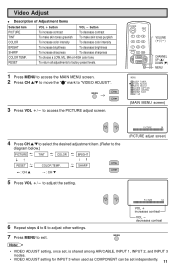
... ECT CC CLOSED CAPT I ON PARENT CONTROL ES ENERGY SAVE SET UP (MAIN MENU screen) 4 Press CH a/s to select the desired adjustment item. (Refer to the diagram below.) PICTURE TINT COLOR BRIGHT P I CTURE 50 6 Repeat steps 4 to 5 to access the PICTURE adjust screen. To choose a LOW, ML, MH or HIGH color tone. Note: • VIDEO ADJUST setting, once set, is shared among AIR/CABLE, INPUT 1, INPUT 2, and INPUT 3 modes. • VIDEO ADJUST setting for INPUT 3 when used as COMPONENT can be set independently...
... ECT CC CLOSED CAPT I ON PARENT CONTROL ES ENERGY SAVE SET UP (MAIN MENU screen) 4 Press CH a/s to select the desired adjustment item. (Refer to the diagram below.) PICTURE TINT COLOR BRIGHT P I CTURE 50 6 Repeat steps 4 to 5 to access the PICTURE adjust screen. To choose a LOW, ML, MH or HIGH color tone. Note: • VIDEO ADJUST setting, once set, is shared among AIR/CABLE, INPUT 1, INPUT 2, and INPUT 3 modes. • VIDEO ADJUST setting for INPUT 3 when used as COMPONENT can be set independently...
32C241 Operation Manual
Page 12
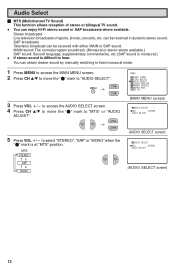
... in dynamic stereo sound. MTS STEREO SAP MONO (MAIN MENU screen) AUD I O SEL ECT MTS : STEREO AUD I O ADJUST (AUDIO SELECT screen) AUD I O SEL ECT MTS : STEREO AUD I ON PARENT CONTROL ES ENERGY SAVE SET UP 3 Press VOL k/l to access the AUDIO SELECT screen. 4 Press CH a/s to move the "E" mark to hear. SAP broadcasts Television broadcast can obtain clearer sound by manually switching to fixed monaural mode. 1 Press MENU to access the MAIN MENU screen. 2 Press CH a/s to...
... in dynamic stereo sound. MTS STEREO SAP MONO (MAIN MENU screen) AUD I O SEL ECT MTS : STEREO AUD I O ADJUST (AUDIO SELECT screen) AUD I O SEL ECT MTS : STEREO AUD I ON PARENT CONTROL ES ENERGY SAVE SET UP 3 Press VOL k/l to access the AUDIO SELECT screen. 4 Press CH a/s to move the "E" mark to hear. SAP broadcasts Television broadcast can obtain clearer sound by manually switching to fixed monaural mode. 1 Press MENU to access the MAIN MENU screen. 2 Press CH a/s to...
32C241 Operation Manual
Page 13
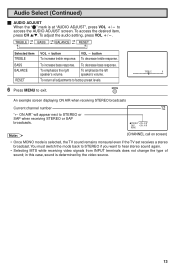
... speaker's volume. To adjust the audio setting, press VOL k/l. To emphasize the left speaker's volume. TREBLE 0 An example screen displaying ON AIR when receiving STEREO broadcasts Current channel number "← ON AIR" will appear next to hear stereo sound again. • Selecting MTS while receiving video signals from INPUT terminals does not change the type of sound; To return all adjustments to factory preset levels. 6 Press MENU to access the AUDIO ADJUST screen. in this case, sound...
... speaker's volume. To adjust the audio setting, press VOL k/l. To emphasize the left speaker's volume. TREBLE 0 An example screen displaying ON AIR when receiving STEREO broadcasts Current channel number "← ON AIR" will appear next to hear stereo sound again. • Selecting MTS while receiving video signals from INPUT terminals does not change the type of sound; To return all adjustments to factory preset levels. 6 Press MENU to access the AUDIO ADJUST screen. in this case, sound...
32C241 Operation Manual
Page 14
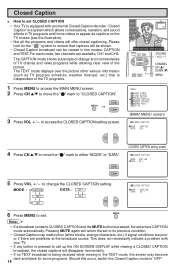
... SCREEN DISPLAY while viewing a CLOSED CAPTION broadcast, the closed captioning. VOLUME (k)/(l) CHANNEL UP (a)/ DOWN (s) MENU MENU SLEEP T I MER V I DEO ADJ UST AUD I O SEL ECT CC CLOSED CAPT I ON PARENT CONTROL ES ENERGY SAVE SET UP (MAIN MENU screen) CC CLOSED CAPT I ON MODE : CAPT I ON DATA : CH 1 4 Press CH a/s to move the "E" mark to "CLOSED CAPTION". → 3 Press VOL k/l to change the CLOSED CAPTION setting. The TEXT mode displays over the picture other various information (such as captions on the TV screen...
... SCREEN DISPLAY while viewing a CLOSED CAPTION broadcast, the closed captioning. VOLUME (k)/(l) CHANNEL UP (a)/ DOWN (s) MENU MENU SLEEP T I MER V I DEO ADJ UST AUD I O SEL ECT CC CLOSED CAPT I ON PARENT CONTROL ES ENERGY SAVE SET UP (MAIN MENU screen) CC CLOSED CAPT I ON MODE : CAPT I ON DATA : CH 1 4 Press CH a/s to move the "E" mark to "CLOSED CAPTION". → 3 Press VOL k/l to change the CLOSED CAPTION setting. The TEXT mode displays over the picture other various information (such as captions on the TV screen...
32C241 Operation Manual
Page 16
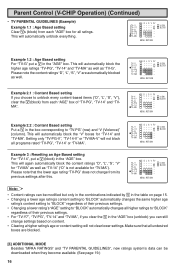
... Example 2.2 : Content Based setting Put a V in the "AGE" box. Parent Control (V-CHIP Operation) (Continued) • TV PARENTAL GUIDELINES (Example) Example 1.1 : Age Based setting Clear V s (block) from each "AGE" box of "TV-PG", "TV-14" and "TVMA". TV-Y TV-Y7 TV-G TV-PG TV-14 T V -MA AGE D L S V FV ---- - ---- ---- - - - - - : V I EW V : BLOCK MENU : RETURN Example 2.1 : Content Based setting If you can be downloaded when they become available...
... Example 2.2 : Content Based setting Put a V in the "AGE" box. Parent Control (V-CHIP Operation) (Continued) • TV PARENTAL GUIDELINES (Example) Example 1.1 : Age Based setting Clear V s (block) from each "AGE" box of "TV-PG", "TV-14" and "TVMA". TV-Y TV-Y7 TV-G TV-PG TV-14 T V -MA AGE D L S V FV ---- - ---- ---- - - - - - : V I EW V : BLOCK MENU : RETURN Example 2.1 : Content Based setting If you can be downloaded when they become available...
32C241 Operation Manual
Page 25
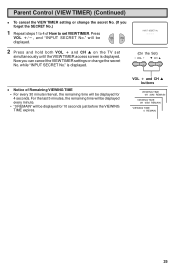
... a buttons VIEWING TIME 0H 30M REMAIN VIEWING TIME 0H 05M REMAIN VIEWING TIME 0 REMAIN 25 Parent Control (VIEW TIMER) (Continued) • To cancel the VIEW TIMER setting or change the secret No. while "INPUT SECRET No." Press VOL k/l, and "INPUT SECRET No." Now you can cancel the VIEW TIMER settings or change the secret No. (If you forget the SECRET No.) 1 Repeat steps 1 to set simultaneously until the VIEW TIMER access screen is displayed. will be displayed for...
... a buttons VIEWING TIME 0H 30M REMAIN VIEWING TIME 0H 05M REMAIN VIEWING TIME 0 REMAIN 25 Parent Control (VIEW TIMER) (Continued) • To cancel the VIEW TIMER setting or change the secret No. while "INPUT SECRET No." Press VOL k/l, and "INPUT SECRET No." Now you can cancel the VIEW TIMER settings or change the secret No. (If you forget the SECRET No.) 1 Repeat steps 1 to set simultaneously until the VIEW TIMER access screen is displayed. will be displayed for...

32C241 Operation Manual
Page 28
A IR/ CABLE A IR CABLE STD CABLE HRC CABLE I RC (AIR/CABLE screen) Note: • Receivable channels of your region, follow the instructions below to manually memorize the channel. 1 Press MENU to access the MAIN MENU screen. 2 Press CH a/s to move the "E" mark to "SET UP". → MENU SLEEP T I MER V I DEO ADJ UST AUD I O SEL ECT CC CLOSED CAPT I ON PARENT CONTROL ES ENERGY SAVE SET UP (MAIN MENU screen) 3 Press VOL k/l to access the SET UP screen. 4 Press...
A IR/ CABLE A IR CABLE STD CABLE HRC CABLE I RC (AIR/CABLE screen) Note: • Receivable channels of your region, follow the instructions below to manually memorize the channel. 1 Press MENU to access the MAIN MENU screen. 2 Press CH a/s to move the "E" mark to "SET UP". → MENU SLEEP T I MER V I DEO ADJ UST AUD I O SEL ECT CC CLOSED CAPT I ON PARENT CONTROL ES ENERGY SAVE SET UP (MAIN MENU screen) 3 Press VOL k/l to access the SET UP screen. 4 Press...
32C241 Operation Manual
Page 32
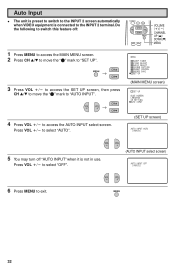
... k/l to access the AUTO INPUT select screen. Auto Input • The unit is preset to switch to the INPUT 2 screen automatically when VIDEO equipment is not in use. Press VOL k/l to the INPUT 2 terminal. VOLUME (k)/(l) CHANNEL UP (a)/ DOWN (s) MENU MENU SLEEP T I MER V I DEO ADJ UST AUD I O SEL ECT CC CLOSED CAPT I ON PARENT CONTROL ES ENERGY SAVE SET UP (MAIN MENU screen) SET UP BLUE SCREEN L ANGUAGE CH SETT I NG AUTO I NPUT (SET UP screen) AUTO I NPUT : AUTO ( I NPUT2) 6 Press MENU to switch this...
... k/l to access the AUTO INPUT select screen. Auto Input • The unit is preset to switch to the INPUT 2 screen automatically when VIDEO equipment is not in use. Press VOL k/l to the INPUT 2 terminal. VOLUME (k)/(l) CHANNEL UP (a)/ DOWN (s) MENU MENU SLEEP T I MER V I DEO ADJ UST AUD I O SEL ECT CC CLOSED CAPT I ON PARENT CONTROL ES ENERGY SAVE SET UP (MAIN MENU screen) SET UP BLUE SCREEN L ANGUAGE CH SETT I NG AUTO I NPUT (SET UP screen) AUTO I NPUT : AUTO ( I NPUT2) 6 Press MENU to switch this...
32C241 Operation Manual
Page 34
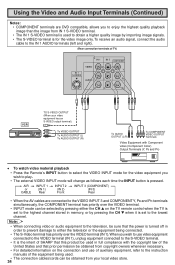
... of SHARP that this product be used to obtain a higher quality image by importing image signals. • The S-VIDEO terminal is for the video equipment you wish to play. • The external VIDEO INPUT mode will change as follows each time the INPUT button is turned off in full compliance with Component video (Component Color) Output Terminals (Y, PB and PR) • To watch video material playback • Press the Remote's INPUT button to select the VIDEO INPUT mode for the video image...
... of SHARP that this product be used to obtain a higher quality image by importing image signals. • The S-VIDEO terminal is for the video equipment you wish to play. • The external VIDEO INPUT mode will change as follows each time the INPUT button is turned off in full compliance with Component video (Component Color) Output Terminals (Y, PB and PR) • To watch video material playback • Press the Remote's INPUT button to select the VIDEO INPUT mode for the video image...
32C241 Operation Manual
Page 35
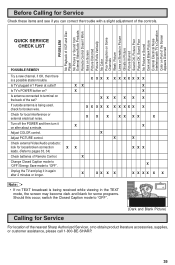
... X X Is antenna connected to "OFF". X X XX X XX X X X XXX X XX X X Is TV plugged in Picture Picture Blurred Sound OK, Picture Poor Picture OK, Sound Poor No Picture or Sound Dark and Blank Picture External Electrical Noise Interfering with a slight adjustment of Remote Control. QUICK SERVICE CHECK LIST PROBLEM No Playback of VCR and Disc Player No Picture or Sound from External Video/Audio Products Remote Control Doesn't Work Bars on Screen Picture Distorted Picture Rolls Vertically No Color Poor Reception on Some Channels Weak Picture Lines or...
... X X Is antenna connected to "OFF". X X XX X XX X X X XXX X XX X X Is TV plugged in Picture Picture Blurred Sound OK, Picture Poor Picture OK, Sound Poor No Picture or Sound Dark and Blank Picture External Electrical Noise Interfering with a slight adjustment of Remote Control. QUICK SERVICE CHECK LIST PROBLEM No Playback of VCR and Disc Player No Picture or Sound from External Video/Audio Products Remote Control Doesn't Work Bars on Screen Picture Distorted Picture Rolls Vertically No Color Poor Reception on Some Channels Weak Picture Lines or...
32C241 Operation Manual
Page 47
... USE ARE LIMITED TO THE PERIOD(S) FROM THE DATE OF PURCHASE SET FORTH BELOW. Model Specific Section Your Product Model Number & Description: Warranty Period for this Product: Additional Item(s) Excluded from defective workmanship and materials, and agrees that above limitation may not apply to you . Contact your Sharp Authorized Servicer to obtain in-home service for this information available when you need service...
... USE ARE LIMITED TO THE PERIOD(S) FROM THE DATE OF PURCHASE SET FORTH BELOW. Model Specific Section Your Product Model Number & Description: Warranty Period for this Product: Additional Item(s) Excluded from defective workmanship and materials, and agrees that above limitation may not apply to you . Contact your Sharp Authorized Servicer to obtain in-home service for this information available when you need service...


