
Instructions for Use
Page 27
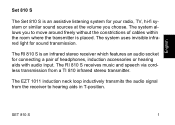
... of headphones, induction accessories or hearing aids with audio input. The EZT 1011 induction neck loop inductively transmits the audio signal from a TI 810 infrared stereo transmitter. The system uses invisible infrared light for connecting a pair of cables within the room where the transmitter is an assistive listening system for your radio, TV, hi-fi system or similar sound sources at the volume you to hearing aids...
... of headphones, induction accessories or hearing aids with audio input. The EZT 1011 induction neck loop inductively transmits the audio signal from a TI 810 infrared stereo transmitter. The system uses invisible infrared light for connecting a pair of cables within the room where the transmitter is an assistive listening system for your radio, TV, hi-fi system or similar sound sources at the volume you to hearing aids...
Instructions for Use
Page 28
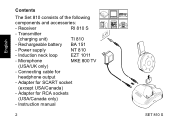
Transmitter (charging unit) TI 810 - Rechargeable battery BA 151 - Power supply NT 810 - Adapter for RCA sockets (USA/Canada only) - Receiver RI 810 S - Adapter for SCART socket (except USA/Canada) - Connecting cable for headphone output - Induction neck loop EZT 1011 - English Contents The Set 810 consists of the following components and accessories: - Microphone MKE 800 TV (USA/UK only) - Instruction manual 2 SET 810 S
Transmitter (charging unit) TI 810 - Rechargeable battery BA 151 - Power supply NT 810 - Adapter for RCA sockets (USA/Canada only) - Receiver RI 810 S - Adapter for SCART socket (except USA/Canada) - Connecting cable for headphone output - Induction neck loop EZT 1011 - English Contents The Set 810 consists of the following components and accessories: - Microphone MKE 800 TV (USA/UK only) - Instruction manual 2 SET 810 S
Instructions for Use
Page 29
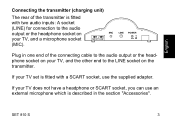
... SCART socket, you can use the supplied adapter. English Connecting the transmitter (charging unit) The rear of the transmitter is fitted with a SCART socket, use an external microphone which is described in one end of the connecting cable to the audio output or the headphone socket on your TV, and the other end to the audio output or the headphone socket on the transmitter. Plug in the section "Accessories".
... SCART socket, you can use the supplied adapter. English Connecting the transmitter (charging unit) The rear of the transmitter is fitted with a SCART socket, use an external microphone which is described in one end of the connecting cable to the audio output or the headphone socket on your TV, and the other end to the audio output or the headphone socket on the transmitter. Plug in the section "Accessories".
Instructions for Use
Page 30
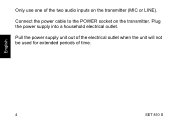
Only use one of time. English 4 SET 810 S Plug the power supply into a household electrical outlet. Connect the power cable to the POWER socket on the transmitter (MIC or LINE). Pull the power supply unit out of the electrical outlet when the unit will not be used for extended periods of the two audio inputs on the transmitter.
Only use one of time. English 4 SET 810 S Plug the power supply into a household electrical outlet. Connect the power cable to the POWER socket on the transmitter (MIC or LINE). Pull the power supply unit out of the electrical outlet when the unit will not be used for extended periods of the two audio inputs on the transmitter.

Instructions for Use
Page 31
SET 810 S 5 e. Guide the cables backwards. Avoid exposure to place the transmitter Place the transmitter so that the infrared light beam is pointed directly at the receiver, i. there should be no obstacles in the light path between transmitter and receiver. Direct sunlight may interfere with the reception and may damage the transmitter. English Where to direct sunlight.
SET 810 S 5 e. Guide the cables backwards. Avoid exposure to place the transmitter Place the transmitter so that the infrared light beam is pointed directly at the receiver, i. there should be no obstacles in the light path between transmitter and receiver. Direct sunlight may interfere with the reception and may damage the transmitter. English Where to direct sunlight.

Instructions for Use
Page 32
Affix the receiver to the clothing by means of sight between the transmitter and the receiver. 6 SET 810 S English Using the receiver The receiver is turned on automatically as soon as a 3.5 mm stereo jack plug is positioned correctly, with the operating control facing the transmitter. Make sure the receiver is inserted into the socket at the top of the receiver. There must be a free line of its integrated attachment clip.
Affix the receiver to the clothing by means of sight between the transmitter and the receiver. 6 SET 810 S English Using the receiver The receiver is turned on automatically as soon as a 3.5 mm stereo jack plug is positioned correctly, with the operating control facing the transmitter. Make sure the receiver is inserted into the socket at the top of the receiver. There must be a free line of its integrated attachment clip.

Instructions for Use
Page 33
Make sure your hearing aid to avoid discharging the battery. The receiver is then turned off. This may prevent interference-free reception. SET 810 S 7 Adjusting the volume Adjust the receiver's volume with the operating control. English Using the induction neck loop Put the EZT 1011 induction neck loop around your neck and insert its plug into the socket at the top of the receiver's socket to position "T". Set your hand doesn't cover the operating control completely. If you are not using the receiver, pull the 3.5 mm stereo jack plug out of the receiver.
Make sure your hearing aid to avoid discharging the battery. The receiver is then turned off. This may prevent interference-free reception. SET 810 S 7 Adjusting the volume Adjust the receiver's volume with the operating control. English Using the induction neck loop Put the EZT 1011 induction neck loop around your neck and insert its plug into the socket at the top of the receiver's socket to position "T". Set your hand doesn't cover the operating control completely. If you are not using the receiver, pull the 3.5 mm stereo jack plug out of the receiver.
Instructions for Use
Page 34
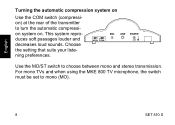
on . This system repro- For mono TVs and when using the MKE 800 TV microphone, the switch must be set to choose between mono and stereo transmission. Choose the setting that suits your liste- ning preferences. Use the MO/ST switch to mono (MO). 8 SET 810 S duces soft passages louder and 24V decreases loud sounds. on system on ) at the rear of the transmitter to turn the automatic compressi- English Turning the automatic compression system on Use the COM switch (compressi-
on . This system repro- For mono TVs and when using the MKE 800 TV microphone, the switch must be set to choose between mono and stereo transmission. Choose the setting that suits your liste- ning preferences. Use the MO/ST switch to mono (MO). 8 SET 810 S duces soft passages louder and 24V decreases loud sounds. on system on ) at the rear of the transmitter to turn the automatic compressi- English Turning the automatic compression system on Use the COM switch (compressi-

Instructions for Use
Page 35
A fully charged battery has an operating time of the receiver to turn the receiver off. SET 810 S 9 The normal charging time is 10-12 hours. Charge the battery for 24 hours before you use it for the first time. Pull the 3.5 mm stereo plug out of approx. 4 hours. English Charging the battery Place the receiver into the transmitter's charging compartment, with the operating control at the right of the transmitter, charging time is 4-5 hours. The left LED on the transmitter must light up. When charging a spare battery in the small charging compartment at the front.
A fully charged battery has an operating time of the receiver to turn the receiver off. SET 810 S 9 The normal charging time is 10-12 hours. Charge the battery for 24 hours before you use it for the first time. Pull the 3.5 mm stereo plug out of approx. 4 hours. English Charging the battery Place the receiver into the transmitter's charging compartment, with the operating control at the right of the transmitter, charging time is 4-5 hours. The left LED on the transmitter must light up. When charging a spare battery in the small charging compartment at the front.
Instructions for Use
Page 36
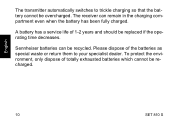
Please dispose of totally exhausted batteries which cannot be replaced if the operating time decreases. The receiver can be overcharged. A battery has a service life of 1-2 years and should be recharged. To protect the environment, only dispose of the batteries as special waste or return them to trickle charging so that the battery cannot be recycled. Sennheiser batteries can remain in the charging compartment even when the battery has been fully charged. English 10 SET 810 S The transmitter automatically switches to your specialist dealer.
Please dispose of totally exhausted batteries which cannot be replaced if the operating time decreases. The receiver can be overcharged. A battery has a service life of 1-2 years and should be recharged. To protect the environment, only dispose of the batteries as special waste or return them to trickle charging so that the battery cannot be recycled. Sennheiser batteries can remain in the charging compartment even when the battery has been fully charged. English 10 SET 810 S The transmitter automatically switches to your specialist dealer.
Instructions for Use
Page 37
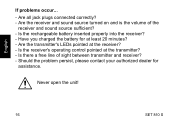
If the light path between transmitter and receiver is emitted by the transmitter and received by the receiver. Varnish or furniture polish may interfere with the useful signal of the Set 810 S. Place the transmitter on a nonslip pad to humans or animals. SET 810 S 11 English Additional information This system uses infrared light which is obstructed by clothing such as scarves etc., the reception may also be...
If the light path between transmitter and receiver is emitted by the transmitter and received by the receiver. Varnish or furniture polish may interfere with the useful signal of the Set 810 S. Place the transmitter on a nonslip pad to humans or animals. SET 810 S 11 English Additional information This system uses infrared light which is obstructed by clothing such as scarves etc., the reception may also be...
Instructions for Use
Page 39
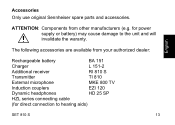
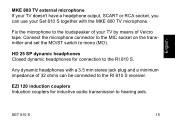
for direct connection to the unit and will invalidate the waranty. English The following accessories are available from other manufacturers (e.g. ATTENTION: Components from your authorized dealer: Rechargeable battery BA 151 Charger L 151-2 Additional receiver RI 810 S Transmitter TI 810 External microphone MKE 800 TV Induction couplers EZI 120 Dynamic headphones HD 25 SP HZL series connecting cable (for power supply or battery) may cause damage to hearing aids) SET 810 S 13 Accessories Only use original Sennheiser spare parts and accessories.
for direct connection to the unit and will invalidate the waranty. English The following accessories are available from other manufacturers (e.g. ATTENTION: Components from your authorized dealer: Rechargeable battery BA 151 Charger L 151-2 Additional receiver RI 810 S Transmitter TI 810 External microphone MKE 800 TV Induction couplers EZI 120 Dynamic headphones HD 25 SP HZL series connecting cable (for power supply or battery) may cause damage to hearing aids) SET 810 S 13 Accessories Only use original Sennheiser spare parts and accessories.
Instructions for Use
Page 40
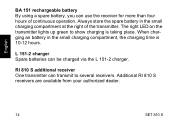
... right of continuous operation. English BA 151 rechargeable battery By using a spare battery, you can use the receiver for more than four hours of the transmitter. Additional RI 810 S receivers are available from your authorized dealer. 14 SET 810 S The right LED on the transmitter lights up green to several receivers. Always store the spare battery in the small charging compartment, the charging time is taking...
... right of continuous operation. English BA 151 rechargeable battery By using a spare battery, you can use the receiver for more than four hours of the transmitter. Additional RI 810 S receivers are available from your authorized dealer. 14 SET 810 S The right LED on the transmitter lights up green to several receivers. Always store the spare battery in the small charging compartment, the charging time is taking...
Instructions for Use
Page 41
... a 3.5 mm stereo jack plug and a minimum impedance of 32 ohms can use your TV by means of your Set 810 S together with the MKE 800 TV microphone. English MKE 800 TV external microphone If your TV doesn't have a headphone output, SCART or RCA socket, you can be connected to the loudspeaker of Velcro tape. Fix the microphone to the RI 810 S receiver. EZI 120...
... a 3.5 mm stereo jack plug and a minimum impedance of 32 ohms can use your TV by means of your Set 810 S together with the MKE 800 TV microphone. English MKE 800 TV external microphone If your TV doesn't have a headphone output, SCART or RCA socket, you can be connected to the loudspeaker of Velcro tape. Fix the microphone to the RI 810 S receiver. EZI 120...
Instructions for Use
Page 42
... all jack plugs connected correctly? - Is the receiver's operating control pointed at the receiver? - Are the transmitter's LEDs pointed at the transmitter? - Is there a free line of the receiver and sound source sufficient? - Should the problem persist, please contact your authorized dealer for at least 20 minutes? - Are the receiver and sound source turned on and is the volume of sight between transmitter and receiver? - Have you charged the battery...
... all jack plugs connected correctly? - Is the receiver's operating control pointed at the receiver? - Are the transmitter's LEDs pointed at the transmitter? - Is there a free line of the receiver and sound source sufficient? - Should the problem persist, please contact your authorized dealer for at least 20 minutes? - Are the receiver and sound source turned on and is the volume of sight between transmitter and receiver? - Have you charged the battery...
Instructions for Use
Page 43
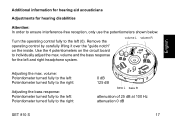
... attenuation 0 dB SET 810 S 17 volume L volume R English Adjusting the max. Remove the operating control by carefully lifting it over the "guide notch" on the circuit board to the left (0). volume: Potentiometer turned fully to the left: Potentiometer turned fully to the right: Adjusting the bass response: Potentiometer turned fully to the left: Potentiometer turned fully to ensure interference-free reception, only use the potentiometers shown...
... attenuation 0 dB SET 810 S 17 volume L volume R English Adjusting the max. Remove the operating control by carefully lifting it over the "guide notch" on the circuit board to the left (0). volume: Potentiometer turned fully to the left: Potentiometer turned fully to the right: Adjusting the bass response: Potentiometer turned fully to the left: Potentiometer turned fully to ensure interference-free reception, only use the potentiometers shown...
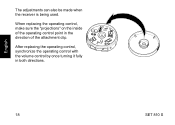
Instructions for Use
Page 44
English The adjustments can also be made when the receiver is being used. When replacing the operating control, make sure the "projections" on the inside of the operating control point in both directions. 18 SET 810 S After replacing the operating control, synchronize the operating control with the volume control by once turning it fully in the direction of the attachment clip.
English The adjustments can also be made when the receiver is being used. When replacing the operating control, make sure the "projections" on the inside of the operating control point in both directions. 18 SET 810 S After replacing the operating control, synchronize the operating control with the volume control by once turning it fully in the direction of the attachment clip.
Instructions for Use
Page 45
English Specifications System Modulation Carrier frequencies AF frequency response S/N ratio Transmitter AF input voltage Audio input Microphone socket Charging time for battery Charging time (spare battery) Power supply Weight Dimensions FM, stereo 2.3 / 2.8 MHz 40 Hz ....... 15 kHz 60 dB A rms 50 mV ...... 5 V 3.5 mm jack, stereo/mono 2.5 mm jack, mono approx. 4 h approx. 10-12 h 24 V DC via NT 810 mains unit approx. 94 g (without battery) diameter: 150 mm, height: 47 mm SET 810 S 19
English Specifications System Modulation Carrier frequencies AF frequency response S/N ratio Transmitter AF input voltage Audio input Microphone socket Charging time for battery Charging time (spare battery) Power supply Weight Dimensions FM, stereo 2.3 / 2.8 MHz 40 Hz ....... 15 kHz 60 dB A rms 50 mV ...... 5 V 3.5 mm jack, stereo/mono 2.5 mm jack, mono approx. 4 h approx. 10-12 h 24 V DC via NT 810 mains unit approx. 94 g (without battery) diameter: 150 mm, height: 47 mm SET 810 S 19

Instructions for Use
Page 46
English Receiver AF frequency response S/N ratio Power supply Operating time Weight Dimensions Output voltage Induction neck loop AF frequency response Impedance Magnetic field strength at the hearing aid Guarantee 40 Hz ....... 15 kHz 60 dB A rms 2.4 V via BA 151 battery approx. 4 hours per battery approx. 35 g (without battery) length: 95 mm, width: 63 mm, height: 35 mm max. 700 mV at 32 Ω 300 Hz ....... 10 kHz 47 Ω 100 mA/m at 1 kHz and 10 mVA 2 years 20 SET 810 S
English Receiver AF frequency response S/N ratio Power supply Operating time Weight Dimensions Output voltage Induction neck loop AF frequency response Impedance Magnetic field strength at the hearing aid Guarantee 40 Hz ....... 15 kHz 60 dB A rms 2.4 V via BA 151 battery approx. 4 hours per battery approx. 35 g (without battery) length: 95 mm, width: 63 mm, height: 35 mm max. 700 mV at 32 Ω 300 Hz ....... 10 kHz 47 Ω 100 mA/m at 1 kHz and 10 mVA 2 years 20 SET 810 S

Instructions for Use
Page 47
... This equipment is available at the end of Directive 2006/95/EC. This symbol indicates that electrical and electronic equipment must be disposed of separately from normal waste at www.sennheiser.com. Please dispose of this product by bringing...Please dispose of rechargeable batteries as special waste or return them to your specialist dealer. Batteries The supplied rechargeable batteries can be recycled. SET 810 S 21 Before putting the device into operation, please observe the respective country-specific regulations! WEEE Declaration Your Sennheiser product was developed and...
... This equipment is available at the end of Directive 2006/95/EC. This symbol indicates that electrical and electronic equipment must be disposed of separately from normal waste at www.sennheiser.com. Please dispose of this product by bringing...Please dispose of rechargeable batteries as special waste or return them to your specialist dealer. Batteries The supplied rechargeable batteries can be recycled. SET 810 S 21 Before putting the device into operation, please observe the respective country-specific regulations! WEEE Declaration Your Sennheiser product was developed and...

