User Guide
Page 2
... publication and features described herein are designed to provide reasonable protection against harmful interference in USA Smart Label Printer © 1992-2000 Print Things. No patent liability is any means, electronic, mechanical, photocopying, recording, or otherwise without notice.... Smart Label Printer 100/200/240 User Guide by Seiko Instruments USA Inc. FCC Compliance Statement This equipment has been tested and found to comply with the limits for ...
... publication and features described herein are designed to provide reasonable protection against harmful interference in USA Smart Label Printer © 1992-2000 Print Things. No patent liability is any means, electronic, mechanical, photocopying, recording, or otherwise without notice.... Smart Label Printer 100/200/240 User Guide by Seiko Instruments USA Inc. FCC Compliance Statement This equipment has been tested and found to comply with the limits for ...

User Guide
Page 3
Other products mentioned in this guide are registered trademarks of Seiko Instruments Inc. SII and the SII logo are trademarks or registered trademarks of Seiko Instruments USA Inc. Trademark Information IBM is a registered trademark and SmartLabels, Smart Label Icons, SmartCopy, SmartCapture and SmartCode are registered trademarks of International Business Machines Corporation. Microsoft and Windows are trademarks of their respective companies. Smart Label Printer is a registered trademark of Microsoft Corporation.
Other products mentioned in this guide are registered trademarks of Seiko Instruments Inc. SII and the SII logo are trademarks or registered trademarks of Seiko Instruments USA Inc. Trademark Information IBM is a registered trademark and SmartLabels, Smart Label Icons, SmartCopy, SmartCapture and SmartCode are registered trademarks of International Business Machines Corporation. Microsoft and Windows are trademarks of their respective companies. Smart Label Printer is a registered trademark of Microsoft Corporation.
User Guide
Page 4
... risk of electric shock or fire. Caution statements are used to service the printer yourself as it could damage the cord and result in a risk of minor personal injury. Repair service should be performed by Seiko Instruments for use the power cord if damaged or frayed. 3 The thermal... print head may cause risk of overheating or fire. 2 Do not bend or place a heavy object on the printer. 2 This printer contains no user-serviceable parts. WARNING. Do ...
... risk of electric shock or fire. Caution statements are used to service the printer yourself as it could damage the cord and result in a risk of minor personal injury. Repair service should be performed by Seiko Instruments for use the power cord if damaged or frayed. 3 The thermal... print head may cause risk of overheating or fire. 2 Do not bend or place a heavy object on the printer. 2 This printer contains no user-serviceable parts. WARNING. Do ...

User Guide
Page 5
... noise, odor or smoke. Installation For best performance, we recommend that satisfies the following conditions occur, turn off the printer and unplug the power cord from an error or the printer does not operate normally when the operating instructions are followed. s Liquid has been spilled into the...s Humidity: 30% RH to 80% RH (non-condensing) s The printer does not recover from the power outlet: s The power cord is damaged or frayed. s The printer exhibits a distinct change in a location that you install your printer on the cable could damage the cable. 5 If any of the power ...
... noise, odor or smoke. Installation For best performance, we recommend that satisfies the following conditions occur, turn off the printer and unplug the power cord from an error or the printer does not operate normally when the operating instructions are followed. s Liquid has been spilled into the...s Humidity: 30% RH to 80% RH (non-condensing) s The printer does not recover from the power outlet: s The power cord is damaged or frayed. s The printer exhibits a distinct change in a location that you install your printer on the cable could damage the cable. 5 If any of the power ...
User Guide
Page 6
About This Guide As you'll soon realize, the Smart Label Printer® is easy to set up and use your SLP. s Text we assume that you are , once you've read what you need to know ...
About This Guide As you'll soon realize, the Smart Label Printer® is easy to set up and use your SLP. s Text we assume that you are , once you've read what you need to know ...

User Guide
Page 7
... accessories. s Appendix B, Commonly Asked Questions and Answers, provides a list of your SLP. ii Smart Label Printer Models 100, 200 and 240 s Chapter 3, Changing Labels and Printer Care, provides information for replacing a label roll and taking care of questions and answers that can help . ...It also describes how to an IBM-compatible PC, loading labels into the printer, and installing the Smart Label software. This guide has three chapters and three appendices: s Chapter 1, Introduction, provides some general information...
... accessories. s Appendix B, Commonly Asked Questions and Answers, provides a list of your SLP. ii Smart Label Printer Models 100, 200 and 240 s Chapter 3, Changing Labels and Printer Care, provides information for replacing a label roll and taking care of questions and answers that can help . ...It also describes how to an IBM-compatible PC, loading labels into the printer, and installing the Smart Label software. This guide has three chapters and three appendices: s Chapter 1, Introduction, provides some general information...
User Guide
Page 8
... Outlet 2-5 Connecting the SLP to an IBM-compatible PC 2-6 Loading a Roll of Labels 2-7 Testing the Printer 2-9 Installing the Smart Label Software 2-10 Using On-Line Help 2-11 Chapter 3 Changing Labels and Printer Care Overview 3-2 Caring for Your Printer 3-2 Off Line and On Line Mode 3-3 Changing a Label Roll 3-3 Removing the Old Roll 3-3 Loading the...
... Outlet 2-5 Connecting the SLP to an IBM-compatible PC 2-6 Loading a Roll of Labels 2-7 Testing the Printer 2-9 Installing the Smart Label Software 2-10 Using On-Line Help 2-11 Chapter 3 Changing Labels and Printer Care Overview 3-2 Caring for Your Printer 3-2 Off Line and On Line Mode 3-3 Changing a Label Roll 3-3 Removing the Old Roll 3-3 Loading the...
User Guide
Page 11
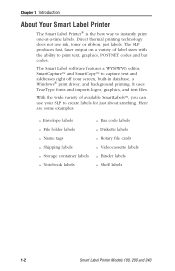
... labels n Notebook labels n Bar code labels n Diskette labels n Rotary file cards n Videocassette labels n Binder labels n Shelf labels 1-2 Smart Label Printer Models 100, 200 and 240 Direct thermal printing technology does not use your screen, built-in database, a Windows® print driver, and background printing.... It uses TrueType fonts and imports logos, graphics, and text files. Chapter 1 Introduction About Your Smart Label Printer The Smart Label Printer® is the best way to create labels for just about anything. With the wide variety of label sizes with...
... labels n Notebook labels n Bar code labels n Diskette labels n Rotary file cards n Videocassette labels n Binder labels n Shelf labels 1-2 Smart Label Printer Models 100, 200 and 240 Direct thermal printing technology does not use your screen, built-in database, a Windows® print driver, and background printing.... It uses TrueType fonts and imports logos, graphics, and text files. Chapter 1 Introduction About Your Smart Label Printer The Smart Label Printer® is the best way to create labels for just about anything. With the wide variety of label sizes with...

User Guide
Page 14
Windows 98 or Windows 2000 is required to connect the Smart Label Printer to have the following: n An IBM PC or 100% compatible computer n An 80386 or higher processor n 4 MB of available Random Access Memory (RAM) n An available USB or RS-232C serial (COM) port n 5 MB available hard disk space n VGA or higher resolution graphics card n A mouse or other pointing device n Microsoft Windows 95, 98, Windows NT 4.0 or Windows 2000 Note... Chapter 2 Getting Started What You Need In order to use your SLP and software, you need to a USB port. 2-2 Smart Label Printer Models 100, 200 and 240
Windows 98 or Windows 2000 is required to connect the Smart Label Printer to have the following: n An IBM PC or 100% compatible computer n An 80386 or higher processor n 4 MB of available Random Access Memory (RAM) n An available USB or RS-232C serial (COM) port n 5 MB available hard disk space n VGA or higher resolution graphics card n A mouse or other pointing device n Microsoft Windows 95, 98, Windows NT 4.0 or Windows 2000 Note... Chapter 2 Getting Started What You Need In order to use your SLP and software, you need to a USB port. 2-2 Smart Label Printer Models 100, 200 and 240
User Guide
Page 15
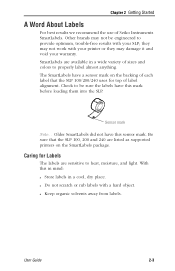
...SmartLabels have a sensor mark on the SmartLabels package. User Guide 2-3 Check to properly label almost anything. n Do not scratch or rub labels with your printer or they may not work with a hard object. n Keep organic solvents away from labels. Be sure that the SLP 100, 200 and 240 are ... of each label that the SLP 100/200/240 uses for Labels The labels are available in a cool, dry place. Caring for top of Seiko Instruments SmartLabels. Chapter 2 Getting Started A Word About Labels For best results we recommend the use of label alignment. Other brands may damage it ...
...SmartLabels have a sensor mark on the SmartLabels package. User Guide 2-3 Check to properly label almost anything. n Do not scratch or rub labels with your printer or they may not work with a hard object. n Keep organic solvents away from labels. Be sure that the SLP 100, 200 and 240 are ... of each label that the SLP 100/200/240 uses for Labels The labels are available in a cool, dry place. Caring for top of Seiko Instruments SmartLabels. Chapter 2 Getting Started A Word About Labels For best results we recommend the use of label alignment. Other brands may damage it ...
User Guide
Page 16
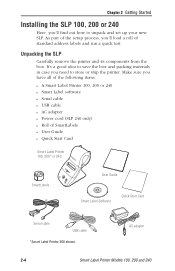
... setup process, you 'll find out how to save the box and packing materials in case you have all of the following items. n A Smart Label Printer 100, 200 or 240 n Smart Label software n Serial cable n USB cable n AC adapter n Power cord (SLP 240 only) n Roll of standard address labels and run... test. Chapter 2 Getting Started Installing the SLP 100, 200 or 240 Here, you 'll load a roll of SmartLabels n User Guide n Quick Start Card Smart Label Printer 100, 200* or 240 SmartLabels User Guide Smart Label Software Quick Start Card Serial cable USB cable *Smart Label...
... setup process, you 'll find out how to save the box and packing materials in case you have all of the following items. n A Smart Label Printer 100, 200 or 240 n Smart Label software n Serial cable n USB cable n AC adapter n Power cord (SLP 240 only) n Roll of standard address labels and run... test. Chapter 2 Getting Started Installing the SLP 100, 200 or 240 Here, you 'll load a roll of SmartLabels n User Guide n Quick Start Card Smart Label Printer 100, 200* or 240 SmartLabels User Guide Smart Label Software Quick Start Card Serial cable USB cable *Smart Label...

User Guide
Page 17
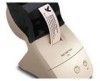
When you know there are no labels in the printer. Form Feed button Power button Status light User Guide 2-5 This is just to a power outlet: 1 Plug the AC adapter cable into the jack at the rear of the SLP. 2 Flip up the AC adapter prongs and plug it into a power outlet. 3 Turn the SLP on , the status light flashes green. Chapter 2 Getting Started Connecting the SLP to a Power Outlet Now you're ready to connect the SLP to let you turn the printer on by pressing the power button.
When you know there are no labels in the printer. Form Feed button Power button Status light User Guide 2-5 This is just to a power outlet: 1 Plug the AC adapter cable into the jack at the rear of the SLP. 2 Flip up the AC adapter prongs and plug it into a power outlet. 3 Turn the SLP on , the status light flashes green. Chapter 2 Getting Started Connecting the SLP to a Power Outlet Now you're ready to connect the SLP to let you turn the printer on by pressing the power button.
User Guide
Page 18
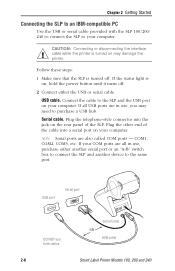
...the jack on your computer. Serial ports are in use both cables 2-6 Serial Cable OR USB cable Smart Label Printer Models 100, 200 and 240 COM1, COM2, COM3, etc. Follow these steps: 1 Make sure that the ...turns off . USB cable. Serial cable. If all in use, you may damage the printer. If your COM ports are all USB ports are also called COM ports - CAUTION: Connecting or disconnecting the ...interface cable while the printer is turned on may need to the same port. USB port Serial port DO NOT use ...
...the jack on your computer. Serial ports are in use both cables 2-6 Serial Cable OR USB cable Smart Label Printer Models 100, 200 and 240 COM1, COM2, COM3, etc. Follow these steps: 1 Make sure that the ...turns off . USB cable. Serial cable. If all in use, you may damage the printer. If your COM ports are all USB ports are also called COM ports - CAUTION: Connecting or disconnecting the ...interface cable while the printer is turned on may need to the same port. USB port Serial port DO NOT use ...

User Guide
Page 19
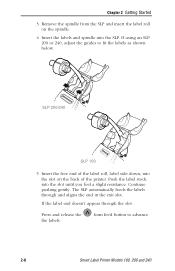
... create a "leader." Check to load a roll of standard address labels. Load the roll of labels 1 Make sure the power cord is connected and that the printer is turned on the label backing as a leader. The green status light should be sure there is a black sensor mark on . Prepare the roll of...
... create a "leader." Check to load a roll of standard address labels. Load the roll of labels 1 Make sure the power cord is connected and that the printer is turned on the label backing as a leader. The green status light should be sure there is a black sensor mark on . Prepare the roll of...
User Guide
Page 20
SLP 200/240 SLP 100 5 Insert the free end of the printer. Push the label stock into the SLP. Continue pushing gently. The SLP automatically feeds the labels through the slot: Press and release the the labels. ... slot. form feed button to fit the labels as shown below. If using an SLP 200 or 240, adjust the guides to advance 2-8 Smart Label Printer Models 100, 200 and 240
SLP 200/240 SLP 100 5 Insert the free end of the printer. Push the label stock into the SLP. Continue pushing gently. The SLP automatically feeds the labels through the slot: Press and release the the labels. ... slot. form feed button to fit the labels as shown below. If using an SLP 200 or 240, adjust the guides to advance 2-8 Smart Label Printer Models 100, 200 and 240
User Guide
Page 21
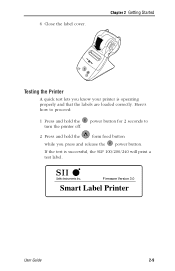
Firmware Version 3.0 Smart Label Printer User Guide 2-9 Here's how to proceed: 1 Press and hold the power button for 2 seconds to turn the printer off. 2 Press and hold the form feed button while you know your printer is successful, the SLP 100/200/240 will print a test label. If the test is operating properly and that the labels are loaded correctly. Chapter 2 Getting Started Testing the Printer A quick test lets you press and release the power button. 6 Close the label cover.
Firmware Version 3.0 Smart Label Printer User Guide 2-9 Here's how to proceed: 1 Press and hold the power button for 2 seconds to turn the printer off. 2 Press and hold the form feed button while you know your printer is successful, the SLP 100/200/240 will print a test label. If the test is operating properly and that the labels are loaded correctly. Chapter 2 Getting Started Testing the Printer A quick test lets you press and release the power button. 6 Close the label cover.
User Guide
Page 22
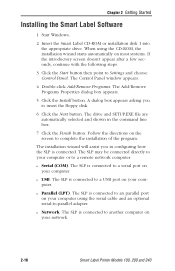
... and SETUP.EXE file are automatically selected and shown in configuring how the SLP is connected to another computer on your network. 2-10 Smart Label Printer Models 100, 200 and 240 The SLP is connected to Settings and choose Control Panel. A dialog box appears asking you in the command line box...
... and SETUP.EXE file are automatically selected and shown in configuring how the SLP is connected to another computer on your network. 2-10 Smart Label Printer Models 100, 200 and 240 The SLP is connected to Settings and choose Control Panel. A dialog box appears asking you in the command line box...

User Guide
Page 24
To quickly locate a topic, type the first few letters of the topic. Find Tab. Double-click a topic to view help text. Click the Find tab to list topics. Type the word or phrase to find specific topics in an alphabetical list. Double-click the topic to find all topics that contain a word or phrase. Click the Index tab to view help text. 2-12 Smart Label Printer Models 100, 200 and 240 Chapter 2 Getting Started Index Tab.
To quickly locate a topic, type the first few letters of the topic. Find Tab. Double-click a topic to view help text. Click the Find tab to list topics. Type the word or phrase to find specific topics in an alphabetical list. Double-click the topic to find all topics that contain a word or phrase. Click the Index tab to view help text. 2-12 Smart Label Printer Models 100, 200 and 240 Chapter 2 Getting Started Index Tab.

User Guide
Page 25
Chapter 3 Changing Labels and Printer Care Overview 3-2 Caring for Your Printer 3-2 Off Line and On Line Mode 3-3 Changing a Label Roll 3-3 Adjusting the Position of Labels 3-4 Removing Stuck Labels 3-5 User Guide 3-1
Chapter 3 Changing Labels and Printer Care Overview 3-2 Caring for Your Printer 3-2 Off Line and On Line Mode 3-3 Changing a Label Roll 3-3 Adjusting the Position of Labels 3-4 Removing Stuck Labels 3-5 User Guide 3-1
User Guide
Page 26
... one label at a time, guide the labels over the front of Seiko Instruments SmartLabels. Caring for Your Printer Your SLP 100/200/240 is designed for trouble-free operation. Chapter 3 Changing Labels and Printer Care Overview The SLP 100/200/240 uses advanced thermal print technology to... replace. For best results we recommend the use only with Seiko Instruments SmartLabels. Use of direct sunlight. s Don't operate the printer in a dusty environment. s Keep the printer out of improper labels may not work with your warranty. s If you are no ...
... one label at a time, guide the labels over the front of Seiko Instruments SmartLabels. Caring for Your Printer Your SLP 100/200/240 is designed for trouble-free operation. Chapter 3 Changing Labels and Printer Care Overview The SLP 100/200/240 uses advanced thermal print technology to... replace. For best results we recommend the use only with Seiko Instruments SmartLabels. Use of direct sunlight. s Don't operate the printer in a dusty environment. s Keep the printer out of improper labels may not work with your warranty. s If you are no ...


