User Guide
Page 2
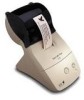
...a particular installation. Copyright© 1989-2000 by Prestige Publications, Milpitas, CA Seiko Instruments USA Inc. 2990 West Lomita Blvd. All rights reserved. Smart Label Printer 100/200/240 User Guide by Seiko Instruments USA Inc. If this publication and features described herein are designed to ...15 of the FCC rules. Nor is assumed with the instructions, may be determined by Seiko Instruments could void the user's authority to the use of information contained herein. Smart Label Printer © 1992-2000 Print Things. However, there is encouraged to try to correct...
...a particular installation. Copyright© 1989-2000 by Prestige Publications, Milpitas, CA Seiko Instruments USA Inc. 2990 West Lomita Blvd. All rights reserved. Smart Label Printer 100/200/240 User Guide by Seiko Instruments USA Inc. If this publication and features described herein are designed to ...15 of the FCC rules. Nor is assumed with the instructions, may be determined by Seiko Instruments could void the user's authority to the use of information contained herein. Smart Label Printer © 1992-2000 Print Things. However, there is encouraged to try to correct...

User Guide
Page 3
Microsoft and Windows are trademarks or registered trademarks of their respective companies. Trademark Information IBM is a registered trademark and SmartLabels, Smart Label Icons, SmartCopy, SmartCapture and SmartCode are trademarks of Seiko Instruments USA Inc. Smart Label Printer is a registered trademark of International Business Machines Corporation. Other products mentioned in this guide are registered trademarks of Seiko Instruments Inc. SII and the SII logo are registered trademarks of Microsoft Corporation.
Microsoft and Windows are trademarks or registered trademarks of their respective companies. Trademark Information IBM is a registered trademark and SmartLabels, Smart Label Icons, SmartCopy, SmartCapture and SmartCode are trademarks of Seiko Instruments USA Inc. Smart Label Printer is a registered trademark of International Business Machines Corporation. Other products mentioned in this guide are registered trademarks of Seiko Instruments Inc. SII and the SII logo are registered trademarks of Microsoft Corporation.
User Guide
Page 4
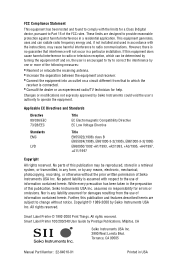
... touch dangerous voltage points or short out parts, and may result in damage to the printer or other risks. Repair service should be performed by Seiko Instruments for use this can expose you to dangerous voltage points or other property, or may result in risk of minor personal injury. Use of... are used in this printer as it could damage the cord and result in risk of electric shock or fire. CAUTION. Be careful when changing labels and cleaning the thermal head. Never spill liquid of any kind into this User Guide. WARNING.
... touch dangerous voltage points or short out parts, and may result in damage to the printer or other risks. Repair service should be performed by Seiko Instruments for use this can expose you to dangerous voltage points or other property, or may result in risk of minor personal injury. Use of... are used in this printer as it could damage the cord and result in risk of electric shock or fire. CAUTION. Be careful when changing labels and cleaning the thermal head. Never spill liquid of any kind into this User Guide. WARNING.
User Guide
Page 6
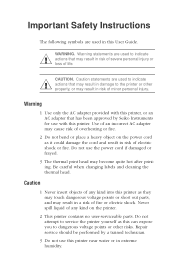
... information in bold. User Guide i In writing this guide except as a quick reminder or a reference. About This Guide As you'll soon realize, the Smart Label Printer® is easy to set up and use. The following conventions are familiar with initial capital letters. Example: Type A:\SETUP. This guide will help...
... information in bold. User Guide i In writing this guide except as a quick reminder or a reference. About This Guide As you'll soon realize, the Smart Label Printer® is easy to set up and use. The following conventions are familiar with initial capital letters. Example: Type A:\SETUP. This guide will help...

User Guide
Page 7
...and Service, provides technical support and service information. It also describes how to an IBM-compatible PC, loading labels into the printer, and installing the Smart Label software. s Appendix B, Commonly Asked Questions and Answers, provides a list of your SLP. This guide ...Introduction, provides some general information about the SLP 100/200/240 and the Smart Label program. s Appendix A, Specifications, provides SLP 100/200/240 specifications. s Chapter 3, Changing Labels and Printer Care, provides information for ordering SmartLabels™ and replacement parts and ...
...and Service, provides technical support and service information. It also describes how to an IBM-compatible PC, loading labels into the printer, and installing the Smart Label software. s Appendix B, Commonly Asked Questions and Answers, provides a list of your SLP. This guide ...Introduction, provides some general information about the SLP 100/200/240 and the Smart Label program. s Appendix A, Specifications, provides SLP 100/200/240 specifications. s Chapter 3, Changing Labels and Printer Care, provides information for ordering SmartLabels™ and replacement parts and ...
User Guide
Page 8
...Outlet 2-5 Connecting the SLP to an IBM-compatible PC 2-6 Loading a Roll of Labels 2-7 Testing the Printer 2-9 Installing the Smart Label Software 2-10 Using On-Line Help 2-11 Chapter 3 Changing Labels and Printer Care Overview 3-2 Caring for Your Printer 3-2 Off Line and On Line... Mode 3-3 Changing a Label Roll 3-3 Removing the Old Roll 3-3 Loading the New Roll 3-3 Adjusting the Position of Labels 3-4 Removing Stuck Labels 3-5 Appendix A Specifications Smart Label Printer 100/200/240 Specifications A-2 Status Light Indicators A-3 Appendix B Commonly ...
...Outlet 2-5 Connecting the SLP to an IBM-compatible PC 2-6 Loading a Roll of Labels 2-7 Testing the Printer 2-9 Installing the Smart Label Software 2-10 Using On-Line Help 2-11 Chapter 3 Changing Labels and Printer Care Overview 3-2 Caring for Your Printer 3-2 Off Line and On Line... Mode 3-3 Changing a Label Roll 3-3 Removing the Old Roll 3-3 Loading the New Roll 3-3 Adjusting the Position of Labels 3-4 Removing Stuck Labels 3-5 Appendix A Specifications Smart Label Printer 100/200/240 Specifications A-2 Status Light Indicators A-3 Appendix B Commonly ...
User Guide
Page 11
... printing. The SLP produces fast, laser output on a variety of available SmartLabels™, you can use ink, toner or ribbon, just labels. Here are some examples: n Envelope labels n File folder labels n Name tags n Shipping labels n Storage container labels n Notebook labels n Bar code labels n Diskette labels n Rotary file cards n Videocassette labels n Binder labels n Shelf labels 1-2 Smart Label Printer Models 100, 200 and 240
... printing. The SLP produces fast, laser output on a variety of available SmartLabels™, you can use ink, toner or ribbon, just labels. Here are some examples: n Envelope labels n File folder labels n Name tags n Shipping labels n Storage container labels n Notebook labels n Bar code labels n Diskette labels n Rotary file cards n Videocassette labels n Binder labels n Shelf labels 1-2 Smart Label Printer Models 100, 200 and 240

User Guide
Page 12
... from Windows applications, saving time and eliminating retyping. on a single line. Chapter 1 Introduction Software Features The Smart Label program provides a rich set of labels. n Mixed text possible within the label. n Shrink-to include text, pictures, bar codes, etc. n Multiple user feature allows each text object-different font... types, sizes and styles (bold/italic/underline) can work with support for long file names. n WYSIWYG editor displays labels as they will print. n Find feature makes it easy to -fit and word wrap ensure that addresses and other applications while...
... from Windows applications, saving time and eliminating retyping. on a single line. Chapter 1 Introduction Software Features The Smart Label program provides a rich set of labels. n Mixed text possible within the label. n Shrink-to include text, pictures, bar codes, etc. n Multiple user feature allows each text object-different font... types, sizes and styles (bold/italic/underline) can work with support for long file names. n WYSIWYG editor displays labels as they will print. n Find feature makes it easy to -fit and word wrap ensure that addresses and other applications while...

User Guide
Page 13
Chapter 2 Getting Started What You Need 2-2 A Word About Labels 2-3 Installing the SLP 100, 200 or 240 2-4 Installing the Smart Label Software 2-10 Using On-Line Help 2-11 User Guide 2-1
Chapter 2 Getting Started What You Need 2-2 A Word About Labels 2-3 Installing the SLP 100, 200 or 240 2-4 Installing the Smart Label Software 2-10 Using On-Line Help 2-11 User Guide 2-1

User Guide
Page 14
Chapter 2 Getting Started What You Need In order to use your SLP and software, you need to a USB port. 2-2 Smart Label Printer Models 100, 200 and 240 Windows 98 or Windows 2000 is required to connect the Smart Label Printer to have the following: n An IBM PC or 100% compatible computer n An 80386 or higher processor n 4 MB of available Random Access Memory (RAM) n An available USB or RS-232C serial (COM) port n 5 MB available hard disk space n VGA or higher resolution graphics card n A mouse or other pointing device n Microsoft Windows 95, 98, Windows NT 4.0 or Windows 2000 Note...
Chapter 2 Getting Started What You Need In order to use your SLP and software, you need to a USB port. 2-2 Smart Label Printer Models 100, 200 and 240 Windows 98 or Windows 2000 is required to connect the Smart Label Printer to have the following: n An IBM PC or 100% compatible computer n An 80386 or higher processor n 4 MB of available Random Access Memory (RAM) n An available USB or RS-232C serial (COM) port n 5 MB available hard disk space n VGA or higher resolution graphics card n A mouse or other pointing device n Microsoft Windows 95, 98, Windows NT 4.0 or Windows 2000 Note...
User Guide
Page 15
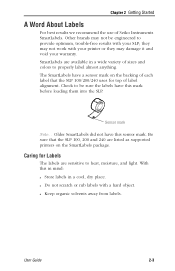
..., dry place. Be sure that the SLP 100/200/240 uses for Labels The labels are listed as supported printers on the backing of Seiko Instruments SmartLabels. n Do not scratch or rub labels with your warranty. n Keep organic solvents away from labels. The SmartLabels have this mark before loading them into the SLP. Sensor mark...
..., dry place. Be sure that the SLP 100/200/240 uses for Labels The labels are listed as supported printers on the backing of Seiko Instruments SmartLabels. n Do not scratch or rub labels with your warranty. n Keep organic solvents away from labels. The SmartLabels have this mark before loading them into the SLP. Sensor mark...
User Guide
Page 16
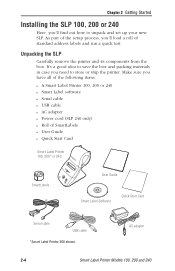
...a good idea to save the box and packing materials in case you 'll find out how to store or ship the printer. AC adapter 2-4 Smart Label Printer Models 100, 200 and 240 Chapter 2 Getting Started Installing the SLP 100, 200 or 240 Here, you need to unpack and set up your...SLP. Make sure you 'll load a roll of SmartLabels n User Guide n Quick Start Card Smart Label Printer 100, 200* or 240 SmartLabels User Guide Smart Label Software Quick Start Card Serial cable USB cable *Smart Label Printer 200 shown. Unpacking the SLP Carefully remove the printer and its components from the box...
...a good idea to save the box and packing materials in case you 'll find out how to store or ship the printer. AC adapter 2-4 Smart Label Printer Models 100, 200 and 240 Chapter 2 Getting Started Installing the SLP 100, 200 or 240 Here, you need to unpack and set up your...SLP. Make sure you 'll load a roll of SmartLabels n User Guide n Quick Start Card Smart Label Printer 100, 200* or 240 SmartLabels User Guide Smart Label Software Quick Start Card Serial cable USB cable *Smart Label Printer 200 shown. Unpacking the SLP Carefully remove the printer and its components from the box...

User Guide
Page 17
Form Feed button Power button Status light User Guide 2-5 When you know there are no labels in the printer. This is just to a power outlet: 1 Plug the AC adapter cable into the jack at the rear of the SLP. 2 Flip up the AC adapter prongs and plug it into a power outlet. 3 Turn the SLP on , the status light flashes green. Chapter 2 Getting Started Connecting the SLP to a Power Outlet Now you're ready to connect the SLP to let you turn the printer on by pressing the power button.
Form Feed button Power button Status light User Guide 2-5 When you know there are no labels in the printer. This is just to a power outlet: 1 Plug the AC adapter cable into the jack at the rear of the SLP. 2 Flip up the AC adapter prongs and plug it into a power outlet. 3 Turn the SLP on , the status light flashes green. Chapter 2 Getting Started Connecting the SLP to a Power Outlet Now you're ready to connect the SLP to let you turn the printer on by pressing the power button.
User Guide
Page 18
.... If your COM ports are all USB ports are also called COM ports - If all in use both cables 2-6 Serial Cable OR USB cable Smart Label Printer Models 100, 200 and 240 USB port Serial port DO NOT use , you may damage the printer. Serial cable. Serial ports are in use...
.... If your COM ports are all USB ports are also called COM ports - If all in use both cables 2-6 Serial Cable OR USB cable Smart Label Printer Models 100, 200 and 240 USB port Serial port DO NOT use , you may damage the printer. Serial cable. Serial ports are in use...

User Guide
Page 19
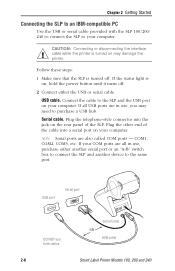
... and that the printer is not prepared as shown above, cut between the labels leaving as much backing as a leader. Prepare the roll of labels 1 Remove the sticker from the beginning of the roll of standard address labels. Check to be flashing. 2 Lift the base of the roll is turned... on page 2-3. 2 If needed, cut between the labels to act as possible on the end of the roll to create a "leader." Spindle Label Cover User Guide 2-7 Note... Roll Waste Roll Prepared end Cut here If the end of the clear plastic...
... and that the printer is not prepared as shown above, cut between the labels leaving as much backing as a leader. Prepare the roll of labels 1 Remove the sticker from the beginning of the roll of standard address labels. Check to be flashing. 2 Lift the base of the roll is turned... on page 2-3. 2 If needed, cut between the labels to act as possible on the end of the roll to create a "leader." Spindle Label Cover User Guide 2-7 Note... Roll Waste Roll Prepared end Cut here If the end of the clear plastic...
User Guide
Page 20
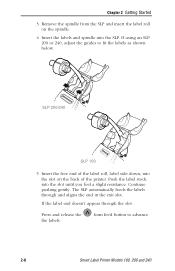
...form feed button to fit the labels as shown below. The SLP automatically feeds the labels through the slot: Press and release the the labels. Chapter 2 Getting Started 3 Remove the spindle from the SLP and insert the label roll on the back of the label roll, label side down, into the slot ...on the spindle. 4 Insert the labels and spindle into the ...
...form feed button to fit the labels as shown below. The SLP automatically feeds the labels through the slot: Press and release the the labels. Chapter 2 Getting Started 3 Remove the spindle from the SLP and insert the label roll on the back of the label roll, label side down, into the slot ...on the spindle. 4 Insert the labels and spindle into the ...
User Guide
Page 21
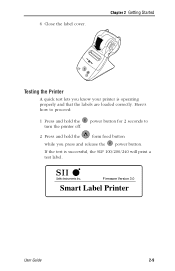
Chapter 2 Getting Started Testing the Printer A quick test lets you press and release the power button. Firmware Version 3.0 Smart Label Printer User Guide 2-9 If the test is operating properly and that the labels are loaded correctly. Here's how to proceed: 1 Press and hold the power button for 2 seconds to turn the printer off. 2 Press and hold the form feed button while you know your printer is successful, the SLP 100/200/240 will print a test label. 6 Close the label cover.
Chapter 2 Getting Started Testing the Printer A quick test lets you press and release the power button. Firmware Version 3.0 Smart Label Printer User Guide 2-9 If the test is operating properly and that the labels are loaded correctly. Here's how to proceed: 1 Press and hold the power button for 2 seconds to turn the printer off. 2 Press and hold the form feed button while you know your printer is successful, the SLP 100/200/240 will print a test label. 6 Close the label cover.
User Guide
Page 22
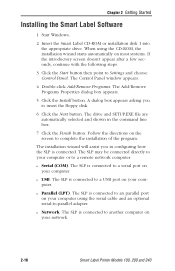
... cable and an optional serial-to Settings and choose Control Panel. The SLP is connected to another computer on your network. 2-10 Smart Label Printer Models 100, 200 and 240 Chapter 2 Getting Started Installing the Smart Label Software 1 Start Windows. 2 Insert the Smart Label CD-ROM or installation disk 1 into the appropriate drive.
... cable and an optional serial-to Settings and choose Control Panel. The SLP is connected to another computer on your network. 2-10 Smart Label Printer Models 100, 200 and 240 Chapter 2 Getting Started Installing the Smart Label Software 1 Start Windows. 2 Insert the Smart Label CD-ROM or installation disk 1 into the appropriate drive.

User Guide
Page 23
... on the Help menu. The Contents tab lists topics grouped by subject. Double-click a book icon to view the contents for creating labels, customizing format, SmartCopy or SmartCapture, printing, and label database functions. User Guide 2-11 Contents Tab. Use the Help Topics screen to jump to other reference topics. After viewing help...
... on the Help menu. The Contents tab lists topics grouped by subject. Double-click a book icon to view the contents for creating labels, customizing format, SmartCopy or SmartCapture, printing, and label database functions. User Guide 2-11 Contents Tab. Use the Help Topics screen to jump to other reference topics. After viewing help...

User Guide
Page 24
Find Tab. Double-click a topic to view help text. Chapter 2 Getting Started Index Tab. Click the Find tab to view help text. 2-12 Smart Label Printer Models 100, 200 and 240 Type the word or phrase to find all topics that contain a word or phrase. Double-click the topic to find specific topics in an alphabetical list. To quickly locate a topic, type the first few letters of the topic. Click the Index tab to list topics.
Find Tab. Double-click a topic to view help text. Chapter 2 Getting Started Index Tab. Click the Find tab to view help text. 2-12 Smart Label Printer Models 100, 200 and 240 Type the word or phrase to find all topics that contain a word or phrase. Double-click the topic to find specific topics in an alphabetical list. To quickly locate a topic, type the first few letters of the topic. Click the Index tab to list topics.

