
User Guide
Page 1
Keep this user's guide carefully before using the printer. Seiko Instruments Inc. USER'S GUIDE Thermal Printer DPU-S445 SERIES Read this user's guide in a place where it can be accessed quickly.
Keep this user's guide carefully before using the printer. Seiko Instruments Inc. USER'S GUIDE Thermal Printer DPU-S445 SERIES Read this user's guide in a place where it can be accessed quickly.
User Guide
Page 2
..., and listing errors. All Rights Reserved. Applicable EC Directive and Standards Product: Thermal Printer DPU-S445-01A-E Directive: Title 1999/5/EC EC Radio and Telecommunications Terminal Equipment Directive Standards EN 301...used in the specifications and materials contained herein without prior written approval of SII. DPU-S445 SERIES THERMAL PRINTER USER'S GUIDE Document Number: U00110291502 First Edition: April 2008 Second Edition: May 2008 Third Edition: July 2008 Copyright ©2008 by reliance on the materials presented, including but not limited to make changes...
..., and listing errors. All Rights Reserved. Applicable EC Directive and Standards Product: Thermal Printer DPU-S445-01A-E Directive: Title 1999/5/EC EC Radio and Telecommunications Terminal Equipment Directive Standards EN 301...used in the specifications and materials contained herein without prior written approval of SII. DPU-S445 SERIES THERMAL PRINTER USER'S GUIDE Document Number: U00110291502 First Edition: April 2008 Second Edition: May 2008 Third Edition: July 2008 Copyright ©2008 by reliance on the materials presented, including but not limited to make changes...
User Guide
Page 5
Keep this printer, refer to as printer), specified AC adapter, specified battery charger, specified battery pack and specified AC cable (hereinafter, omit "specified"). SAFETY PRECAUTIONS 2 OPERATING PRECAUTIONS 9 1 PREPARATION 12 2 EACH PART OF PRINTER 13 3 POWER CONNECTION 16 4 PAPER SETTING 19 5 TEST PRINTING 21 6 FUNCTION SETTING 22 7 CONNECTING TO THE HOST DEVICE 29 8 RECHARGING THE BATTERY PACK 33 9 THERMAL HEAD MAINTENANCE 36 10 TROUBLESCHOOTING 37 11 SPECIFICATIONS 38 12 OPTIONS...
Keep this printer, refer to as printer), specified AC adapter, specified battery charger, specified battery pack and specified AC cable (hereinafter, omit "specified"). SAFETY PRECAUTIONS 2 OPERATING PRECAUTIONS 9 1 PREPARATION 12 2 EACH PART OF PRINTER 13 3 POWER CONNECTION 16 4 PAPER SETTING 19 5 TEST PRINTING 21 6 FUNCTION SETTING 22 7 CONNECTING TO THE HOST DEVICE 29 8 RECHARGING THE BATTERY PACK 33 9 THERMAL HEAD MAINTENANCE 36 10 TROUBLESCHOOTING 37 11 SPECIFICATIONS 38 12 OPTIONS...

User Guide
Page 9
... AC plug from the outlet and remove the battery pack from the printer. u Places with any place where it might cause fire or electric shock. Make sure that the thermal head is cool before clearing a paper jam or cleaning the thermal head. DO NOT subject the printer to the following places as the thermal head or the paper sensor or the platen roller directly while opening the paper cover...
... AC plug from the outlet and remove the battery pack from the printer. u Places with any place where it might cause fire or electric shock. Make sure that the thermal head is cool before clearing a paper jam or cleaning the thermal head. DO NOT subject the printer to the following places as the thermal head or the paper sensor or the platen roller directly while opening the paper cover...

User Guide
Page 13
... use , always clean the terminals using soft, lint-free cloth. u DO NOT install the printer in a location that generate strong electromagnetic fields such as a copy machine. u DO NOT open the paper cover during printing or transmission. DO NOT use . u When cleaning the TH, wipe the thermal head with the paper cutter installed in use alcohol or other soft material. u DO NOT install the printer in cool place. u Switch the power...
... use , always clean the terminals using soft, lint-free cloth. u DO NOT install the printer in a location that generate strong electromagnetic fields such as a copy machine. u DO NOT open the paper cover during printing or transmission. DO NOT use . u When cleaning the TH, wipe the thermal head with the paper cutter installed in use alcohol or other soft material. u DO NOT install the printer in cool place. u Switch the power...
User Guide
Page 14
... to touch the paper for details. Thermal Paper Handling u Store the thermal paper in use. u DO NOT allow plastic film, erasers, or adhesive tape to remember: NOTE - Operation Precautions This box contains items that is not a malfunction. u DO NOT stack the thermal paper with hard objects. type copies. u When the battery pack is not a failure in the printer, but an inherent paper phenomenon. u High-print-rate printing or using...
... to touch the paper for details. Thermal Paper Handling u Store the thermal paper in use. u DO NOT allow plastic film, erasers, or adhesive tape to remember: NOTE - Operation Precautions This box contains items that is not a malfunction. u DO NOT stack the thermal paper with hard objects. type copies. u When the battery pack is not a failure in the printer, but an inherent paper phenomenon. u High-print-rate printing or using...

User Guide
Page 18
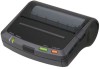
... hot immediately (13) Power connector after opening the Releases the battery pack from the thermal paper after printing. The platen roller brings the paper in the printer. - 14 - The thermal head prints characters on the thermal paper. Open this (9) Paper sensor connector. Open the rubber cover and insert the connector. (11) Paper cover The platen roller is turned to clean the thermal head. (7) Paper outlet (12) Platen roller Paper port with the interface cable.
... hot immediately (13) Power connector after opening the Releases the battery pack from the thermal paper after printing. The platen roller brings the paper in the printer. - 14 - The thermal head prints characters on the thermal paper. Open this (9) Paper sensor connector. Open the rubber cover and insert the connector. (11) Paper cover The platen roller is turned to clean the thermal head. (7) Paper outlet (12) Platen roller Paper port with the interface cable.

User Guide
Page 24
... to set the printer. (4) If the paper roll with the label that is in the direction of the arrow. (2) Install the paper roll to the paper holder and make sure that is being loaded. If doing so, it may cause a paper jam. - Open and close the paper cover to release the thermal head and label, and then press the FEED switch to feed the label home position before using the printer...
... to set the printer. (4) If the paper roll with the label that is in the direction of the arrow. (2) Install the paper roll to the paper holder and make sure that is being loaded. If doing so, it may cause a paper jam. - Open and close the paper cover to release the thermal head and label, and then press the FEED switch to feed the label home position before using the printer...

User Guide
Page 25
DPU-S445 [Ver Copyright (C) : SII . . . (4) After test printing, the printer goes into print-ready mode. - 21 - If the paper is off . (2) Press the POWER and FEED switches at the same time. In test printing, the printer's function setting and character strings for testing are printed. When the POWER lamp lights, release the POWER switch, then the FEED switch. (3) Several dozens of lines of text are printed. (1) Make sure that the thermal paper is loaded in the...
DPU-S445 [Ver Copyright (C) : SII . . . (4) After test printing, the printer goes into print-ready mode. - 21 - If the paper is off . (2) Press the POWER and FEED switches at the same time. In test printing, the printer's function setting and character strings for testing are printed. When the POWER lamp lights, release the POWER switch, then the FEED switch. (3) Several dozens of lines of text are printed. (1) Make sure that the thermal paper is loaded in the...
User Guide
Page 26
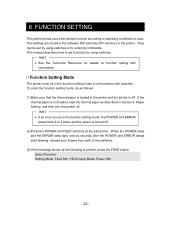
... setting mode, do as follows: (1) Make sure that the thermal paper is loaded in the printer and the printer is turned off. (2) Press the POWER and FEED switches at the following is not loaded, load the thermal paper as described in the function setting mode to set various function according to operating conditions or uses. HINT • If an error occurs in the printer. Select Function Setting Mode: Feed SW / HEX Dump Mode: Power SW - 22 - 6 FUNCTION SETTING This printer...
... setting mode, do as follows: (1) Make sure that the thermal paper is loaded in the printer and the printer is turned off. (2) Press the POWER and FEED switches at the following is not loaded, load the thermal paper as described in the function setting mode to set various function according to operating conditions or uses. HINT • If an error occurs in the printer. Select Function Setting Mode: Feed SW / HEX Dump Mode: Power SW - 22 - 6 FUNCTION SETTING This printer...
User Guide
Page 27
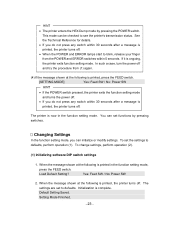
... function setting mode and turns the power off . Changing Settings In the function setting mode, you do not press any switch within 5 seconds. To change settings, perform operation (2). (1) Initializing software DIP switch settings 1. Setting Mode Finished. - 23 - If it is complete. Load Default Setting? Default Setting Saved. Initialization is ongoing, the printer exits function setting mode. When the message shown at the following is printed, the printer turns off . • If you can be checked to defaults, perform operation (1). HINT...
... function setting mode and turns the power off . Changing Settings In the function setting mode, you do not press any switch within 5 seconds. To change settings, perform operation (2). (1) Initializing software DIP switch settings 1. Setting Mode Finished. - 23 - If it is complete. Load Default Setting? Default Setting Saved. Initialization is ongoing, the printer exits function setting mode. When the message shown at the following is printed, the printer turns off . • If you can be checked to defaults, perform operation (1). HINT...
User Guide
Page 28
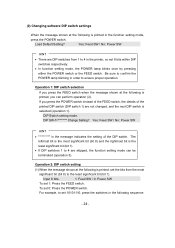
... printed, set the bits from 1 to 4 in the printer, so set 10101110, press the switches in order to ensure proper operation. Input 8 bits. 1: Feed SW / 0: Power SW To set 0: Press the POWER switch. Load Default Setting? (2) Changing software DIP switch settings When the message shown at the following is the least significant bit (bit 1). • If DIP switches 1 to 4 are skipped, the function setting mode can perform operation (2). To set...
... printed, set the bits from 1 to 4 in the printer, so set 10101110, press the switches in order to ensure proper operation. Input 8 bits. 1: Feed SW / 0: Power SW To set 0: Press the POWER switch. Load Default Setting? (2) Changing software DIP switch settings When the message shown at the following is the least significant bit (bit 1). • If DIP switches 1 to 4 are skipped, the function setting mode can perform operation (2). To set...

User Guide
Page 29
... not changed. The leftmost bit is the most significant bit (bit 8) and the rightmost bit is now complete. Operation 3: Exiting function setting mode If you press the FEED switch when the message shown at the following is printed, you press the POWER switch, the message shown at the following is printed, and the setting is saved. The printer leaves the function setting mode and turns...
... not changed. The leftmost bit is the most significant bit (bit 8) and the rightmost bit is now complete. Operation 3: Exiting function setting mode If you press the FEED switch when the message shown at the following is printed, you press the POWER switch, the message shown at the following is printed, and the setting is saved. The printer leaves the function setting mode and turns...

User Guide
Page 31
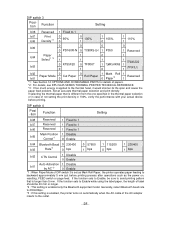
DIP switch 2 Position Function Setting Auto Status 1 Disable bit8 Output 0 Enable bit7 Kanji Code 1 JIS code 0 Shift-JIS Code 1 24 dots bit6 Font Size 0 16 dots bit5 Auto Power 1 Disable Off 0 Enable Character 1 ANK bit4 Set 0 IBM Compatible 1 Enable bit3 Auto Loading 0 Disable bit2 Data Input 0 BHT-Ir/ bit1 Mode 0 USB 0 Serial/ 1 USB 1 IrDA/USB 0 *1 : This setting is enabled only the Bluetooth supported model. 1 Bluetooth/ 1 USB *1 - 27 -
DIP switch 2 Position Function Setting Auto Status 1 Disable bit8 Output 0 Enable bit7 Kanji Code 1 JIS code 0 Shift-JIS Code 1 24 dots bit6 Font Size 0 16 dots bit5 Auto Power 1 Disable Off 0 Enable Character 1 ANK bit4 Set 0 IBM Compatible 1 Enable bit3 Auto Loading 0 Disable bit2 Data Input 0 BHT-Ir/ bit1 Mode 0 USB 0 Serial/ 1 USB 1 IrDA/USB 0 *1 : This setting is enabled only the Bluetooth supported model. 1 Bluetooth/ 1 USB *1 - 27 -
User Guide
Page 32
... Paper Mode Cut Paper 0 Roll Paper 1 0 Paper*2 Reserved 1 *1 : See Section 12 OPTIONS AND CONSUMABLE PARTS for details of papers. *2 : For details, see DPU-S445 SERIES THERMAL PRINTER TECHNICAL REFERENCE. *3 : If too much energy is enabled only the Bluetooth supported model. If the function sets to Enable, be 40 mm or longer. *2 : This setting is applied to the thermal head, it would shorten its life span and cause the paper feed problem...
... Paper Mode Cut Paper 0 Roll Paper 1 0 Paper*2 Reserved 1 *1 : See Section 12 OPTIONS AND CONSUMABLE PARTS for details of papers. *2 : For details, see DPU-S445 SERIES THERMAL PRINTER TECHNICAL REFERENCE. *3 : If too much energy is enabled only the Bluetooth supported model. If the function sets to Enable, be 40 mm or longer. *2 : This setting is applied to the thermal head, it would shorten its life span and cause the paper feed problem...
User Guide
Page 33
... IrDA (Ver1.2). DO NOT connect the USB interface cable If other communication modes are required. - 29 - See Section 6 FUNCTION SETTINGS for details of communication mode by software as well as USB communication mode regardless of selection of interface specifications. NOTE: Unsupported Bluetooth printer does not support wireless communication. HINT • Connecting the printer and the host device using the USB interface cable makes fix to communication method as print type and size.
... IrDA (Ver1.2). DO NOT connect the USB interface cable If other communication modes are required. - 29 - See Section 6 FUNCTION SETTINGS for details of communication mode by software as well as USB communication mode regardless of selection of interface specifications. NOTE: Unsupported Bluetooth printer does not support wireless communication. HINT • Connecting the printer and the host device using the USB interface cable makes fix to communication method as print type and size.
User Guide
Page 36
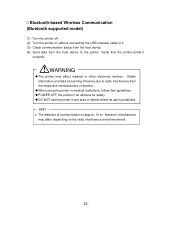
... printer prints it . (3) Check communication status from the host device. (4) Send data from the respective manufacturers or dealers. ‹ When using the printer in medical institutions, follow their guidelines. ‹ POWER OFF the printer in an airplane for safety. ‹ DO NOT use the printer in any area or district where its use is approx. 10 m. Bluetooth-based Wireless Communication (Bluetooth supported model) (1) Turn the printer...
... printer prints it . (3) Check communication status from the host device. (4) Send data from the respective manufacturers or dealers. ‹ When using the printer in medical institutions, follow their guidelines. ‹ POWER OFF the printer in an airplane for safety. ‹ DO NOT use the printer in any area or district where its use is approx. 10 m. Bluetooth-based Wireless Communication (Bluetooth supported model) (1) Turn the printer...

User Guide
Page 41
...; Is the interface cable that meets the Interface Specifications of the User's Guide being used ? · Are used communication method and the function setting of the printer correct? · Is the Bluetooth or IrDA communication status good ? · Are the communication conditions for repair. The power does not turn on page 14. · Is the printer function setting correct ? 10 TROUBLESHOOTING Check the following points...
...; Is the interface cable that meets the Interface Specifications of the User's Guide being used ? · Are used communication method and the function setting of the printer correct? · Is the Bluetooth or IrDA communication status good ? · Are the communication conditions for repair. The power does not turn on page 14. · Is the printer function setting correct ? 10 TROUBLESHOOTING Check the following points...
User Guide
Page 42
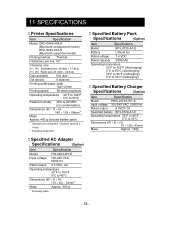
11 SPECIFICATIONS Printer Specifications Item Specification Model DPU-S445-00A-E (Bluetooth unsupported model) DPU-S445-01A-E (Bluetooth supported model) Printing method Thermal Characters per line 52*1 Character size (H × W) Standard size: 24 dots × 12 dots (H × W) Kanji size: 24 dots × 24 dots Dots available 832 dots Dot density 8 dots/mm Printing width/paper width 104/112mm Printing speed 90 mm/s maximum Operating temperature 32°F to 122°F 0°C to 50°C Related...
11 SPECIFICATIONS Printer Specifications Item Specification Model DPU-S445-00A-E (Bluetooth unsupported model) DPU-S445-01A-E (Bluetooth supported model) Printing method Thermal Characters per line 52*1 Character size (H × W) Standard size: 24 dots × 12 dots (H × W) Kanji size: 24 dots × 24 dots Dots available 832 dots Dot density 8 dots/mm Printing width/paper width 104/112mm Printing speed 90 mm/s maximum Operating temperature 32°F to 122°F 0°C to 50°C Related...
User Guide
Page 44
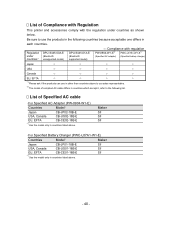
... one differs in each countries. Regulation under countries*1 DPU-S445-00A-E (Bluetooth unsupported model) DPU-S445-01A-E (Bluetooth supported model) ○: Compliance with the regulation under countries as shown below. List of Compliance with Regulation This printer and accessories comply with regulation PW-0904-W1-E*2 PWC-L07A1-W1-E*2 (Specified AC adapter) (Specified battery charger) Japan ○ ○ ○ ○ USA...
... one differs in each countries. Regulation under countries*1 DPU-S445-00A-E (Bluetooth unsupported model) DPU-S445-01A-E (Bluetooth supported model) ○: Compliance with the regulation under countries as shown below. List of Compliance with Regulation This printer and accessories comply with regulation PW-0904-W1-E*2 PWC-L07A1-W1-E*2 (Specified AC adapter) (Specified battery charger) Japan ○ ○ ○ ○ USA...


