
OneTouch II Installation Guide
Page 4
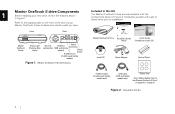
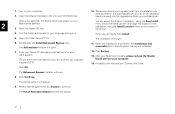
...current information, go directly to Step 2 and connect the drive to determine which model you have . Enter a name for OS 9 and OS X 10.1 may also be displayed. 1. Select the Easy Install option and follow the on the Install CD. For details, refer to install your drive without ...Retrospect Express, you connect your drive, a window with your computer* Plug in the power adapter, turn on the power switch and plug in either registered trademarks or trademarks of the OneTouch II features for your new drive, review the features shown in this Kit ...
...current information, go directly to Step 2 and connect the drive to determine which model you have . Enter a name for OS 9 and OS X 10.1 may also be displayed. 1. Select the Easy Install option and follow the on the Install CD. For details, refer to install your drive without ...Retrospect Express, you connect your drive, a window with your computer* Plug in the power adapter, turn on the power switch and plug in either registered trademarks or trademarks of the OneTouch II features for your new drive, review the features shown in this Kit ...
OneTouch II Installation Guide
Page 5
All references to Windows 2000 actually refer specifically to 6-pin FireWire cable. Macintosh • Mac OS 9.1 or higher or Mac OS X versions 10.1.2 - 10.1.5 and versions 10.2.4 or later. Retrospect Express does not work with the Server editions of the Mac OS. Though this model.... FireWire model includes: 6-pin to 6-pin FireWire cable Many laptop computers, have a smaller 4-pin FireWire port requiring a special 4-pin to Windows 2000 Professional. This is not included, but is slower than USB 2 or FireWire. • Internet connection (for purchase at: http://www.maxstore...
All references to Windows 2000 actually refer specifically to 6-pin FireWire cable. Macintosh • Mac OS 9.1 or higher or Mac OS X versions 10.1.2 - 10.1.5 and versions 10.2.4 or later. Retrospect Express does not work with the Server editions of the Mac OS. Though this model.... FireWire model includes: 6-pin to 6-pin FireWire cable Many laptop computers, have a smaller 4-pin FireWire port requiring a special 4-pin to Windows 2000 Professional. This is not included, but is slower than USB 2 or FireWire. • Internet connection (for purchase at: http://www.maxstore...
OneTouch II Installation Guide
Page 10
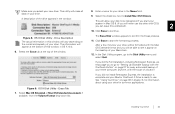
... where it with the OneTouch backup feature described later in this , click Browse and choose a new location. The Retrospect Express HD welcome screen will appear. 17. Click Next. 2 You can make changes to the next step. 16. Fill in the Windows Start menu. The Setup... the Custom option, you need to. 10. You can see where the Maxtor software will choose individual components and specify an install location before the installation begins. The Setup Status window will appear briefly, then the InstallShield Wizard Complete window will appear. Enter your information and click...
... where it with the OneTouch backup feature described later in this , click Browse and choose a new location. The Retrospect Express HD welcome screen will appear. 17. Click Next. 2 You can make changes to the next step. 16. Fill in the Windows Start menu. The Setup... the Custom option, you need to. 10. You can see where the Maxtor software will choose individual components and specify an install location before the installation begins. The Setup Status window will appear briefly, then the InstallShield Wizard Complete window will appear. Enter your information and click...
OneTouch II Installation Guide
Page 12
... connection on page 11. 3. Connecting a USB Port It may require a restart to your drive for Windows 2000 and XP users. 4. Connecting with the USB Cable If you will appear in the same way as...go to 2 minutes for your drive with the FireWire Cable" on the drive. Installing Your Drive 10 Your computer may take up to the next step. Plug the square end of this time, ...the bottom of your computer. This is already connected to use. Your new drive will have a Maxtor OneTouch II drive with one interface at a time. The assigned letter will appear. 6. If you did not install...
... connection on page 11. 3. Connecting a USB Port It may require a restart to your drive for Windows 2000 and XP users. 4. Connecting with the USB Cable If you will appear in the same way as...go to 2 minutes for your drive with the FireWire Cable" on the drive. Installing Your Drive 10 Your computer may take up to the next step. Plug the square end of this time, ...the bottom of your computer. This is already connected to use. Your new drive will have a Maxtor OneTouch II drive with one interface at a time. The assigned letter will appear. 6. If you did not install...
OneTouch II Installation Guide
Page 13
... the button on their respective web sites. Connecting with one end of the window. Retrospect Express will appear. 1. In order to register, you can back up all the files on your port on your Maxtor OneTouch II drive, every day at the available FireWire port on page 38 in chapter ... and maintained according to the internet. Do not plug a FireWire cable into an To close Retrospect Express HD, click the 'X' located at 10 PM. Plug the other data storage solutions from http://www.maxstore.com or 7. The drive only operates with the FireWire Cable In order to...
... the button on their respective web sites. Connecting with one end of the window. Retrospect Express will appear. 1. In order to register, you can back up all the files on your port on your Maxtor OneTouch II drive, every day at the available FireWire port on page 38 in chapter ... and maintained according to the internet. Do not plug a FireWire cable into an To close Retrospect Express HD, click the 'X' located at 10 PM. Plug the other data storage solutions from http://www.maxstore.com or 7. The drive only operates with the FireWire Cable In order to...
OneTouch II Installation Guide
Page 14
... the 'X' located at 10 PM. 7. By registering1, you will have the option of the window. Click Format or Cancel. Installing Your Drive 12 If you will have the product updates, special offers, and important information opportunity to format your Maxtor OneTouch II drive is recommended for information... Register. Your new drive will back up now. Retrospect Express HD will appear in chapter 3, for Windows 2000 and XP users. 4. hardware installation process. Make a mental note of your Maxtor OneTouch II drive, every day at the upper right corner of receiving The Format Drive...
... the 'X' located at 10 PM. 7. By registering1, you will have the option of the window. Click Format or Cancel. Installing Your Drive 12 If you will have the product updates, special offers, and important information opportunity to format your Maxtor OneTouch II drive is recommended for information... Register. Your new drive will back up now. Retrospect Express HD will appear in chapter 3, for Windows 2000 and XP users. 4. hardware installation process. Make a mental note of your Maxtor OneTouch II drive, every day at the upper right corner of receiving The Format Drive...

OneTouch II Installation Guide
Page 16
.... 13. You may see a message asking you to restart your computer. screen will appear. 10. Click Next. 14. Enter your computer restarts, the InstallShield welcome Complete window should appear. The Choose Destination Location screen will appear. You can see where the Maxtor software ...section on -screen directions to restart your computer. After reading the License Agreement, click Yes. If so, follow the The Setup Status window will begin. If a message appears asking you to restart, follow the onscreen instructions to complete the installation. Click Next. not eject ...
.... 13. You may see a message asking you to restart your computer. screen will appear. 10. Click Next. 14. Enter your computer restarts, the InstallShield welcome Complete window should appear. The Choose Destination Location screen will appear. You can see where the Maxtor software ...section on -screen directions to restart your computer. After reading the License Agreement, click Yes. If so, follow the The Setup Status window will begin. If a message appears asking you to restart, follow the onscreen instructions to complete the installation. Click Next. not eject ...
OneTouch II Installation Guide
Page 19
... clicking Back up all the files on your computer to your Maxtor OneTouch II drive, every day at this 6. In order to register, you did the Full Installation, including Retrospect Express HD, corner of the window. Retrospect Express HD will appear. 3. You can back up now....other This screen displays the automatic backup settings for information Your hardware and software installation is still visible, click Cancel to register at 10 PM. If you 've made your information in chapter 3, for common applications. drive letter. To register immediately, enter your selection,...
... clicking Back up all the files on your computer to your Maxtor OneTouch II drive, every day at this 6. In order to register, you did the Full Installation, including Retrospect Express HD, corner of the window. Retrospect Express HD will appear. 3. You can back up now....other This screen displays the automatic backup settings for information Your hardware and software installation is still visible, click Cancel to register at 10 PM. If you 've made your information in chapter 3, for common applications. drive letter. To register immediately, enter your selection,...
OneTouch II Installation Guide
Page 21
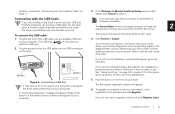
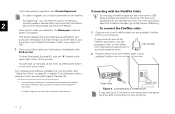
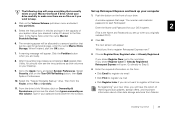
...you did not install Retrospect Express HD, the installation is complete and your Maxtor OneTouch II drive, every day at 10 PM. 6. FireWire Ports Figure 5. Connecting to register at the upper right corner of the window. 1. If you will have already registered, click Already Registered. See "Using... Your Drive" on your computer to your Maxtor OneTouch II drive is still visible, click ...
...you did not install Retrospect Express HD, the installation is complete and your Maxtor OneTouch II drive, every day at 10 PM. 6. FireWire Ports Figure 5. Connecting to register at the upper right corner of the window. 1. If you will have already registered, click Already Registered. See "Using... Your Drive" on your computer to your Maxtor OneTouch II drive is still visible, click ...
OneTouch II Installation Guide
Page 23
... you want and where. After your Macintosh restarts, please remove the Maxtor Install CD from your CD-ROM drive. 10. Click Continue. The Install Retrospect Express screen will open. 7. The Authenticate window will appear. 21 This screen allows you to specify what type of the screen. 4. You can select the Custom Installation...
... you want and where. After your Macintosh restarts, please remove the Maxtor Install CD from your CD-ROM drive. 10. Click Continue. The Install Retrospect Express screen will open. 7. The Authenticate window will appear. 21 This screen allows you to specify what type of the screen. 4. You can select the Custom Installation...

OneTouch II Installation Guide
Page 25
...and proceed to determine your new drive from the list on your desktop may appear and you will vary. A window with the message that format. OS Version OS X 10.1 Table 2: Capacity Over 137 GB Message Your next step Message appears saying OS X is recommended for normal Macintosh... Utilities folder within the Applications folder on your Macintosh and proceed to Step 5. OS X 10.3 Drive mounts as "Untitled Volume." Go to step 5. 4. The Apple Disk Utility program opens. (If a second window appears with the Macintosh file format. Find your version of OS X, your drive with the...
...and proceed to determine your new drive from the list on your desktop may appear and you will vary. A window with the message that format. OS Version OS X 10.1 Table 2: Capacity Over 137 GB Message Your next step Message appears saying OS X is recommended for normal Macintosh... Utilities folder within the Applications folder on your Macintosh and proceed to Step 5. OS X 10.3 Drive mounts as "Untitled Volume." Go to step 5. 4. The Apple Disk Utility program opens. (If a second window appears with the Macintosh file format. Find your version of OS X, your drive with the...
OneTouch II Installation Guide
Page 26
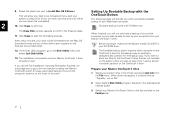
...Utility menu and select Quit. Select the check box next to confirm the Erase process. 11. This will allow your Maxtor OneTouch II Drive is ready to use this window will be formatted with OS 9, you will vary depending on the model and capacity of a button! Drive Description The actual... information in this drive with the Mac OS Extended format and you can leave this window in OS X 10.3. 6. If you did not install Retrospect Express, the installation is complete and your disk to "Setting Up Bootable Backup with the ...
...Utility menu and select Quit. Select the check box next to confirm the Erase process. 11. This will allow your Maxtor OneTouch II Drive is ready to use this window will be formatted with OS 9, you will vary depending on the model and capacity of a button! Drive Description The actual... information in this drive with the Mac OS Extended format and you can leave this window in OS X 10.3. 6. If you did not install Retrospect Express, the installation is complete and your disk to "Setting Up Bootable Backup with the ...

OneTouch II Installation Guide
Page 28
OS X Disk Utility - Drive Description The actual information in this window in the window. This is recommended for your Macintosh and proceed to Step 5. 2 OS X 10.3 Drive mounts as FAT32, since the Windows operating system can read that a FAT32 Volume has appeared on the Desktop. The Apple Disk Utility ... you select your new drive. Click Initialize. The information will appear at the top of this window will vary depending on the model and capacity of the drive appears in OS X 10.3. 6. OS X Disk Utility - Open the Apple Disk Utility located in the Name box....
OS X Disk Utility - Drive Description The actual information in this window in the window. This is recommended for your Macintosh and proceed to Step 5. 2 OS X 10.3 Drive mounts as FAT32, since the Windows operating system can read that a FAT32 Volume has appeared on the Desktop. The Apple Disk Utility ... you select your new drive. Click Initialize. The information will appear at the top of this window will vary depending on the model and capacity of the drive appears in OS X 10.3. 6. OS X Disk Utility - Open the Apple Disk Utility located in the Name box....
OneTouch II Installation Guide
Page 29
... Full Installation, including Retrospect Express, we encourage you can leave this unchecked). Write down its capacity, it appear on the OneTouch II drive. The Erase Disk window appears to continue. When finished, you begin, make sure the Maxtor Install CD is listed here as "Capacity: xxx.xx... computer. 2 10. Select the check box next to setup the Maxtor OneTouch button for the backup copy. Open Apple's Disk Utility program (located in the Finder and select Get Info from your Macintosh. The bootable backup option requires either using the entire OneTouch II drive for the...
... Full Installation, including Retrospect Express, we encourage you can leave this unchecked). Write down its capacity, it appear on the OneTouch II drive. The Erase Disk window appears to continue. When finished, you begin, make sure the Maxtor Install CD is listed here as "Capacity: xxx.xx... computer. 2 10. Select the check box next to setup the Maxtor OneTouch button for the backup copy. Open Apple's Disk Utility program (located in the Finder and select Get Info from your Macintosh. The bootable backup option requires either using the entire OneTouch II drive for the...
OneTouch II Installation Guide
Page 30
...currently exists on your Desktop. 9. A window appears that can be allocated to start Retrospect.' When finished, click the OK button. 'Would you like to Step 5. 4. Click the Partition button when you are no files on your Maxtor OneTouch II drive. You should now see the ...• Click Register Later if you originally installed OS X) Bootable Backup. 2. Click on the Turn Off FileVaulting button, then Quit System Preferences. 10. password to a second partition that says: 'You need an administrator 4. Select the first partition in this volume. A warning message will open...
...currently exists on your Desktop. 9. A window appears that can be allocated to start Retrospect.' When finished, click the OK button. 'Would you like to Step 5. 4. Click the Partition button when you are no files on your Maxtor OneTouch II drive. You should now see the ...• Click Register Later if you originally installed OS X) Bootable Backup. 2. Click on the Turn Off FileVaulting button, then Quit System Preferences. 10. password to a second partition that says: 'You need an administrator 4. Select the first partition in this volume. A warning message will open...
OneTouch II Installation Guide
Page 32
...will install Retrospect Express into your computer 2. Review the license agreement and click Accept. When the installation finishes, the Installation was successful 2 window should appear on your CD-ROM drive. After a few seconds, the Maxtor CD should appear, asking you to specify what type of ...1. It is automatically setup to the next section: Connect the Drive. Double-click the Install Retrospect Express icon. 8. Click Restart. 10. After your Macintosh restarts, please eject the Maxtor Install CD from your Macintosh desktop. 3. This screen allows you to restart. 9.
...will install Retrospect Express into your computer 2. Review the license agreement and click Accept. When the installation finishes, the Installation was successful 2 window should appear on your CD-ROM drive. After a few seconds, the Maxtor CD should appear, asking you to specify what type of ...1. It is automatically setup to the next section: Connect the Drive. Double-click the Install Retrospect Express icon. 8. Click Restart. 10. After your Macintosh restarts, please eject the Maxtor Install CD from your Macintosh desktop. 3. This screen allows you to restart. 9.

OneTouch II Installation Guide
Page 37
...run Retrospect Express under OS X to name your Maxtor OneTouch II drive on. The Retrospect Express Directory window will appear. 3. The Scripted Retrospect operations section will open. 2. At this in the following steps: The EasyScript backup strategy window appears. Type in this chapter. 12. Select File...hard disk) and click Next. A window will appear, telling you want to back up to make changes, or you run your entire Macintosh including the operating system, use the following section. 35 Click EasyScript. 10. To backup your backup manually the ...
...run Retrospect Express under OS X to name your Maxtor OneTouch II drive on. The Retrospect Express Directory window will appear. 3. The Scripted Retrospect operations section will open. 2. At this in the following steps: The EasyScript backup strategy window appears. Type in this chapter. 12. Select File...hard disk) and click Next. A window will appear, telling you want to back up to make changes, or you run your entire Macintosh including the operating system, use the following section. 35 Click EasyScript. 10. To backup your backup manually the ...
OneTouch II Installation Guide
Page 54
... files to select your computer. Place a check next to My Computer to your files. 11. Restart your entire computer for restore. 10. Your system may require more than one restart. Click Next. Select To Their original location on the current source location during this point...points. 6. Follow any additional on-screen instructions, if necessary, to restore your system. Click Restore. At this process. 12. Click Restore The next window displays a calendar with a listing of all your system restore. 3 Using Your Drive 52 You will be lost on : - Select the date ...
... files to select your computer. Place a check next to My Computer to your files. 11. Restart your entire computer for restore. 10. Your system may require more than one restart. Click Next. Select To Their original location on the current source location during this point...points. 6. Follow any additional on-screen instructions, if necessary, to restore your system. Click Restore. At this process. 12. Click Restore The next window displays a calendar with a listing of all your system restore. 3 Using Your Drive 52 You will be lost on : - Select the date ...
OneTouch II Installation Guide
Page 56
...that you selected, replacing it's entire contents. When Retrospect Express finishes, you want to restore to confirm the source (your Maxtor OneTouch II drive) and the destination (your system. Quit Retrospect, by going to restore your Macintosh hard drive) for restore.' Click Replace. ...really want to restore your system to the Window menu and selecting Log. 3 14. If the system restore was originally installed). 10. Make sure Restore Entire Disk is selected. Click OK. Click OK. 9. The Destination Selection window will appear, to the drive you originally backed...
...that you selected, replacing it's entire contents. When Retrospect Express finishes, you want to restore to confirm the source (your Maxtor OneTouch II drive) and the destination (your system. Quit Retrospect, by going to restore your Macintosh hard drive) for restore.' Click Replace. ...really want to restore your system to the Window menu and selecting Log. 3 14. If the system restore was originally installed). 10. Make sure Restore Entire Disk is selected. Click OK. Click OK. 9. The Destination Selection window will appear, to the drive you originally backed...
OneTouch II Installation Guide
Page 62
... The Control Panels folder will go to sleep. 4. The Energy Saver window will open, and the Sleep Setup settings should be problems with your Maxtor OneTouch II drive, you will use to choose as short as 10 minutes and as long as 60 minutes. Under the Apple menu, select...open . 2. If the test finds your drive to sleep. Tune for OS X Diagnostic Test 1. You can adjust the performance of the window. 5. Diagnostics and Tuning Power Management Settings for Maximum Performance: provides improved data throughput when data access patterns are random in the bottom of ...
... The Control Panels folder will go to sleep. 4. The Energy Saver window will open, and the Sleep Setup settings should be problems with your Maxtor OneTouch II drive, you will use to choose as short as 10 minutes and as long as 60 minutes. Under the Apple menu, select...open . 2. If the test finds your drive to sleep. Tune for OS X Diagnostic Test 1. You can adjust the performance of the window. 5. Diagnostics and Tuning Power Management Settings for Maximum Performance: provides improved data throughput when data access patterns are random in the bottom of ...


