
User Guide for Mac
Page 10
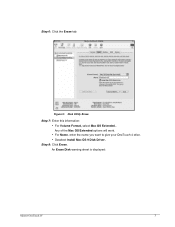
Step 6: Click the Erase tab: Figure 9: Disk Utility Erase Step 7: Enter this information: • For Volume Format, select Mac OS Extended... An Erase Disk warning sheet is displayed: Maxtor OneTouch IV 7 Any of the Mac OS Extended options will work. • For Name, enter the name you want to give your OneTouch 4 drive. • Deselect Install Mac OS 9 Disk Driver. Step 8: Click Erase.
Step 6: Click the Erase tab: Figure 9: Disk Utility Erase Step 7: Enter this information: • For Volume Format, select Mac OS Extended... An Erase Disk warning sheet is displayed: Maxtor OneTouch IV 7 Any of the Mac OS Extended options will work. • For Name, enter the name you want to give your OneTouch 4 drive. • Deselect Install Mac OS 9 Disk Driver. Step 8: Click Erase.
User Guide for Mac
Page 62
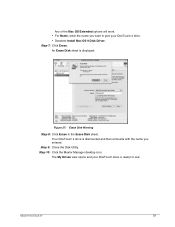
An Erase Disk sheet is dismounted and then remounts with the name you want to give your OneTouch drive is ready for use: Maxtor OneTouch IV 59 Step 9: Close the Disk Utility. Step 10: Click the Maxtor Manager desktop icon. Step 7: Click Erase. Any of the Mac OS Extended options will work. • For Name, enter the name you entered. Your OneTouch 4 drive is displayed: Figure 27: Erase Disk Warning Step 8: Click Erase in the Erase Disk sheet. The My Drives view opens and your OneTouch 4 drive. • Deselect Install Mac OS 9 Disk Driver.
An Erase Disk sheet is dismounted and then remounts with the name you want to give your OneTouch drive is ready for use: Maxtor OneTouch IV 59 Step 9: Close the Disk Utility. Step 10: Click the Maxtor Manager desktop icon. Step 7: Click Erase. Any of the Mac OS Extended options will work. • For Name, enter the name you entered. Your OneTouch 4 drive is displayed: Figure 27: Erase Disk Warning Step 8: Click Erase in the Erase Disk sheet. The My Drives view opens and your OneTouch 4 drive. • Deselect Install Mac OS 9 Disk Driver.
User Guide for Mac
Page 76
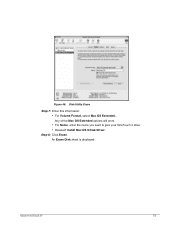
An Erase Disk sheet is displayed: Maxtor OneTouch IV 73 Step 8: Click Erase. Any of the Mac OS Extended options will work. • For Name, enter the name you want to give your OneTouch 4 drive. • Deselect Install Mac OS 9 Disk Driver. Figure 46: Disk Utility Erase Step 7: Enter this information: • For Volume Format, select Mac OS Extended...
An Erase Disk sheet is displayed: Maxtor OneTouch IV 73 Step 8: Click Erase. Any of the Mac OS Extended options will work. • For Name, enter the name you want to give your OneTouch 4 drive. • Deselect Install Mac OS 9 Disk Driver. Figure 46: Disk Utility Erase Step 7: Enter this information: • For Volume Format, select Mac OS Extended...
User Guide for Mac
Page 10
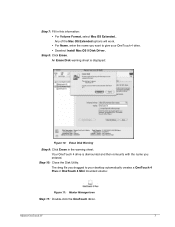
...to give your desktop automatically creates a OneTouch 4 Plus or OneTouch 4 Mini mounted volume: Figure 11: Maxtor Manager Icon Step 11: Double-click the OneTouch 4icon. The dmg file you want to your OneTouch 4 drive. • Deselect Install Mac OS 9 Disk Driver. An Erase Disk warning sheet is ...dismounted and then remounts with the name you entered. Your OneTouch 4 drive is displayed: Figure 10: ...
...to give your desktop automatically creates a OneTouch 4 Plus or OneTouch 4 Mini mounted volume: Figure 11: Maxtor Manager Icon Step 11: Double-click the OneTouch 4icon. The dmg file you want to your OneTouch 4 drive. • Deselect Install Mac OS 9 Disk Driver. An Erase Disk warning sheet is ...dismounted and then remounts with the name you entered. Your OneTouch 4 drive is displayed: Figure 10: ...

User Guide for Mac
Page 26
Any of the Mac OS Extended options will work. • For Name, enter the name you want to give your OneTouch 4 drive. • Deselect Install Mac OS 9 Disk Driver. Step 8: Click Erase. An Erase Disk sheet is displayed: Maxtor OneTouch IV 23 Figure 14: Disk Utility Erase Step 7: Enter this information: • For Volume Format, select Mac OS Extended...
Any of the Mac OS Extended options will work. • For Name, enter the name you want to give your OneTouch 4 drive. • Deselect Install Mac OS 9 Disk Driver. Step 8: Click Erase. An Erase Disk sheet is displayed: Maxtor OneTouch IV 23 Figure 14: Disk Utility Erase Step 7: Enter this information: • For Volume Format, select Mac OS Extended...

User Guide for Mac
Page 74
Any of the Mac OS Extended options will work. • For Name, enter the name you entered. Step 9: Close the Disk Utility. Your OneTouch 4 drive is dismounted and then remounts with the name you want to give your OneTouch drive is displayed: Figure 19: Erase Disk Warning Step 8: Click Erase in the Erase Disk sheet. Step 10: Click the Maxtor Manager desktop icon. The My Drives view opens and your OneTouch 4 drive. • Deselect Install Mac OS 9 Disk Driver. Step 7: Click Erase. An Erase Disk sheet is ready for use: Maxtor OneTouch IV 71
Any of the Mac OS Extended options will work. • For Name, enter the name you entered. Step 9: Close the Disk Utility. Your OneTouch 4 drive is dismounted and then remounts with the name you want to give your OneTouch drive is displayed: Figure 19: Erase Disk Warning Step 8: Click Erase in the Erase Disk sheet. Step 10: Click the Maxtor Manager desktop icon. The My Drives view opens and your OneTouch 4 drive. • Deselect Install Mac OS 9 Disk Driver. Step 7: Click Erase. An Erase Disk sheet is ready for use: Maxtor OneTouch IV 71


