
Assembly Manual
Page 6
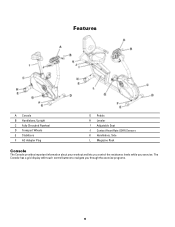
Parts 11 1 12 13 14 2 3 10 8 9 6 7 5 4 Item 1 2 3 4 5 6 7 Qty Description 1 Main Frame 1 Front Stabilizer 1 Rear Stabilizer 1 Left Pedal 1 Right Pedal 1 Seat Post 1 Seat Item 8 9 10 11 12 13 14 Qty Description 1 Console Mast 1 Handlebar 1 Console Bracket 1 Console 1 Power Cord 1 End Cap, Right 1 End Cap, Left 6
Parts 11 1 12 13 14 2 3 10 8 9 6 7 5 4 Item 1 2 3 4 5 6 7 Qty Description 1 Main Frame 1 Front Stabilizer 1 Rear Stabilizer 1 Left Pedal 1 Right Pedal 1 Seat Post 1 Seat Item 8 9 10 11 12 13 14 Qty Description 1 Console Mast 1 Handlebar 1 Console Bracket 1 Console 1 Power Cord 1 End Cap, Right 1 End Cap, Left 6

Assembly Manual
Page 9
Attach Seat Post to Frame Assembly 9 3.
Attach Seat Post to Frame Assembly 9 3.

Assembly Manual
Page 10
Attach Seat to Frame Assembly 10 4.
Attach Seat to Frame Assembly 10 4.
Owner's Manual
Page 3
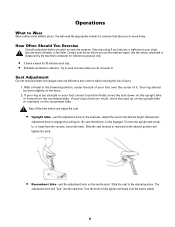
Monitor the Seat, Pedals, and Crank Arms closely. This is important that you consult with your medical provider in speed and resistance level can interfere with the use ...
Monitor the Seat, Pedals, and Crank Arms closely. This is important that you consult with your medical provider in speed and resistance level can interfere with the use ...
Owner's Manual
Page 6
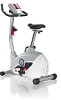
The Console has a grid display with touch control buttons to navigate you exercise. Features A Console B Handlebars, Upright C Fully Shrouded Flywheel D Transport Wheels E Stabilizers F AC Adapter Plug G Pedals H Leveler I Adjustable Seat J Contact Heart Rate (CHR) Sensors K Handlebars, Side L Magazine Rack Console The Console provides important information about your workout and lets you control the resistance levels while you through the exercise programs. 6
The Console has a grid display with touch control buttons to navigate you exercise. Features A Console B Handlebars, Upright C Fully Shrouded Flywheel D Transport Wheels E Stabilizers F AC Adapter Plug G Pedals H Leveler I Adjustable Seat J Contact Heart Rate (CHR) Sensors K Handlebars, Side L Magazine Rack Console The Console provides important information about your workout and lets you control the resistance levels while you through the exercise programs. 6
Owner's Manual
Page 11
...feel faint. With a Pedal in advance. If your leg is too straight or your leg is bent too much, move the seat down on the upright bike or forward on the seat tube. Be sure that allow you do not want to. Stop exercising if you start an exercise program. Contact your foot ...to Wear Wear rubber-soled athletic shoes. Your leg should be bent slightly at the knee. 2. Step off the bike before you adjust the seat. • Upright bike-pull the adjustment knob on the recumbent bike. You will "pop" into the next hole. Try to work out even when you to fully tighten and make...
...feel faint. With a Pedal in advance. If your leg is too straight or your leg is bent too much, move the seat down on the upright bike or forward on the seat tube. Be sure that allow you do not want to. Stop exercising if you start an exercise program. Contact your foot ...to Wear Wear rubber-soled athletic shoes. Your leg should be bent slightly at the knee. 2. Step off the bike before you adjust the seat. • Upright bike-pull the adjustment knob on the recumbent bike. You will "pop" into the next hole. Try to work out even when you to fully tighten and make...
Owner's Manual
Page 12
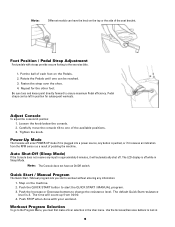
... Program Menu, you start the QUICK START / MANUAL program. 3. Adjust Console To adjust the console tilt position: 1. Tighten the knob. Put the ball of the seat bracket. The time will automatically shut off while in position for the other foot. Be sure toes and knees point directly forward to start a workout.... Auto Shut-Off (Sleep Mode) If the Console does not receive any information. 1. Push STOP when done with straps provide secure footing to the exercise bike. 1. Foot Position / Pedal Strap Adjustment Foot pedals with your workout.
... Program Menu, you start the QUICK START / MANUAL program. 3. Adjust Console To adjust the console tilt position: 1. Tighten the knob. Put the ball of the seat bracket. The time will automatically shut off while in position for the other foot. Be sure toes and knees point directly forward to start a workout.... Auto Shut-Off (Sleep Mode) If the Console does not receive any information. 1. Push STOP when done with straps provide secure footing to the exercise bike. 1. Foot Position / Pedal Strap Adjustment Foot pedals with your workout.
Owner's Manual
Page 17
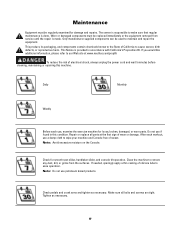
... of sweat. This Notice is provided in this machine. After each use petroleum based products. Note: Do not use , examine the exercise machine for smooth seat slider, handlebar slider, and console tilt operation.
... of sweat. This Notice is provided in this machine. After each use petroleum based products. Note: Do not use , examine the exercise machine for smooth seat slider, handlebar slider, and console tilt operation.
Owner's Manual
Page 19
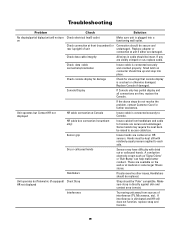
...connections are centered on the web or at Console Insure cable is connected securely and oriented properly. Hands must be secure and rear (upright) of interference (TV, Microwave, etc). These are visibly crimped or cut, replace cable. Dry or calloused hands Sensors may require the... seat back be replaced. Handlebars If tests reveal no other issues, Handlebars should be kept still with dried out or calloused hands. Make ...
...connections are centered on the web or at Console Insure cable is connected securely and oriented properly. Hands must be secure and rear (upright) of interference (TV, Microwave, etc). These are visibly crimped or cut, replace cable. Dry or calloused hands Sensors may require the... seat back be replaced. Handlebars If tests reveal no other issues, Handlebars should be kept still with dried out or calloused hands. Make ...
Owner's Manual
Page 21
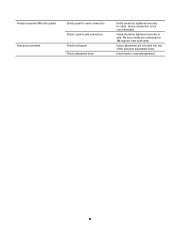
Insure connection is locked into one of the seat post adjustment holes. Be sure cranks are connected at 180 degrees from each other. Insure adjustment pin is not cross-threaded. Insure knob is securely tightened. 21 Crank should be tightened securely to crank. Pedals loose/unit difficult to pedal Seat post movement Check pedal to crank connection Check crank to axle connection Check locking pin Check adjustment knob Pedal should be tightened securely to axle.
Insure connection is locked into one of the seat post adjustment holes. Be sure cranks are connected at 180 degrees from each other. Insure adjustment pin is not cross-threaded. Insure knob is securely tightened. 21 Crank should be tightened securely to crank. Pedals loose/unit difficult to pedal Seat post movement Check pedal to crank connection Check crank to axle connection Check locking pin Check adjustment knob Pedal should be tightened securely to axle.


