Instruction Manual, PLC-XP56
Page 2
... ELECTRIC SHOCK, DO NOT REMOVE COVER (OR BACK). THIS SYMBOL INDICATES THAT DANGEROUS VOLTAGE CONSTITUTING A RISK OF ELECTRIC SHOCK IS PRESENT WITHIN THIS UNIT. G This projector produces intense light from the projection lens. G This projector should be dangerous. Do not cover the ventilation slot on the top, sides and rear of the...
... ELECTRIC SHOCK, DO NOT REMOVE COVER (OR BACK). THIS SYMBOL INDICATES THAT DANGEROUS VOLTAGE CONSTITUTING A RISK OF ELECTRIC SHOCK IS PRESENT WITHIN THIS UNIT. G This projector produces intense light from the projection lens. G This projector should be dangerous. Do not cover the ventilation slot on the top, sides and rear of the...
Instruction Manual, PLC-XP56
Page 5
...REPLACE COUNTER 45 21 TROUBLESHOOTING 46 21 INDICATORS AND PROJECTOR CONDITION 48 22 22 COMPATIBLE COMPUTER SPECIFICATION 49 22 MENU TREE 50 22 TECHNICAL SPECIFICATIONS 52 CONFIGURATIONS OF TERMINALS 53 OPTIONAL PARTS 54 LENS REPLACEMENT 54 TRADEMARKS G Apple, Macintosh, and ...OF ON-SCREEN MENU OPERATION 18 MENU BAR 19 APPENDIX 41 BASIC OPERATION TURNING ON / OFF PROJECTOR ADJUSTING SCREEN ZOOM ADJUSTMENT FOCUS ADJUSTMENT LENS SHIFT ADJUSTMENT KEYSTONE ADJUSTMENT PICTURE FREEZE FUNCTION NO SHOW FUNCTION P-TIMER FUNCTION SOUND ADJUSTMENT 20 OPERATING WIRELESS...
...REPLACE COUNTER 45 21 TROUBLESHOOTING 46 21 INDICATORS AND PROJECTOR CONDITION 48 22 22 COMPATIBLE COMPUTER SPECIFICATION 49 22 MENU TREE 50 22 TECHNICAL SPECIFICATIONS 52 CONFIGURATIONS OF TERMINALS 53 OPTIONAL PARTS 54 LENS REPLACEMENT 54 TRADEMARKS G Apple, Macintosh, and ...OF ON-SCREEN MENU OPERATION 18 MENU BAR 19 APPENDIX 41 BASIC OPERATION TURNING ON / OFF PROJECTOR ADJUSTING SCREEN ZOOM ADJUSTMENT FOCUS ADJUSTMENT LENS SHIFT ADJUSTMENT KEYSTONE ADJUSTMENT PICTURE FREEZE FUNCTION NO SHOW FUNCTION P-TIMER FUNCTION SOUND ADJUSTMENT 20 OPERATING WIRELESS...
Instruction Manual, PLC-XP56
Page 6
..., a palette of 16.77 million colors, and matrix liquid crystal display (LCD) technology. Projection Lamp is automatically turned on a projected screen. N Laser... system can be connected. This projector is shipped with motordriven lens shift function. The projector can be also adjusted with this function ON. FEATURES AND DESIGN This Multimedia Projector is designed with most advanced technology... the data image stored in ; Keystone Correction solves this projector has Wireless Mouse function for connecting DVI output from a computer between XGA (1024 x 768) and SXGA (1280 x 1024) ...
..., a palette of 16.77 million colors, and matrix liquid crystal display (LCD) technology. Projection Lamp is automatically turned on a projected screen. N Laser... system can be connected. This projector is shipped with motordriven lens shift function. The projector can be also adjusted with this function ON. FEATURES AND DESIGN This Multimedia Projector is designed with most advanced technology... the data image stored in ; Keystone Correction solves this projector has Wireless Mouse function for connecting DVI output from a computer between XGA (1024 x 768) and SXGA (1280 x 1024) ...
Instruction Manual, PLC-XP56
Page 7
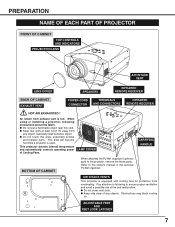
... power of any object, especially heat-sensitive object. PREPARATION NAME OF EACH PART OF PROJECTOR FRONT OF CABINET TOP CONTROLS AND INDICATORS PROJECTION LENS AIR INTAKE VENT LENS COVER SPEAKERS INFRARED REMOTE RECEIVER BACK OF CABINET EXHAUST VENT POWER CORD CONNECTOR TERMINALS AND... protection from any objects. G Keep side clear of Cooling Fans. When using or installing a projector, following to following precautions should be taken. Refer to the projector, remove the these parts. Pay attention to ensure proper ventilation and avoid a possible risk of fire...
... power of any object, especially heat-sensitive object. PREPARATION NAME OF EACH PART OF PROJECTOR FRONT OF CABINET TOP CONTROLS AND INDICATORS PROJECTION LENS AIR INTAKE VENT LENS COVER SPEAKERS INFRARED REMOTE RECEIVER BACK OF CABINET EXHAUST VENT POWER CORD CONNECTOR TERMINALS AND... protection from any objects. G Keep side clear of Cooling Fans. When using or installing a projector, following to following precautions should be taken. Refer to the projector, remove the these parts. Pay attention to ensure proper ventilation and avoid a possible risk of fire...
Instruction Manual, PLC-XP56
Page 9
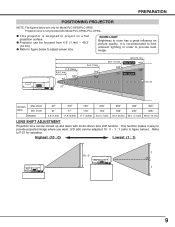
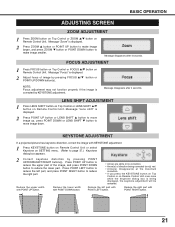
... designed to P 21 for Model PLC-XP55/PLC-XP56. G Projector can be moved up and down with Model PLC-XP55L/PLC-XP56L. Zoom 400" 300" 231" Min. Zoom Min. This function makes it easy to adjust screen size. G Refer to figure below to provide projected image ... (3.6m) 150" 115" 17.7' (5.4m) 200" 154" 24.0' (7.3m) 250" 300" 400" 192" 231" 308" 30.2' (9.2m) 36.1' (11.0m) 48.3' (14.7m) LENS SHIFT ADJUSTMENT Projection lens can be adjusted 10 : 0 ~ 1 : 1 (refer to provide best image. 11.8'(3.6m) 4.6'(1.4m) 100" 40" 77" 31" 24.0'(7.3m) 200" 154" 48.3'(14.7m) 36...
... designed to P 21 for Model PLC-XP55/PLC-XP56. G Projector can be moved up and down with Model PLC-XP55L/PLC-XP56L. Zoom 400" 300" 231" Min. Zoom Min. This function makes it easy to adjust screen size. G Refer to figure below to provide projected image ... (3.6m) 150" 115" 17.7' (5.4m) 200" 154" 24.0' (7.3m) 250" 300" 400" 192" 231" 308" 30.2' (9.2m) 36.1' (11.0m) 48.3' (14.7m) LENS SHIFT ADJUSTMENT Projection lens can be adjusted 10 : 0 ~ 1 : 1 (refer to provide best image. 11.8'(3.6m) 4.6'(1.4m) 100" 40" 77" 31" 24.0'(7.3m) 200" 154" 48.3'(14.7m) 36...
Instruction Manual, PLC-XP56
Page 11
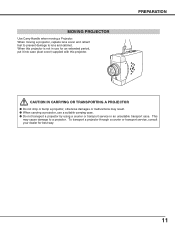
... in use a suitable carrying case. G When carrying a projector, use for best way. 11 When moving a Projector. PREPARATION CAUTION IN CARRYING OR TRANSPORTING A PROJECTOR G Do not drop or bump a projector, otherwise damages or malfunctions may cause damage to lens and cabinet. MOVING PROJECTOR Use Carry Handle when moving a projector, replace lens cover and retract feet to prevent damage to...
... in use a suitable carrying case. G When carrying a projector, use for best way. 11 When moving a Projector. PREPARATION CAUTION IN CARRYING OR TRANSPORTING A PROJECTOR G Do not drop or bump a projector, otherwise damages or malfunctions may cause damage to lens and cabinet. MOVING PROJECTOR Use Carry Handle when moving a projector, replace lens cover and retract feet to prevent damage to...
Instruction Manual, PLC-XP56
Page 15
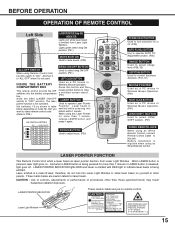
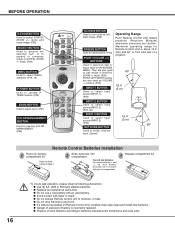
... BUTTON Used to "OFF" position. LASER POINTER FUNCTION This Remote Control Unit emits a laser beam as a PC mouse in Wireless Mouse Operation. (P41) LENS SHIFT BUTTON Used to correct keystone distortion. (P21, 37) MOUSE POINTER Used as a PC mouse in Wireless Mouse Operation. (P41) RIGHT CLICK BUTTON Used...OFF OFF ON Code 7 OFF OFF OFF Code 8 DRAG ON/OFF BUTTON Used to indicate laser beam is required when using Remote Control Unit, turn projector on . therefore, do not look into the battery compartment box. that you want to select remote control code. (Refer to adjust focus. (P21...
... BUTTON Used to "OFF" position. LASER POINTER FUNCTION This Remote Control Unit emits a laser beam as a PC mouse in Wireless Mouse Operation. (P41) LENS SHIFT BUTTON Used to correct keystone distortion. (P21, 37) MOUSE POINTER Used as a PC mouse in Wireless Mouse Operation. (P41) RIGHT CLICK BUTTON Used...OFF OFF ON Code 7 OFF OFF OFF Code 8 DRAG ON/OFF BUTTON Used to indicate laser beam is required when using Remote Control Unit, turn projector on . therefore, do not look into the battery compartment box. that you want to select remote control code. (Refer to adjust focus. (P21...
Instruction Manual, PLC-XP56
Page 16
... zoom. (P21) COLOR MANAGEMENT BUTTON Used to operate COLOR MANAGEMENT. (P34) LASER P-TIMER INPUT 1 ZOOM COLOR.M INPUT 2 INPUT 3 FOCUS LENS NETWORK NO SHOW BUTTON Used to turn picture into compartment. 3 Replace compartment lid. Press lid downward and slide it. 2 Slide batteries into black...ON-SCREEN MENU. G Do not expose Remote Control Unit to select input source (INPUT 1). (P23) Operating Range Point Remote Control Unit toward projector (Receiver Window) whenever pressing any button. buttons. (P22) INPUT 1 BUTTON Used to moisture, or heat. Two AA size batteries For ...
... zoom. (P21) COLOR MANAGEMENT BUTTON Used to operate COLOR MANAGEMENT. (P34) LASER P-TIMER INPUT 1 ZOOM COLOR.M INPUT 2 INPUT 3 FOCUS LENS NETWORK NO SHOW BUTTON Used to turn picture into compartment. 3 Replace compartment lid. Press lid downward and slide it. 2 Slide batteries into black...ON-SCREEN MENU. G Do not expose Remote Control Unit to select input source (INPUT 1). (P23) Operating Range Point Remote Control Unit toward projector (Receiver Window) whenever pressing any button. buttons. (P22) INPUT 1 BUTTON Used to moisture, or heat. Two AA size batteries For ...
Instruction Manual, PLC-XP56
Page 17
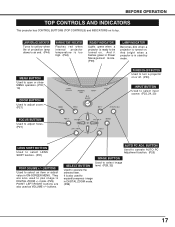
And bright when a projector is turned on or off. (P20) INPUT BUTTON Used to select input source. (P23, 24, 30) FOCUS BUTTON Used to adjust focus. (P21) LENS SHIFT BUTTON Used to select LENS SHIFT function. (P21) POINT (VOLUME + / - ) BUTTONS Used to select an item or adjust value in DIGITAL ZOOM ...execute the selected item. They are also used as VOLUME +/- And it flashes green in Power Management mode. (P39) LAMP INDICATOR Becomes dim when a projector is in DIGITAL ZOOM mode. (P29) 17 MENU BUTTON Used to open or close MENU operation. (P18, 19) ZOOM BUTTON Used to adjust zoom...
And bright when a projector is turned on or off. (P20) INPUT BUTTON Used to select input source. (P23, 24, 30) FOCUS BUTTON Used to adjust focus. (P21) LENS SHIFT BUTTON Used to select LENS SHIFT function. (P21) POINT (VOLUME + / - ) BUTTONS Used to select an item or adjust value in DIGITAL ZOOM ...execute the selected item. They are also used as VOLUME +/- And it flashes green in Power Management mode. (P39) LAMP INDICATOR Becomes dim when a projector is in DIGITAL ZOOM mode. (P29) 17 MENU BUTTON Used to open or close MENU operation. (P18, 19) ZOOM BUTTON Used to adjust zoom...
Instruction Manual, PLC-XP56
Page 18
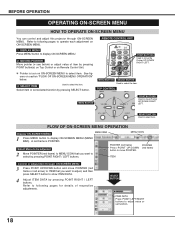
... VOLUME- BEFORE OPERATION OPERATING ON-SCREEN MENU HOW TO OPERATE ON-SCREEN MENU You can control and adjust this projector through ON-SCREEN MENU 3 Press POINT UP/DOWN button and move POINTER. FOCUS LENS FLOW OF ON-SCREEN MENU OPERATION Display ON-SCREEN MENU MENU BAR MENU ICON 1 Press MENU button to...
... VOLUME- BEFORE OPERATION OPERATING ON-SCREEN MENU HOW TO OPERATE ON-SCREEN MENU You can control and adjust this projector through ON-SCREEN MENU 3 Press POINT UP/DOWN button and move POINTER. FOCUS LENS FLOW OF ON-SCREEN MENU OPERATION Display ON-SCREEN MENU MENU BAR MENU ICON 1 Press MENU button to...
Instruction Manual, PLC-XP56
Page 21
... focus of image by pressing FOCUS L/M button or POINT UP/DOWN button(s) . Message "Lens shift" is displayed. 2 Press POINT UP button or LENS SHIFT L button to move image up, press POINT DOWN or LENS SHIFT M button to page 37.) Keystone dialog box appears. 2 Correct keystone distortion by... with KEYSTONE adjustment. 1 Press KEYSTONE button on Remote Control Unit or select Keystone on Remote Control Unit. LENS SHIFT ADJUSTMENT 1 Press LENS SHIFT button on Top Control or LENS SHIFT L/M button on Remote Control Unit. Message "Focus" is corrected by pressing POINT UP/DOWN/LEFT/RIGHT...
... focus of image by pressing FOCUS L/M button or POINT UP/DOWN button(s) . Message "Lens shift" is displayed. 2 Press POINT UP button or LENS SHIFT L button to move image up, press POINT DOWN or LENS SHIFT M button to page 37.) Keystone dialog box appears. 2 Correct keystone distortion by... with KEYSTONE adjustment. 1 Press KEYSTONE button on Remote Control Unit or select Keystone on Remote Control Unit. LENS SHIFT ADJUSTMENT 1 Press LENS SHIFT button on Top Control or LENS SHIFT L/M button on Remote Control Unit. Message "Focus" is corrected by pressing POINT UP/DOWN/LEFT/RIGHT...
Instruction Manual, PLC-XP56
Page 41
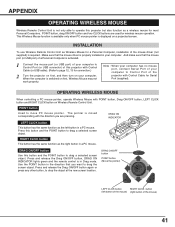
...wireless mouse for most Personal Computers. APPENDIX OPERATING WIRELESS MOUSE Wireless Remote Control Unit is not only able to Control Port of the projector with Control Cable for Serial Port (supplied). DRAG ON/OFF button POINT button (Move the pointer) LEFT CLICK button RIGHLTASCLEIRCK button...computer. Make sure that you are used for a Personal Computer, installation of the mouse) P-TIMERCOMPUTER 1 ZOOM COMPUTER 2 VIDEO FOCUS LENS 41 POINT button, drag ON/OFF button and two CLICK buttons are pressing. When the computer is displayed on first, Wireless Mouse ...
...wireless mouse for most Personal Computers. APPENDIX OPERATING WIRELESS MOUSE Wireless Remote Control Unit is not only able to Control Port of the projector with Control Cable for Serial Port (supplied). DRAG ON/OFF button POINT button (Move the pointer) LEFT CLICK button RIGHLTASCLEIRCK button...computer. Make sure that you are used for a Personal Computer, installation of the mouse) P-TIMERCOMPUTER 1 ZOOM COMPUTER 2 VIDEO FOCUS LENS 41 POINT button, drag ON/OFF button and two CLICK buttons are pressing. When the computer is displayed on first, Wireless Mouse ...
Instruction Manual, PLC-XP56
Page 43
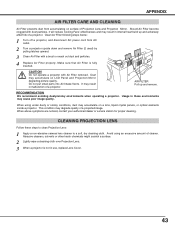
...Should Air Filter become clogged with Air Filter removed. CAUTION Do not operate a projector with dust particles, it will reduce Cooling Fans' effectiveness and may accumulate on LCD Panel and Projection Mirror degrading picture quality. When using an excessive amount of ...harsh chemicals might scratch a surface. 2 Lightly wipe a cleaning cloth over Projection Lens. 3 When a projector is fully inserted. APPENDIX AIR FILTER CARE AND CLEANING Air Filter prevents dust from AC outlet. 2 Turn a projector upside down and remove Air Filter (2 used) by pulling latches upward. 3 Clean...
...Should Air Filter become clogged with Air Filter removed. CAUTION Do not operate a projector with dust particles, it will reduce Cooling Fans' effectiveness and may accumulate on LCD Panel and Projection Mirror degrading picture quality. When using an excessive amount of ...harsh chemicals might scratch a surface. 2 Lightly wipe a cleaning cloth over Projection Lens. 3 When a projector is fully inserted. APPENDIX AIR FILTER CARE AND CLEANING Air Filter prevents dust from AC outlet. 2 Turn a projector upside down and remove Air Filter (2 used) by pulling latches upward. 3 Clean...
Instruction Manual, PLC-XP56
Page 46
... seconds, READY indicator lights green again and a projector may be sure to a warm temperature location may result in moisture condensation on Projection Lens. Picture is Top/Bottom reversed. No sound. and READY indicator flashes, a projector cannot be turned on by pressing Power ON-OFF...equipment back on . Try these Solutions G Plug a projector into your computer or video equipment. Some displays are properly connected. 3. G Check Projection Lens to see if it takes about 30 seconds to page 44.) G Adjust focus of : Projector and computer.) 6. G Adjust audio source. Verify that...
... seconds, READY indicator lights green again and a projector may be sure to a warm temperature location may result in moisture condensation on Projection Lens. Picture is Top/Bottom reversed. No sound. and READY indicator flashes, a projector cannot be turned on by pressing Power ON-OFF...equipment back on . Try these Solutions G Plug a projector into your computer or video equipment. Some displays are properly connected. 3. G Check Projection Lens to see if it takes about 30 seconds to page 44.) G Adjust focus of : Projector and computer.) 6. G Adjust audio source. Verify that...
Instruction Manual, PLC-XP56
Page 52
... VGA Cable USB Cable Control Cable for Serial port Protective Dust Cover Lens Cover (PLC-XP55/XP56) Lens Attachment (PLC-XP55L/XP56L) G Specifications are manufactured to change without notice. APPENDIX TECHNICAL SPECIFICATIONS Projector Type Dimensions (W x H x D) Net Weight LCD Panel System Panel Resolution Number of the LCD panels. 52 Ampere), 50 / 60 Hz (Continental Europe and The U.K.) 41 ˚...
... VGA Cable USB Cable Control Cable for Serial port Protective Dust Cover Lens Cover (PLC-XP55/XP56) Lens Attachment (PLC-XP55L/XP56L) G Specifications are manufactured to change without notice. APPENDIX TECHNICAL SPECIFICATIONS Projector Type Dimensions (W x H x D) Net Weight LCD Panel System Panel Resolution Number of the LCD panels. 52 Ampere), 50 / 60 Hz (Continental Europe and The U.K.) 41 ˚...
Instruction Manual, PLC-XP56
Page 54
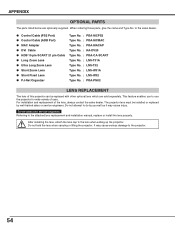
... dealer. When ordering those parts, give the name and Type No. The projector lens must be replaced with other optional lens which are optionally supplied. Do not attempt to use the projector for wide variety of the lens, always contact the sales dealer. G Control Cable (PS2 Port) G Control...LNS-W32 Type No. : POA-PN02 LENS REPLACEMENT The lens of this projector can be installed or replaced by yourself as it may cause serious damage to the lens when setting up the projector. After installing the lens, attach the lens cap to the projector. 54 To the sales and service ...
... dealer. When ordering those parts, give the name and Type No. The projector lens must be replaced with other optional lens which are optionally supplied. Do not attempt to use the projector for wide variety of the lens, always contact the sales dealer. G Control Cable (PS2 Port) G Control...LNS-W32 Type No. : POA-PN02 LENS REPLACEMENT The lens of this projector can be installed or replaced by yourself as it may cause serious damage to the lens when setting up the projector. After installing the lens, attach the lens cap to the projector. 54 To the sales and service ...


