
Instruction Manual, VPC-HD700EX Xacti Library
Page 12
SETUP TV By using a HD (high definition) compatible TV, you will be able to enjoy the excellent image quality of video clips recorded in the HD mode. Others i A connection cable between the docking station and the hard disk (example: USB interface cable , USB converter cable, etc.) is necessary. i A connection cable between the docking station and the TV (example: S-AV interface cable, component cable, HDMI cable, etc.) is necessary. English 8
SETUP TV By using a HD (high definition) compatible TV, you will be able to enjoy the excellent image quality of video clips recorded in the HD mode. Others i A connection cable between the docking station and the hard disk (example: USB interface cable , USB converter cable, etc.) is necessary. i A connection cable between the docking station and the TV (example: S-AV interface cable, component cable, HDMI cable, etc.) is necessary. English 8
Instruction Manual, VPC-HD700EX
Page 6
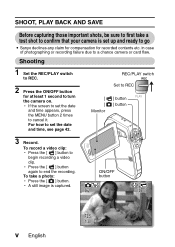
h If the screen to set the date and time appears, press the MENU button 2 times to set up and ready to go i Sanyo declines any claim for compensation for at least 1 second to end the recording. For how to cancel it. SHOOT, PLAY BACK AND SAVE Before capturing ... clip. h Press the [ ] button again to turn the camera on. To record a video clip: h Press the [ ] button to confirm that your camera is captured. 362 HD-SHQ 00:05:08 F3.5 1/30 v English
h If the screen to set the date and time appears, press the MENU button 2 times to set up and ready to go i Sanyo declines any claim for compensation for at least 1 second to end the recording. For how to cancel it. SHOOT, PLAY BACK AND SAVE Before capturing ... clip. h Press the [ ] button again to turn the camera on. To record a video clip: h Press the [ ] button to confirm that your camera is captured. 362 HD-SHQ 00:05:08 F3.5 1/30 v English

Instruction Manual, VPC-HD700EX
Page 32
... H.264/MPEG-4 AVC standard is used for saving recorded data to hard disk and managing files without getting flustered, as well as software with the "Xacti Library" feature for formatting video files. GETTING THE MOST OUT OF YOUR CAMERA Your digital movie camera can record video clips in one high-performance...
... H.264/MPEG-4 AVC standard is used for saving recorded data to hard disk and managing files without getting flustered, as well as software with the "Xacti Library" feature for formatting video files. GETTING THE MOST OUT OF YOUR CAMERA Your digital movie camera can record video clips in one high-performance...
Instruction Manual, VPC-HD700EX
Page 33
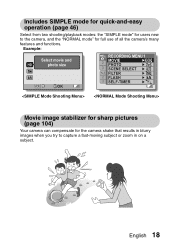
English 18 Includes SIMPLE mode for quick-and-easy operation (page 46) Select from two shooting/playback modes: the "SIMPLE mode" for users new to capture a fast-moving subject or zoom in blurry images when you try to the camera, and the "NORMAL mode" for the camera shake that results in on a subject. Example: Select movie and photo size OK 1 RECORDING MENU 1 2 MOVIE PHOTO HD-SHQ 3 SCENE SELECT 1 FILTER 2 FLASH 3 SELF-TIMER Movie image stabilizer for sharp pictures (page 104) Your camera can compensate for full use of all the camera's many features and functions.
English 18 Includes SIMPLE mode for quick-and-easy operation (page 46) Select from two shooting/playback modes: the "SIMPLE mode" for users new to capture a fast-moving subject or zoom in blurry images when you try to the camera, and the "NORMAL mode" for the camera shake that results in on a subject. Example: Select movie and photo size OK 1 RECORDING MENU 1 2 MOVIE PHOTO HD-SHQ 3 SCENE SELECT 1 FILTER 2 FLASH 3 SELF-TIMER Movie image stabilizer for sharp pictures (page 104) Your camera can compensate for full use of all the camera's many features and functions.

Instruction Manual, VPC-HD700EX
Page 60
For recording: Set it to PLAY. For playback: Set it to the desired mode. SWITCHING BETWEEN THE SHOOTING MODE AND PLAYBACK MODE Switch between the shooting mode (for recording) and the playback mode (for viewing your recorded images). 1 Turn on the camera (page 39). 2 Set the REC/PLAY switch to REC. REC/PLAY switch Shooting mode Playback mode HD-SHQ 362 00:05:08 F3.5 1/30 2007.12.24 PLAY 45 English
For recording: Set it to PLAY. For playback: Set it to the desired mode. SWITCHING BETWEEN THE SHOOTING MODE AND PLAYBACK MODE Switch between the shooting mode (for recording) and the playback mode (for viewing your recorded images). 1 Turn on the camera (page 39). 2 Set the REC/PLAY switch to REC. REC/PLAY switch Shooting mode Playback mode HD-SHQ 362 00:05:08 F3.5 1/30 2007.12.24 PLAY 45 English
Instruction Manual, VPC-HD700EX
Page 61
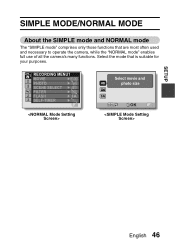
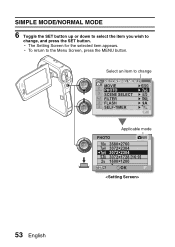
SETUP SIMPLE MODE/NORMAL MODE About the SIMPLE mode and NORMAL mode The "SIMPLE mode" comprises only those functions that is suitable for your purposes. 1 RECORDING MENU1 2 MOVIE PHOTO HD-SHQ 3 SCENE SELECT 1 FILTER 2 FLASH 3 SELF-TIMER Select movie and photo size OK English 46 Select the mode that are most often used and necessary to operate the camera, while the "NORMAL mode" enables full use of all the camera's many functions.
SETUP SIMPLE MODE/NORMAL MODE About the SIMPLE mode and NORMAL mode The "SIMPLE mode" comprises only those functions that is suitable for your purposes. 1 RECORDING MENU1 2 MOVIE PHOTO HD-SHQ 3 SCENE SELECT 1 FILTER 2 FLASH 3 SELF-TIMER Select movie and photo size OK English 46 Select the mode that are most often used and necessary to operate the camera, while the "NORMAL mode" enables full use of all the camera's many functions.
Instruction Manual, VPC-HD700EX
Page 63
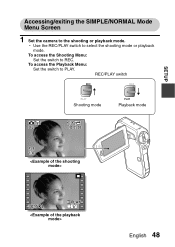
To access the Playback Menu: Set the switch to select the shooting mode or playback mode. h Use the REC/PLAY switch to PLAY. SETUP Accessing/exiting the SIMPLE/NORMAL Mode Menu Screen 1 Set the camera to REC. To access the Shooting Menu: Set the switch to the shooting or playback mode. REC/PLAY switch Shooting mode Playback mode HD-SHQ 362 00:05:08 F3.5 1/30 2007.12.24 PLAY English 48
To access the Playback Menu: Set the switch to select the shooting mode or playback mode. h Use the REC/PLAY switch to PLAY. SETUP Accessing/exiting the SIMPLE/NORMAL Mode Menu Screen 1 Set the camera to REC. To access the Shooting Menu: Set the switch to the shooting or playback mode. REC/PLAY switch Shooting mode Playback mode HD-SHQ 362 00:05:08 F3.5 1/30 2007.12.24 PLAY English 48
Instruction Manual, VPC-HD700EX
Page 64
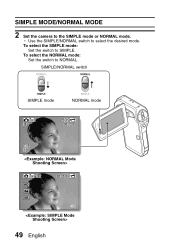
To select the NORMAL mode: Set the switch to select the desired mode. h Use the SIMPLE/NORMAL switch to NORMAL. SIMPLE/NORMAL switch SIMPLE mode NORMAL mode HD-SHQ 362 00:05:08 F3.5 1/30 362 00:05:08 49 English To select the SIMPLE mode: Set the switch to the SIMPLE mode or NORMAL mode. SIMPLE MODE/NORMAL MODE 2 Set the camera to SIMPLE.
To select the NORMAL mode: Set the switch to select the desired mode. h Use the SIMPLE/NORMAL switch to NORMAL. SIMPLE/NORMAL switch SIMPLE mode NORMAL mode HD-SHQ 362 00:05:08 F3.5 1/30 362 00:05:08 49 English To select the SIMPLE mode: Set the switch to the SIMPLE mode or NORMAL mode. SIMPLE MODE/NORMAL MODE 2 Set the camera to SIMPLE.
Instruction Manual, VPC-HD700EX
Page 65
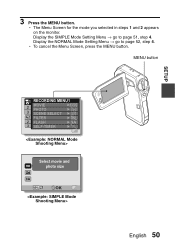
Display the SIMPLE Mode Setting Menu → go to page 51, step 4. Display the NORMAL Mode Setting Menu → go to page 52, step 4. MENU button SETUP 1 RECORDING MENU1 2 MOVIE PHOTO HD-SHQ 3 SCENE SELECT 1 FILTER 2 FLASH 3 SELF-TIMER Select movie and photo size OK English 50 h The Menu Screen for the mode you selected in steps 1 and 2 appears on the monitor. h To cancel the Menu Screen, press the MENU button. 3 Press the MENU button.
Display the SIMPLE Mode Setting Menu → go to page 51, step 4. Display the NORMAL Mode Setting Menu → go to page 52, step 4. MENU button SETUP 1 RECORDING MENU1 2 MOVIE PHOTO HD-SHQ 3 SCENE SELECT 1 FILTER 2 FLASH 3 SELF-TIMER Select movie and photo size OK English 50 h The Menu Screen for the mode you selected in steps 1 and 2 appears on the monitor. h To cancel the Menu Screen, press the MENU button. 3 Press the MENU button.
Instruction Manual, VPC-HD700EX
Page 67
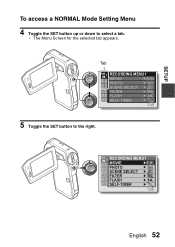
Tab 1 RECORDING MENU1 2 MOVIE PHOTO HD-SHQ 3 SCENE SELECT 1 FILTER 2 FLASH 3 SELF-TIMER 5 Toggle the SET button to select a tab. h The Menu Screen for the selected tab appears. SETUP To access a NORMAL Mode Setting Menu 4 Toggle the SET button up or down to the right. 1 RECORDING MENU1 2 MOVIE PHOTO HD-SHQ 3 SCENE SELECT 1 FILTER 2 FLASH 3 SELF-TIMER English 52
Tab 1 RECORDING MENU1 2 MOVIE PHOTO HD-SHQ 3 SCENE SELECT 1 FILTER 2 FLASH 3 SELF-TIMER 5 Toggle the SET button to select a tab. h The Menu Screen for the selected tab appears. SETUP To access a NORMAL Mode Setting Menu 4 Toggle the SET button up or down to the right. 1 RECORDING MENU1 2 MOVIE PHOTO HD-SHQ 3 SCENE SELECT 1 FILTER 2 FLASH 3 SELF-TIMER English 52
Instruction Manual, VPC-HD700EX
Page 68
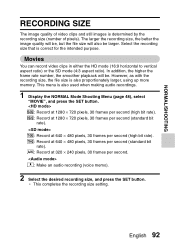
SIMPLE MODE/NORMAL MODE 6 Toggle the SET button up or down to select the item you wish to change 1 RECORDING MENU1 2 MOVIE PHOTO HD-SHQ 3 SCENE SELECT 1 FILTER 2 FLASH 3 SELF-TIMER Applicable mode PHOTO 3680×2760 3072×2304 3072×2304 3072×1728 [16:9] 1600×1200 OK 53 English h To return to change , and press the SET button. h The Setting Screen for the selected item appears. Select an item to the Menu Screen, press the MENU button.
SIMPLE MODE/NORMAL MODE 6 Toggle the SET button up or down to select the item you wish to change 1 RECORDING MENU1 2 MOVIE PHOTO HD-SHQ 3 SCENE SELECT 1 FILTER 2 FLASH 3 SELF-TIMER Applicable mode PHOTO 3680×2760 3072×2304 3072×2304 3072×1728 [16:9] 1600×1200 OK 53 English h To return to change , and press the SET button. h The Setting Screen for the selected item appears. Select an item to the Menu Screen, press the MENU button.

Instruction Manual, VPC-HD700EX
Page 74
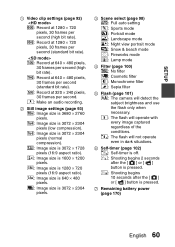
SIMPLE MODE/NORMAL MODE Overview of the NORMAL Mode Setting Screen NORMAL Mode Shooting Menu 1 RECORDING MENU1 2 MOVIE PHOTO HD-SHQ 1 2 3 SCENE SELECT 3 1 FILTER 4 2 FLASH 5 3 SELF-TIMER 6 7 59 English
SIMPLE MODE/NORMAL MODE Overview of the NORMAL Mode Setting Screen NORMAL Mode Shooting Menu 1 RECORDING MENU1 2 MOVIE PHOTO HD-SHQ 1 2 3 SCENE SELECT 3 1 FILTER 4 2 FLASH 5 3 SELF-TIMER 6 7 59 English
Instruction Manual, VPC-HD700EX
Page 75
m: The flash will detect the subject brightness and use the flash only when necessary. y: Shooting begins 2 seconds after the [ ] or [ ] button is 640 × 480 pixels. B: Record at 640 × 480 pixels, 30 frames per second. : Image size is 3072 × 2304 pixels. 3 Scene select (page 98) =: Full auto setting a: Sports mode >: Portrait mode +: Landscape mode /: Night view portrait mode k: Snow & beach mode +: Fireworks mode Q: Lamp mode 4 Filter (page 100) &: No filter %: Cosmetic filter W: Monochrome filter ,: Sepia filter 5 Flash (page 101) k: The camera will operate with every ...
m: The flash will detect the subject brightness and use the flash only when necessary. y: Shooting begins 2 seconds after the [ ] or [ ] button is 640 × 480 pixels. B: Record at 640 × 480 pixels, 30 frames per second. : Image size is 3072 × 2304 pixels. 3 Scene select (page 98) =: Full auto setting a: Sports mode >: Portrait mode +: Landscape mode /: Night view portrait mode k: Snow & beach mode +: Fireworks mode Q: Lamp mode 4 Filter (page 100) &: No filter %: Cosmetic filter W: Monochrome filter ,: Sepia filter 5 Flash (page 101) k: The camera will operate with every ...
Instruction Manual, VPC-HD700EX
Page 82
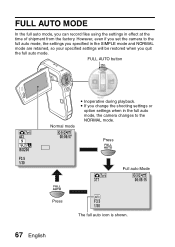
Press Full auto Mode HD-SHQ 377 00:05:15 Press F3.5 1/30 The full auto icon is shown. 67 English i If you change the shooting settings or option settings ... auto mode, the settings you specified in effect at the time of shipment from the factory. FULL AUTO button 443 ISO200 F3.5 1/30 Normal mode HD-SHQ 00:06:57 i Inoperative during playback. However, even if you set the camera to the NORMAL mode. FULL AUTO MODE In the full auto...
Press Full auto Mode HD-SHQ 377 00:05:15 Press F3.5 1/30 The full auto icon is shown. 67 English i If you change the shooting settings or option settings ... auto mode, the settings you specified in effect at the time of shipment from the factory. FULL AUTO button 443 ISO200 F3.5 1/30 Normal mode HD-SHQ 00:06:57 i Inoperative during playback. However, even if you set the camera to the NORMAL mode. FULL AUTO MODE In the full auto...
Instruction Manual, VPC-HD700EX
Page 89
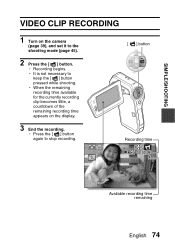
h It is not necessary to stop recording. [ ] button Recording time HD-SHQ REC 00:00:09 5 Available recording time remaining English 74 h When the remaining recording time available for the currently recording clip becomes little, a countdown of the remaining recording time appears on the camera (page 39), and set it to the shooting mode (page 45). 2 Press the [ ] button. h Press the [ ] button again to keep the [ ] button pressed while shooting. h Recording begins. SIMPLE/SHOOTING VIDEO CLIP RECORDING 1 Turn on the display. 3 End the recording.
h It is not necessary to stop recording. [ ] button Recording time HD-SHQ REC 00:00:09 5 Available recording time remaining English 74 h When the remaining recording time available for the currently recording clip becomes little, a countdown of the remaining recording time appears on the camera (page 39), and set it to the shooting mode (page 45). 2 Press the [ ] button. h Press the [ ] button again to keep the [ ] button pressed while shooting. h Recording begins. SIMPLE/SHOOTING VIDEO CLIP RECORDING 1 Turn on the display. 3 End the recording.

Instruction Manual, VPC-HD700EX
Page 93
SIMPLE/SHOOTING SHOOT A STILL IMAGE WHILE RECORDING A VIDEO CLIP You can capture a still image (a single-shot) while recording a video clip. 1 Turn on the camera (page 39), and set it to the shooting mode (page 45). [ ] button [ ] button 2 Press the [ ] button. 3 When you see a scene you'd like to end the video clip recording. press the [ ] button. 4 Press the [ ] button to capture as a still image. HD-SHQ REC 00:00:09 English 78
SIMPLE/SHOOTING SHOOT A STILL IMAGE WHILE RECORDING A VIDEO CLIP You can capture a still image (a single-shot) while recording a video clip. 1 Turn on the camera (page 39), and set it to the shooting mode (page 45). [ ] button [ ] button 2 Press the [ ] button. 3 When you see a scene you'd like to end the video clip recording. press the [ ] button. 4 Press the [ ] button to capture as a still image. HD-SHQ REC 00:00:09 English 78
Instruction Manual, VPC-HD700EX
Page 107
Movies You can record video clips in either the HD mode (16:9 horizontal to vertical aspect ratio) or the SD mode (4:3 aspect ratio). B: Record at 1280 × 720 pixels, 30 frames per second. In addition, ...
Movies You can record video clips in either the HD mode (16:9 horizontal to vertical aspect ratio) or the SD mode (4:3 aspect ratio). B: Record at 1280 × 720 pixels, 30 frames per second. In addition, ...
Instruction Manual, VPC-HD700EX
Page 120
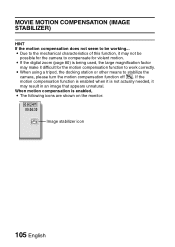
... to the mechanical characteristics of this function, it may not be working... When motion compensation is enabled, i The following icons are shown on the monitor: HD-SHQ 00:04:30 Image stabilizer icon 105 English i Due to stabilize the camera, please turn the motion compensation function off ].
... to the mechanical characteristics of this function, it may not be working... When motion compensation is enabled, i The following icons are shown on the monitor: HD-SHQ 00:04:30 Image stabilizer icon 105 English i Due to stabilize the camera, please turn the motion compensation function off ].

Instruction Manual, VPC-HD700EX
Page 122
... 362 bar appears. h The focus distance is set in .) or less, the zoom changes to the largest setting that is suitable for that focus distance. HD-SHQ 00:05:07 3 Toggle the SET button to the left or right to the Shooting Screen. 2.0m HINT About the focus range i The focus...
... 362 bar appears. h The focus distance is set in .) or less, the zoom changes to the largest setting that is suitable for that focus distance. HD-SHQ 00:05:07 3 Toggle the SET button to the left or right to the Shooting Screen. 2.0m HINT About the focus range i The focus...

Instruction Manual, VPC-HD700EX
Page 123
... spot focus setting is selected, the focus mark + appears in the center of the monitor. Spot focus: The camera focuses on the monitor. F3.5 1/30 HD-SHQ 00:02:47 Focus mark English 108 NORMAL/SHOOTING FOCUS MODE You can choose from the following 2 types of autofocus (still image shooting only...
... spot focus setting is selected, the focus mark + appears in the center of the monitor. Spot focus: The camera focuses on the monitor. F3.5 1/30 HD-SHQ 00:02:47 Focus mark English 108 NORMAL/SHOOTING FOCUS MODE You can choose from the following 2 types of autofocus (still image shooting only...
