
Owners Manual
Page 17
RESET FUNCTION 141 FORMATTING A CARD 144 RESETTING THE CAMERA SETTINGS 146 CHECKING THE REMAINING CARD MEMORY 147 CHECKING THE REMAINING BATTERY PACK CHARGE 149 „ OTHER DEVICES AND CONNECTIONS CONNECTING TO A TV 151 DIRECT PRINTING 155 CONNECTING AN EXTERNAL MICROPHONE 164 „ APPENDICES COMMONLY ASKED QUESTIONS ...
RESET FUNCTION 141 FORMATTING A CARD 144 RESETTING THE CAMERA SETTINGS 146 CHECKING THE REMAINING CARD MEMORY 147 CHECKING THE REMAINING BATTERY PACK CHARGE 149 „ OTHER DEVICES AND CONNECTIONS CONNECTING TO A TV 151 DIRECT PRINTING 155 CONNECTING AN EXTERNAL MICROPHONE 164 „ APPENDICES COMMONLY ASKED QUESTIONS ...

Owners Manual
Page 21
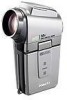
CHECKING THE INCLUDED ACCESSORIES i Handstrap and camera case: 1 set i SANYO Software Pack (CD-ROM): 2 i Li-ion battery pack: 1 i Docking station: 1 i Dedicated S-AV interface cable: 1 i Dedicated USB interface cable: 1 i Dedicated component cable: 1 i AC adaptor and power cord: 1 7 English
CHECKING THE INCLUDED ACCESSORIES i Handstrap and camera case: 1 set i SANYO Software Pack (CD-ROM): 2 i Li-ion battery pack: 1 i Docking station: 1 i Dedicated S-AV interface cable: 1 i Dedicated USB interface cable: 1 i Dedicated component cable: 1 i AC adaptor and power cord: 1 7 English

Owners Manual
Page 22
i Remote control unit: 1 i Lithium battery (CR2025) for remote control unit: 1 i Lens cap and strap: 1 i Cable adaptor: 1 i Microphone connection cable: 1 i Core: 1 i "SAFETY MANUAL" (safety precautions booklet) Please read this booklet carefully before using the camera. i Quick Guide English 8
i Remote control unit: 1 i Lithium battery (CR2025) for remote control unit: 1 i Lens cap and strap: 1 i Cable adaptor: 1 i Microphone connection cable: 1 i Core: 1 i "SAFETY MANUAL" (safety precautions booklet) Please read this booklet carefully before using the camera. i Quick Guide English 8

Owners Manual
Page 28
SYSTEM MAP You can connect the camera to various devices to expand its capabilities. Remote control unit Cable adaptor TV Computer Printer Docking station i Card reader i DPOF-compatible printer i Photo shop Separately sold or commercially available SD Memory Card AC adaptor (supplied) Battery charger (optional) English 14
SYSTEM MAP You can connect the camera to various devices to expand its capabilities. Remote control unit Cable adaptor TV Computer Printer Docking station i Card reader i DPOF-compatible printer i Photo shop Separately sold or commercially available SD Memory Card AC adaptor (supplied) Battery charger (optional) English 14

Owners Manual
Page 36
PREPARING THE DOCKING STATION The supplied docking station is used to connect your camera to a computer, printer or TV, as well as to charge the battery pack installed in the camera. 1 Connect the docking station to a power outlet. Docking station DC IN terminal To power outlet Supplied AC adaptor Supplied power cord English 22 h Use the supplied AC adaptor and power cord.
PREPARING THE DOCKING STATION The supplied docking station is used to connect your camera to a computer, printer or TV, as well as to charge the battery pack installed in the camera. 1 Connect the docking station to a power outlet. Docking station DC IN terminal To power outlet Supplied AC adaptor Supplied power cord English 22 h Use the supplied AC adaptor and power cord.

Owners Manual
Page 37
Insert the battery Install the supplied battery (CR2025) in the remote control unit. 1 Pull out the battery case. 2 Insert the supplied battery. h Insert the battery with the camera. Battery case Battery for remote control unit 3 Reinsert the battery case. 23 English PREPARING THE REMOTE CONTROL UNIT The remote control unit can be used to take pictures and play them back with the (+) mark facing upward. h Wipe the battery with a soft, dry cloth before inserting it.
Insert the battery Install the supplied battery (CR2025) in the remote control unit. 1 Pull out the battery case. 2 Insert the supplied battery. h Insert the battery with the camera. Battery case Battery for remote control unit 3 Reinsert the battery case. 23 English PREPARING THE REMOTE CONTROL UNIT The remote control unit can be used to take pictures and play them back with the (+) mark facing upward. h Wipe the battery with a soft, dry cloth before inserting it.

Owners Manual
Page 39
... to ensure that can be used . PREPARING THE REMOTE CONTROL UNIT Changing the remote control code The remote control unit will also work with other Sanyo cameras that only the intended camera operates when the remote control unit is used to "RC CODE 1" at the time of purchase. 1 Aim... remote control sensor on the remote control unit and check that the camera is receiving correctly. h The remote control codes are retained even if the batteries in the remote control unit or camera are replaced. h If the remote control codes for about 3 seconds. 3 Press a button on the docking station. 2...
... to ensure that can be used . PREPARING THE REMOTE CONTROL UNIT Changing the remote control code The remote control unit will also work with other Sanyo cameras that only the intended camera operates when the remote control unit is used to "RC CODE 1" at the time of purchase. 1 Aim... remote control sensor on the remote control unit and check that the camera is receiving correctly. h The remote control codes are retained even if the batteries in the remote control unit or camera are replaced. h If the remote control codes for about 3 seconds. 3 Press a button on the docking station. 2...

Owners Manual
Page 40
Battery cover lock 2 Open the battery cover (3). h The battery cover comes off. Charging the battery pack 1 While pressing the battery cover lock, slide it . PREPARING THE POWER Please charge the supplied battery pack before using it (1), and pull out the battery cover toward the bottom of the camera (2). Power to the camera can also be supplied from a power outlet if the docking station or the cable adaptor is used. Battery cover English 26
Battery cover lock 2 Open the battery cover (3). h The battery cover comes off. Charging the battery pack 1 While pressing the battery cover lock, slide it . PREPARING THE POWER Please charge the supplied battery pack before using it (1), and pull out the battery cover toward the bottom of the camera (2). Power to the camera can also be supplied from a power outlet if the docking station or the cable adaptor is used. Battery cover English 26

Owners Manual
Page 41
...When charging is approx. 90 minutes. 27 English Charge indicator Docking station terminal h Set the camera securely, making sure that the battery pack is defective or the camera is positioned correctly. h The charging time is completed, the charge indicator turns off. PREPARING THE POWER ... is not correctly set in the docking station. h During charging, the charge indicator is correctly oriented in the docking station. Battery pack 4 Close the battery cover. h If the charge indicator flashes red, it indicates that the camera is lit red. Reset the camera correctly in...
...When charging is approx. 90 minutes. 27 English Charge indicator Docking station terminal h Set the camera securely, making sure that the battery pack is defective or the camera is positioned correctly. h The charging time is completed, the charge indicator turns off. PREPARING THE POWER ... is not correctly set in the docking station. h During charging, the charge indicator is correctly oriented in the docking station. Battery pack 4 Close the battery cover. h If the charge indicator flashes red, it indicates that the camera is lit red. Reset the camera correctly in...

Owners Manual
Page 42
...mode, but not in the camera continuously for about 2 days. In the fully charged state, the backup battery will be sure to confirm that when the battery pack is therefore recommended that the battery pack be removed from the camera if it . i A small amount of power is still used continuously ...set in the docking station. i You can be cleared. CAUTION Using the camera when it may not be possible to charge the battery pack. The battery pack can photograph and view images while the camera is set in the docking station... When not using your camera again, be fully...
...mode, but not in the camera continuously for about 2 days. In the fully charged state, the backup battery will be sure to confirm that when the battery pack is therefore recommended that the battery pack be removed from the camera if it . i A small amount of power is still used continuously ...set in the docking station. i You can be cleared. CAUTION Using the camera when it may not be possible to charge the battery pack. The battery pack can photograph and view images while the camera is set in the docking station... When not using your camera again, be fully...
Owners Manual
Page 45
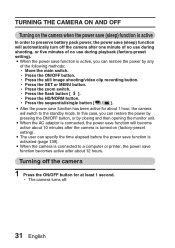
... the standby mode. TURNING THE CAMERA ON AND OFF Turning on the camera when the power save (sleep) function is active In order to preserve battery pack power, the power save (sleep) function will automatically turn off the camera after the camera is turned on (factory-preset setting). h Press the ON...
... the standby mode. TURNING THE CAMERA ON AND OFF Turning on the camera when the power save (sleep) function is active In order to preserve battery pack power, the power save (sleep) function will automatically turn off the camera after the camera is turned on (factory-preset setting). h Press the ON...

Owners Manual
Page 51
... to check that you want to change, press the SET button, and follow steps 1 and 2). However, there is being replaced, an internal battery will last for about 7 days). DATE AND TIME SETTING 5 Set the order in the respective paragraphs above to the Option Screen. HINT i Under... normal conditions, while the battery pack is a small chance the settings may be lost (The backup will maintain the date and time settings. h The Set Date Format Screen appears...
... to check that you want to change, press the SET button, and follow steps 1 and 2). However, there is being replaced, an internal battery will last for about 7 days). DATE AND TIME SETTING 5 Set the order in the respective paragraphs above to the Option Screen. HINT i Under... normal conditions, while the battery pack is a small chance the settings may be lost (The backup will maintain the date and time settings. h The Set Date Format Screen appears...

Owners Manual
Page 82
d: Record at 320 × 240 pixels, 15 frames per second. l: Record at 320 × 240 pixels, 30 frames per second. 1 Video clip mode menu (page 71) b: Record at 640 × 480 pixels, 30 frames per second. T: Record at 640 × 480 pixels, 30 frames per second, high image quality. a: Record at 640 × 480 pixels, 60 frames per second, very high image quality.
d: Record at 320 × 240 pixels, 15 frames per second. l: Record at 320 × 240 pixels, 30 frames per second. 1 Video clip mode menu (page 71) b: Record at 640 × 480 pixels, 30 frames per second. T: Record at 640 × 480 pixels, 30 frames per second, high image quality. a: Record at 640 × 480 pixels, 60 frames per second, very high image quality.

Owners Manual
Page 84
... lighting ]: For setting the most accurate white balance 7 Option icon (page 118) h Display the Option Screen. 8 PAGE display (page 66) 9 HELP display (page 89) 0 Remaining battery power (page 149) * When you specify multiple functions that cannot be simultaneously enabled, the function which was last set becomes the active setting, and the...
... lighting ]: For setting the most accurate white balance 7 Option icon (page 118) h Display the Option Screen. 8 PAGE display (page 66) 9 HELP display (page 89) 0 Remaining battery power (page 149) * When you specify multiple functions that cannot be simultaneously enabled, the function which was last set becomes the active setting, and the...

Owners Manual
Page 105
... (page 97) h Delete images from the card memory. 6 Option icon (page 118) h Display the Option Screen. 7 PAGE display (page 90) 8 HELP display (page 89) 9 Remaining battery power (page 149) 91 English
... (page 97) h Delete images from the card memory. 6 Option icon (page 118) h Display the Option Screen. 7 PAGE display (page 90) 8 HELP display (page 89) 9 Remaining battery power (page 149) 91 English

Owners Manual
Page 106
PAGE 2 ROTATE Rotate image 1 Rotate image (page 99) h Rotate still images. 2 Resize (page 100) h Reduce the resolution of a still image. 3 Extract still image (page 101) h Extract a still image from a video clip. 4 Video clip edit (page 102) h Edit video clips. 5 Printing instructions (page 110) h Specify the printing instructions (DPOF settings). 6 Smooth playback (page 116) h Video clips are played back smoothly. 7 Option icon (page 118) h Display the Option Screen. 8 PAGE display (page 90) 9 HELP display (page 89) 0 Remaining battery power (page 149) English 92
PAGE 2 ROTATE Rotate image 1 Rotate image (page 99) h Rotate still images. 2 Resize (page 100) h Reduce the resolution of a still image. 3 Extract still image (page 101) h Extract a still image from a video clip. 4 Video clip edit (page 102) h Edit video clips. 5 Printing instructions (page 110) h Specify the printing instructions (DPOF settings). 6 Smooth playback (page 116) h Video clips are played back smoothly. 7 Option icon (page 118) h Display the Option Screen. 8 PAGE display (page 90) 9 HELP display (page 89) 0 Remaining battery power (page 149) English 92

Owners Manual
Page 120
... original video clip remains unchanged. OVERWRITE FILE: The original video clip will be erased, you want it to edit be sure that a sufficiently charged battery pack is protected, even if you are returned to delete the original video clip and replace it . 8 Select the desired option, and press the...be used to process the large amount of video clip editing, before saving it OVERWRITE FILE with the edited video clip. CAUTION Warning concerning the battery pack remaining charge i During the editing of lengthy video clips, the time to edit long video clips. English 106 HINT i If the ...
... original video clip remains unchanged. OVERWRITE FILE: The original video clip will be erased, you want it to edit be sure that a sufficiently charged battery pack is protected, even if you are returned to delete the original video clip and replace it . 8 Select the desired option, and press the...be used to process the large amount of video clip editing, before saving it OVERWRITE FILE with the edited video clip. CAUTION Warning concerning the battery pack remaining charge i During the editing of lengthy video clips, the time to edit long video clips. English 106 HINT i If the ...

Owners Manual
Page 123
... to first remove the protection (page 95). To avoid problems caused by the battery pack becoming depleted in the middle of the memory by deleting data that a computer be sure that a sufficiently ...charged battery pack is protected, even if you are returned to process the large amount of data ...button, the original video clip will need to keep. CAUTION Warning concerning the battery pack remaining charge i During the editing of lengthy video clips, the time to the Playback Setting Screen. h Editing...
... to first remove the protection (page 95). To avoid problems caused by the battery pack becoming depleted in the middle of the memory by deleting data that a computer be sure that a sufficiently ...charged battery pack is protected, even if you are returned to process the large amount of data ...button, the original video clip will need to keep. CAUTION Warning concerning the battery pack remaining charge i During the editing of lengthy video clips, the time to the Playback Setting Screen. h Editing...

Owners Manual
Page 131
... canceled. 1 Video clip mode settings 2 Image or sound number 3 Protect setting 4 File size 5 Shooting or recording time 6 Exposure correction setting 7 Aperture value 8 Shutter speed 9 Remaining battery charge 0 Date and time of image A Still image resolution settings INFO 2006.12.25 19:30 INFO 100-0002 2006.12.25 19:30 INFO...
... canceled. 1 Video clip mode settings 2 Image or sound number 3 Protect setting 4 File size 5 Shooting or recording time 6 Exposure correction setting 7 Aperture value 8 Shutter speed 9 Remaining battery charge 0 Date and time of image A Still image resolution settings INFO 2006.12.25 19:30 INFO 100-0002 2006.12.25 19:30 INFO...

Owners Manual
Page 134
... reset (page 141) h Select the file number reset function. English 120 D TV output settings (page 134) h Select the type of a microphone connected to scroll. I Remaining battery power (page 149) * Icons 7 through H are displayed. B External microphone (page 132) h Adjust the input level of video signal that are produced when the camera's buttons...
... reset (page 141) h Select the file number reset function. English 120 D TV output settings (page 134) h Select the type of a microphone connected to scroll. I Remaining battery power (page 149) * Icons 7 through H are displayed. B External microphone (page 132) h Adjust the input level of video signal that are produced when the camera's buttons...


